

Hi Everyone, this is a continuation of the series about cheap furnishings that look much more expensive than they are. However, there was an old post that I updated. It’s one of my favorites that shares a lot of ways to make budget window treatments look custom and expensive.
In addition, there’s a widget at the end that shares some fantastic sources, many of them new for ready-mades and customizable window treatments. But… One has to know what they are doing when ordering. There are links throughout the post that will take you to other posts where I share pretty much everything I’ve learned in the past 37 years.
Dear Laurel,
We recently moved to a 60s center hall colonial. And, yes, the previous owners had granny decor taste. Lots of ditzy flowers and ruffles and stained oak.
Oh, Laurel, we’re house poor and have 21 windows that are covered in paper shades.
So, I looked at some of your ultimate window treatment guide. And, from what I can ascertain, it would be thousands of dollars, not including installation. Uh, like tens of thousands. I asked a friend who has a gorgeous, professionally decorated home. And yep. That’s what it is.
We just don’t have that kind of money to spend.
The absolute most we can afford right now for all 21 windows is $5,000.
We need budget window treatments, but with a custom look. Am I asking for the impossible?
Best,
Sade Roman
*********
Thank you, Sade! Is it possible to get budget window treatments that look like high-end custom ones?
It’s a challenge, for sure.
But, with a little ingenuity and some clever ideas (none of them are mine), much can be achieved to make budget window treatments look pretty damned good.
Plus, I have found some fantastic lower-priced alternatives. You’ll find those later on in the post.
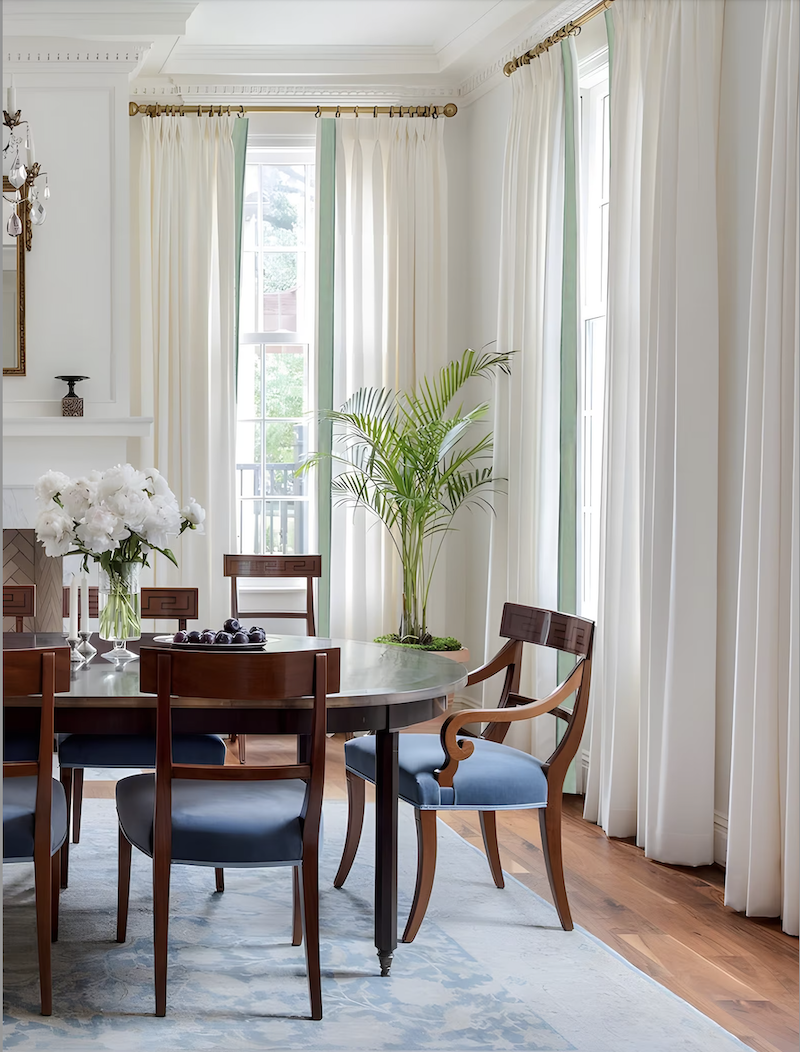
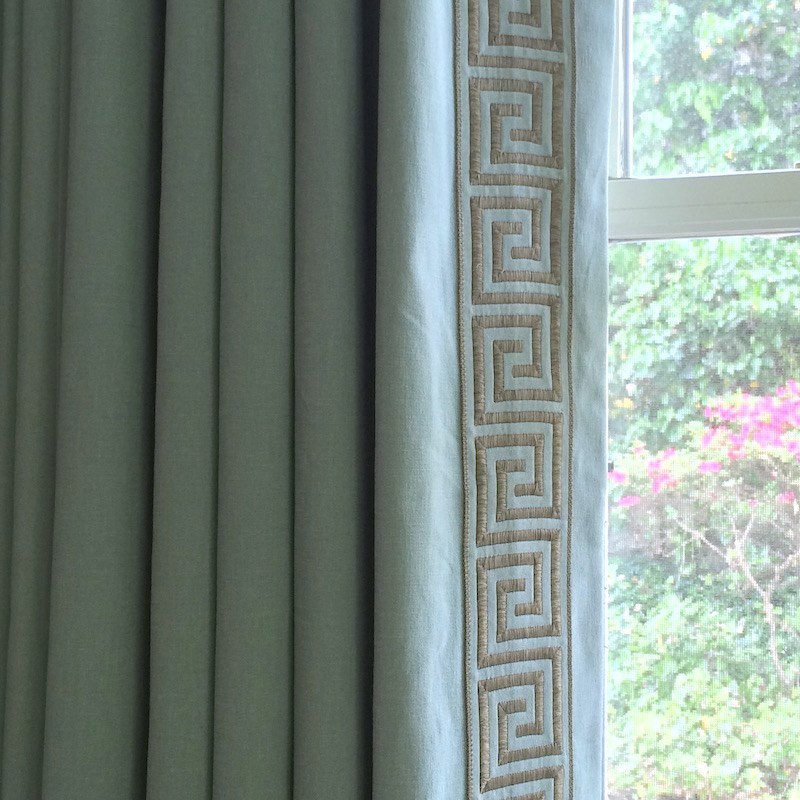
But, here’s one, FabriHome on Etsy (they’re taking a short break.) However, putting a decorative trim down the fronts of the drapes is an excellent way to give a budget curtain a high-end look.
Before I go on… I realize that several readers are professional designers or own window treatment workrooms.
I want to make it clear to consumers that if you can swing it, there is nothing like custom curtains, draperies, valances, shades, etc. That is because these are going to be crafted by hand by professionals who also know how to measure, how high to hang the drapes, how long they need to be, and 100s of other details that only years of experience can teach.
These types of custom window treatments are super-labor-intensive. Thus, you can expect to pay a lot more for that than for something manufactured in China, in an automated process.
Custom drapes and shades are very expensive.
Still, if you can’t afford custom window treatments, please know that all is not hopeless. If money is tight, we will go over some ways you can create the custom look for a fraction of the price.
So, let’s get started, as I’m excited to share all of this with you!
A while back, Beverly, a very clever reader, sent me a photo of her beautiful bathroom.
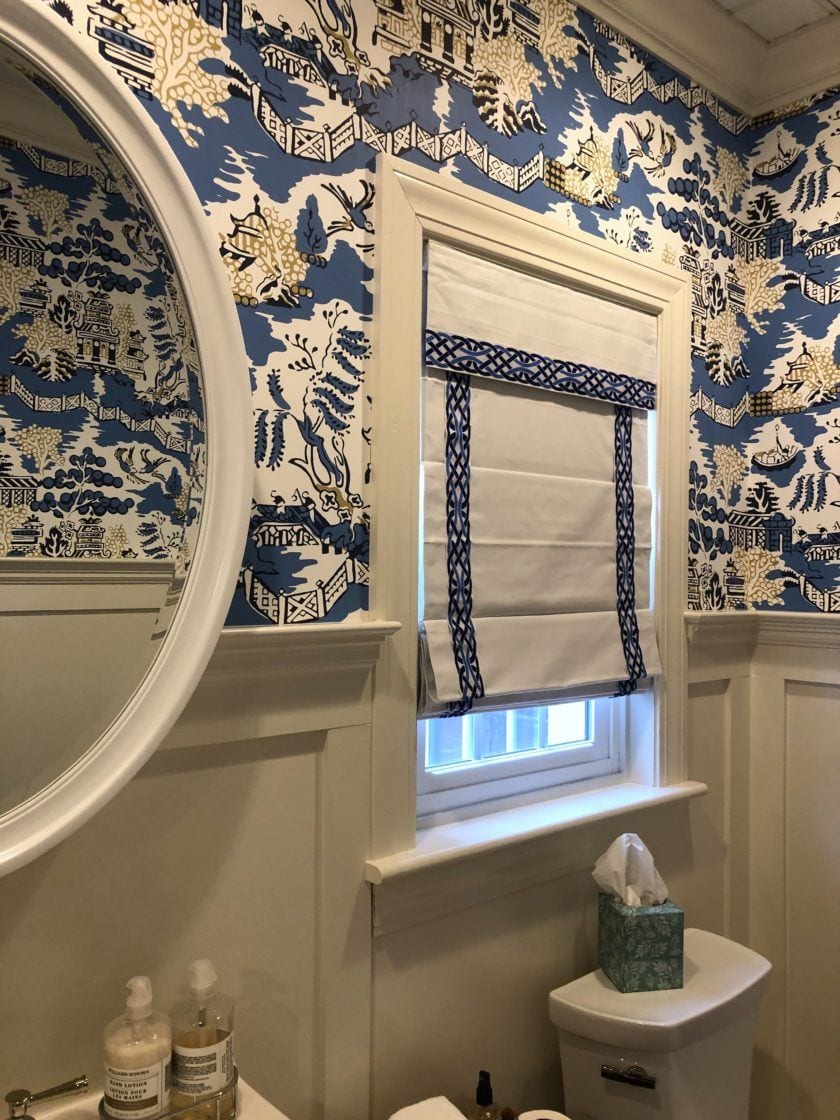
Wow! That’s gorgeous.
But, get this. She told me the Roman shade was from Bed, Bath & Beyond! And no, it did not come trimmed like that; she added the trim. Now, I’m doubly impressed!
I know. You want to know where the wallpaper is from.
After some research, I discovered that it’s Luzon by Thibaut.
***Before ordering wallpaper, I recommend reading this post to help you avoid making costly mistakes. Unfortunately, wallpaper is never returnable. That’s right; not even if it’s shrinkwrap sealed and unopened.
Okay, it’s time to share numerous ideas for ways to get budget-friendly window treatments that look custom.
This first idea to get a custom look for a budget window treatment is not for the plain tangerine curtains, but for the plain white roller shade.

A talented designer, Darnetha, stenciled the roller shade!
But, not only do I love the stencil design, her use of color is fantastic and fun.
Please check out her beautiful blog, where she shares her tutorial for how she did the stenciling.
You can purchase the stencil here.
There’s also this darling idea where a woman took a plain roller shade and embellished it with iron-on tape to make a Greek Key design. I love this idea.
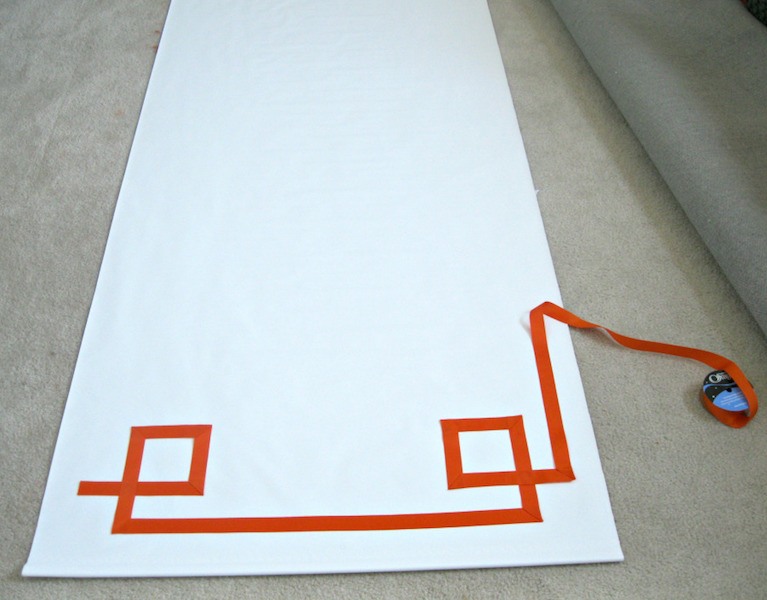
What The Vita – The Tutorial is here.
A few years ago, I was considering this design (below) for my old bedroom.
 The design is with ribbon trim.
Around that time, I showed a similar image to a client I was helping with her kitchen, and she found a source to have them made!
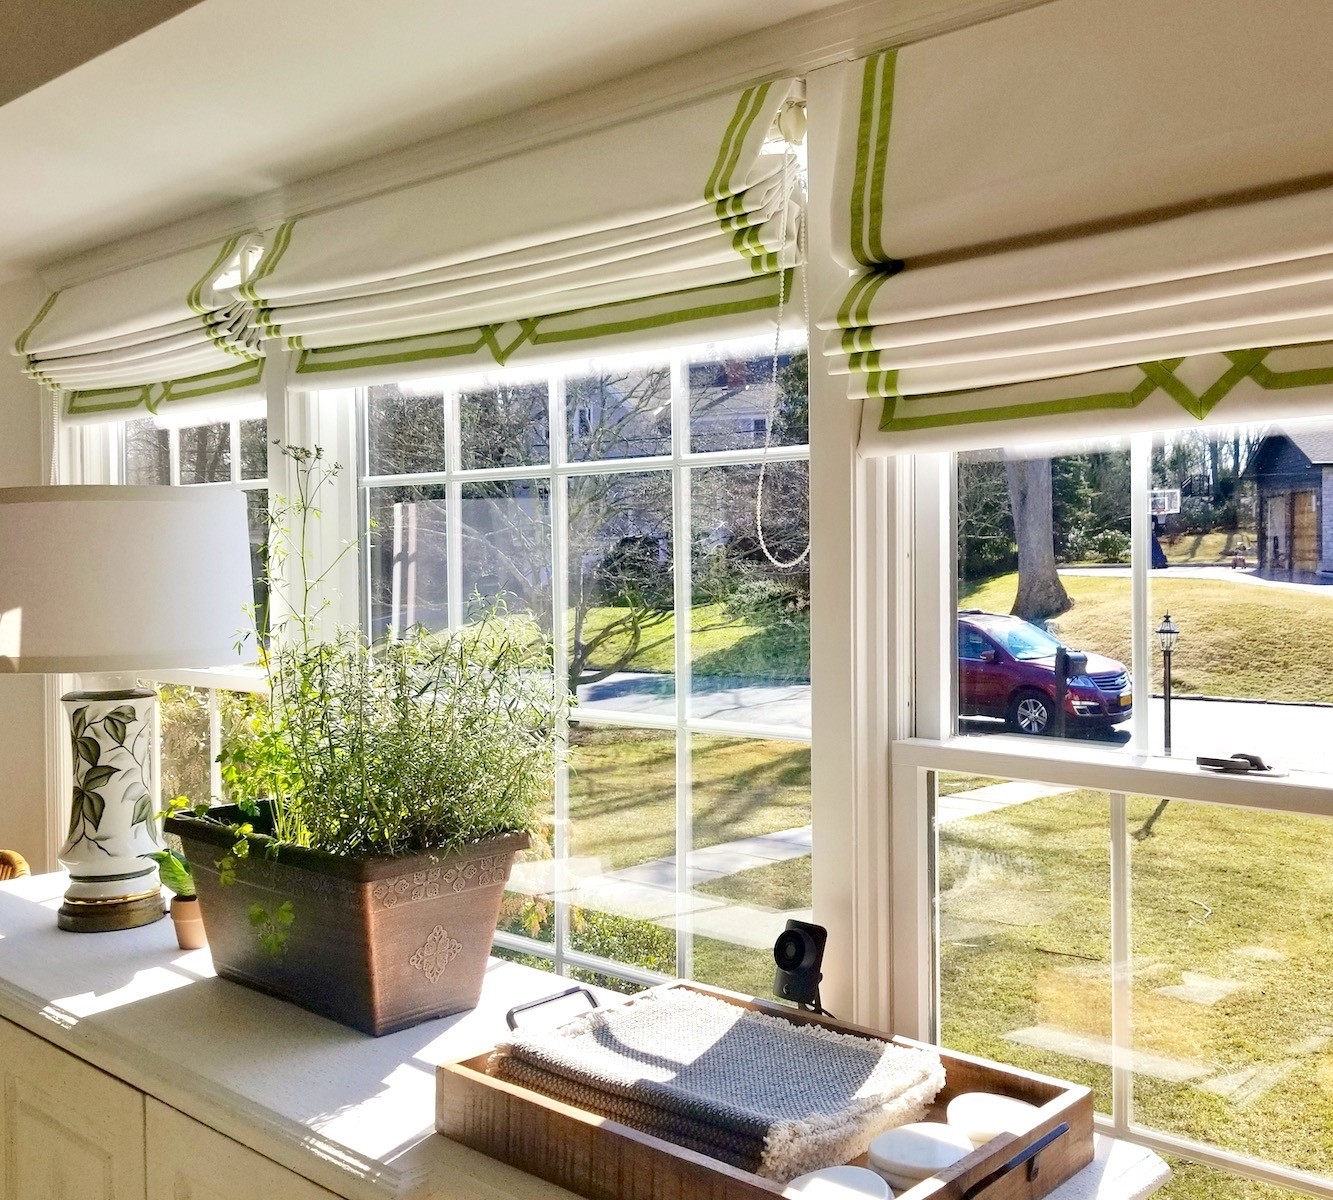
The source*, you might already realize, is By Harrington. And, they did a wonderful job. This was a new design then, and they should’ve made the bottom flap longer. Dianne, the owner of By Harrington, offered to fix it– no extra charge, but my client was fine with them the way they are.
*By Harrington, many of you have seen on the HOT SALES main page, is offering 15% off all shades and drapes– everything, only for Laurel Home readers. To get your 15%-off, use code SECRETSALE

And, please check out this post for another Greek Key design on a Roman shade.
I want this one for my living room– one day, I hope!
Haha. That’s what I said in April 2023. I will be getting the re-made shades in a few weeks, but in the meantime, below is what I ended up with, made by Dianne of By Harrington.

Okay, let’s move on to curtains and drapes for our next category for budget window treatments that look expensive.
The first idea shows trim on the fronts and sometimes the bottom of the drapes. We did this kind of applied trim dozens of times for clients. Sometimes plain and quite often my favorite Greek Key trim.
These kinds of trim are usually sewn on by hand.
The above is from a job we did several years ago.
However, what if you don’t have a sewing machine?
No problem.
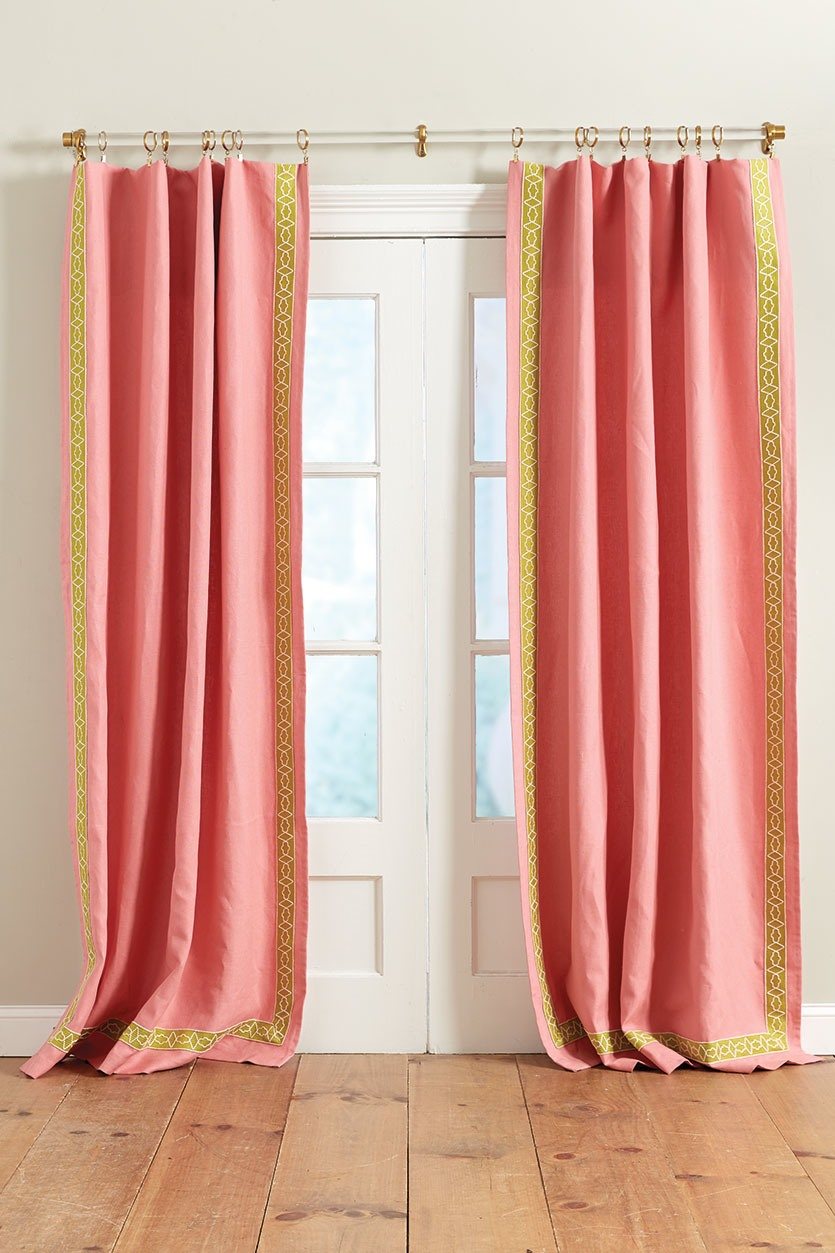
Please check out this beauty. These ready-made curtains from Ballard Designs had the trim applied after purchase, and without sewing!

They used stitch witchery, an iron-on adhesive. I’ve seen tutorials that explain how to create all sorts of things using this iron-on tape.

However, other products are on the market for no-sew curtains and other soft furnishings.
Please check reviews and other information. Also, if anyone has had great success using no-sew adhesives or tapes, please let us know what works and what doesn’t work as well.
Please click on any image for more information.

It has come to my attention from a kind reader that she prefers using Steam A Seam.
She found that stitch witchery tended to bleed through the fabrics. What I would do is buy a few of these and then make some samples, following the directions. Then, let them dry and see which one performs best. Below is a mini widget for some of the Steam-A-Seam Products.
This like will take you to some terrific sources for trim on Etsy!
You’ll also see some beautiful trim in the big widget later on.
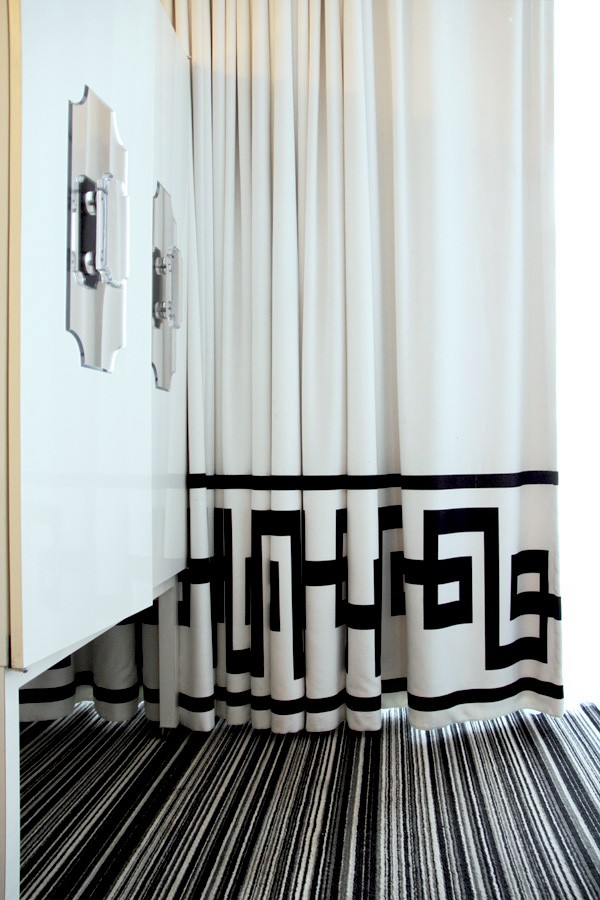
The next idea I got years ago when I found this image on the ish and chi – blog from seven years ago!
The location of this window with the gorge drapery is the Viceroy Hotel in Palm Springs, CA.
However, this is the only image I had.
The design is by Kelly Wearstler. Remember her? She’s the decorator who got arrested in Florida for practicing without a license.
I realize that sounds very clickbait-like; however, it’s true. My idol, Darryl Carter, and the legendary Juan Montoya were also arrested in Florida. WTF??? It’s a very entertaining post. I promise you won’t be disappointed.
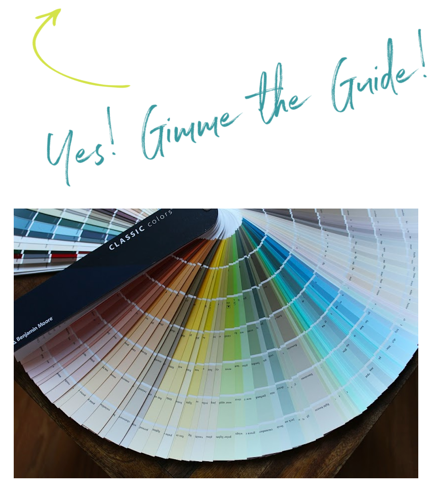
Well, I loved this trim so much (and still do) that I used it on at least four or five of the boards in the Laurel Home Paint & Palette Collection.

If you missed the announcement, there’s a flash sale going on this week of all of my interior design guides, and ending Sunday night. You can read about it here.
But, I had no idea what the trim actually looked like, without the drapery folds.

This is one of my favorite mood boards from the Laurel Home Paint and Palette collection. There are 40 of these boards and 40 palettes. And, guess what my favorite part is? Yeah, the curtains with that awesome trim.
So, I had this wild idea to reproduce the trim without seeing the full repeat.
I began doing searches for running Greek key trim.
I couldn’t find it anywhere.
Okay, so what did I do? Well, I went on picmonkey and created a grid, and then I started recreating the parts I could see. I figured if I started with that, knowing it’s a meander, I might be able to reconstruct it.

Part one. I did a screenshot and saved it. And then I came back and added the screenshot to what you see above, only I turned it upside down.
 OMG! That’s it! I was so excited.

Then, I created the entire pattern, including the top and bottom trim. The height of the trim is about 12″ – 14″. But, you could scale it a little bigger if needed. Kelly’s, actually, IS bigger. Or, at least, it is when it’s used as a valance.
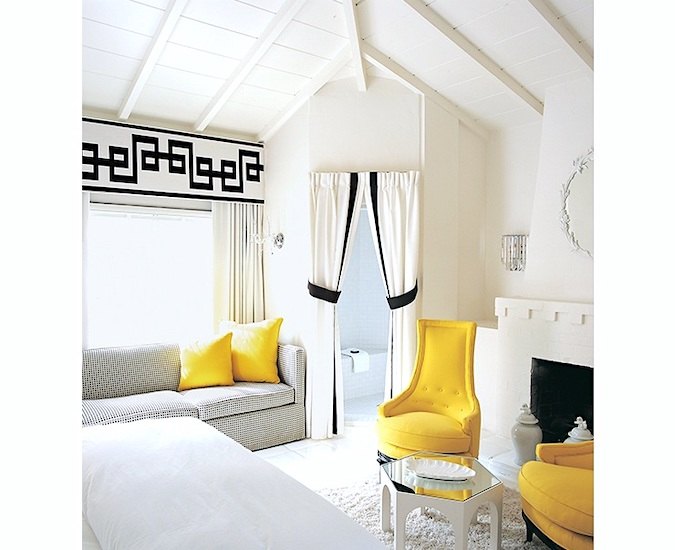
The above is from one of the hotel rooms at the Viceroy in Palm Springs, designed by Kelly Wearstler. My design is more square and a little looser. Kelly’s is more rectangular and tighter.

So, now the question is, how do you make this design on the bottom of a plain linen or cotton curtain?
Thank you, that is a very good question. I’m afraid that my capabilities are more conceptual than actual. haha.
That isn’t stopping me from longing to see this in my bedroom. If I do it, I would have to iron on the tape to a separate piece of fabric and then iron that onto the hem of the curtain.

original source unknown
Fortunately, Kristi from Addicted 2 Decorating loves doing this stuff and always does it well. In this post, she puts together a gorgeous drape with one of my favorite Greek Key corner trims. The one above isn’t hers. But, her design is very similar.
In addition, you can see other posts I’ve done on the blog, such as this one about all kinds of Roman shades and some great ideas to dress them up.
So, one way to create the Kelly Wearstler design is with tape, as Kristi from Addicted to Decorating did.
Another way would be to paint the design on. That would require a stencil and a tremendous amount of patience. But, it could be done. (not by me, but someone. haha)
Why don’t you have Dianne make them for you, Laurel?
I’ll have to think about that. It might be fun, but maybe I’m deluding myself. ;]
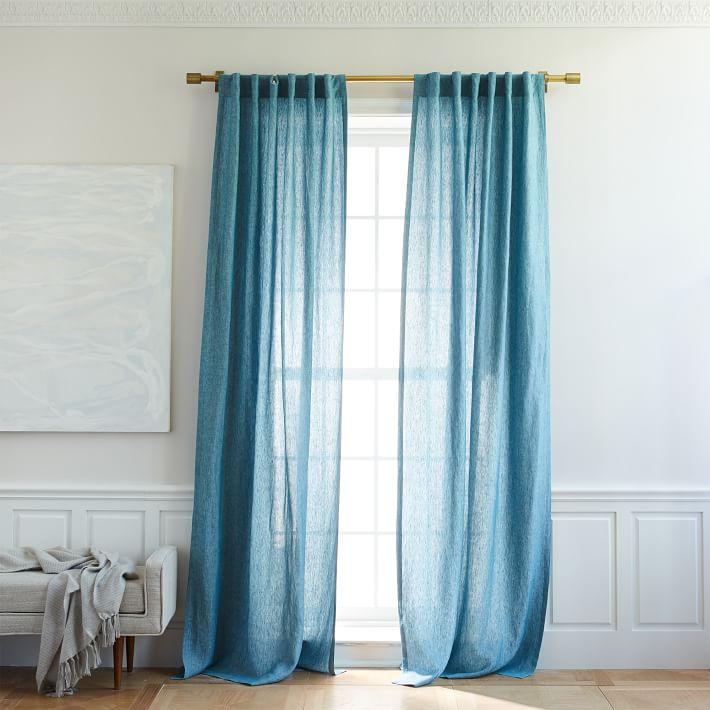
Okay, I want to talk about another favorite way to make budget window treatments look amazing.
This idea is also my favorite remedy if your drapes are too short.
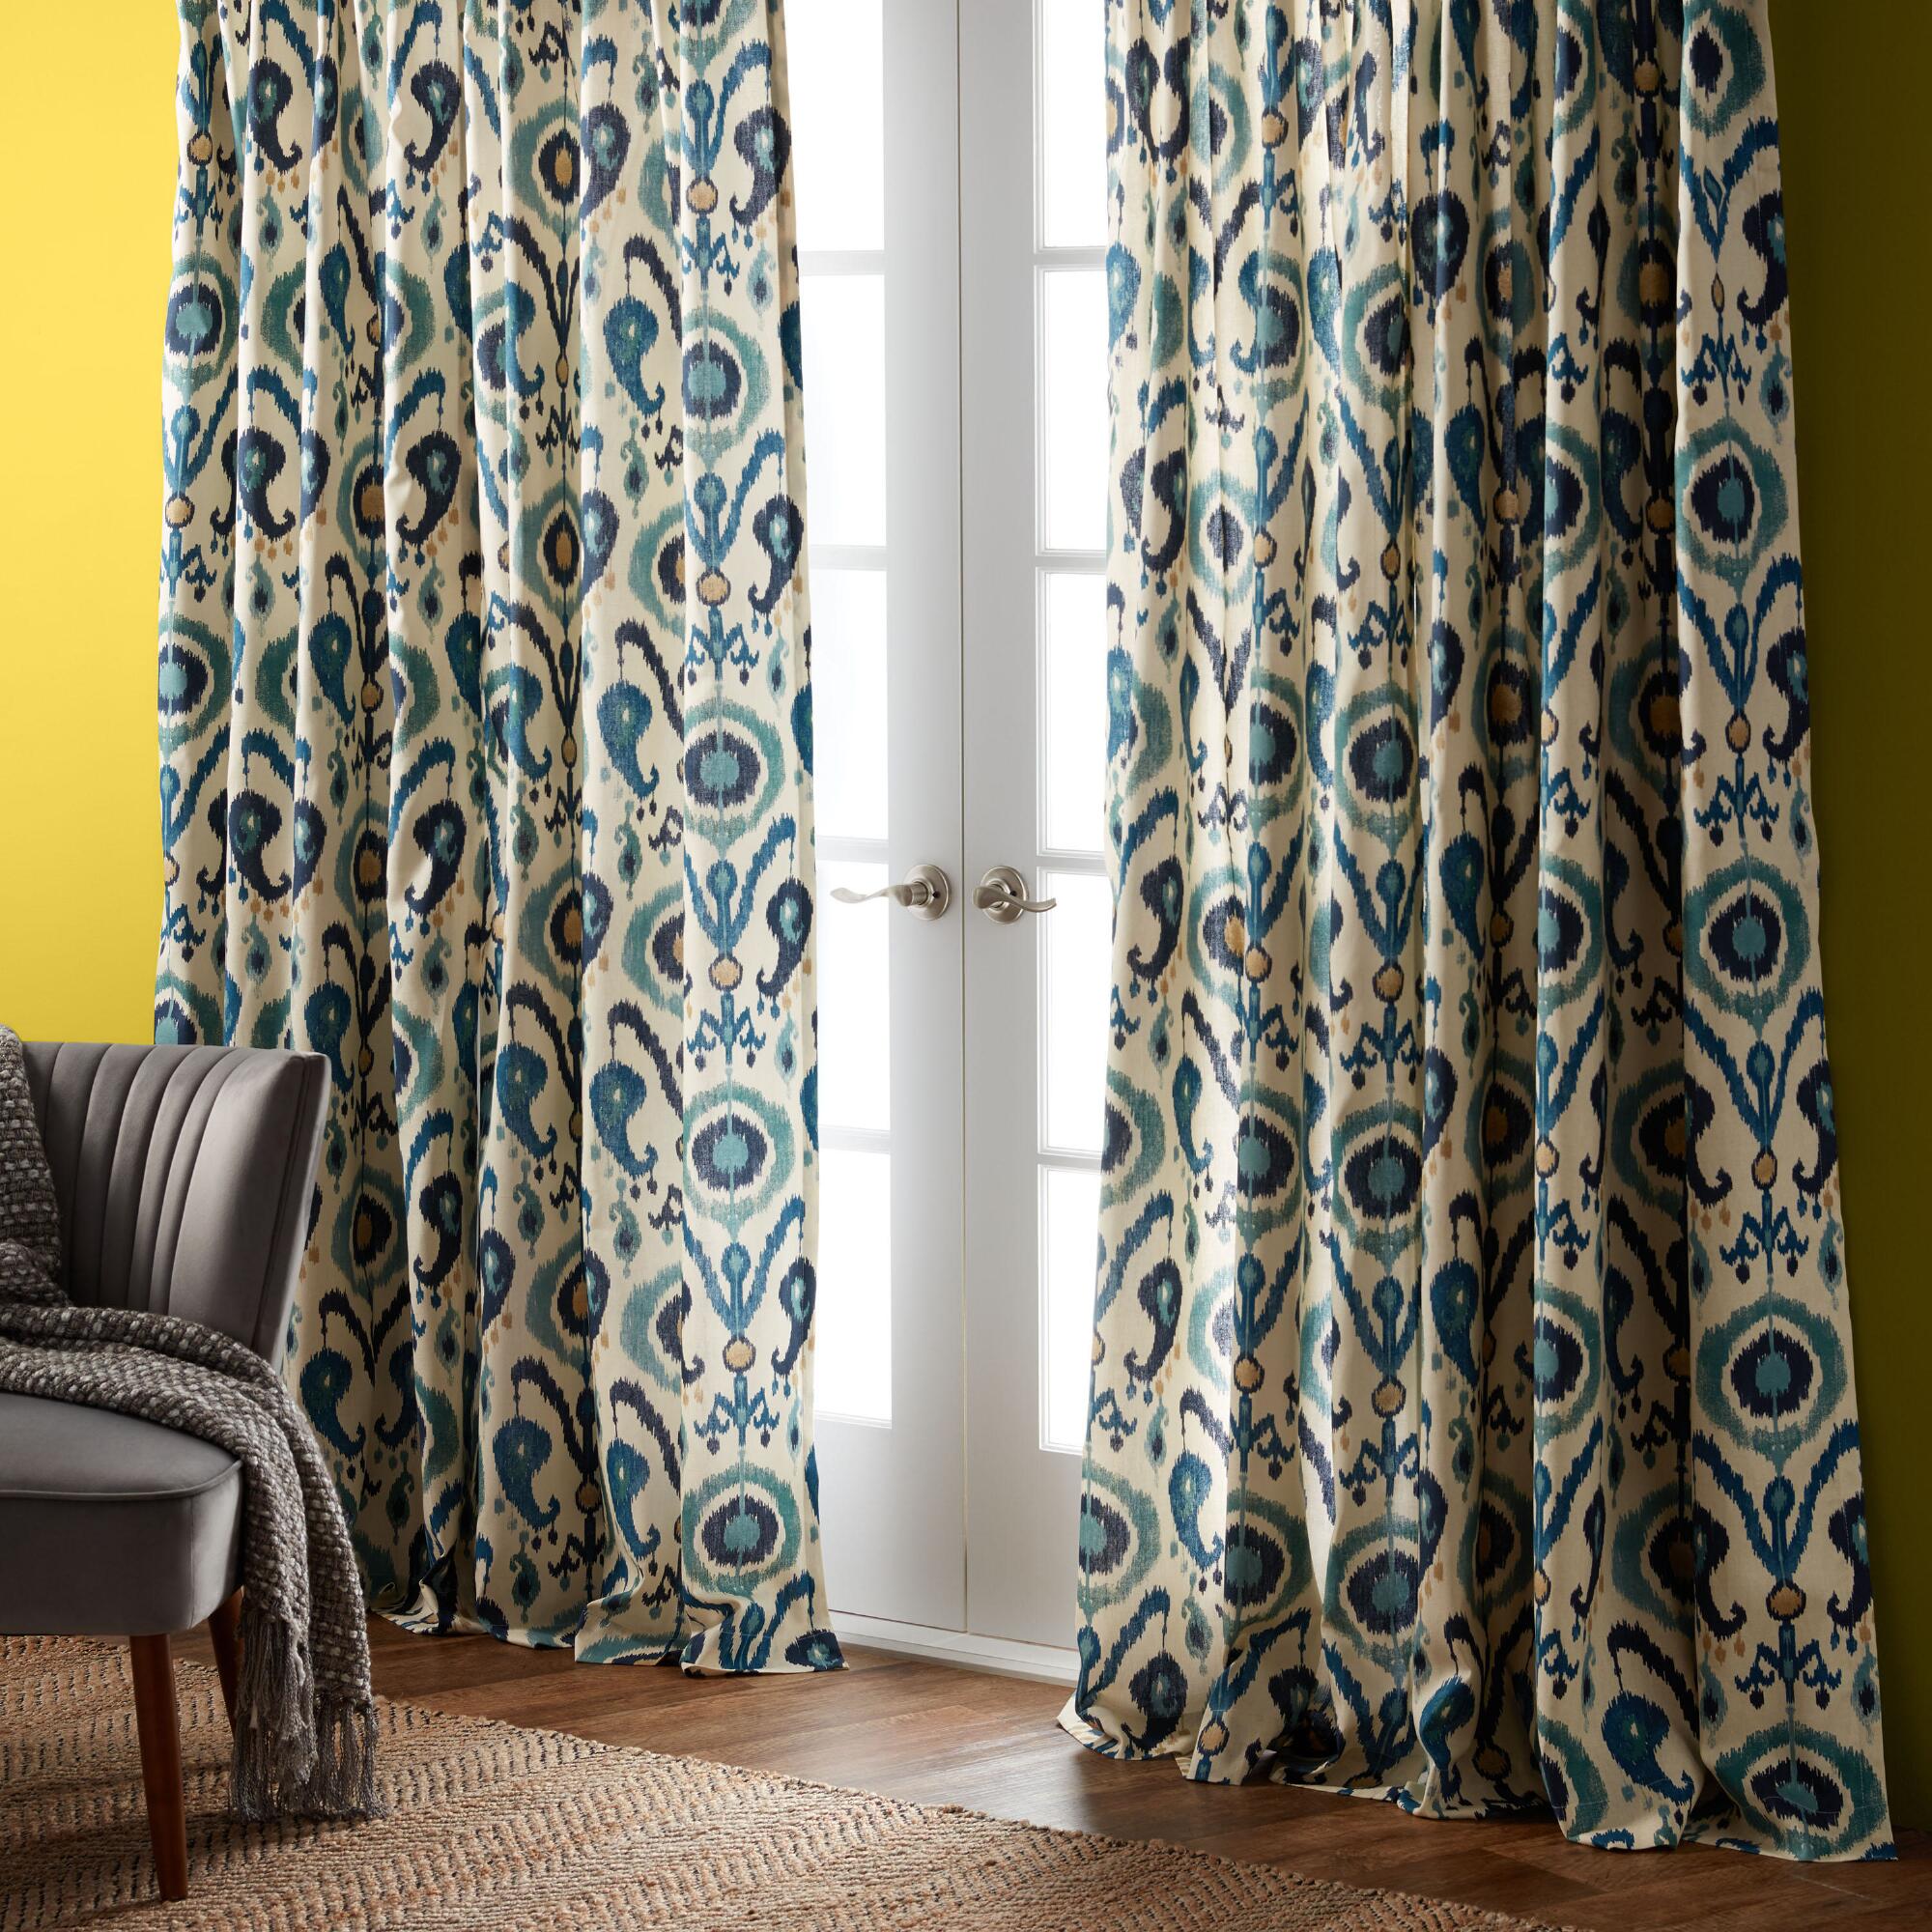
These ikat curtains were from World Marke, but now discontinued. However, they are also only 84″ long.
Tsk, tsk… 84″ is so 1992. We no longer do 84″ curtains unless the ceiling height is only 7 feet or so. 84″ is too short for an 8-foot ceiling. The only choice is to mount the curtain rod on the window frame. (casing) These days, we are mounting the drapes much higher.
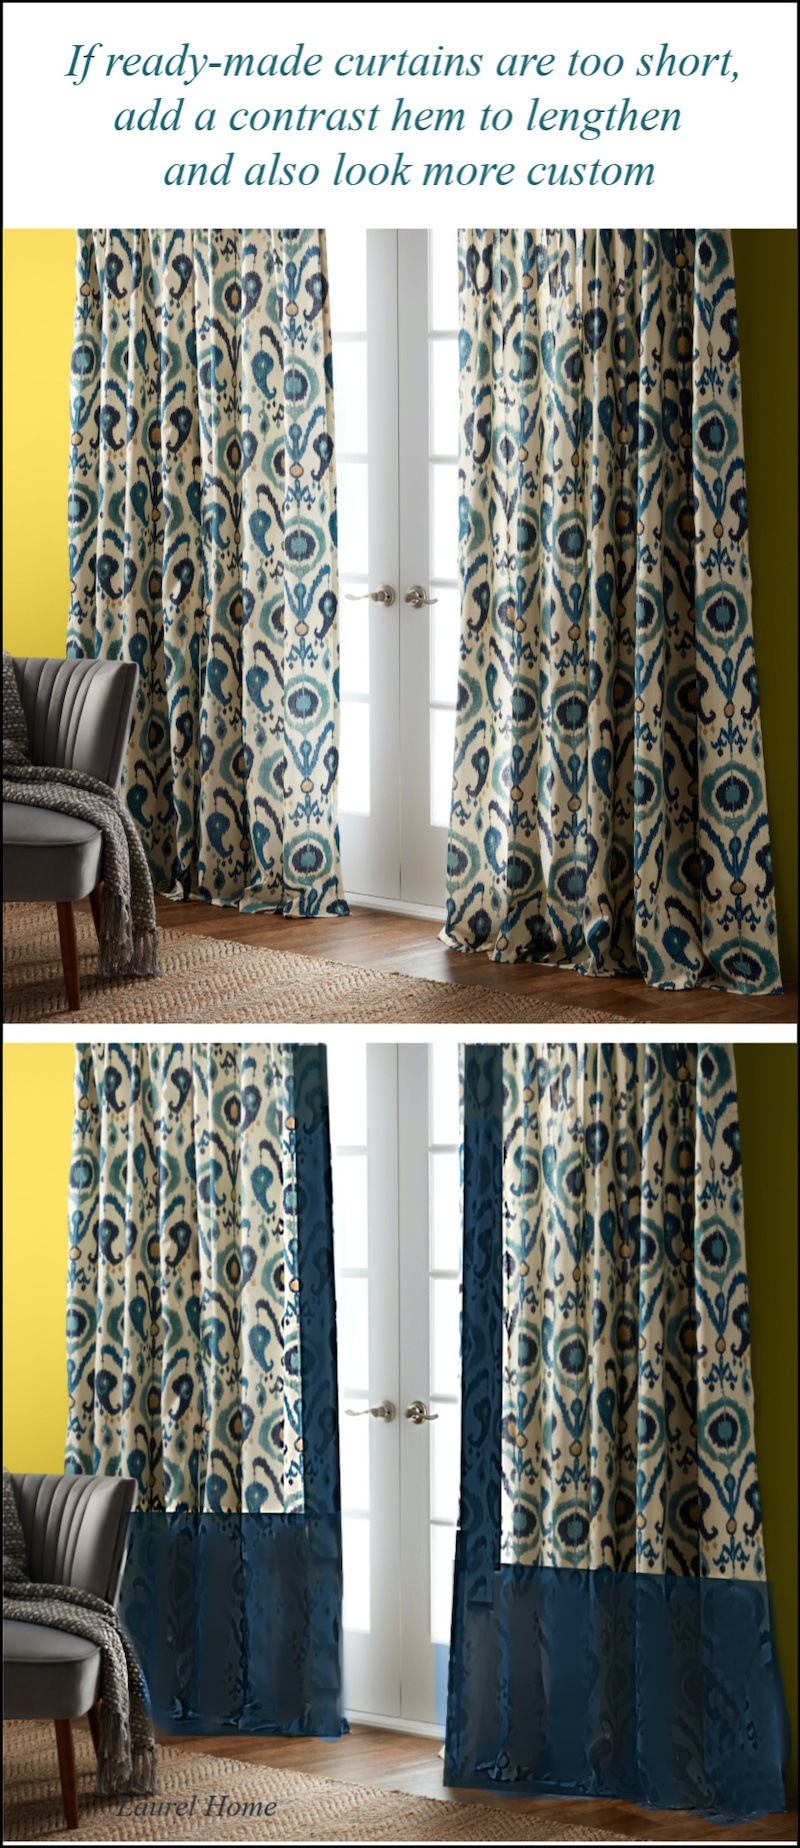
The solution is to add a deep hem. We can also add a border to the front, but that isn’t essential. The fabric looks like it has a slight pattern because the ikat is showing through. I did that so that the folds would still show. But, usually, we do a solid pattern.
I adore this look! And, have done it for clients who possessed some curtains that were too short. That was a gratifying solution.
Now, we need to go over some things NOT to do when working with budget window treatments.
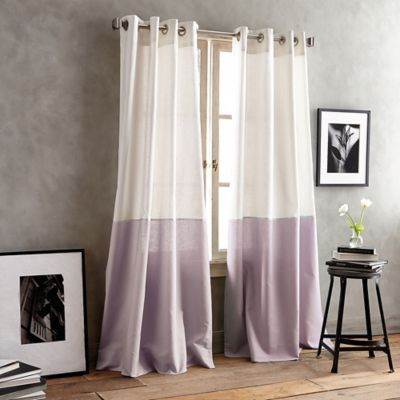
The contrast hem above is too deep. This is a ready-made, but if it were custom, this is a wonderful example of a low sill that is the perfect height for the contrast hem. The drapes should be longer as well and go up several inches above the window.
Usually, the hem is from 14″ – 18″. However, if your sill is at 20″, then it’s fine to follow that line.
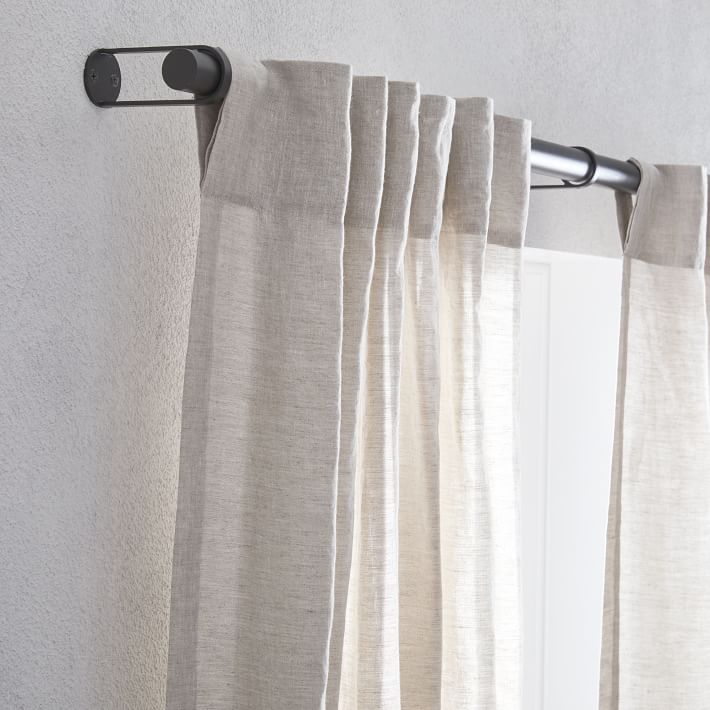
If the ready-made curtains come with back tabs, please do not use them, or the rod pocket.
The curtain looks glued to the rod instead of hanging from it, thereby giving is a cheap look.
We’ve been through this before, but I feel compelled to speak up as the marketplace is determined to impose this 21st-century abomination on us.
Below is another example of the backtab stuck-to-the-rod look.
Instead, please use rings with hooks.
If you want more information about decorative curtains and drapery hardware, please check out one of my favorite posts.
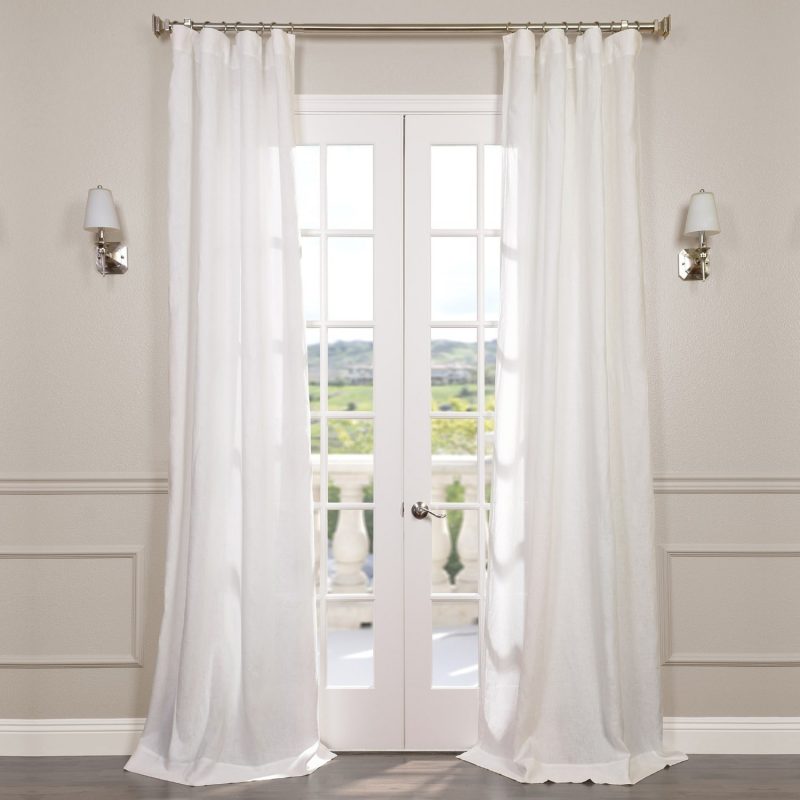
The curtain above is hung properly, using hooks and rings, thus exposing the rod. Yes, the rings are an added expense, but curtains stuck to your rod will never hang right, and they will scream BUDGET WINDOW TREATMENTS!
For an extensive post about drapery hardware, please go here.
For good-looking and inexpensive window treatments, another choice is bamboo blinds, below. They’re great alone or layered with curtains.
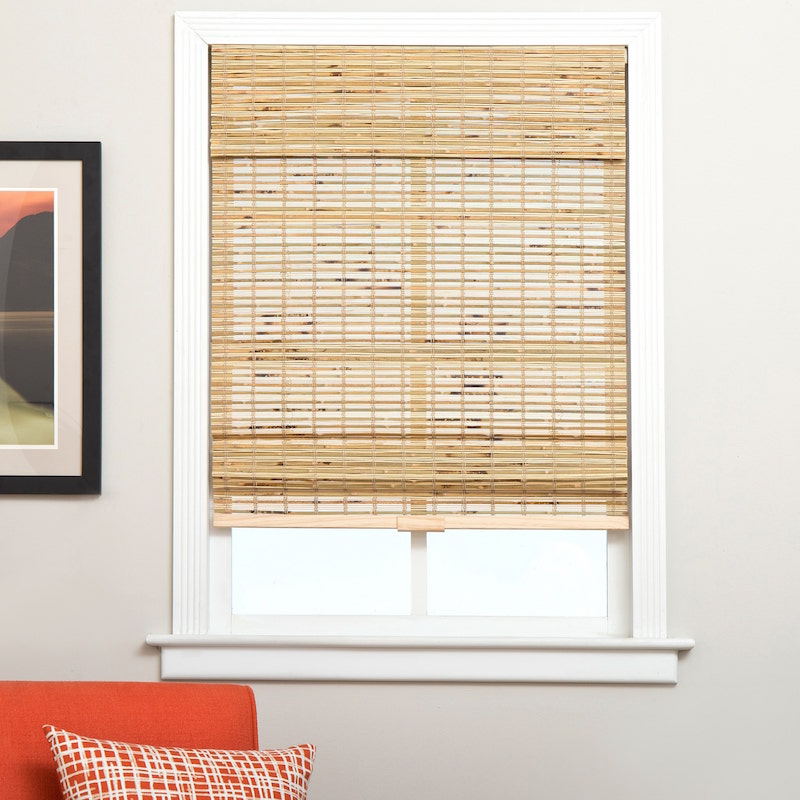
These are so cheap, I’m wondering if they are okay.
But the reviews are splendid. And they have many styles and sizes to choose from. (info in the link)
Please note that the bamboo shades above are NOT LINED. That means they are not private. They will make the room darker, but folks can see through them at night.
Yes, Laurel made that mistake once for a client job, and I had to pay to get them fixed. Lesson learned.
Woven wood blinds are terrific alone or underneath your curtains or drapes. You can see an example in this post about a young woman who inherited her granny’s dated furniture.
For an extensive post about woven wood blinds, please go here.
And please enjoy more shades, curtains, trim, drapes, and hardware in the widget below.
(Please click on the individual images for more info. Also, a few of these treatments are not cheap, but they are not expensive either. But, totally lovely, I think.)
I hope you enjoyed learning some of my tips and tricks about how to make budget window treatments look more custom.
xo,

***Please check out the recently updated HOT SALES!
There is now an Amazon link on my home page and below. Thank you for the suggestion!
Please note that I have decided not to create a membership site. However, this website is very expensive to run. To provide this content, I rely on you, the kind readers of my blog, to use my affiliate links whenever possible for items you need and want. There is no extra charge to you. The vendor you’re purchasing from pays me a small commission.

To facilitate this, some readers have asked me to put
A link to Amazon.com is on my home page.
Please click the link before items go into your shopping cart. Some people save their purchases in their “save for later folder.” Then, if you remember, please come back and click my Amazon link, and then you’re free to place your orders. While most vendor links have a cookie that lasts a while, Amazon’s cookies only last up to 24 hours.
Thank you so much!
I very much appreciate your help and support!
Related Posts
 Treillage – What Is It? And Why Your Home Needs It!
 The Open Concept Bathroom – Holy Crap Is Right!
 Can A Stained Wood Kitchen Look Fresh?
 New Traditional Decorating – Little Known Ideas You’ll Love
 Please Tell Me Your Biggest Decorating Problem
 Should These Top Decorating Trends Stay or Go?
 The Ultimate Guide To Decorating With Plates On the Wall


31 Responses
Beautifully explained! I love how you’ve shown that small details like rod placement and trim can make budget window treatments look truly elegant and high-end. Great practical tips!
Hi Laurel,
Something I’ve noticed when opting out of custom made drapes that are professionally hung is most homeowners don’t take the outside edge back to the wall with an eye hook & drapery hook. Of course I don’t blame them. Sites that sell them usually don’t show them hung that way.
Hanging them this way also helps prevent light from leaking in if you want to ensure your blackout drapes live up to their expectations.
I prefer pleats to grommets, but still consider grommets a durable, budget-friendly option for casual places like recreation rooms. Check out Rebecca Robeson’s outstanding Youtube video on how to make grommet curtains look classy. Grommet curtains look better with spacers. You can buy them on Amazon or create the spacers from cardboard toilet paper rolls. Also, consider using the Grom-A-Link product along with an acrylic wand for a better look as well as easier opening and closing. I’ve only done one set of custom curtains with pleats. I got the rod and curtains through Etsy and the result was beautiful. I did learn that when you include the heavier thermal liner, it gives the curtains a prettier, fuller look and also helps block out sound as well. I have also learned that elegant, custom looking window coverings can help sell a house faster and for more money. I’m convinced everyone wants great window coverings but the subject really intimidates most people. They don’t know where to start and when they call a pro, the cost is too great, so they give up. Thank you, Laurel, for all the good information. Some years ago you posted another blog about curtains that helped me overcome my trepidation on this topic.
Hi Diane,
Thanks for helping me out and answering Sue’s question. My Bronxville apartment came with grommet drapes in the bedroom which I lived with for several years and didn’t mind them.
What about grommet top drapes? I have a ton of heave Pottery Barn Payton drapes in my home – mistake already made. What can I do to remedy the look without completely replacing? They are very full – double to triple the window width. I like the color of them. I don’t find them overly offensive, and can make do, but opening them is a PITA.
To puddle or not to puddle, that is the question. Is it OK to not have the curtains puddle on the floor? It just bothers me, but I don’t know why?! I like my curtains to come straight to the edge of the quarter round on a hardwood floor. They just look more neat to me.
I love making curtains…no curves! I find it the most relaxing sewing I can do. In college, I removed our vertical dorm room blinds, and made some cute tie-backs, which were probably very granny, but they worked on our college budget, my roommate liked them, and our room was beautiful.
I’m still thinking about what curtains I want in my house…everytime I think I’ll do a home improvement, an appliance quits or the car goes in for repairs. C’est la vie! Thanks for this post, and the reader comments … all very inspiring!!
Hi Gabrielle,
It’s 100% okay to not have the curtains puddle or break on the floor. I would say that at least 90% of my clients did not want the drapes to touch the floor, so I would tell the installer, 1/8″ above the floor with a wink. Actually, the window treatment industry is one-inch above the floor. The reality is that floors are almost always uneven, particularly around the perimeter of the room. And sometimes the discrepancy is a lot. That’s why every window has to be carefully measured, and another reason why installations are so unnerving. There is a lot of “fudging” going on so that the rods appear straight and the hems fall as evenly as possible. Small tweaks can be accomplished via pinning, and we’ve even raised the rod up to a quarter of an inch by putting some padding between the bracket and the rod. It’s not noticeable.
One must never assume that they all of the windows are the same size or are at the same height from the ceiling.
So, this is one reason that designers, including myself, favor a small break on the floor. It helps eliminate the issue with uneven floors and windows that aren’t hanging perfectly straight. I also like a small break, of from 1/2″ inch to no more than 2″ because it gives a more luxurious look. But again, the vast majority of folks don’t want that because they don’t want the fabric to get dirty or they have pets, etc.
I recently ordered from By Harrington. One of the shades arrived damaged and we are (hopefully) working to fix it. However, Dianne mentioned she was retiring in September. I haven’t asked her if the business will continue. Have you been in touch recently?
Hi Sara,
Yes, I’ve been in touch with Dianne and she’s retiring from sewing, but I believe she’ll still be there as an owner and consultant. She’s always had other people do the bulk of the sewing as one person would never be able to keep up with the workload.
I want to invest in indoor solid panel shutters..Do you have a source for something like this?
thanks!
Hi Gilda,
Sorry, I don’t, but I do love the embrasured or pocket shutters like they have in England, and also you’ll sometimes find here in Boston, New York, Charleston, SC amongst other old cities.
Hi Laurel. I received my tenth paint palette, paint guide, and rolodex a couple days ago and have enjoyed looking through these updated versions. The guides are among the best purchases I’ve ever made; they’ve saved me so much time and angst over the decade! In terms of window coverings, for people looking for inexpensive blinds and cellular shades, including motorized ones, I’ve been very impressed with Ikea shades. As of fall 2025, Ikea does not have any in any stores, as they are releasing new versions that should be available in 2026. I installed Ikea cellular shades in ten windows a few months ago and am in the process of making faux Roman Shades as toppers. The Rowley Company has an excellent online tutorial on how to make a faux Roman shade, which is quite easy for those with basic sewing skills. They also have an video tutorial on how to make fabric (laminated) roller shades.
Hi Tsippi,
Thanks so much for the endorsement and information!
—Great information blog. An extensive range of interior solutions to create workplaces that inspire and excite. A designer and dedicated project manager will be with you throughout the project.
How I found out I was claustrophobic. I ordered lined bamboo shades for two windows. No more. All bamboo shades are now unlined. Also to make my curtains look lush, I store paper shopping bags that I need for recycling behind the curtains. Puffs them right out.
Dear Laurel, Happy 11th Blogiversary! Thank you for the great examples of window coverings that won’t break the bank. You’ve given me some excellent ideas. Also, thank you for the links to purchase trim. I’m itching to put some Greek key trim on something (thanks to you)!!
Very useful reading! I have Arlo shade above in several rooms and people always ask me where I got them. I think they look very nice and the price sure works for my window budget. I do most of my own curtains (I even made a Roman shade once) but hadn’t thought about adding trim. Now I’m going to shop around for some Greek Key designs. If you ever do another post about making inexpensive curtains look high end, I would like to read about how many rings per panel, how deep the hem should be, what kind of hem fabric selection, etc. It’s not easy information to find. Thanks for all of the ideas and links!
I’ve used Stitch Witchery tape, but it was to tack up a hem—haven’t tried applying drapery trim.
To (a fellow:) Elizabeth, who commented on the fullness of custom drapes vs ready-made, custom usually are lined *and* interlined (with bump, which is more substantial and helps with the fullness—but is probably not easily replicated). They are also typically 1 1/2 to 2 widths of fabric (or more, depending on the window width) while ready-mades are single width. When I’ve used ready-mades for larger windows I’ve typically ordered two panels per side and had them stitched together.
This is about inexpensive curtain rods that are telescoped together rather than one solid rod. Another non-custom money saver many of us use in our homes. I’ve struggled with pulling my rings across the “bump” where the two rods come together. They always got stuck at that point. This gliding tape made all the difference in the world:
Modtek curtain & rod glide tape.
I highly recommend it. And congratulations on your blogiversary Laurel!
Hi Shelley,
Thanks so much! We always used a silicone spray. Or, if we didn’t have that a little bar soap or beeswax also works applied to the top of the rod. If using the silicone spray, it is best to apply it outside, by first spraying it on a rag and wiping it on. (a little goes a long way) It is verrry slippery, so can be a problem if it gets on the floor.
If there’s a center support(s) and the rings need to pass it, that’s another matter. In that case, we used C-rings. There’s a link to some in the widget in the post.
Congratulations on you blogaverssiary! Thank you for all this information! I just wish I had read your post on wallpaper BEFORE I ordered my wallpaper that I was terrified (I know, a bit dramatic) was going to be discontinued before my new build is finished. Fingers crossed that I purchased enough and that when hanging time comes, I can find someone competent to hang it!
Congratulations Laurel on your blog anniversary. Thank you for the years of entertainment and education. Yes, DIY window treatments can be done. I even made a set of lined pinch pleat drapes back in the 90s despite not knowing the first thing about sewing. However, life is short and I’d rather be birding. In fact, I may rather stick a pin in my eye than sew. I’ve used your suggestion of budget panels with good rods and rings to great effect in my home. I took the panels to my local seamstress to be hemmed and trimmed. A inexpensive solution with no sewing involved. I do hang my own rods. I like that sort of thing.
Can you write about window treatments for small, 8 foot ceiling mid century homes, limited budget, up/down shades or blinds? Prices are so high, what are options. Interior casings are white.
Laurel, This post is wonderful. It has so many creative ideas, resources to help and methods to get the job done! I’ll refer back many times to this post.
Thank you,
Diana
I really dislike drapes that puddle on the floor (my dog would create a nest) or are on the floor by an inch or so. The pleats will need to be arranged every time they are drawn open or closed, will get dirty sooner and IMHO just look like they were mismeasured or installed incorrectly. Absolutely love the white drapes with black trim.
Wayfair has nice, neutral, light-blocking and budget-priced panels, especially on sale. But they always come with the 3-way header that makes them hang weirdly, as Laurel says. For two of my wide and drafty windows I bought four panels and sewed two together for each side. This is the fussy part because the lining has to be tacked down by hand because it’s not as wide as the fabric. I ripped off the tabs on the header and restitched the edges. Then I used the instructions on Susan Woodcock’s homedecgirl workroom channel to make Euro pleats. She has a trick for hiding the tack that makes it super easy. The result is casual and chic-looking draperies for around $30 a panel! (Watch for sales!)
Laurel, Ready-mades aren’t as full as custom drapes.
I’ve added my own hidden layer with off-the-shelf blackout liner pinned to the back. It helps – but doesn’t entirely solve the problem.
Any tips?
Hi Laurel,
Love your blog! My husband and I are moving in about a month to a house built in 1787. It has been renovated but fortunately was done to maintain the character and finishes of an old house. It has gorgeous original floors, lots of hand carved cabinetry and those beautiful deep window frames. My question is, what kind of window treatments work for a house of that age? There are some windows I would do nothing to, but bedroom and bathrooms definitely need some kind of privacy. I do sew a good bit, so making something myself is not out of the question. I just don’t want to compromise the style and flavor of this old girl!
Thanks much!
I’ll second Em’s recommendation of the Workroom channel by Susan Woodcock! I recently made five sets of drapes for my living room. Susan’s Workroom channel helped me all the way way through the long process. I wound up lining and interlining the drapes and hand sewing them. I spent a fraction of the price of even ready-made drapes.
Dear Laurel, this may be the time to confess that I have vertical blinds – and a carpet! – in my sitting room (John having insisted on both). I hate vertical blinds, so I had to find a way to make them attractive. I bought the cheapest option online, with centre-opening header cassettes, and enough ‘Navajo’-design curtain fabric to make the main curtains and a cover for each blind slat. It was my first sewing project and it took months. And I mean months and months. It still cost well over a thousand pounds for the curtains and blinds. But getting them made up would have been prohibitive, maybe not even possible. The end result is the best compromise we’ve made in our house. He has his privacy option for the street-facing windows; I have the same fabric all the way round the room. And we’ve both caught the sewing bug. Thanks for a great post, Laurel. I hope people take you up on the invitation to DIY. It really is doable if you go slowly, even for ten-left-fingered people like me.
It can be done!
The Workroom Channel offers Susan Woodcock’s spectacular, reasonable, easy-to- follow class on how to make handcrafted curtains.
I even used shamefully inexpensive Ikea cotton linen panels, ripped open all the seams and headers, and used the fabric to make lined/interlined/trimmed, europleated curtains for my dining room.
To answer your question Laurel, I did—very carefully—use glue to apply my trim tape. It was Fringe Adhesive from Rowley… SUPER product!!!