
Hi Everyone,
Welcome to both parts 1 and 2 of this Picmonkey tutorial. Today, I added a floor plan which is almost the same as the one I did a week ago. Then, I added all of the images I used in the floor plan for you to practice with.
Finally, there is a 14-minute video that required several hours of prep work so I could keep it moving.
What would really help, I think, is for you to get a Picmonkey account and then, when you’re ready, try to make the same floor plan, along with me.
If you’re here for the first time, please start from the top of the page. Otherwise, you can click the link below to skip to part 2 and watch the Picmonkey video tutorial.
Part 2 Begins Here
Hi Everyone,
Many of you requested this beginner Picmonkey tutorial after Sunday’s post about room planners.
This is 100% new content from a post that originated in 2019. The entire interface is unrecognizable from the way it was.
The reason I like Picmonkey so much is that it’s not difficult to learn, and the options are endless since one can use their own images to create moodboards, floor plans, logos, cards, marketing materials, and much more!
A decade ago, I tried Canva; however, Canva is more of a template-based platform.
So if you’d like to make flyers, business cards or social media posts primarily, it’s great for that. Picmonkey offers far greater versatility with photo editing, which is what you need to make one-of-a-kind floor plans, perspective images and moodboards.
This will be a pictorial and written-out Picmonkey tutorial.
However, I would like to follow up with a video, probably tomorrow night.
The first thing you need to do is get the Picmonkey program, and there is a trial version. I pay $130 a year for the pro version. I don’t know what’s on the other versions, but it more than pays for itself!
While the majority of us know our way around the basics of computer technology, there are still many of you who are a good 25 years behind.
This next part is very important, so please read carefully.
Please understand.
In the late 90s through the turn-of-the-century (that’s the turn of the 20th century, in case that’s not clear lol), I was a technophobe par excellence! A Luddite, my wasband called me.
Computers were completely intimidating. I didn’t want anything to do with them.
However, in 2002, I received an email from a client. (How dare she!) And from then on, things slowly began to change, and then began to change massively in 2012 when I started this website/blog.
Soooo, please take a deep breath.
Even if you tried before to learn Picmonkey and gave up in abject frustration, it’s probably because you were:
- tense
- rushed
- got stuck at a crucial junction
- tried to watch and learn from their tutorial.
Out of curiosity, I watched one of their tutorials on video, and I realized the problem. I was confused very early on, and I can do Picmonkey in my sleep with one arm tied behind my back.
To begin the PicmonkeyTutorial.
I will be breaking this down as tightly as possible; however, your device might be a bit different.
If so, please ask Google or use AI for answers. For example, how do I make a screenshot on a PC? Or how do I crop an image on a PC?
These simple quearies will have the answers that you seek.
1. Please get set up on Picmonkey. I have the pro version, but you can try the free trial version. There might also be a lower-cost non-profit option.
2. After that, you will need to be able to create images you can upload to Picmonkey.
This is a basic skill and essential because if you wish to make a moodboard, you will need to use your own images that are not available on Picmonkey.
The most common way to save an image is to right-click it and save it as a JPG or PNG.(A JPG or JPEG is fine, but a PNG will give a higher resolution, so I usually use that format.)
However, most images you will find on the internet are locked and saved in a format that can’t be uploaded to Picmonkey.
Therefore, you will need to take a screenshot. Or, if the image is too large, you can save the image in the locked form and then take a screenshot of the entire image that will now fit on your screen.
If you don’t know how, please Google it.
On a MacBook, you press Command+Shift+3 simultaneously, and you will create a screenshot of your entire screen, just like you see below.

Then, crop your image before adding it to a folder, which is what I usually do. You can also crop images in Picmonkey. On a MacBook near the top of your screenshot, you will see a tab called MARKUP. Click that and drag your cursor to the part you’d like to crop, and hit the crop icon directly underneath where it says MARKUP.
As I recall, cropping on a PC is very similar, but it’s been over 11 years since I used one.
If you mess up, try command + z (MacBook), which will undo your crop, or at the top of your screen, click the edit tab and click “undo crop.” If you go to the FILE tab, there is also an option to restore to the previous save or other saves. This is also the place to create a duplicate image. I often do this if I want the same image in multiple folders.
No worries if you just went south on me. I am a visual learner, so written instructions make my eyes glaze over. I get it! We will definitely do a video!
Create a folder (right-click on your desktop and select New Folder in the pop-up menu) and name it by clicking underneath the folder until it’s highlighted.
Then type in whatever you want to call it. I named my folder PICMONKEY. Clever, huh? ;]
Drag your image into the folder.
That’s all you need to do. There are some editing options, like resizing your image. Let’s say you’re using this image as a tiny vase on your moodboard, but your image is 2500 x 2500 pixels. You will want to reduce the size of your image considerably; otherwise, your image will look distorted due to the immense amount of compression.
Sometimes, I can’t find the perfect image, but images can be manipulated to some extent. That is more advanced.
The bulk of the boards I make are either floor plans/elevations, or perspective virtual spaces. (mood boards)
Sometimes, I use a photo of a room that needs a makeover. That is also more advanced.
However, once you’ve mastered uploading photos to your desktop folder, you’re already in great shape.
If this is completely foreign or new to you, please first practice uploading images through a screenshot, cropping them, and putting them in a folder on your desktop that you have named.
Once you’re good with that skill, it’s time to open picmonkey.
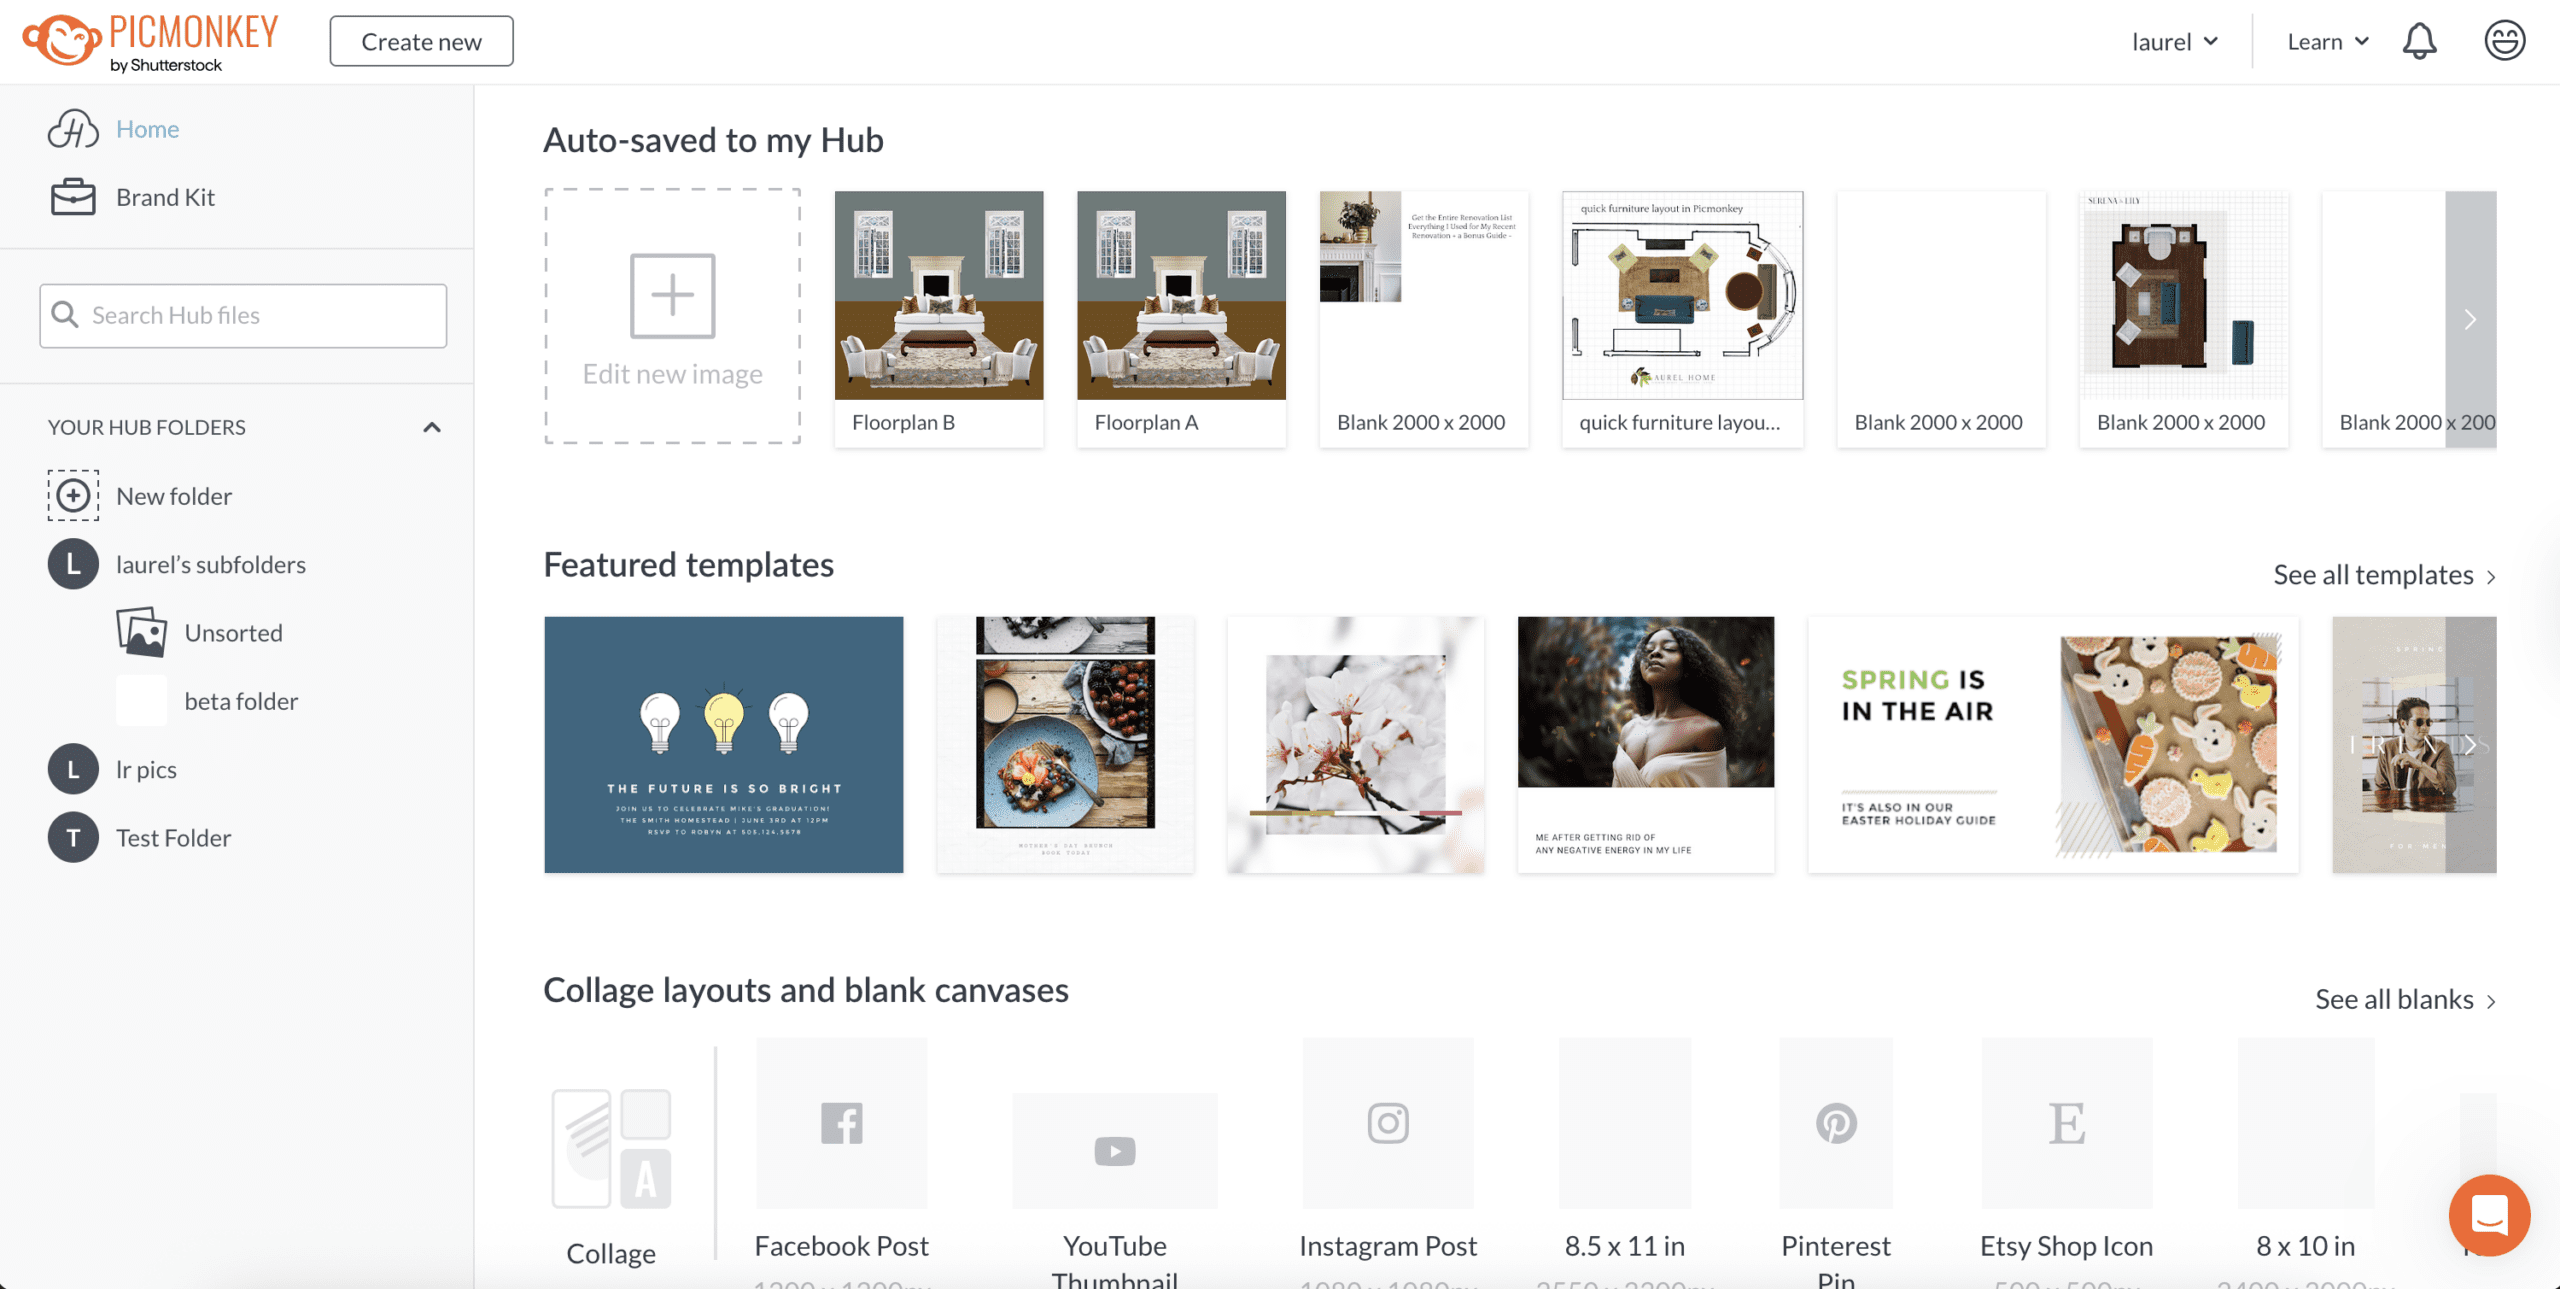
I don’t use the hub folders. However, every board or image saved gets saved to the hub. (See auto-save at the top of my screen.) For instance, I take my graph paper out of the hub file as well as my Laurel Home logo. There is a search box on the left that says search hub files. I type in graph, and the graph image pops up.
To make a canvas or a board, which is the same thing. click on create new.

The menu below will open up.
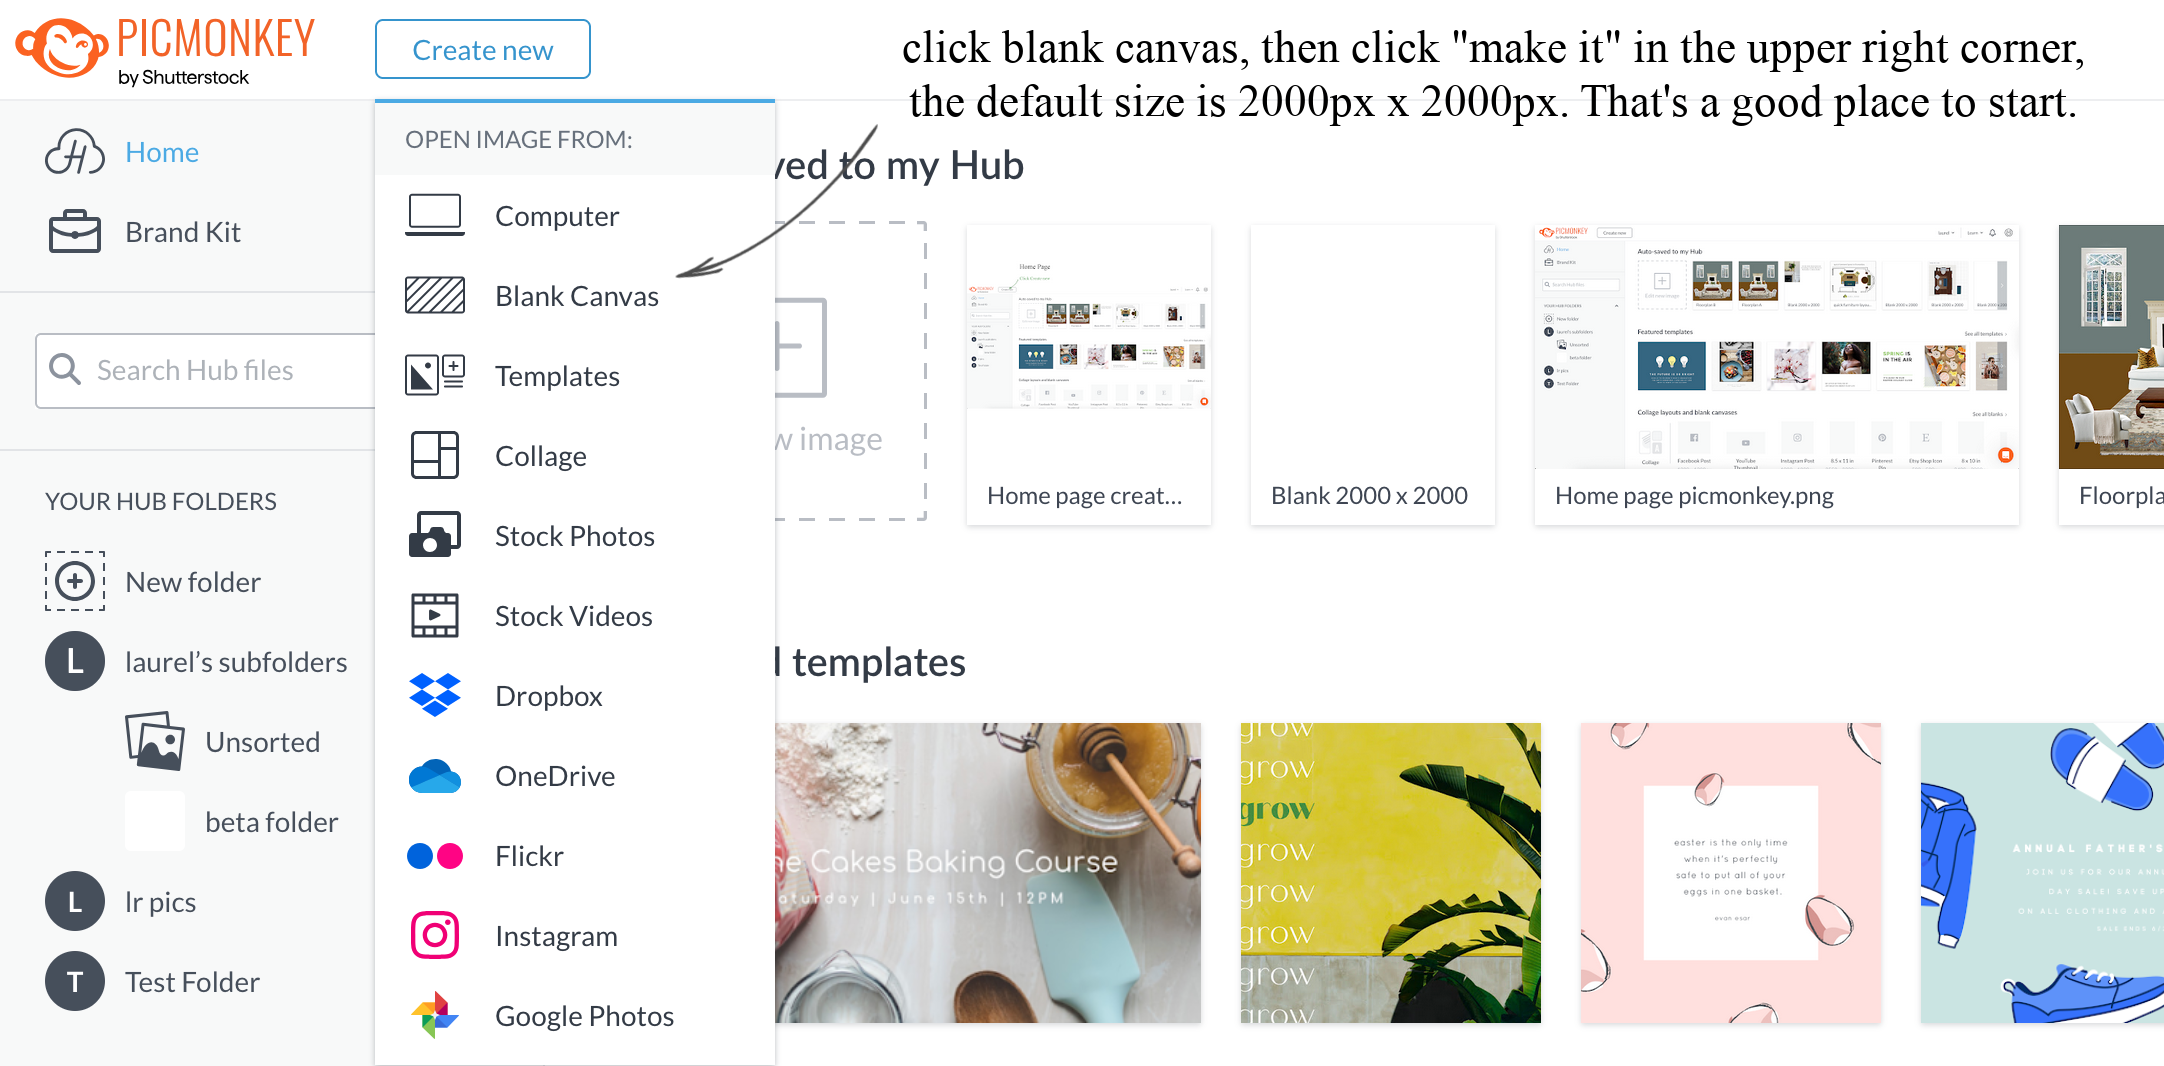
Click the blank canvas and then click make it in the upper right corner. Sorry, I cropped out the make it, but you’ll see it on your screen.
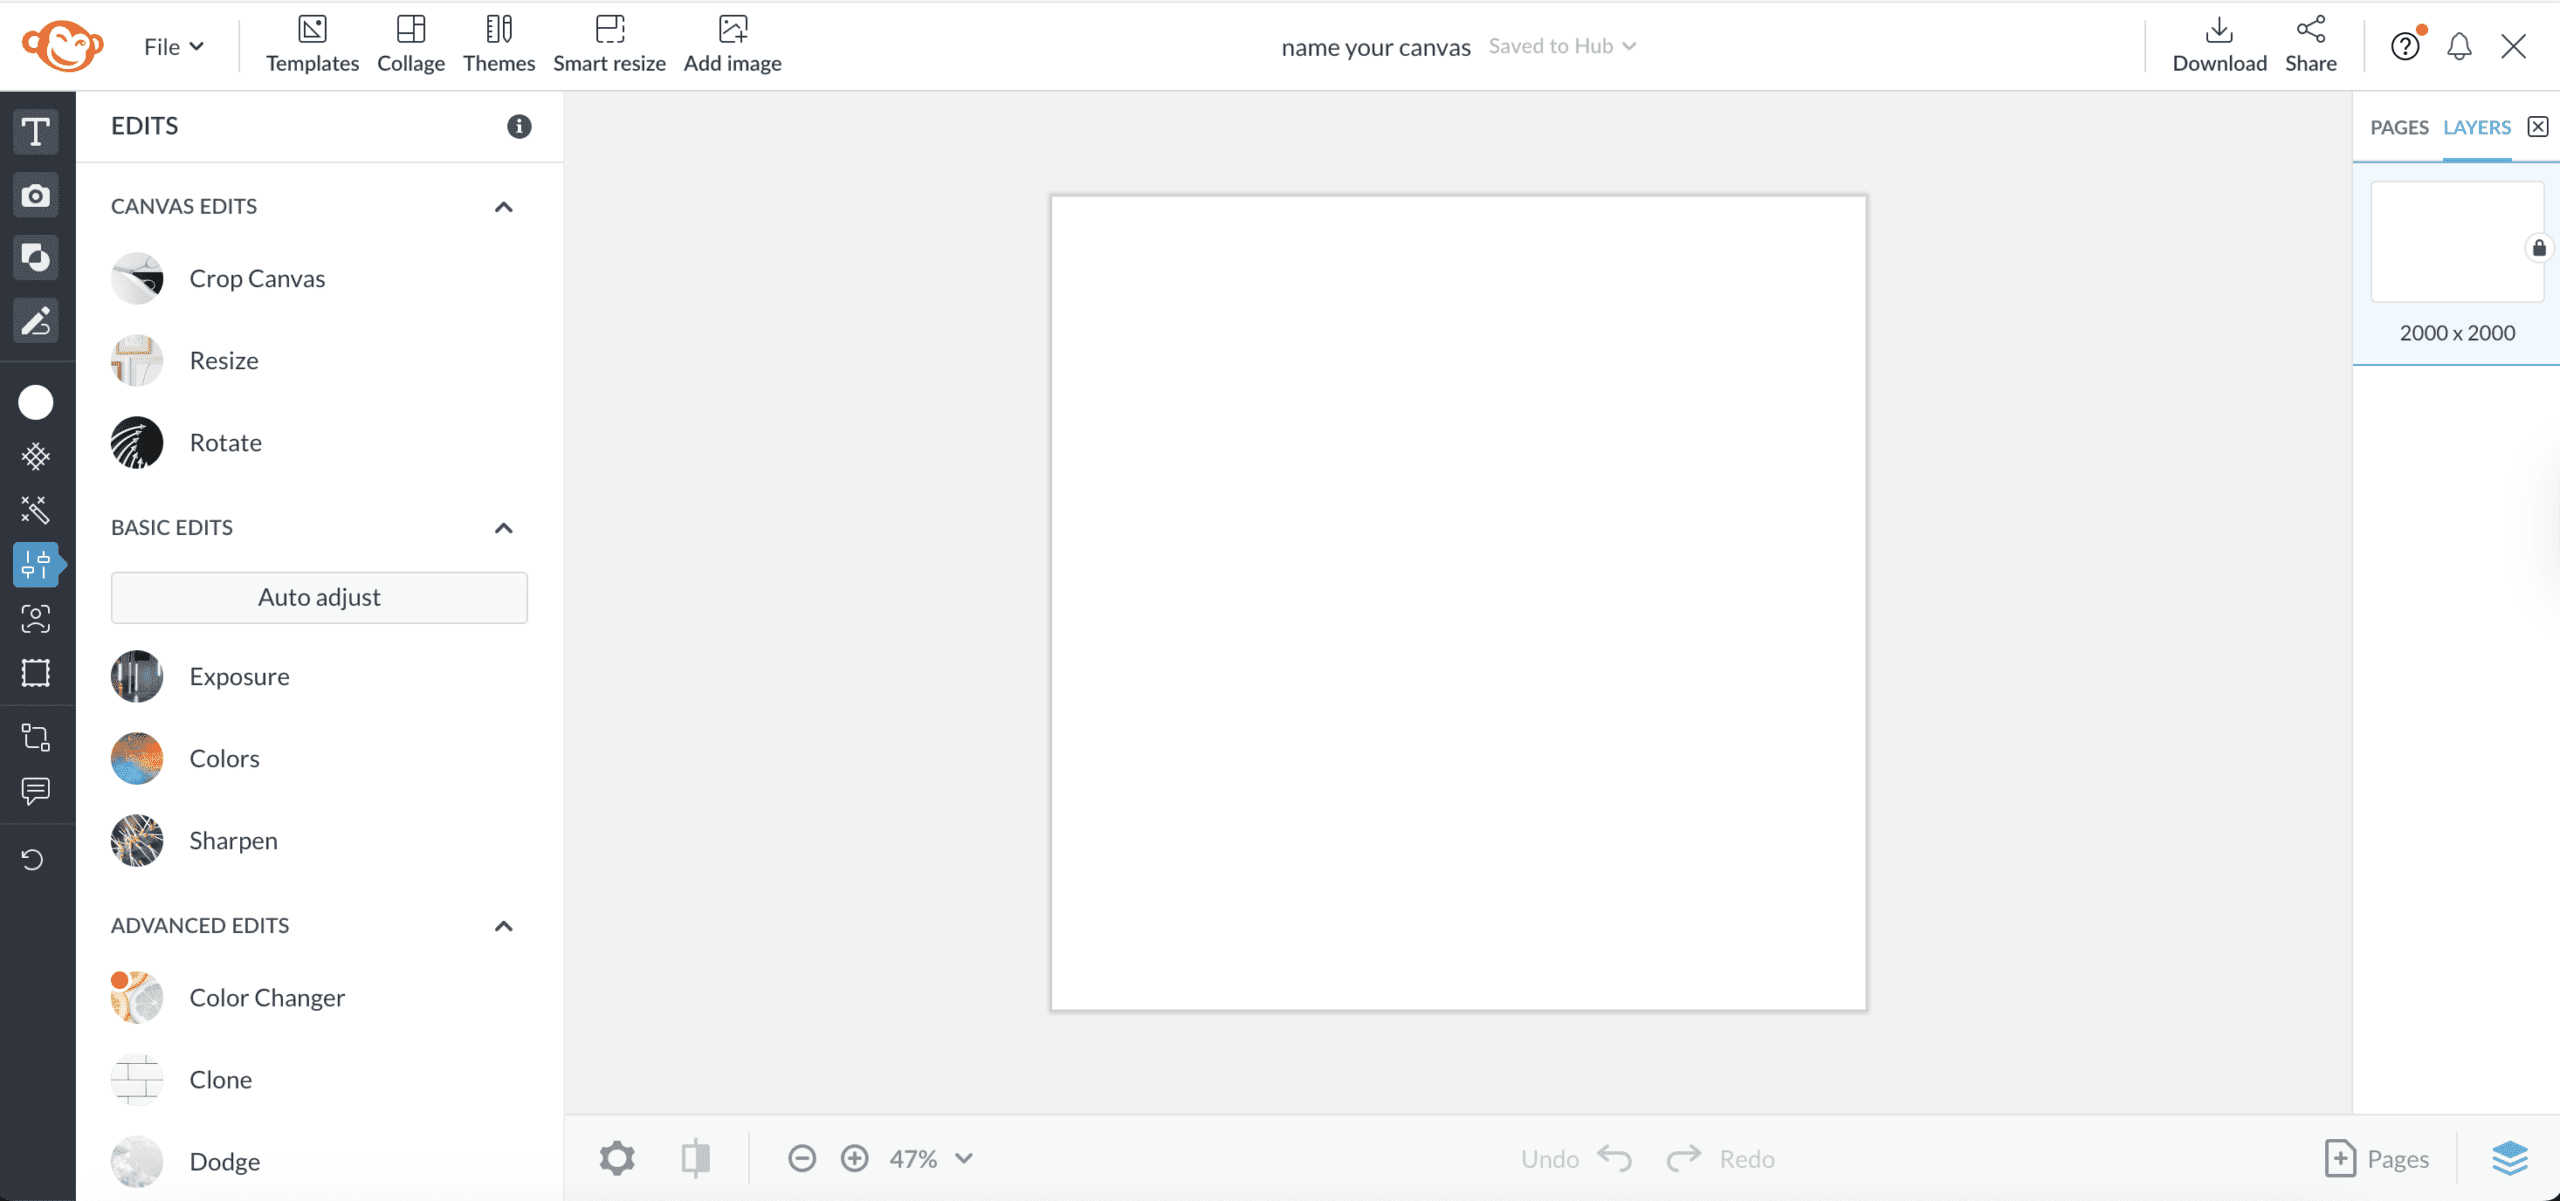
Where it says 2000 x 2000, change that to whatever you’d like to name your canvas. Mine says, “Name your canvas.”
Looking at your left sidebar, you’ll see an intimidating black bar and then Edits on the left. Both are for editing.
Hover over the black bar, and all of those symbols will open up. If you’d like it to stick, you can click the little carrot > in a gray dot near the top.
The image below explains which of these I use frequently for moodboards and floor plans. So, please read what I wrote on the board.
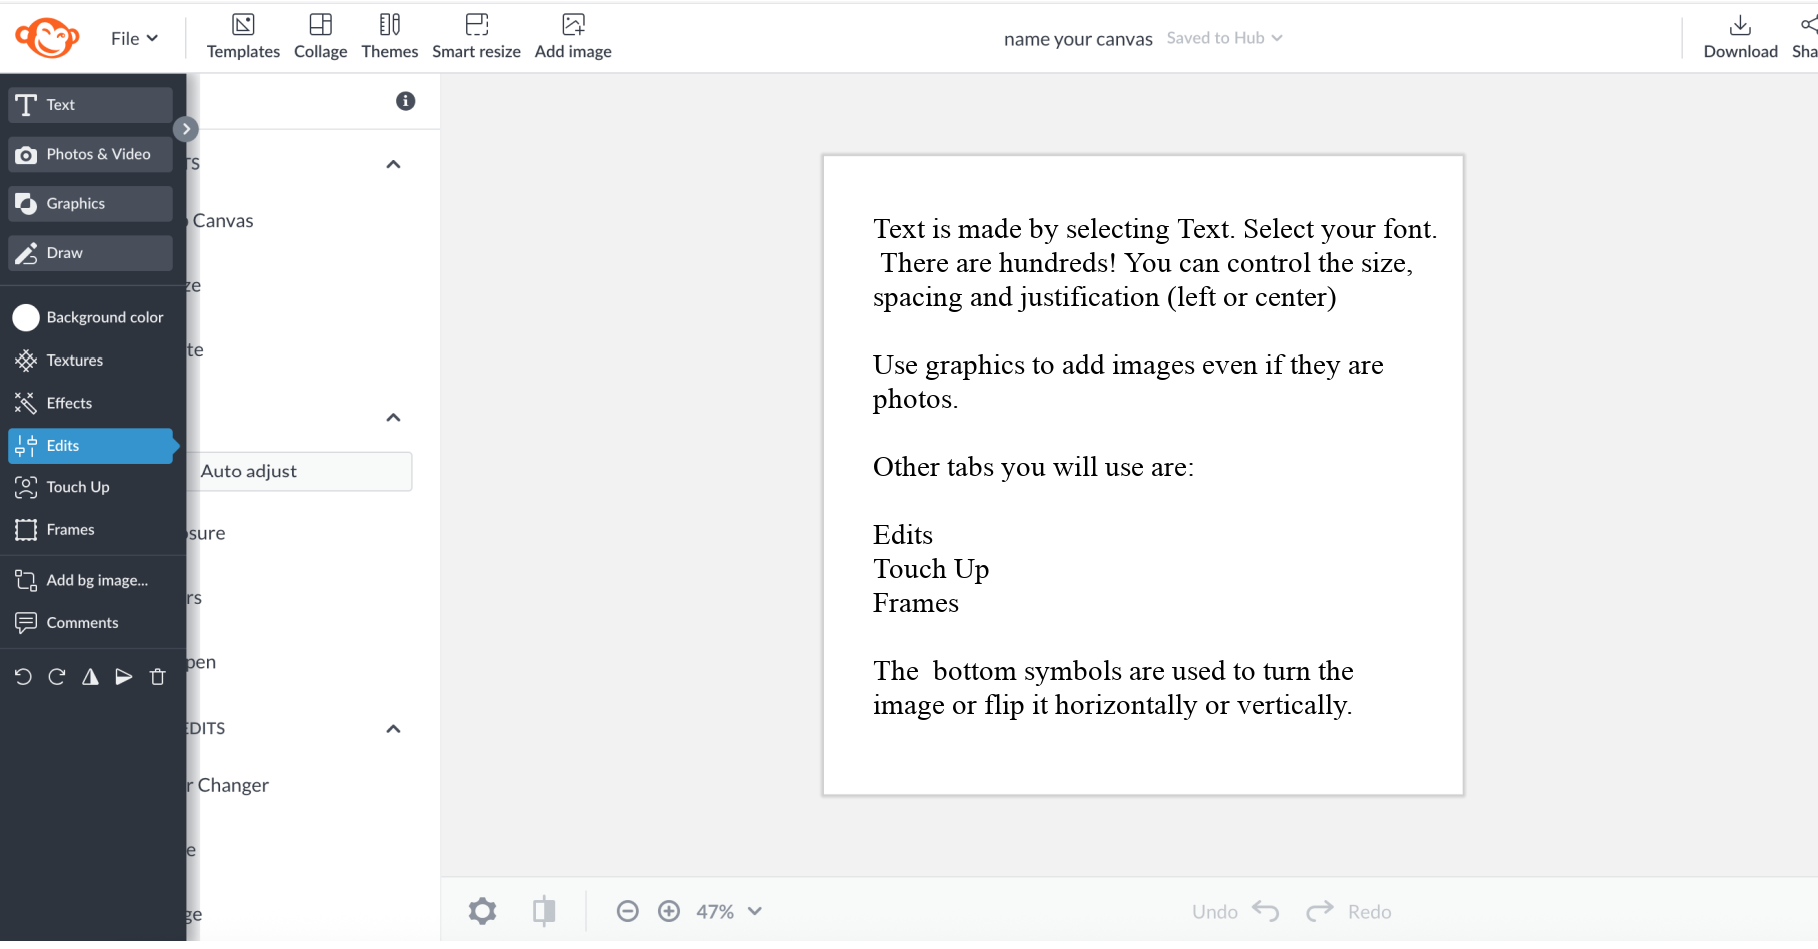
The frames are optional and used to add a border around the entire board.
This is the sort of thing you’ll need to play with. I usually don’t use the inner border, but it can be used to make the margin around your graphics wider if they’re too close to the edges of the board. I usually make my outer border 3 pixels. It shows up better on the blog than in Picmonkey.
If you click edits or stop hovering, you’ll see the white menu again.
I use exposure to brighten or darken images and colors, to enhance or change colors, and the sharpen option. I also use the Clone option, which can also be found under the Touch Up tab, which will appear once a graphic is added to your board.
We’re going to end soon because I don’t want you to be overwhelmed.
Please remember that I did not learn all of this overnight. No, it won’t take you months, but maybe a week or two to get the hang of basic functions.
Let’s add an image, but we’ll call it a graphic because I only use the graphic.
So please click graphics, then click add your own graphic, and select computer.
Open up your folder on your desktop, if it is not already open. Picmonkey will remember the last folder you used.
You can also do a search for your image; however, the easiest way to retrieve an image is to have it handy in a folder on your desktop.
Below is our image we’re going to edit in Picmonkey.
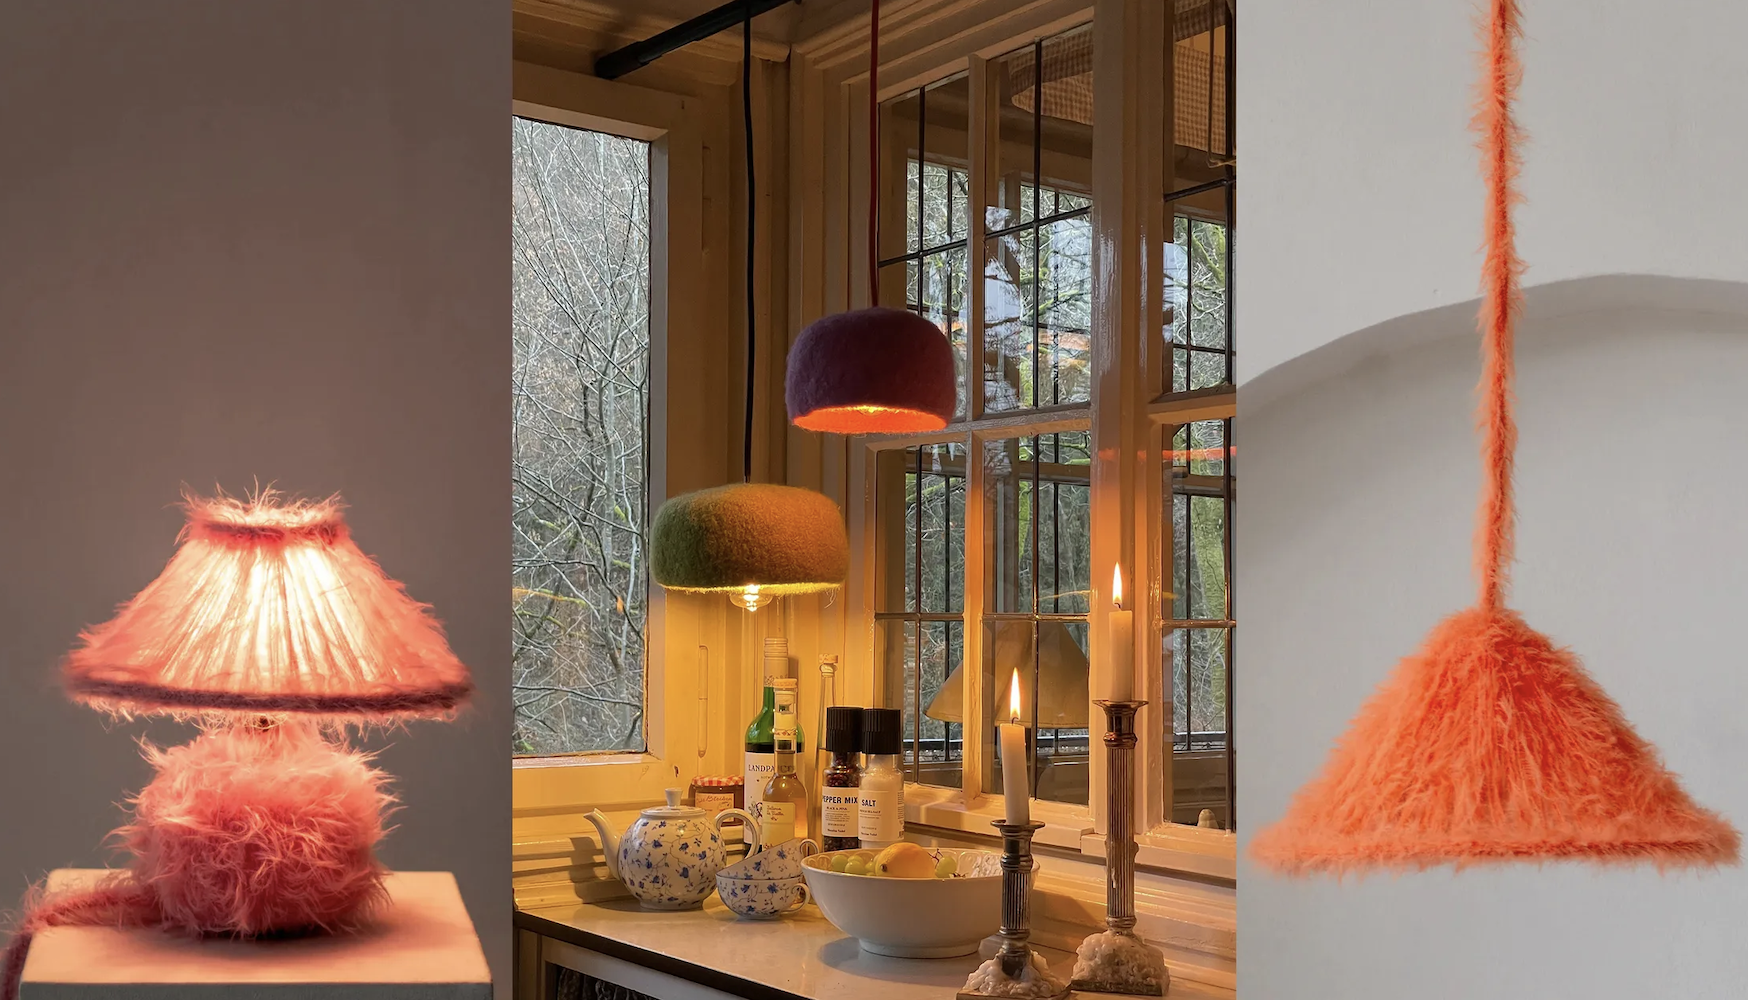
What on earth is that, Laurel? Is that some kind of fungus growing on the lamp?
These are “sweater lamps.”
Yes, they are a thing.
No, silly, not that “thing.” haha
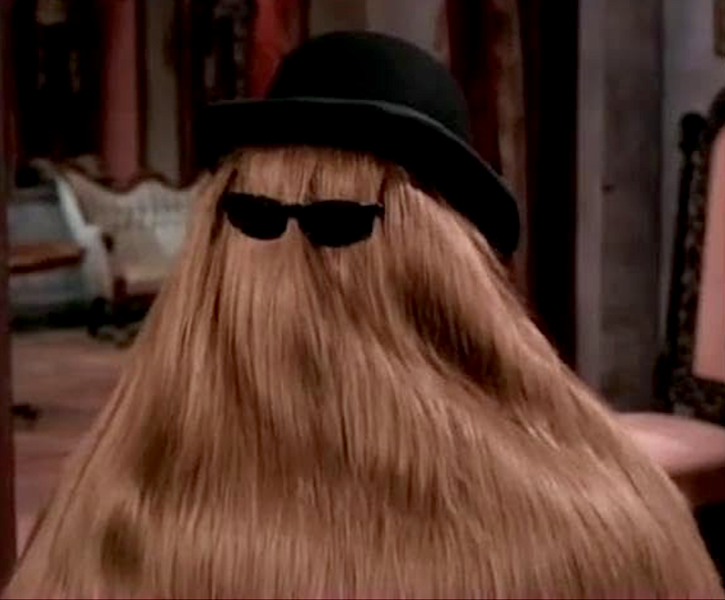
More like Cousin Itt having a bad hair day!
Oh, Laurel, how could you??? ;]
Hey, you said they look like a fungus! ;]
I found them on Architectural Digest— yesterday, before I began working on this post.
Nothing personal to whoever created these fuzzy-wuzzy lampshades, but, if their goal is to catch dust, they’re perfect! :/
Anyway, this image will serve as a good example to work with for our Picmonkey tutorial.
I want to add this image to the board and crop out the lamp. Then, we will remove the background behind the lamp.
Once added to the board (please scroll back up to see the instructions), click the image, which will put a blue frame around it. This is how you edit individual images.
All of my boards are made up of dozens, sometimes hundreds, of separate images!
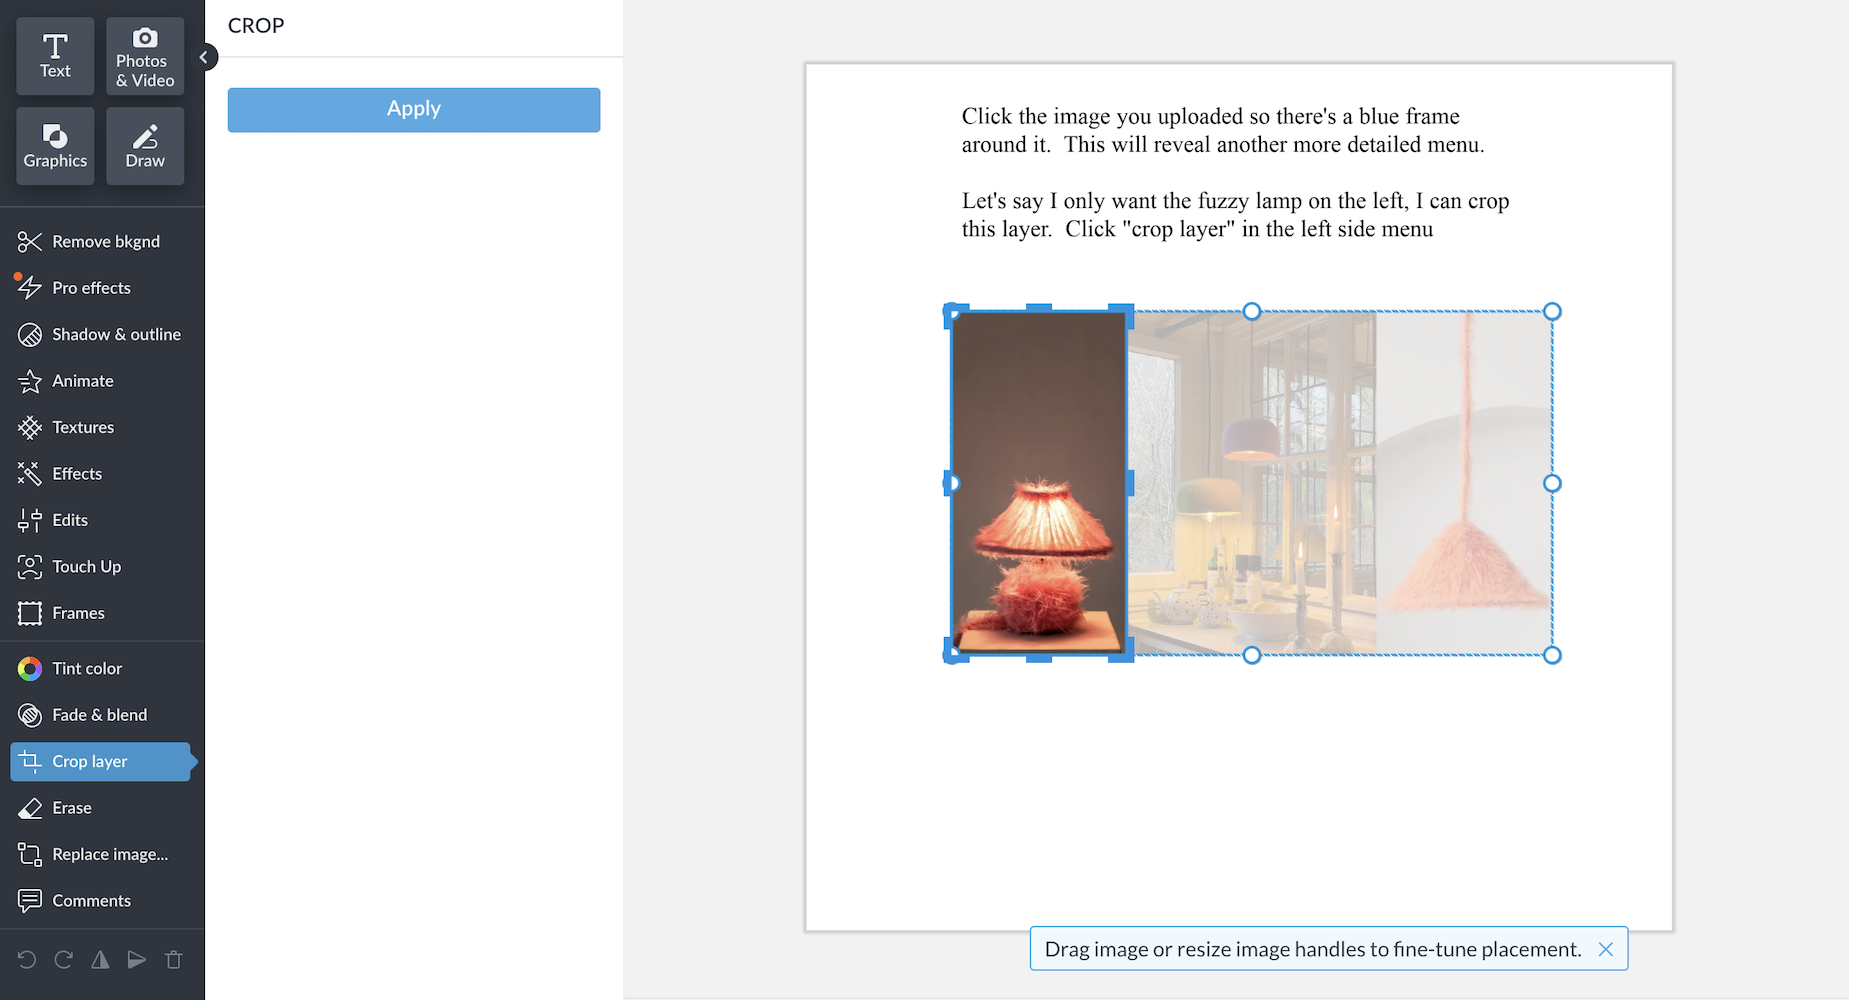
Now you will see another, more detailed menu on the left. With the blue frame, you can adjust the size by pulling from the corners with your mouse. You can also make it wider or taller by clicking on the sides, top, or bottom.
To crop out the lamp: (above)
Click the crop layer, and you’ll see some blue handles appear. Push those to crop as desired and click “apply” in the blue box.
To remove the background, click the scissor icon.
Let’s do that.
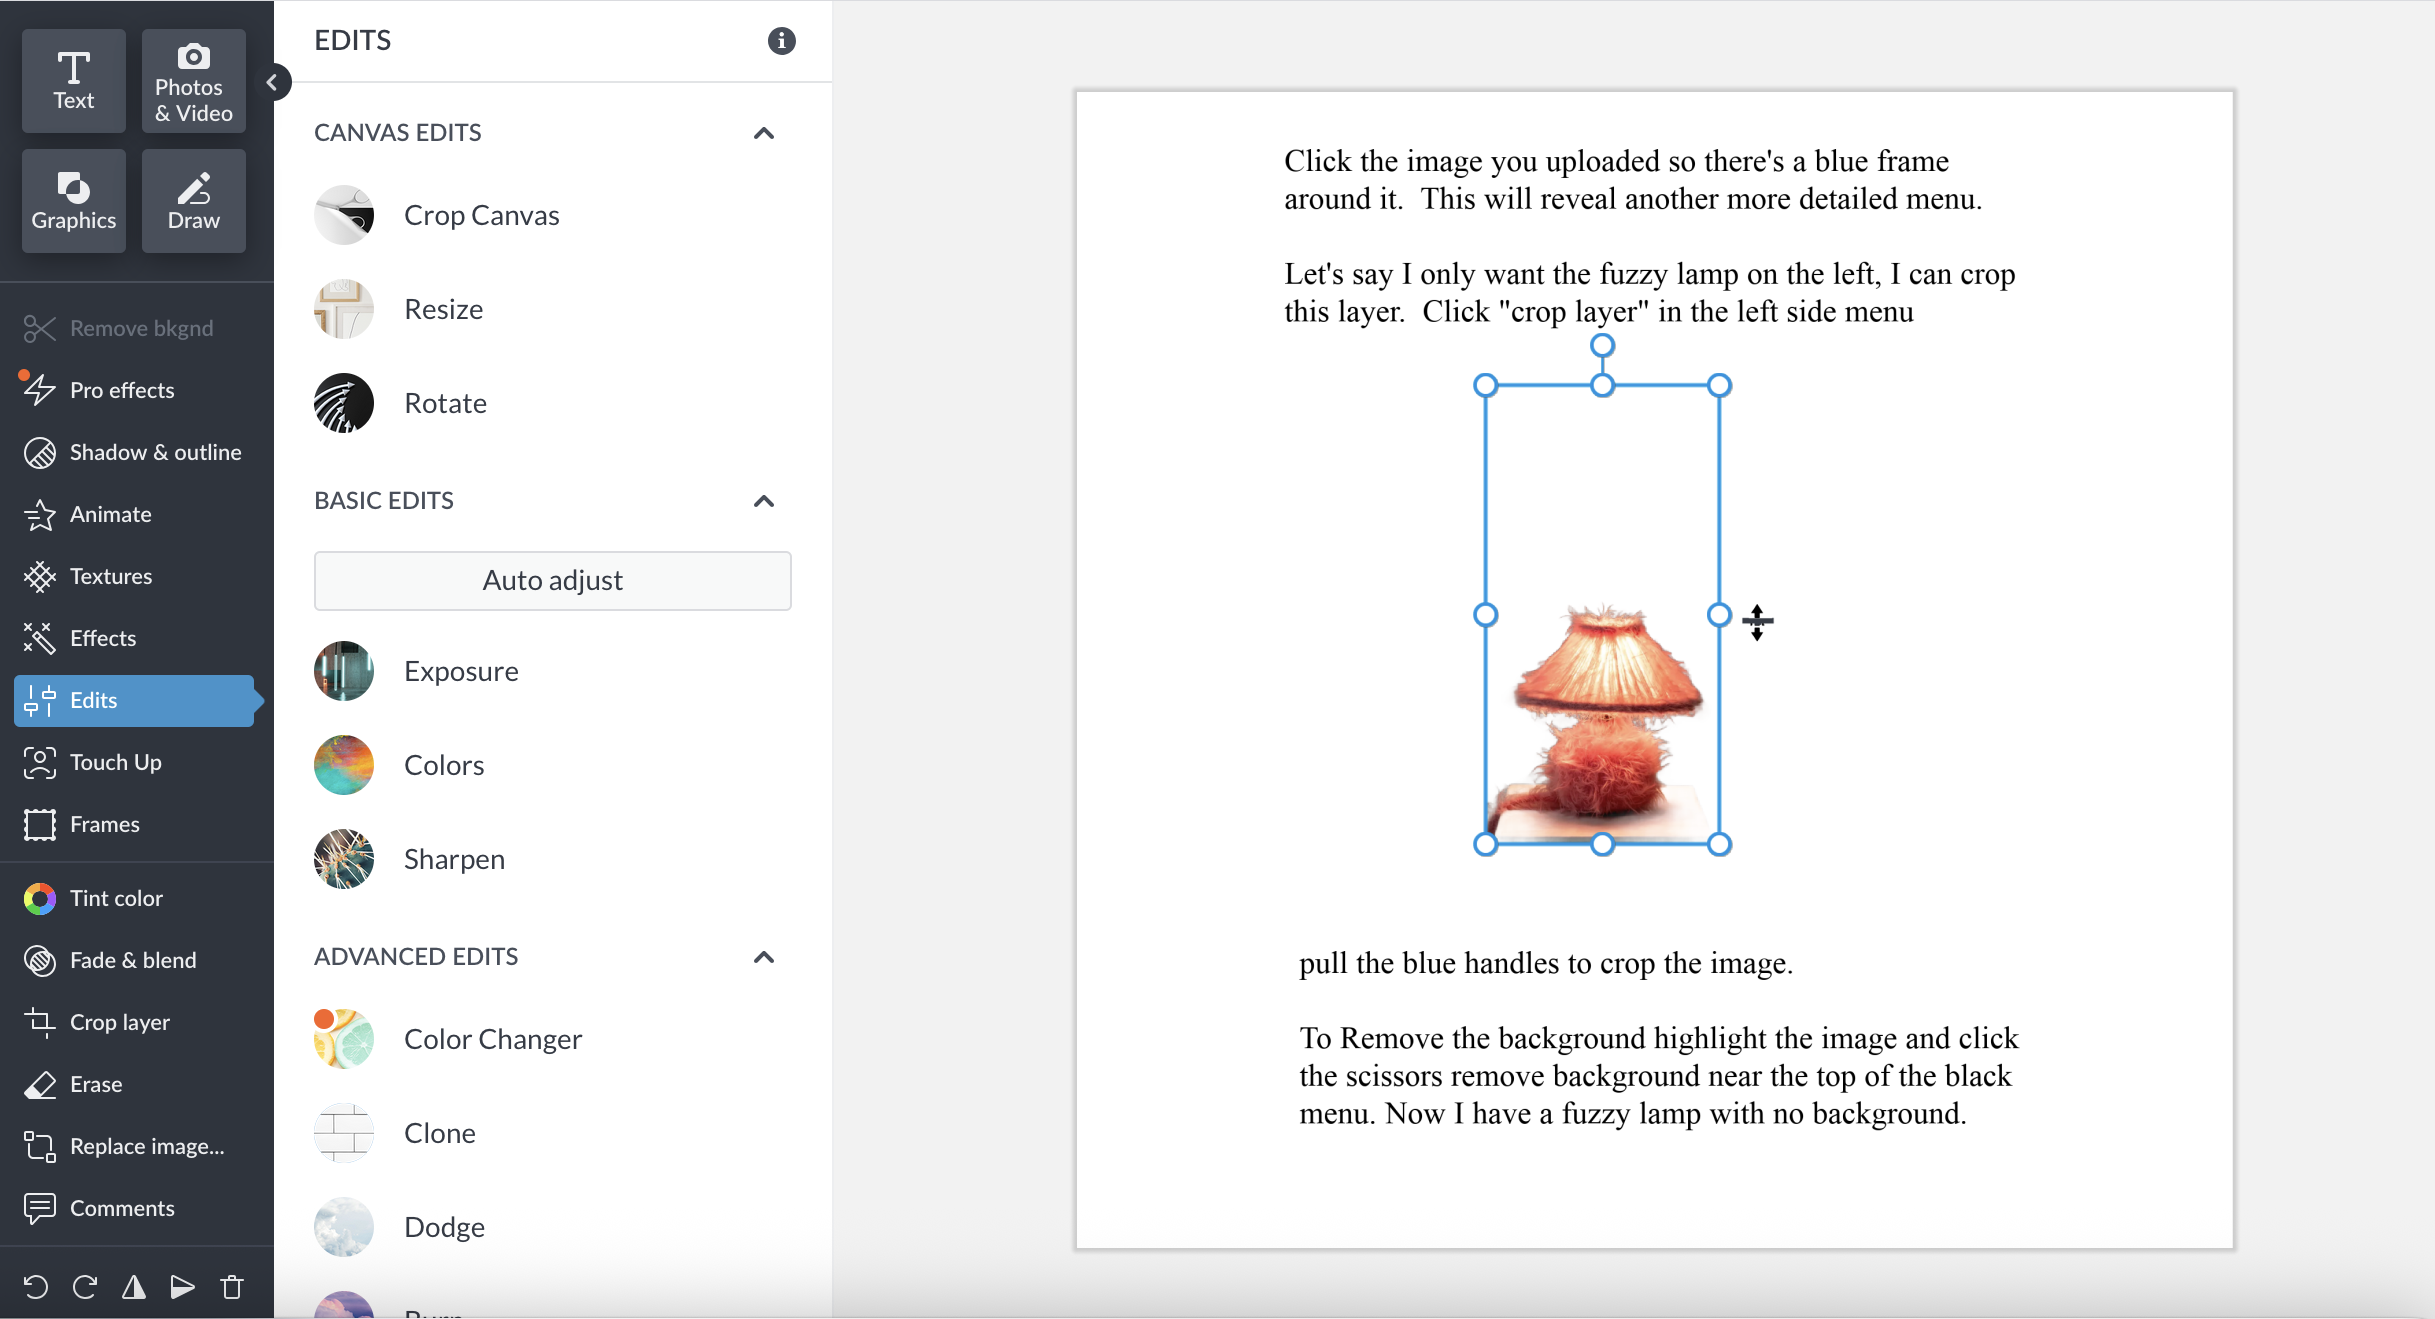
Use erase to erase the fungus fuzz.
Other tabs I use are:
- Touch Up
- Fade & Blend, and then on the right, exposure, colors, sharpen, and clone.
- I also use the graphics tab of inherent graphics on picmonkey called BASIC when you click on graphics.
Okay, I am going to stop here for now.
Please ask questions, and I will address them.
Those of you who have Picmonkey and are struggling, please tell me where you’re getting stuck. I find that sometimes when I’m learning something, I’ll hit a roadblock when one step is missing or isn’t sinking in.
Also, if you feel overwhelmed, I have experimented with doing a video, and I think the combination of written instructions with me slowly going through the motions in a video will be the most helpful. Keep telling yourself, “If Laurel can do this, I can do this.”
It’s true!
However, the best way to learn is to begin working with it.
xo,

*********************************************************
Part 2 Begins Here
Sunday, February 22, 2026
Hi Everyone,
I did it! I made y’all a video tutorial. It’s not as easy as I thought because in order not to make it drag on for an hour (or two), I had to have everything all ready to go and then practice a bit. The video is 14 minutes long, so not too bad.
I shared many of the techniques I use when creating my boards; however, not all of them.
If you like, I can also share two more types of boards. One is where I take a floor plan and make changes to it. You can also create a floor plan from scratch.
And then there are the mood boards I make that show a space with a bit of perspective, like the board below.
However, you can also arrange your elements on a board as most do. I like showing them as a room because it gives context to the furnishings.
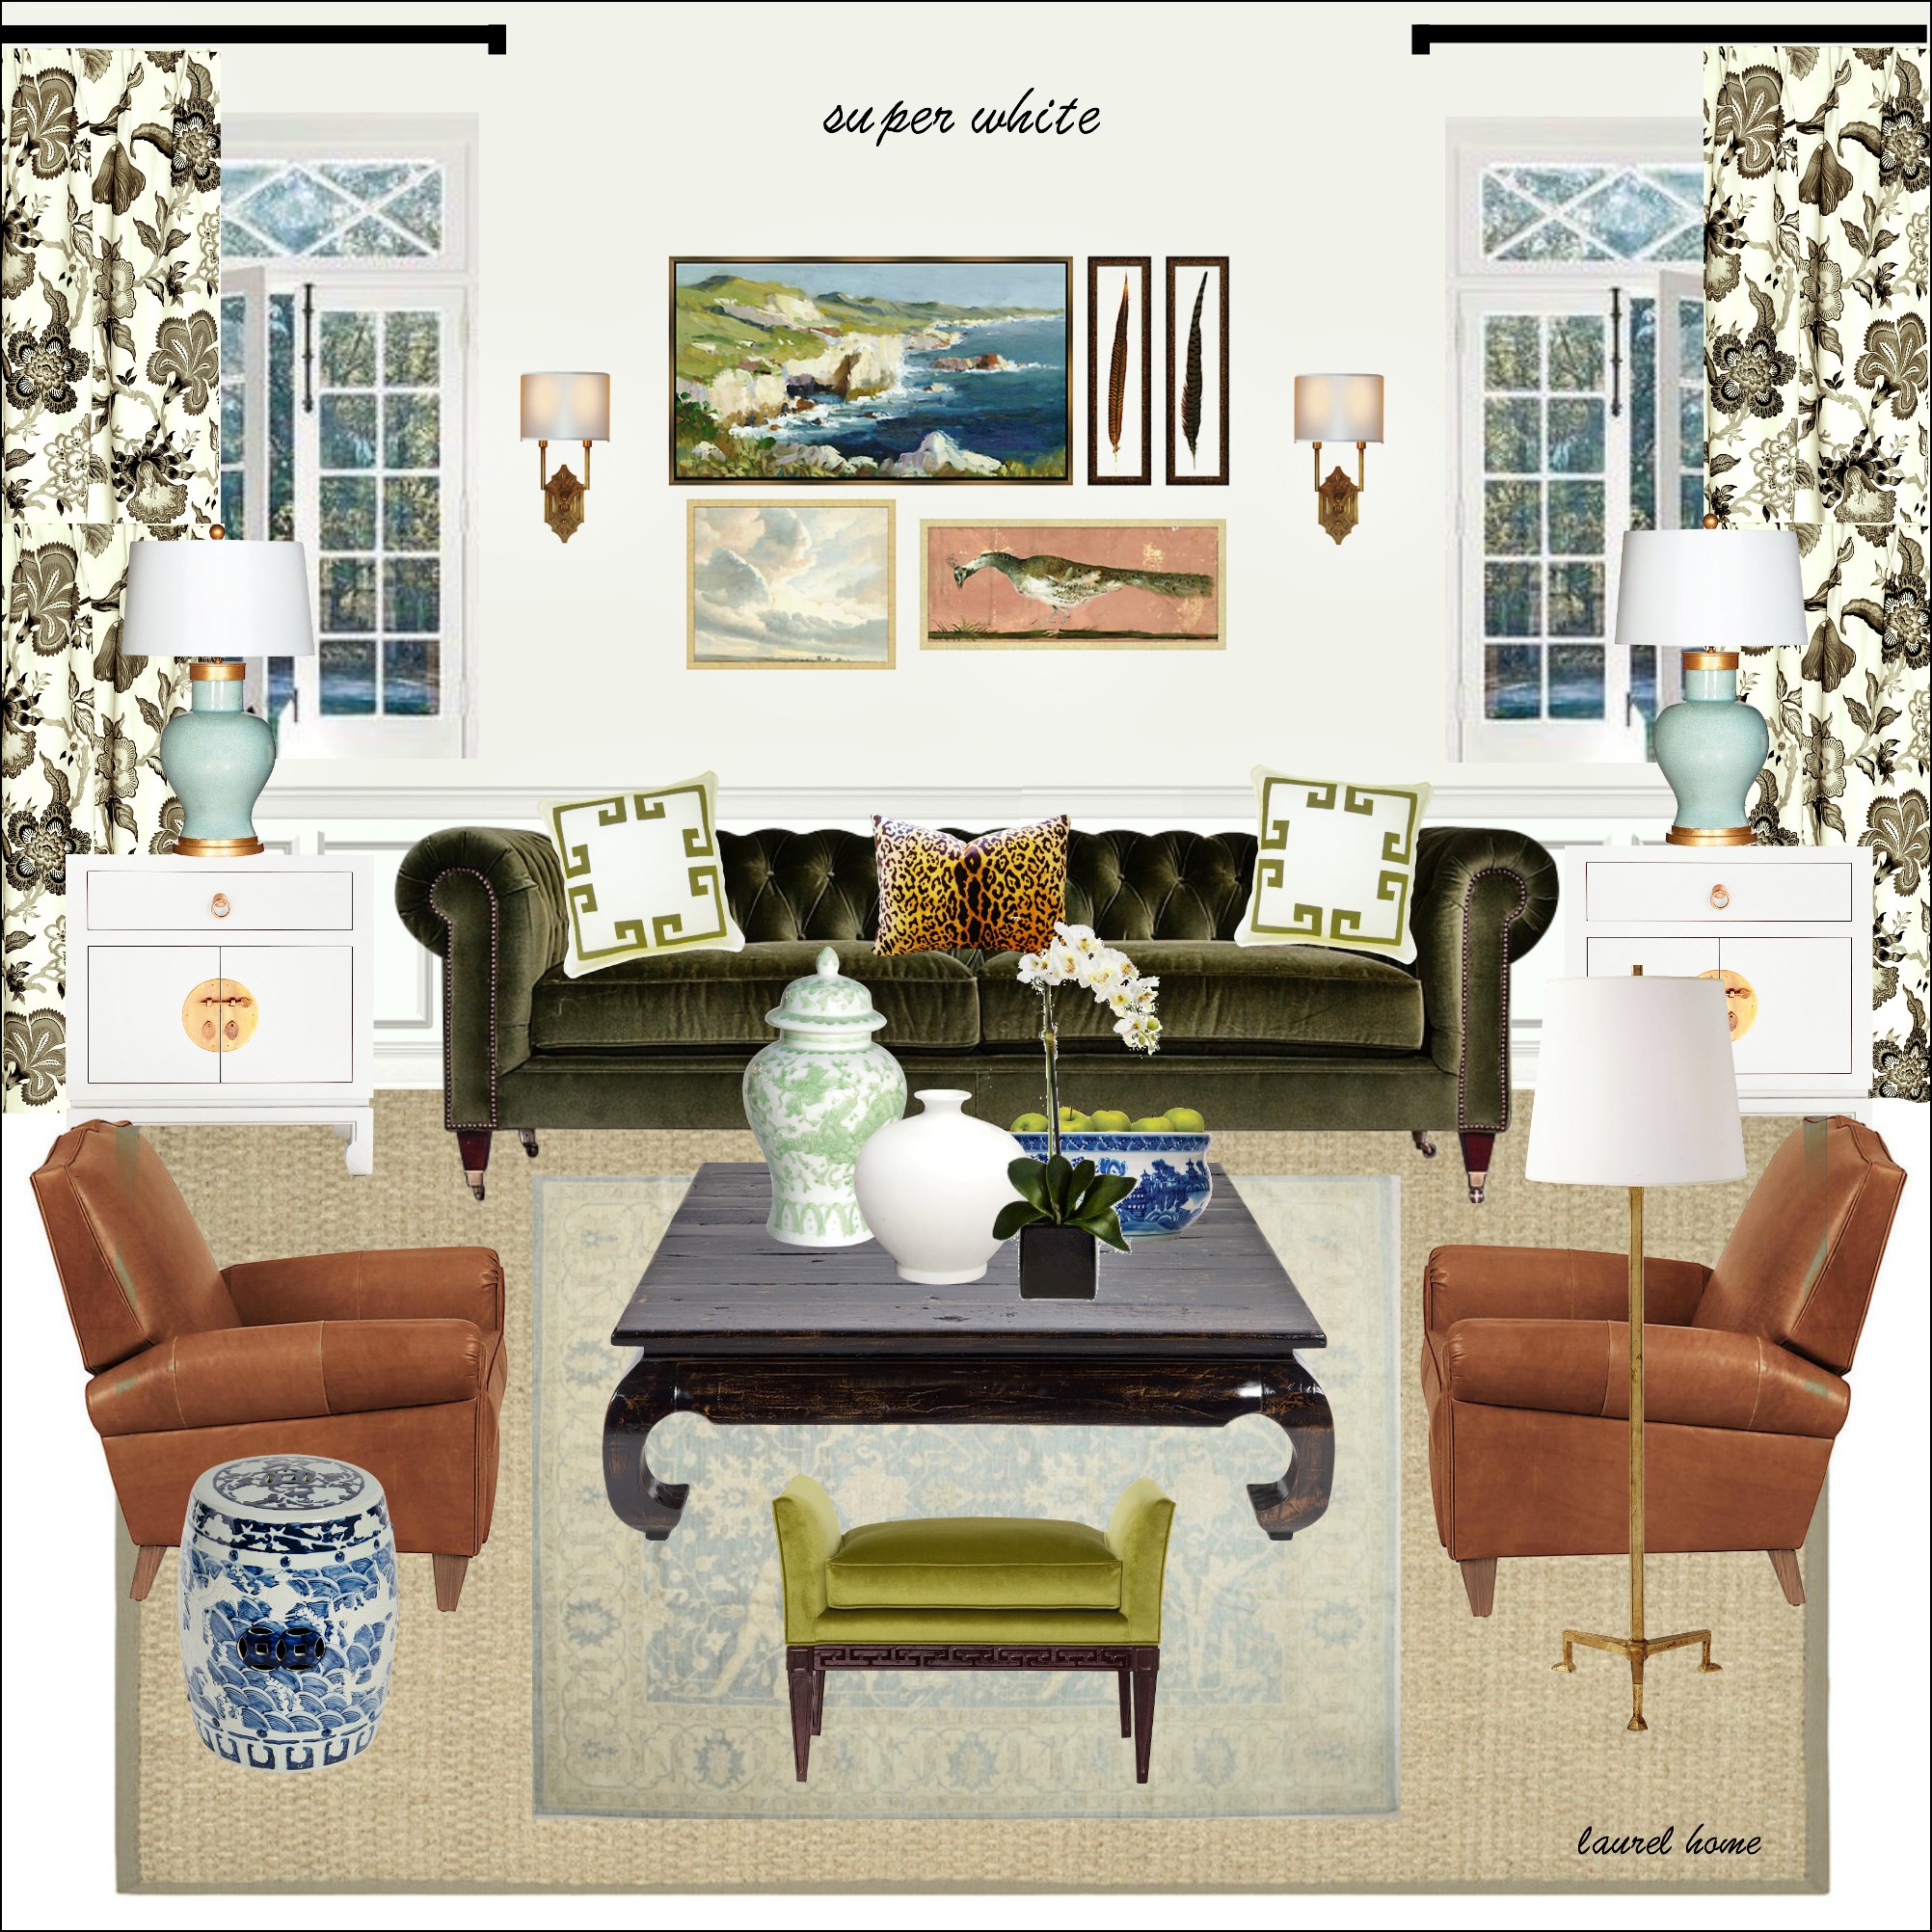
This was made about nine years ago. I can do a better job. Oh, I just noticed something. That is *my* garden stool that I have in my living room. I didn’t remember that I used the exact one.
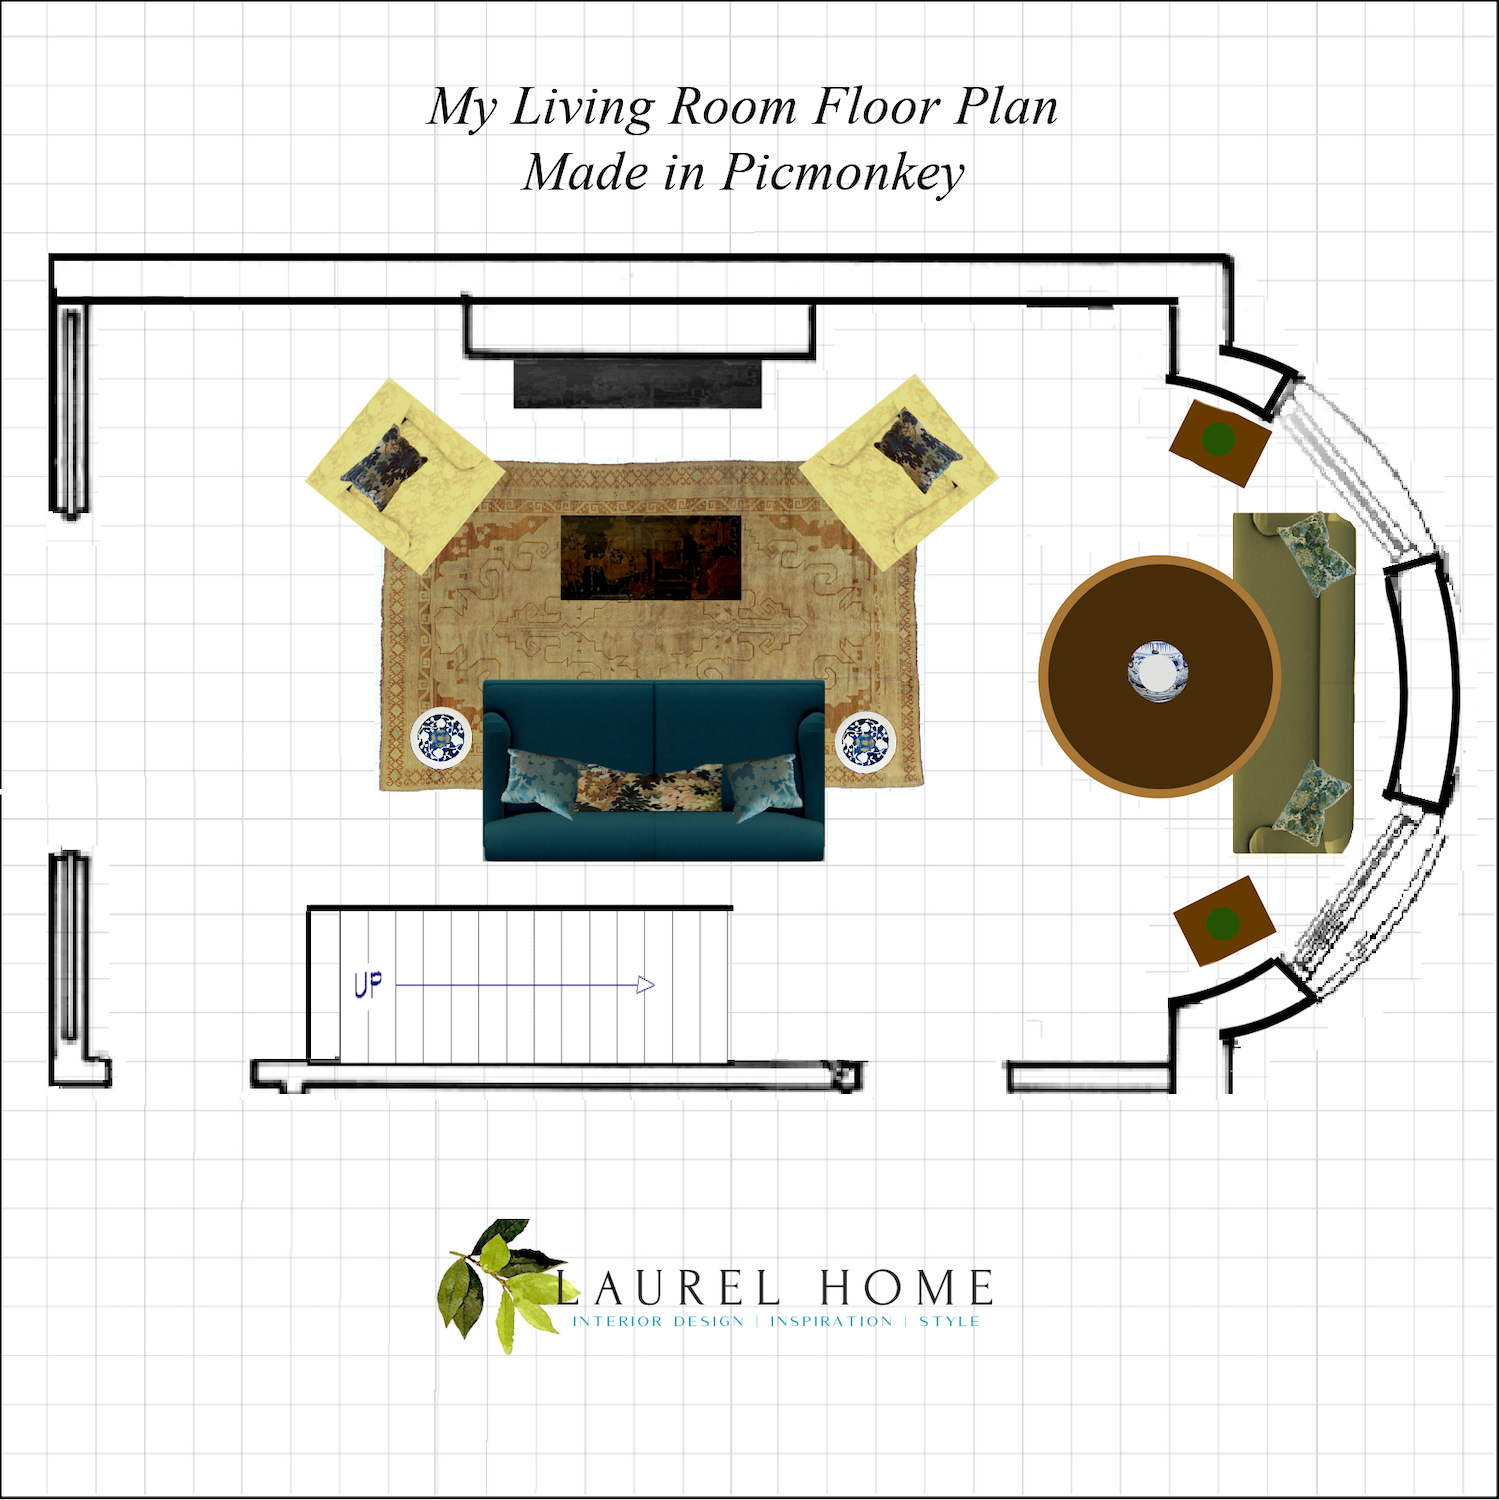
Okay, before I share the video, below are some fairly high-res images you can take screenshots of.
Below is the floor plan with the furnishings.
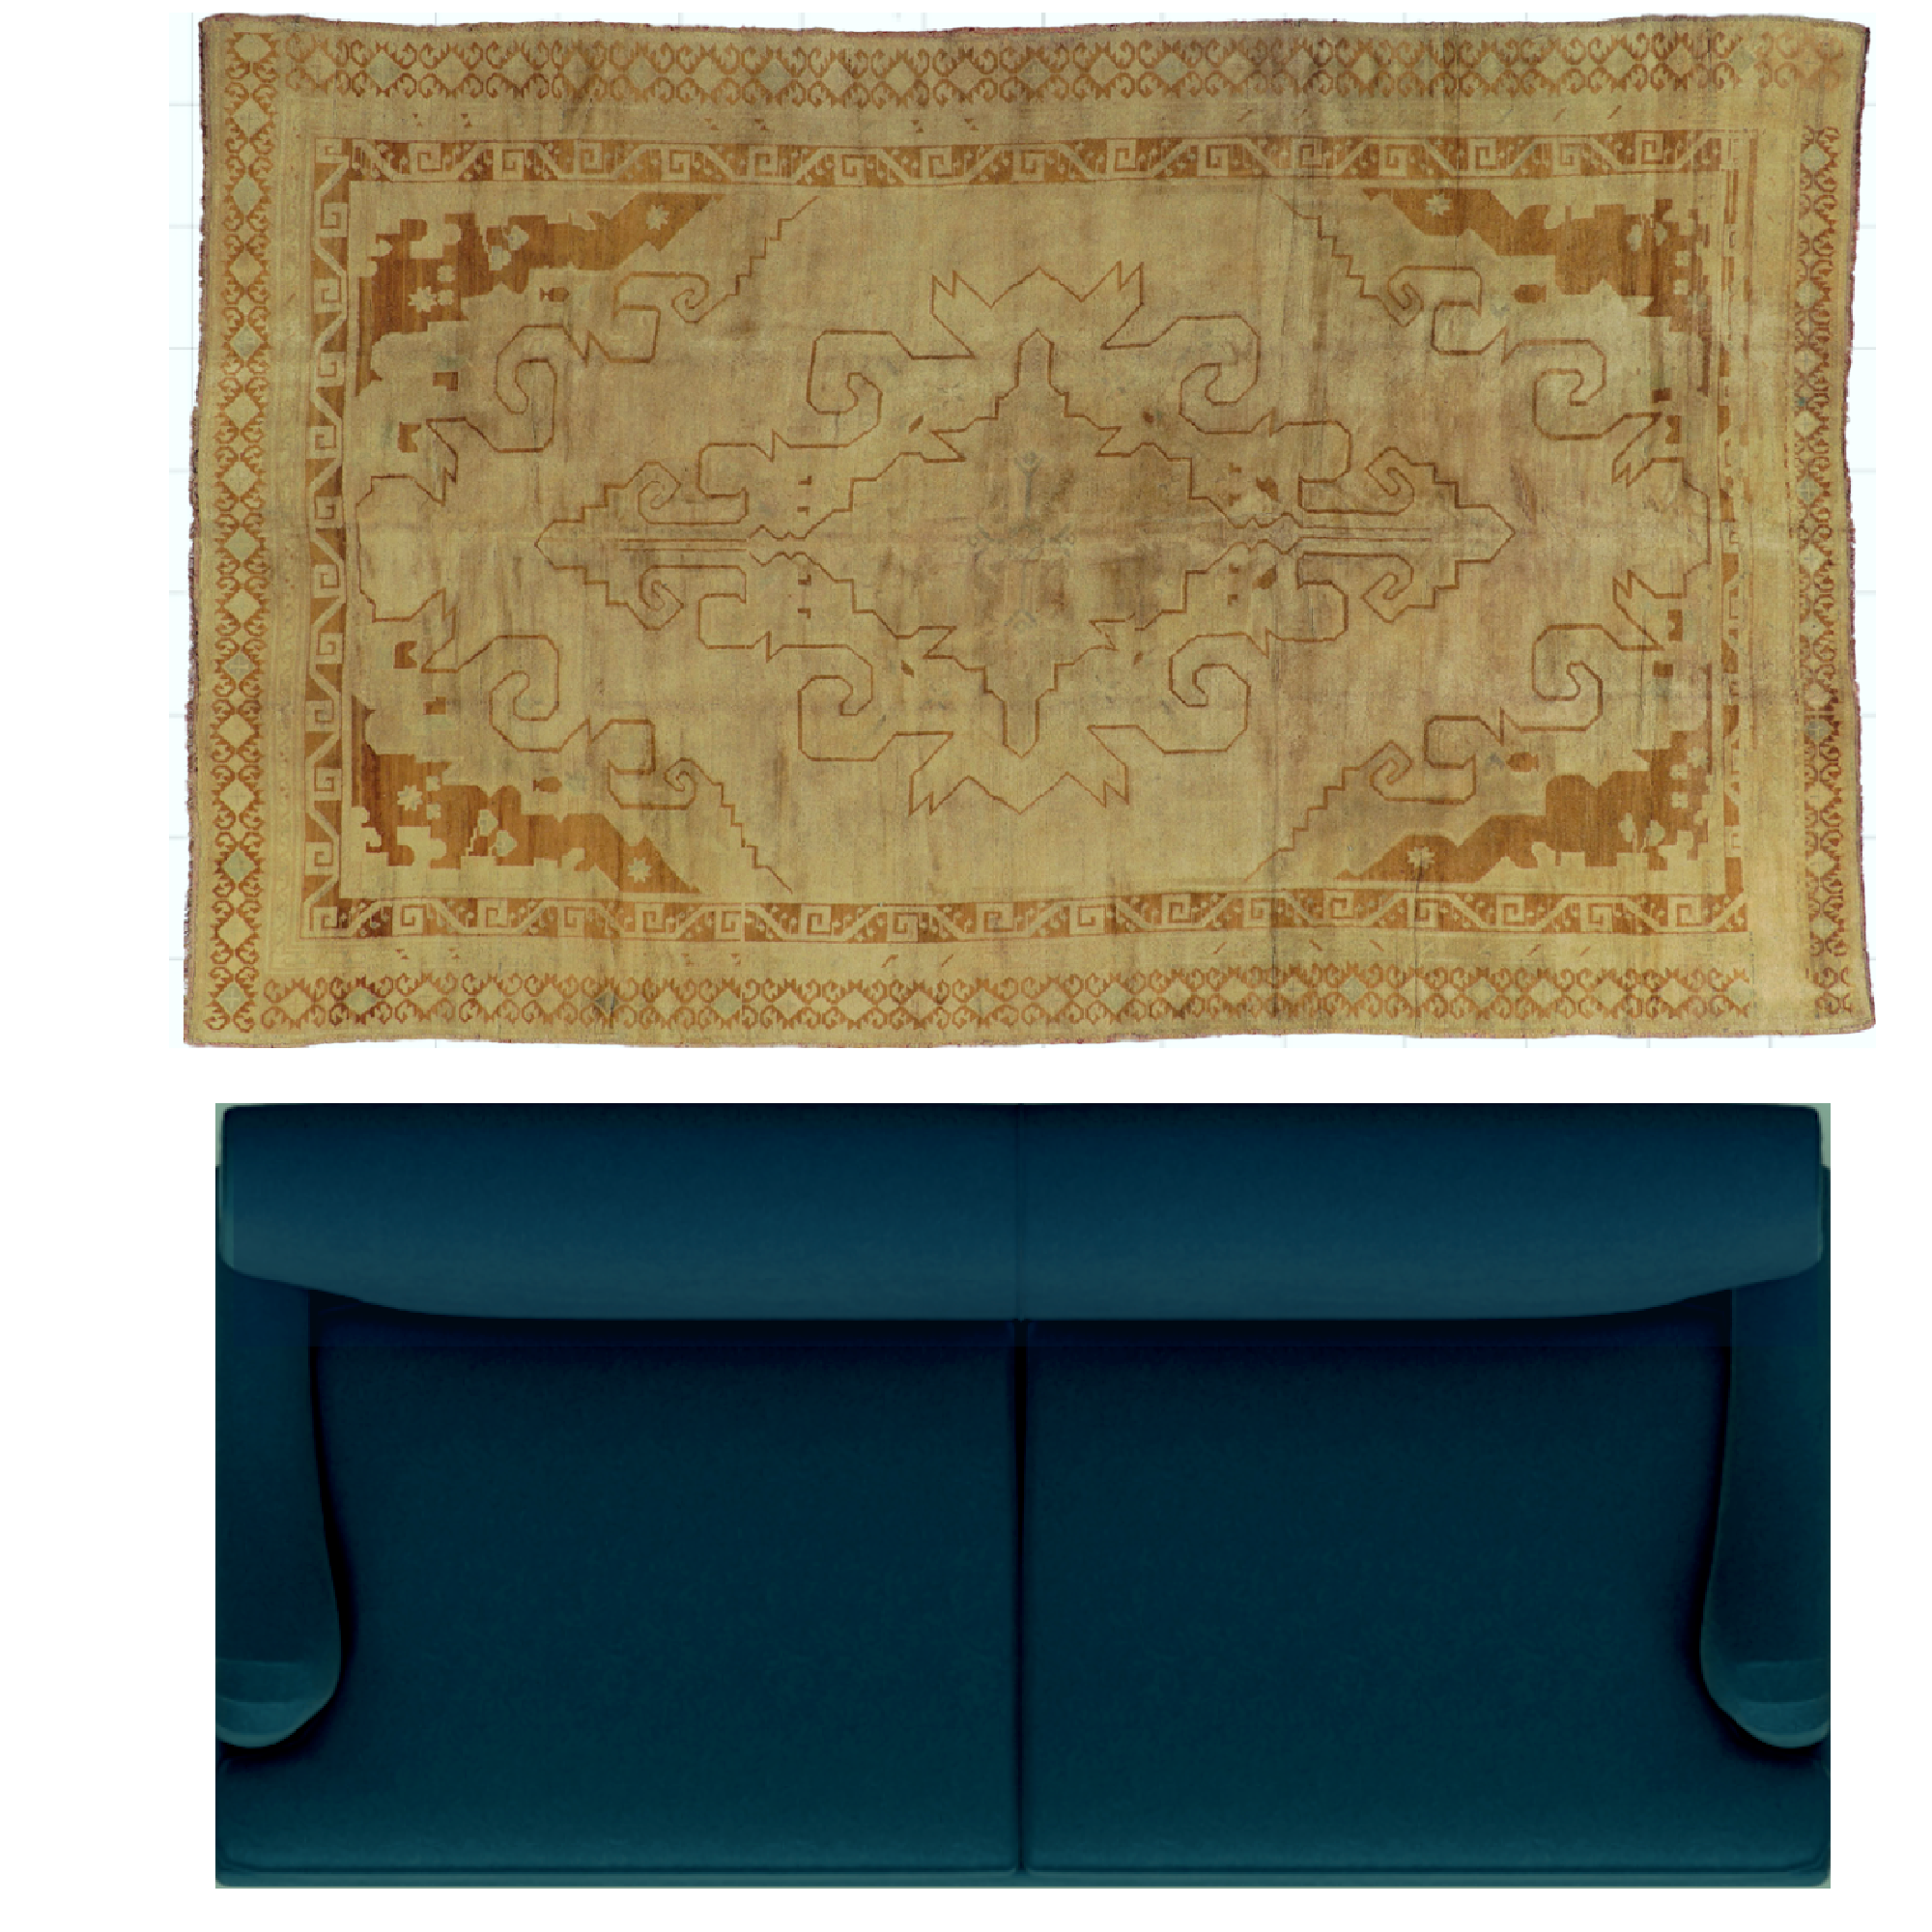
And below are the larger images you can right-click and save to your computer. To get each individual item off each board, you can make duplicates of each board and crop out each item individually.
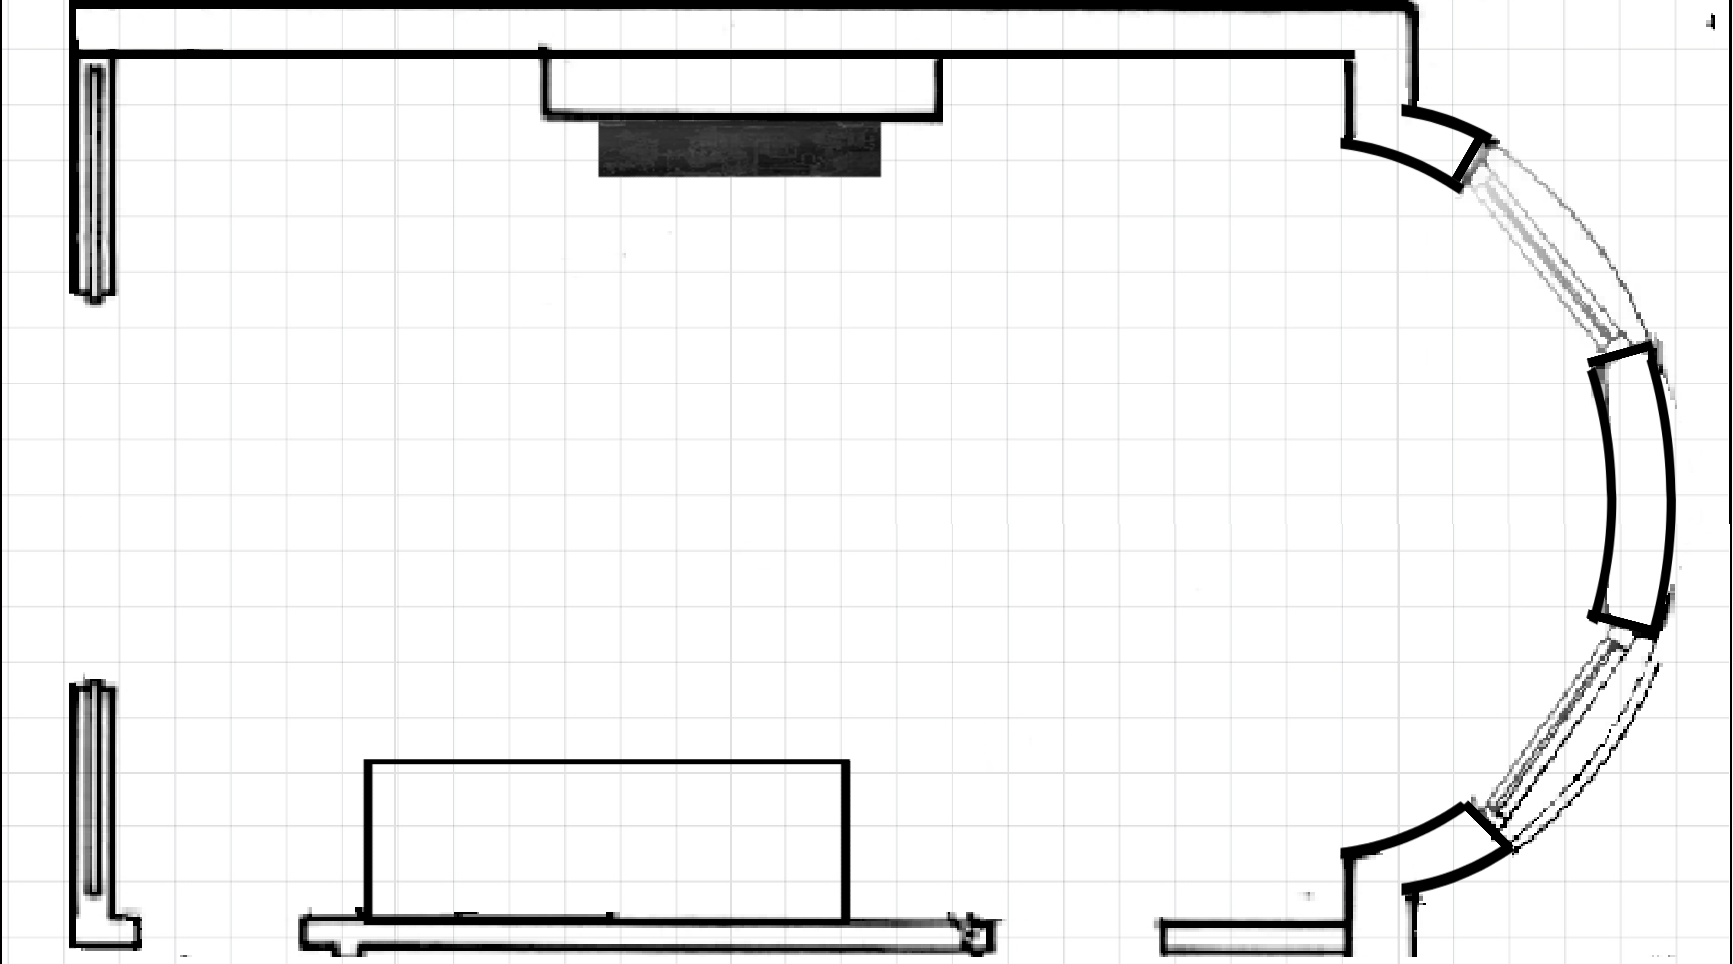
The beauty of using the graph paper is that one square always = one square foot, so it’s easy to scale the furnishings.
Please right-click to save each image. These were all added to boards on Picmonkey, instead of being uploaded separately.
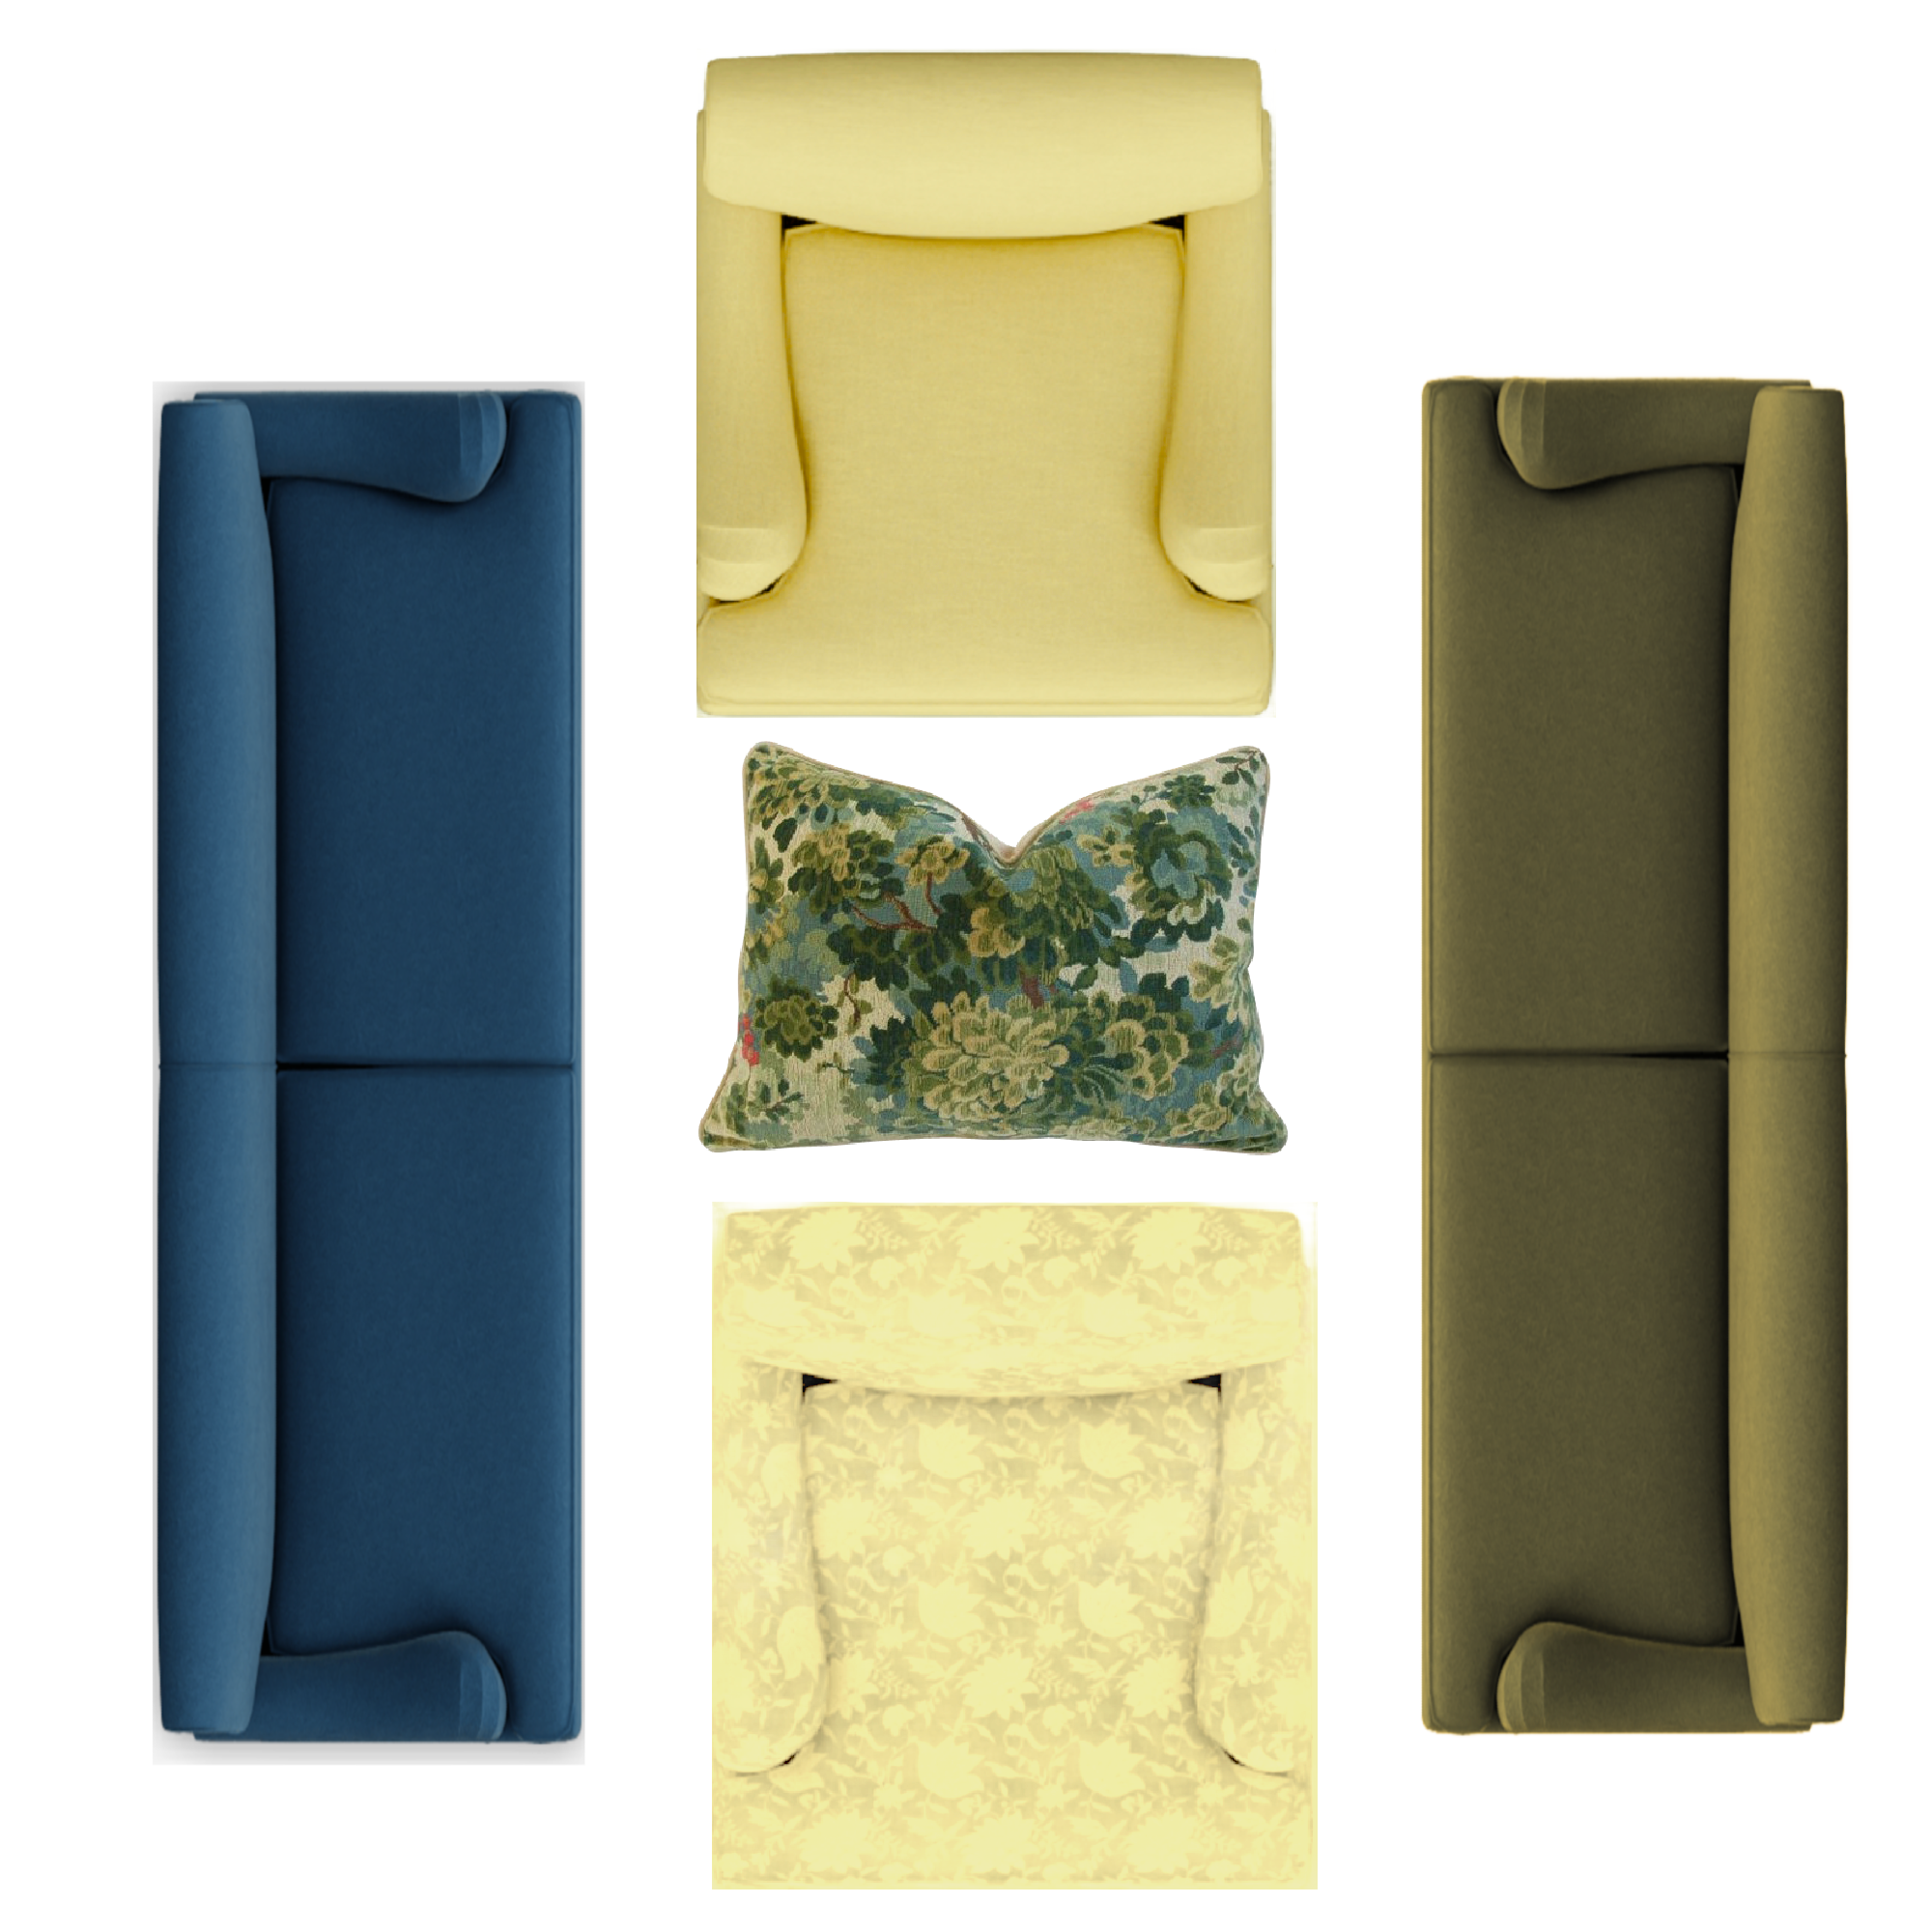
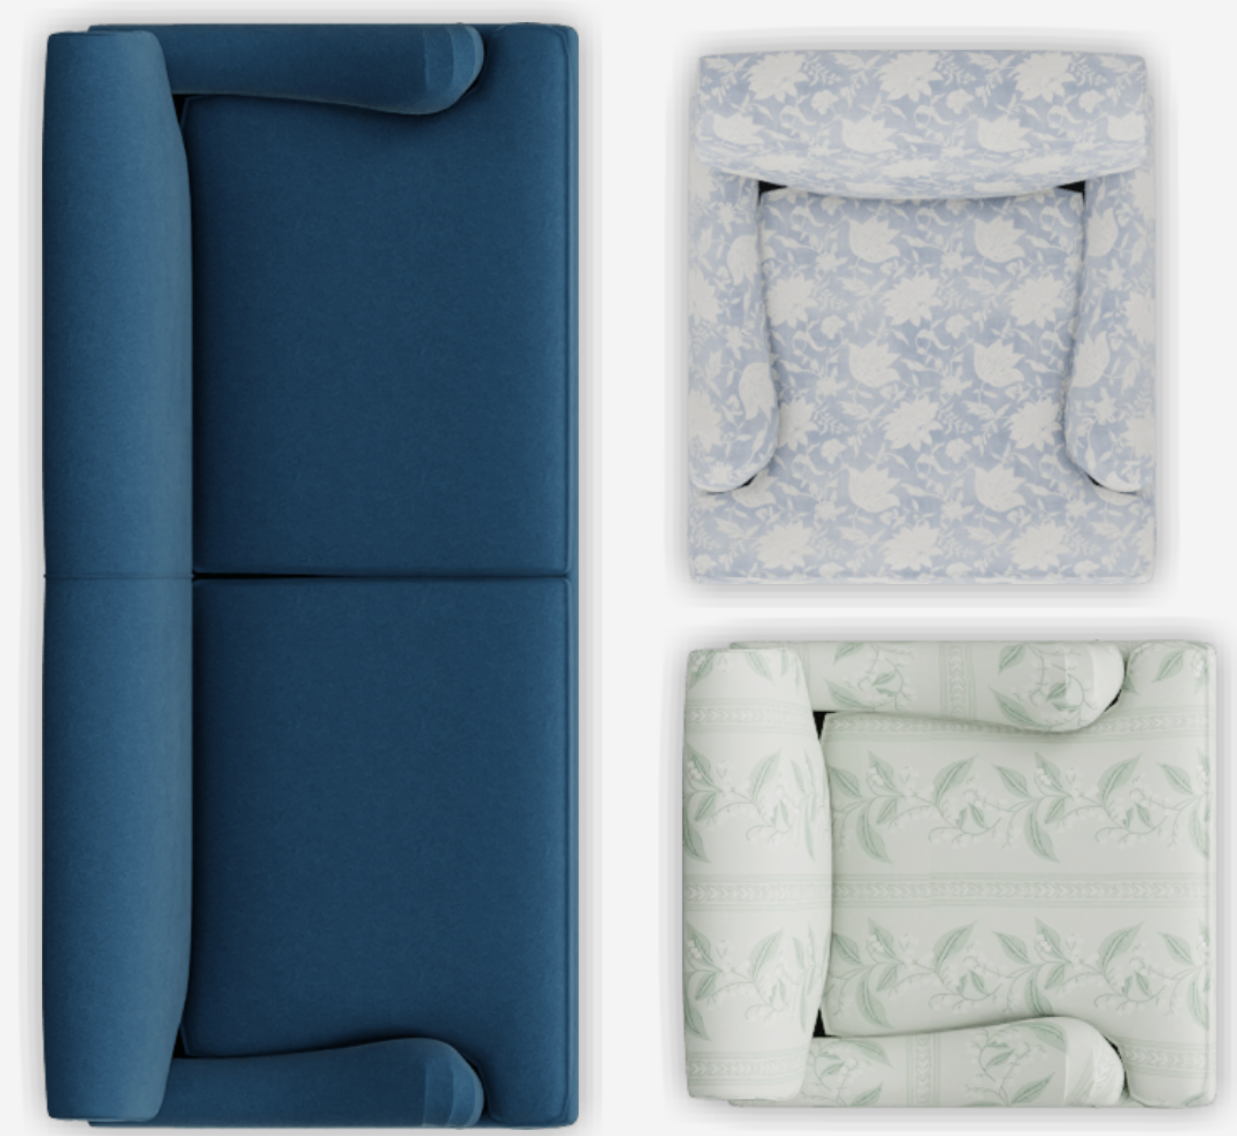
Next is a yellow chair plus other furnishings.

The pillows need some adjusting and correction under the exposure setting on the left sidebar.
Below, I changed the teal sofa into the olive green settee. It is seven feet long, like the sofa, but not nearly as deep.
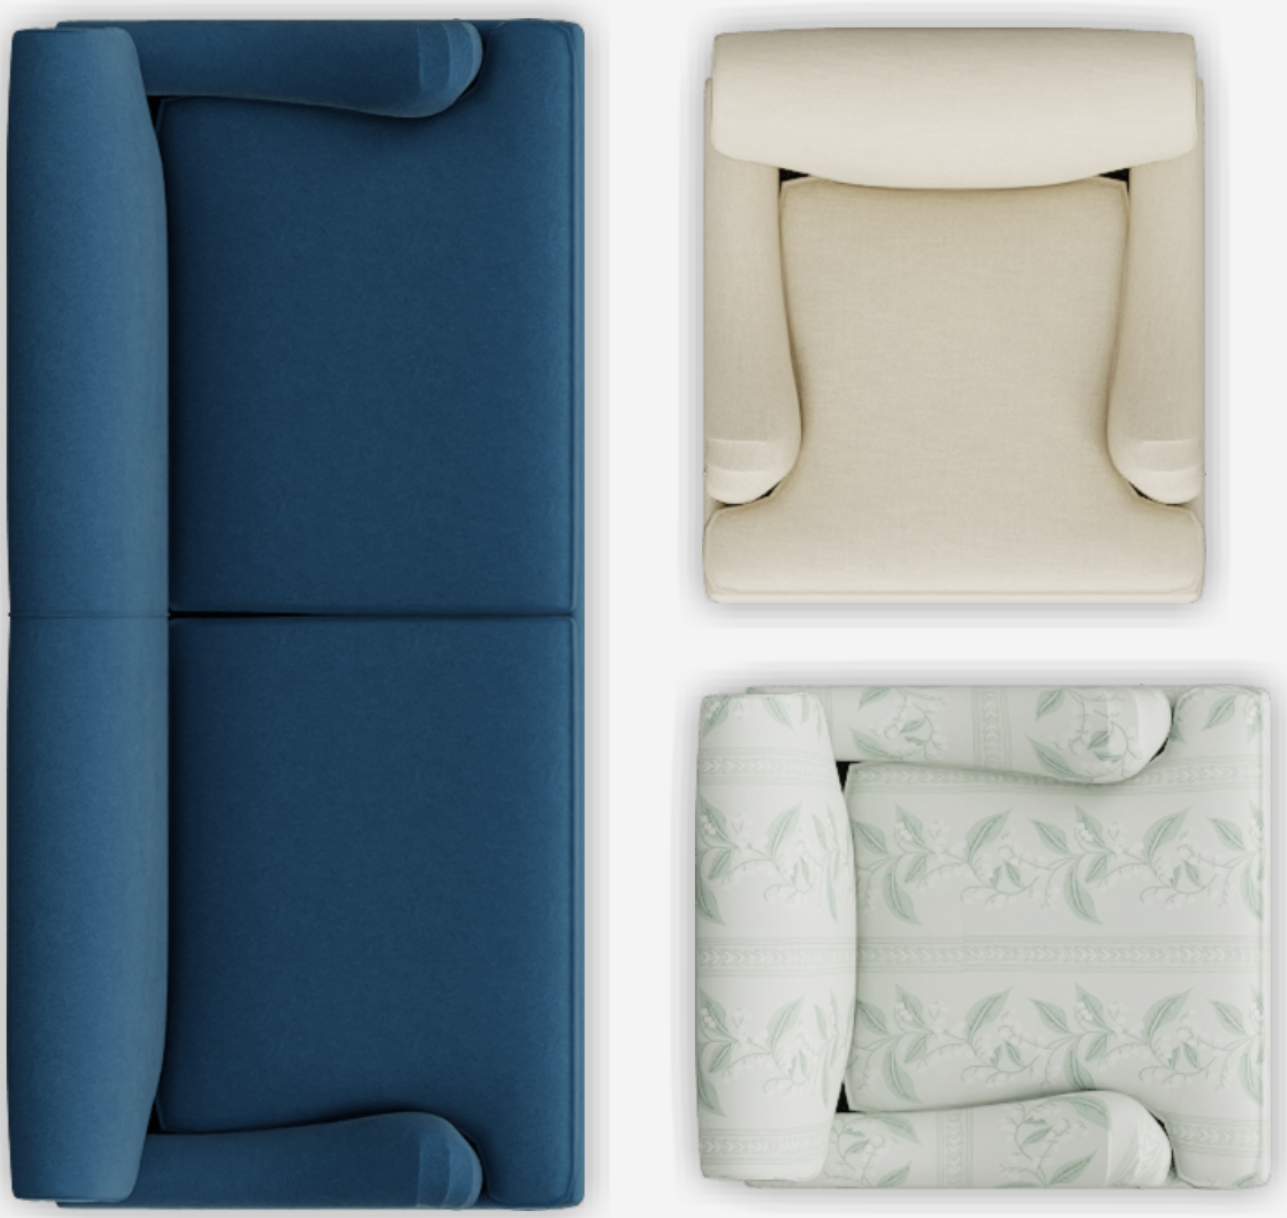
Below are some chairs if you’d like to practice changing colors on Picmonkey.
Below is the video sharing how I created the floor plan in Picmonkey.
I hope you have enjoyed this Picmonkey Tutorial!
Please let me know if anything isn’t clear. Also know that there’s usually more than one way to do things. I try to show only one or two ways at the most because I feel it helps cut down on the noise and confusion.
Ack! We’re bracing for another storm!
xo,
***Please check out the recently updated HOT SALES
***Also, if you’re doing some shopping on Amazon, please click this Amazon affiliate link or the graphic below.
Thank you so much!
I very much appreciate your help and support!
Related Posts
 The 15 Most Beautiful Blog Posts on Laurel Home
 The Ugly Truth Behind The Pretty Interiors On Houzz
 Come See The Gracie Panels For Real – Parts 1 & 2
 The 21 Funniest Laurel Home Blog Posts
 One Living Room Layout – Seven Different Ways!
 Her Bossy Home Builder Needs To Calm Down!
 How to Fix Dreary Decorating + A Mistake I Made!


42 Responses
Thank you for this post! Do you scale items (furniture, lighting, etc.) when you put them on your mood boards too? Understanding scale from how it looks on paper to how it looks IRL is tricky for me – ie. understanding when sourcing if I can use a 32″ mirror or should just focus on a 36″ mirror, etc.
Ooo, fun! Thank you for the tutorial! And I suspect that there is a “grid” setting somewhere in PicMonkey for the background, in answer to Beverly’s query. Or, screenshot a picture of graph paper and add to a board. I am excited to try this out – thank you for this, Laurel!! Hope you stay warm…it got cool here in Alabama last night, but the daffodils are blooming anyway!
Hi Gabrielle,
I just checked and they do, but I uploaded my graph paper image years ago. If you do a search under “search all graphics,” it comes up. I would use four of them on one square board so that the scale isn’t too big.
Thank you for this tutorial! I was able to follow along and recreate your living room alongside you. Thank you, thank you! Very excited to get to work on my own spaces now. One question I have is how did you create the graph paper sketch of your room that you started with? I can’t figure out how to start on my space without that as a starting point. I’ll keep trying things and know that you will eventually share that tip with us.
This was so clearly done and helpful. I would love to see a tutorial for mood boards! Thank you Laurel
Thank you for your generosity! I look forward to diving into your tutorial soon. So kind of you to take the time to share.
Hopefully Spring is around the corner…
I appreciate the time and effort you dedicated to this tutorial. I transitioned from an old PC using Power Point to a Mac and you taught me more in a half hour than in over 4 years dueling between the two. Thanks for the lesson! I will be anxious to learn more!
Laurel, you are the best! Thank you for all the effort you put forth to create this tutorial. I was just going to comment about the Command+Shift+4, but Kim beat me to it! I use that command several times a day. It will help eliminate a little of the process :]
Love this!
A time saving tip for getting pics of items — instead of taking a screenshot on a Mac (Command+Shift+3 simultaneously) and then cropping to get a picture of the item you want, press Command+Shift+4 simultaneously. You will see a small cross-hatch cursor. Use the track pad or mouse to drag the corners to select just the item you want to copy. The picture will be saved on your Desktop with the name Screenshot yyyy-mm-dd at 12.05.39 PM. No cropping needed. You can then move it to your desired folder.
Hi Laurel,
This is a great tutorial – thank you so much. I’m trying it now with the free version and like it lots.
Can you change the color on a piece of furniture? I can get a photo of something I like, but the fabric is not the color I want. Is there some way to do that? Maybe on the paid version??
It certainly wasn’t a complaint or a criticism on my part, I just didn’t want you to miss out on anything you’ve worked so hard to get (like, authorship credit, or website traffic). It was SUCH a long and detailed post that I imagined you were simply glad to get to the end of it and, perhaps, too pooped to remember the more mundane housekeeping details. Anyway, clearly you’ve got it all in hand. I hope you got some sleep!
Hi Michelle,
No, I didn’t read it as a complaint, whatsoever! Most posts do take longer than anticipated. You’d think after seven years, I’d have a better idea. But, usually, that is not the case.
Design Files is WAY better than Olioboard, but you already got that boyfriend trained 😉
haha – but, good to know. It never hurts to have a backup. ;]
Hi Laurel! I was googling BM Spanish White and your blog was one of the search results that stood out….so glad I stumbled across it!! I am getting ready to remodel/repair my 1931 home and my contractor is begging me for exterior paint colors. I thought I wanted BM spanish white with a grayish brown door/accents similar to the Gerald Bland photo you shared on your blog in February. If you had to guess what colors those are….would you….could you? They are as close to what I have envisioned on my old stucco home but unable to figure out the exact colors. Thank you so much for your time. I’ve printed out your “stop freaking out over your paint colors”…but I’m still freaking out a bit. 🙂
My brain is caught in a bike chain. Sorry.
As much as I like & use PicMonkey, I’m actually surprised that you don’t use Design Files (formerly Olioboard). There is a fee for unlimited “projects” for designers, but you get one free project which means you can create unlimited rooms/boards for that project. The web clipper is awesome. Just “clip” the sofa, drapes, pillow, whatever and it stores it for you in your project, ready to use and usually with the background already removed. I could go on and on about it, but if you find 2 minutes of fun time, check it out.
Hi Sue,
I used Olioboard about 8 years ago. While I liked it, I didn’t love it. My biggest issue was that I couldn’t control the resolution and could only make the images a certain size which wasn’t big enough. And, I also couldn’t always make the images as sharp as I like them to be. In addition, PicMonkey is one-stop shopping for all graphics except for advanced photo editing where there is lens and perspective distortion. For that, I use Gimp which is a free program, that’s not super easy to use, but there are tutorials on youtube.
However, Design Files might be an improvement over Olioboard. But, I’m the faithful sort. When I find a boyfriend I love, I see no reason to go and seek out a different boyfriend. ;]
Hi Laurel,
Great tutorial! I used to use PicMonkey all the time and I need to revisit the site again to see what changes have been made.
If you want a super easy method of removing backgrounds, try http://www.remove.bg. I don’t know how they wrote the code for it, but it really does know what the background is and what you want to keep in about 5 seconds! Check it out…I think you’ll like it.
Nancy
Hi Nancy,
Thanks so much Nancy. I checked it out and it’s pretty good. But, unless you’re doing bulk, it could be more expensive than Saarika! And, I found that I still needed to make adjustments which took a few minutes. In addition, the time savings is worth it to have that delegated to someone else since I needed at least a couple hundred images with their backgrounds removed. But, if one is in a pinch and can’t wait, it’s pretty good.
Love the drapes
Thanks so much Nancy! That’s Schumacher’s Hot House Flowers in the dusk colorway.
Wonderful tutorial!!!!
Thank you Ramona!
Hello Laurel, I once tried Picmonkey, but got frustrated with it and learned how to do the same things in Paint.net, a free program. There was perhaps a bit more of a learning curve, but it still is pretty intuitive.
By the way, I took your advice and looked up Victoria Hagan. You are right, she is very talented, but her work could never be confused with Loi’s. Hers is more modern, and has more pops and blocks of bright color. Victoria’s interiors seem to go more for an entire look, while in Loi’s each piece stands out more and makes an individual contribution. Or so it seems to me.
–Jim
Hi Jim,
Yes, Loi and Victoria are different. But, not all of her rooms have bright color. I’ve featured her beautiful work on here a number of times. This is a link to all of the posts.
THANK YOU SO MUCH LAUREL. Oh wow, I have wanted to know how to do this for so long and so this is super helpful! Thanks for sharing your skills and wisdom so freely.
Did you know that I’ve gotten so used to reading your blog regularly that sometimes I think, hmmm, I haven’t heard from Laurel lately! Like we are old friends. Keep it up!
xoxox (because we’re friends- haha!)
Thank you so much Noni!
Good morning Laurel!
Thank you!
Though I know how to use photoshop, I sometimes want to make quick boards or collage images and this is s great tool. I will be testing the app right now on my phone for using it on the go, ha ha.
Have you used it ?
Have a great week,
Carolina
Hi CV,
I’ve not used the mobile app. I do everything on my 13″ macbook pro. If you can imagine, five of the keys have their letters worn off. haha! which ones? The E, M, N, L and ,
Oh my! This is wonderful! It takes so much effort to delineate each step to take in an app and this is so clear. Can’t wait to start designing rooms. Of course, a lot of research is required to find my favorite items first! Thank you!!
Hi Elle,
Yes! And design. Those boards in the paint palette guide took 4-ever! Well, each one from concept to finish was 10-15 hours of work.
Wonderful idea! Thanks for sharing your wisdom and your expertise. Now I’m wondering if it’s possible to upload an image of an existing room as a (temporary?) background and overlay images on it. I’ve learned so much from your mood boards – now I’m excited to try to create one on my own. 😬
Hi Clark,
That is a great idea. And, then, like a magic trick, you delete the original image and there it is!
Haha Yep, PicMonkey tutorial is here. Laurel, thank you sooooo much!!! I’m the happiest!!! Thank you, thank you, thank you. Super helpful and clear explanation
Hi Val,
Glad that it’s understandable and that you’re enjoying it!
I’m not a designer, and I’ll probably never make a mood board, but I am most definitely a fan of PicMonkey. I have done every bit of photo editing and logo work, and almost all of my graphic design work for my small business using it.
Thanks so much Mel! I use it for everything, as well.
This, as always, is a Master Class. You SO graciously and SO generously–and always SO ACCESSIBLY– offer us master classes in so many differing domains. And always with such encouragement that “if you can do it, we can do it,” which is such a lovely sentiment, even if sometimes overly optimistic! Anyway, any of these images is Pinnable, of course, but you usually create a specific image that includes the title of your blog article for posting to Pinterest boards… Perhaps I missed it? Your name/your brand must not be lost to a generic marker when your efforts are so generous and your content so rich!
Hi Michelle,
Thank you so much for your kind words! Something has to give sometimes. I’ll make it in a little while. Needed a few hours of sleep.
This was fantastic. Thank you!
Thanks so much Louise.