
Hi Everyone,
This post definitely needed a part 2 because many of you don’t seem to understand that the wide frame surrounding the window is not part of the window casing. And then there are some technical misconceptions. As usual with two part posts, please start from the top of the page for greater understanding. If you like reading in reverse or have already read part 1, then please click the link below which will then take you to part 2.
Part 2 Begins Here
Hi Everyone,
Today, we are continuing the topic of the den, living room windows, and the Roman shades I’m planning.
I have spoken at length to Dianne Lee, owner of By Harrington, a custom workroom specializing in Roman Shades. However, she also makes curtains. Luckily, I specified dozens of Roman shades during the 20 years I helped clients.
However, my living room windows, while spectacularly tall, have several issues.
One is that they’re too tall for Roman shades, from a technical standpoint. That’s a lot of fabric to have fold up. Dianne agrees it will be better not to have them come down all the way. I will most likely never lower them more than halfway down the window if that much.
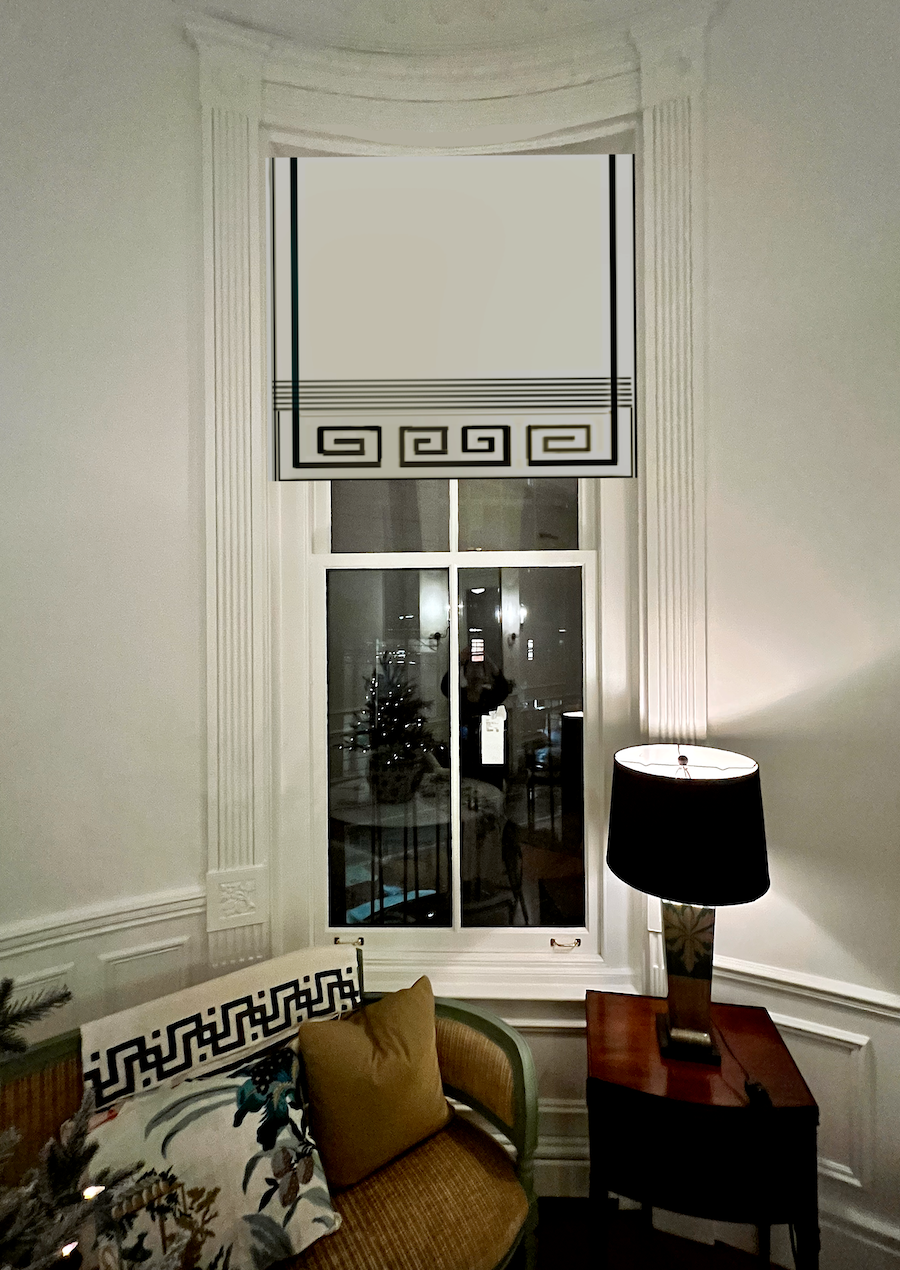
Therefore, I made a schematic that shows the shade when it is fully down. (below)
I indicated where the rings are, but you won’t see them unless the fabric is sheer or semi-sheer.
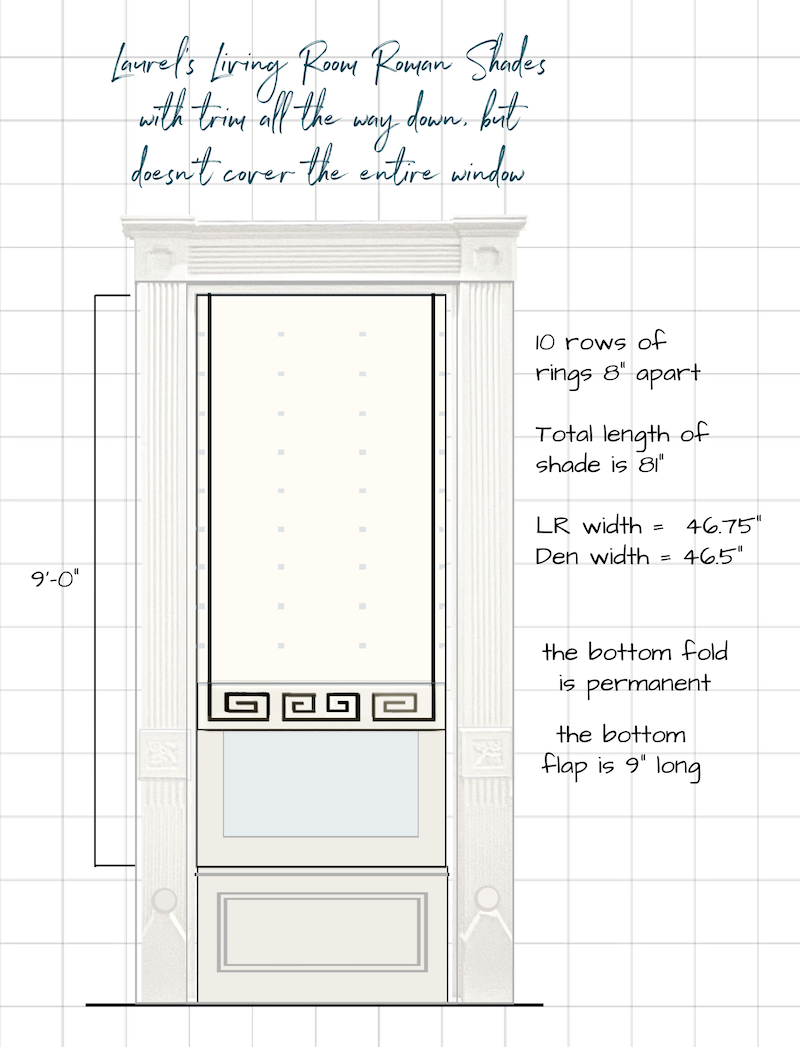
The rings (folds) are eight inches apart, so I did nine folds and one last stationary fold.
In other words, there is still a fold when the shade is let down all the way. Early on in my career, I didn’t know to specify that, and I was pretty horrified to walk into my client’s son’s room with the shade all the way down, dragging on the sill. It looked like someone had stuck a sheet up there.
However, because of the decorative trim, these Roman shades must have a permanent fold followed by a flap.
Still, I like doing a little flap even if there isn’t a trim on flat fold Roman shades these are called.
Please review the different styles of Roman shades in “Roman Shades Weren’t Built in a Day.”
My finished length will be 81″. The bottom flap, so far, will be 9″. There is 1-1/2″ above and below the Greek Key design, which is six inches high. This is for both the den and living room windows.
However, I wasn’t quite sure about the size of the Greek key trim. So, I did two more schematics with the shade pulled up.
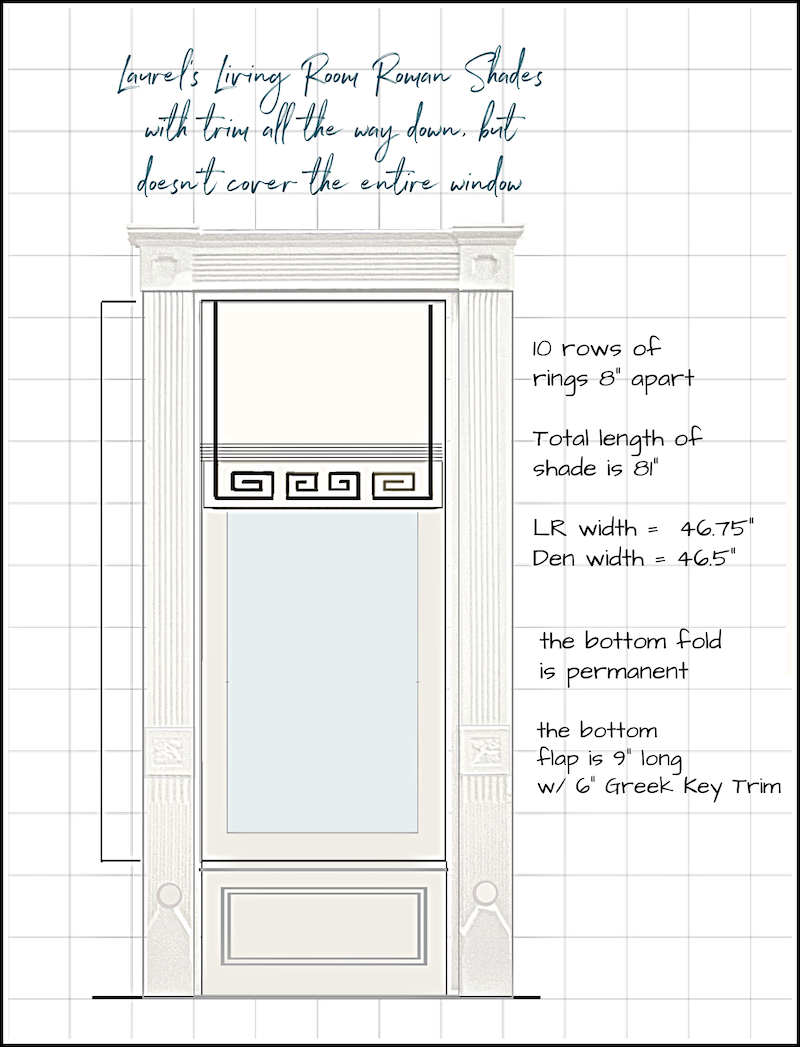
Above is a 6″ high design with 5/8″ wide grosgrain ribbon. Below is the same grosgrain ribbon, but the design is 5″ high.
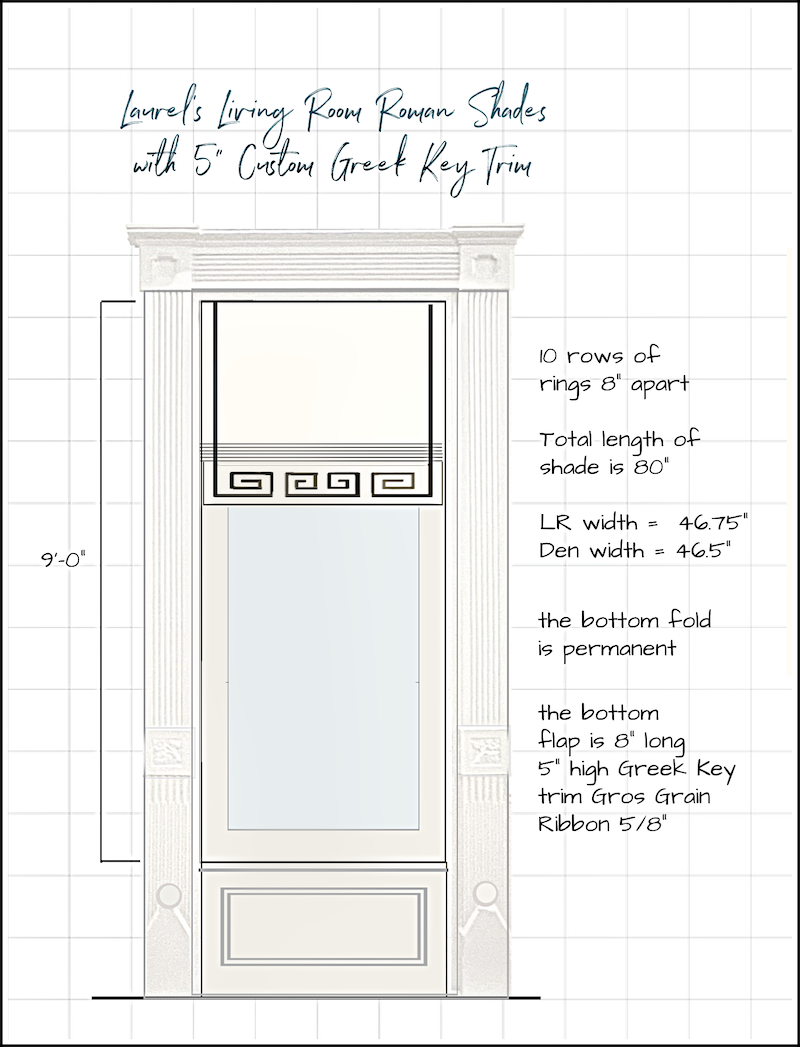
There isn’t a huge difference, but I prefer the 5″ high design with an 8″ flap. Do you have a preference?
I will show you the fabric I want to get on Monday. It is very similar to the fabric Meg Braff used and won’t look as stiff as my drawing does. That is for design purposes only.
Geez, Laurel. There’s so much that goes into designing the window treatments.
Yes, I know. And we haven’t even gotten into the fabric yet!
Okay, back to the issues.
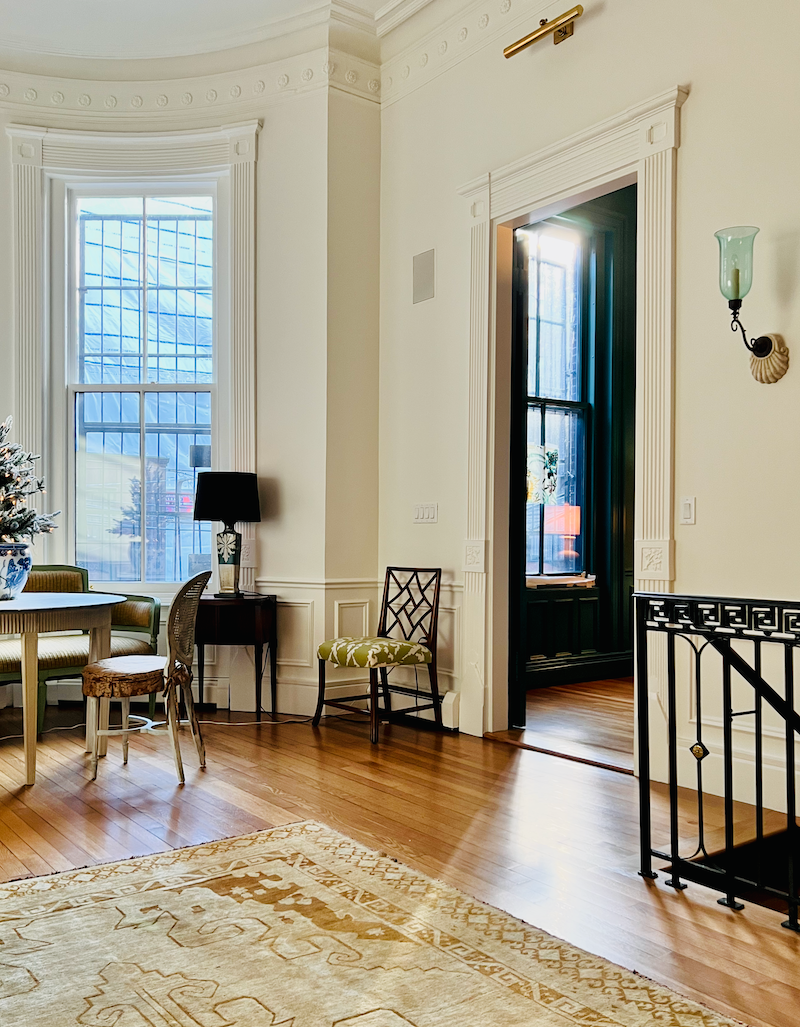
2. The window is curved. This isn’t a big problem except that the only place to put the inside mount Romans has a very narrow space in the middle of the window. Here, let me show you what I’m talking about. The shade is going in the lowest curved part that’s shaded.
Above is the window. The curve looks exaggerated because of perspective, but it is still there.
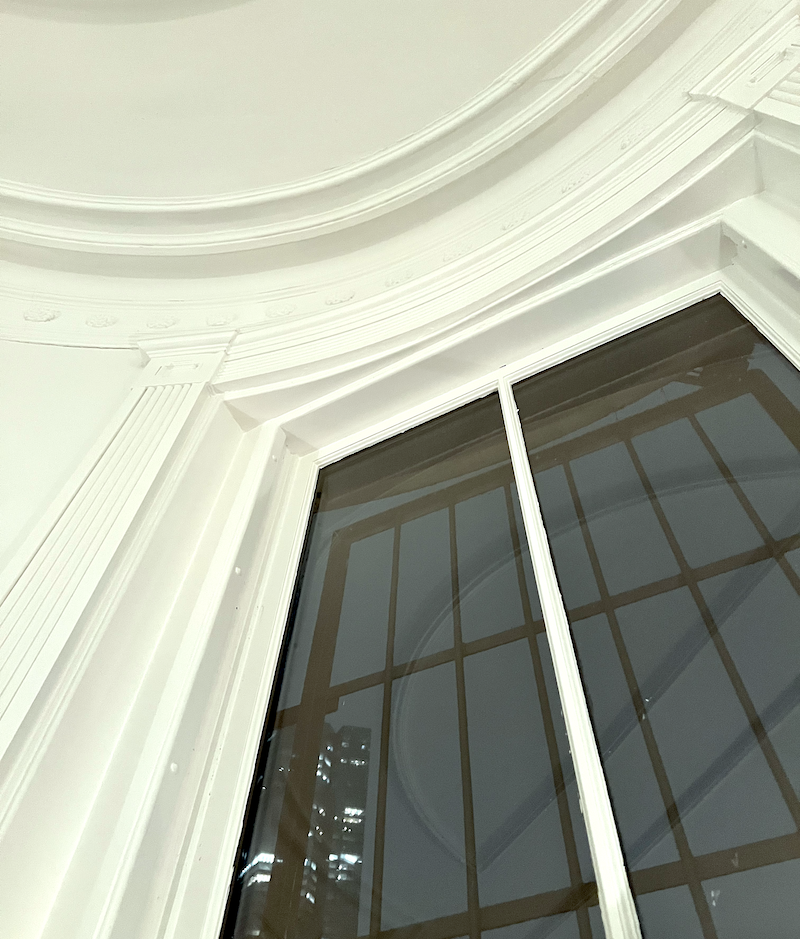
Above is a detailed view. The shade should go in the shaded curved part. Do you see how narrow it is in the middle? There is a workaround: We can run the mounting board so the one-inch side is vertical. The shade will protrude slightly in the middle, but it won’t be noticeable. We did that all the time when the windows were very shallow, including the Roman shades in our New York townhouse.
Laurel, you lost me at the “shaded curved part.”
Okay, sorry. I realize it isn’t very easy. Here’s a better graphic.
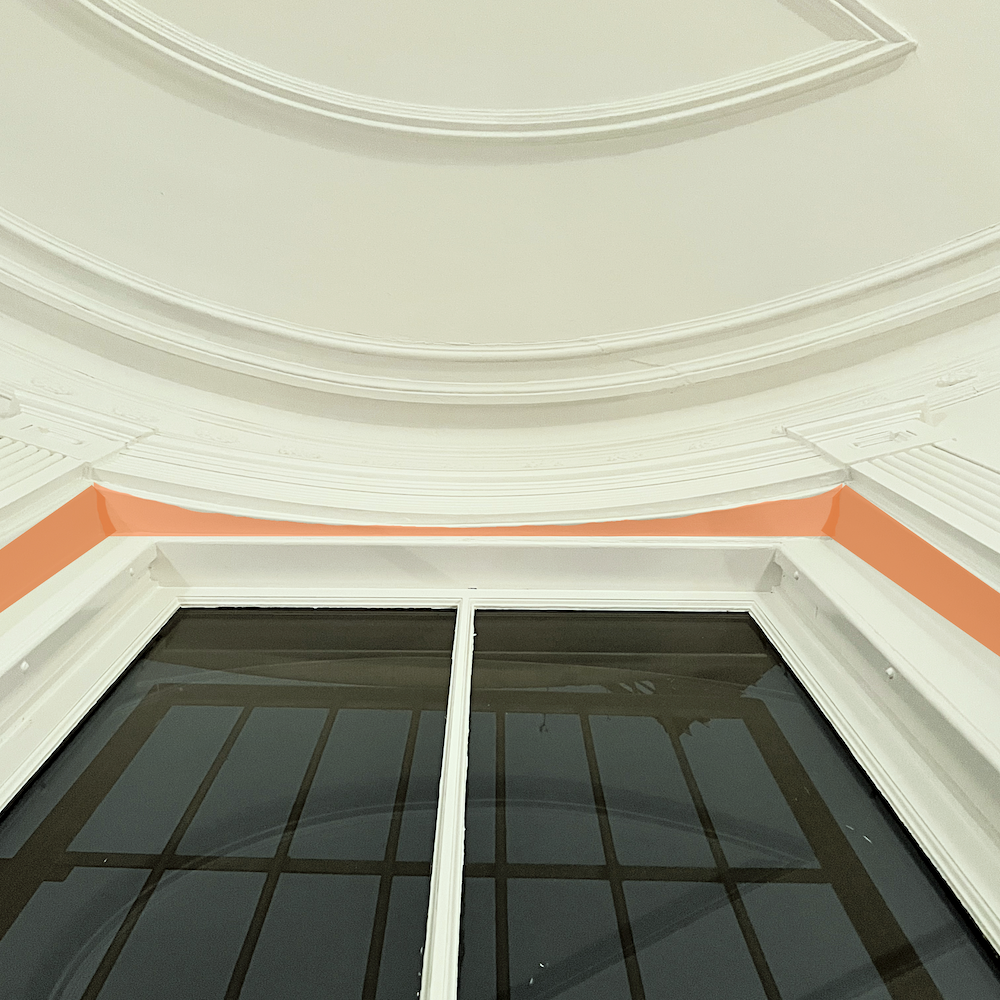
If the shade went inside the square space below it, a wide inset of wood would be on each side between the window and the window casing. I’ve never seen a window done this way, but that’s what it is. It’s like someone ordered the windows, then made the opening, and when the windows arrived, the opening was too big, so they filled it in with wood.
Above is a virtual shade covering only the window. This one will look a bit odd, as it emphasizes that the window is in a giant frame.
The shade should fit inside the wider portion, as shown above.
Please note that this is not a view anyone sees.
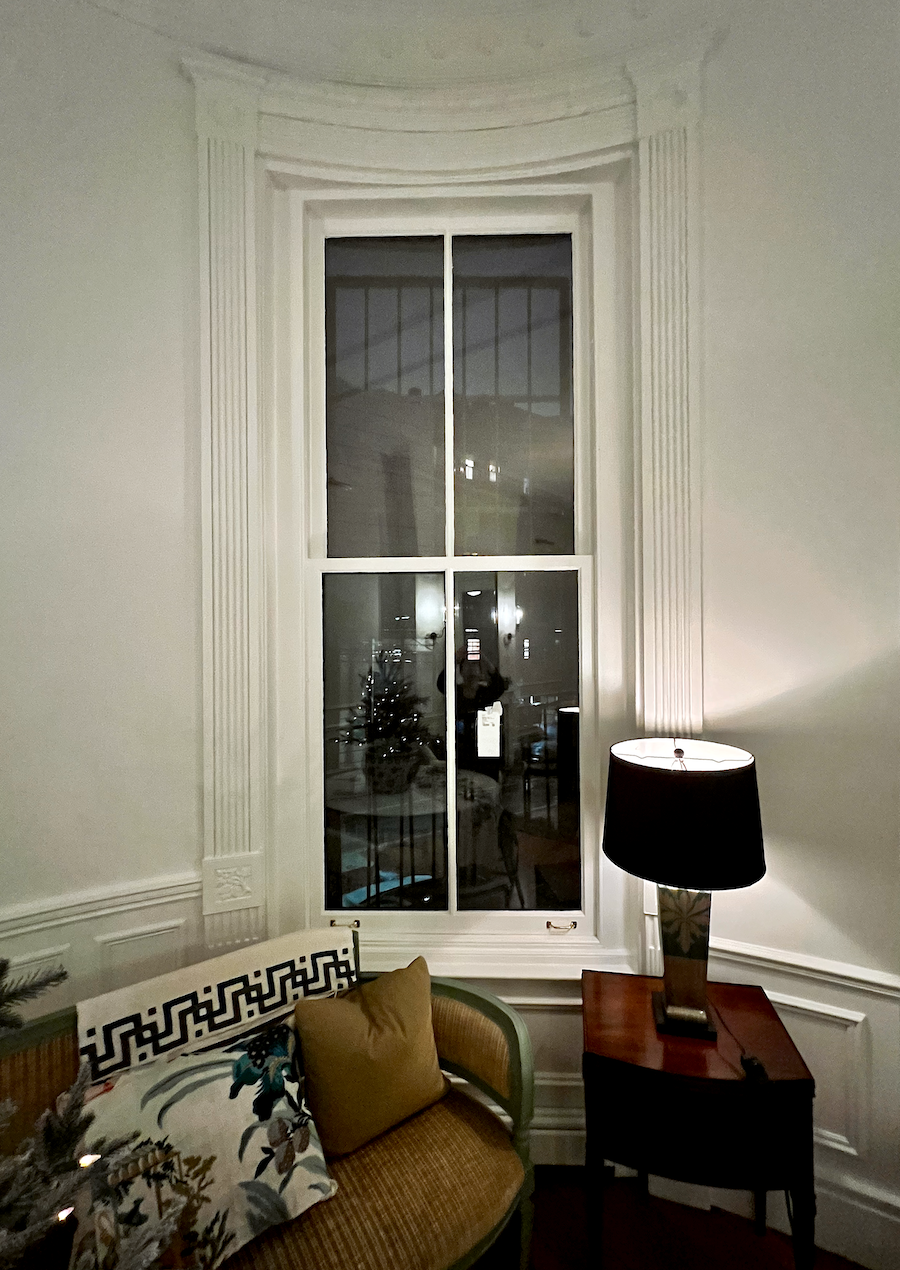
This is the most common view of the windows. If one is standing close, then the eye doesn’t go more than about four feet up. This image also shows a little better that the inset closest to the glass is too narrow a shade for the expansive casing and inset of the window frame.
Okay, we will continue this topic…
xo,

*********************************************************
Part 2 Begins Here
Guys! Oh my, there have been so many comments.
Alas, I don’t know what happened this week, but many comments were painful to read. While I love hearing from you, please try to have a little faith that after decades of experience in this business, it is for a good reason when I emphatically state something.
However, when I don’t know something, I say so, too. Yet, that is not the case when it comes to Roman Shades.
There is no contest about how wide the shades should be, yet many of you disagree.
It is fine if you don’t understand. However, I would prefer it if you asked questions instead of going on about some erroneous assumptions.
While many of you selected the narrower of the two shades, the outer window frame, adds an additional 3.5 inches on each side to an already beefy and wide window casing. Exposing that wide frame would make the entire casing 11″ wide. That is something I’ve never seen.
To be clear, that piece is not actually part of the gorgeous trim. No, I am not covering any part of that as some of you implied I was planning on doing. The trim (window casing) is the fluted part with the plinth block.(below) I am also including the piece marked #1 below as part of the casing.
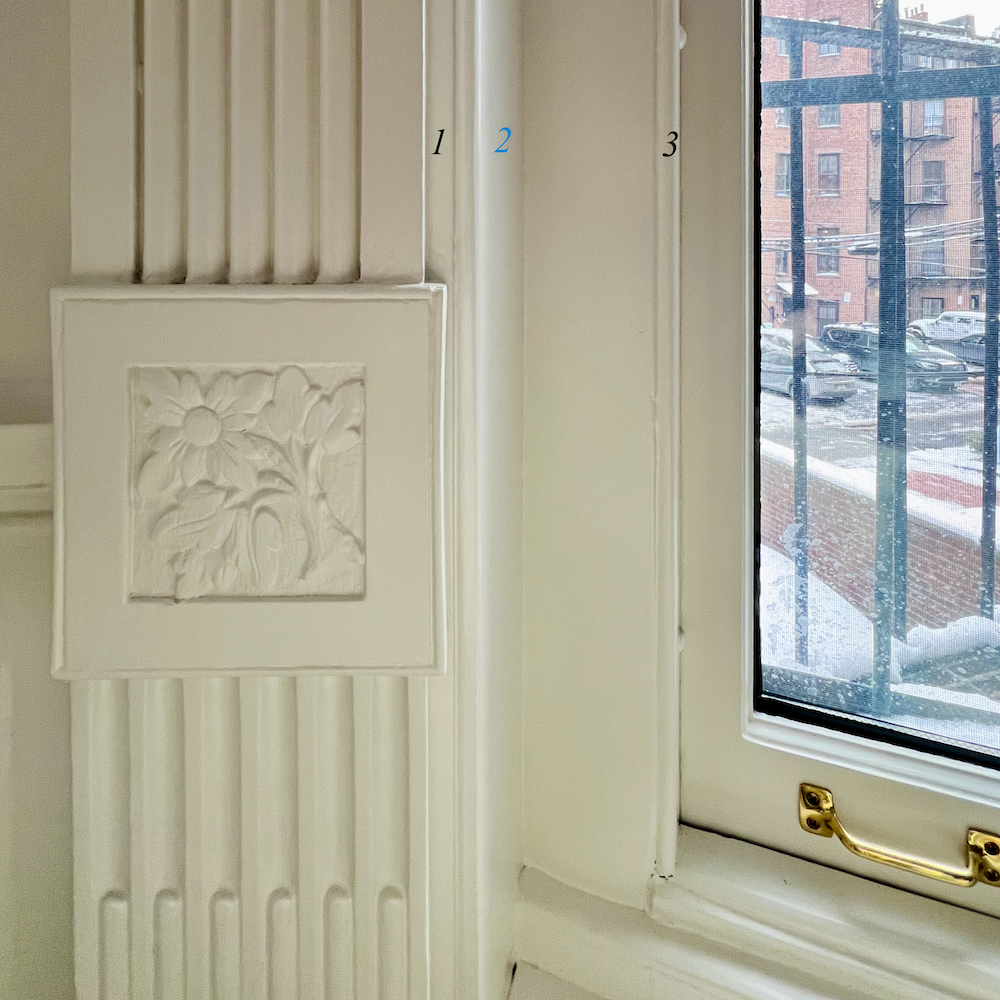
The blue two is where the shade should sit.
Many of you thought the shade should be at #3. I can’t emphasize strongly enough that it would be a terrible mistake.
Below is the old window treatment that shows the proper placement for my Roman Shades.
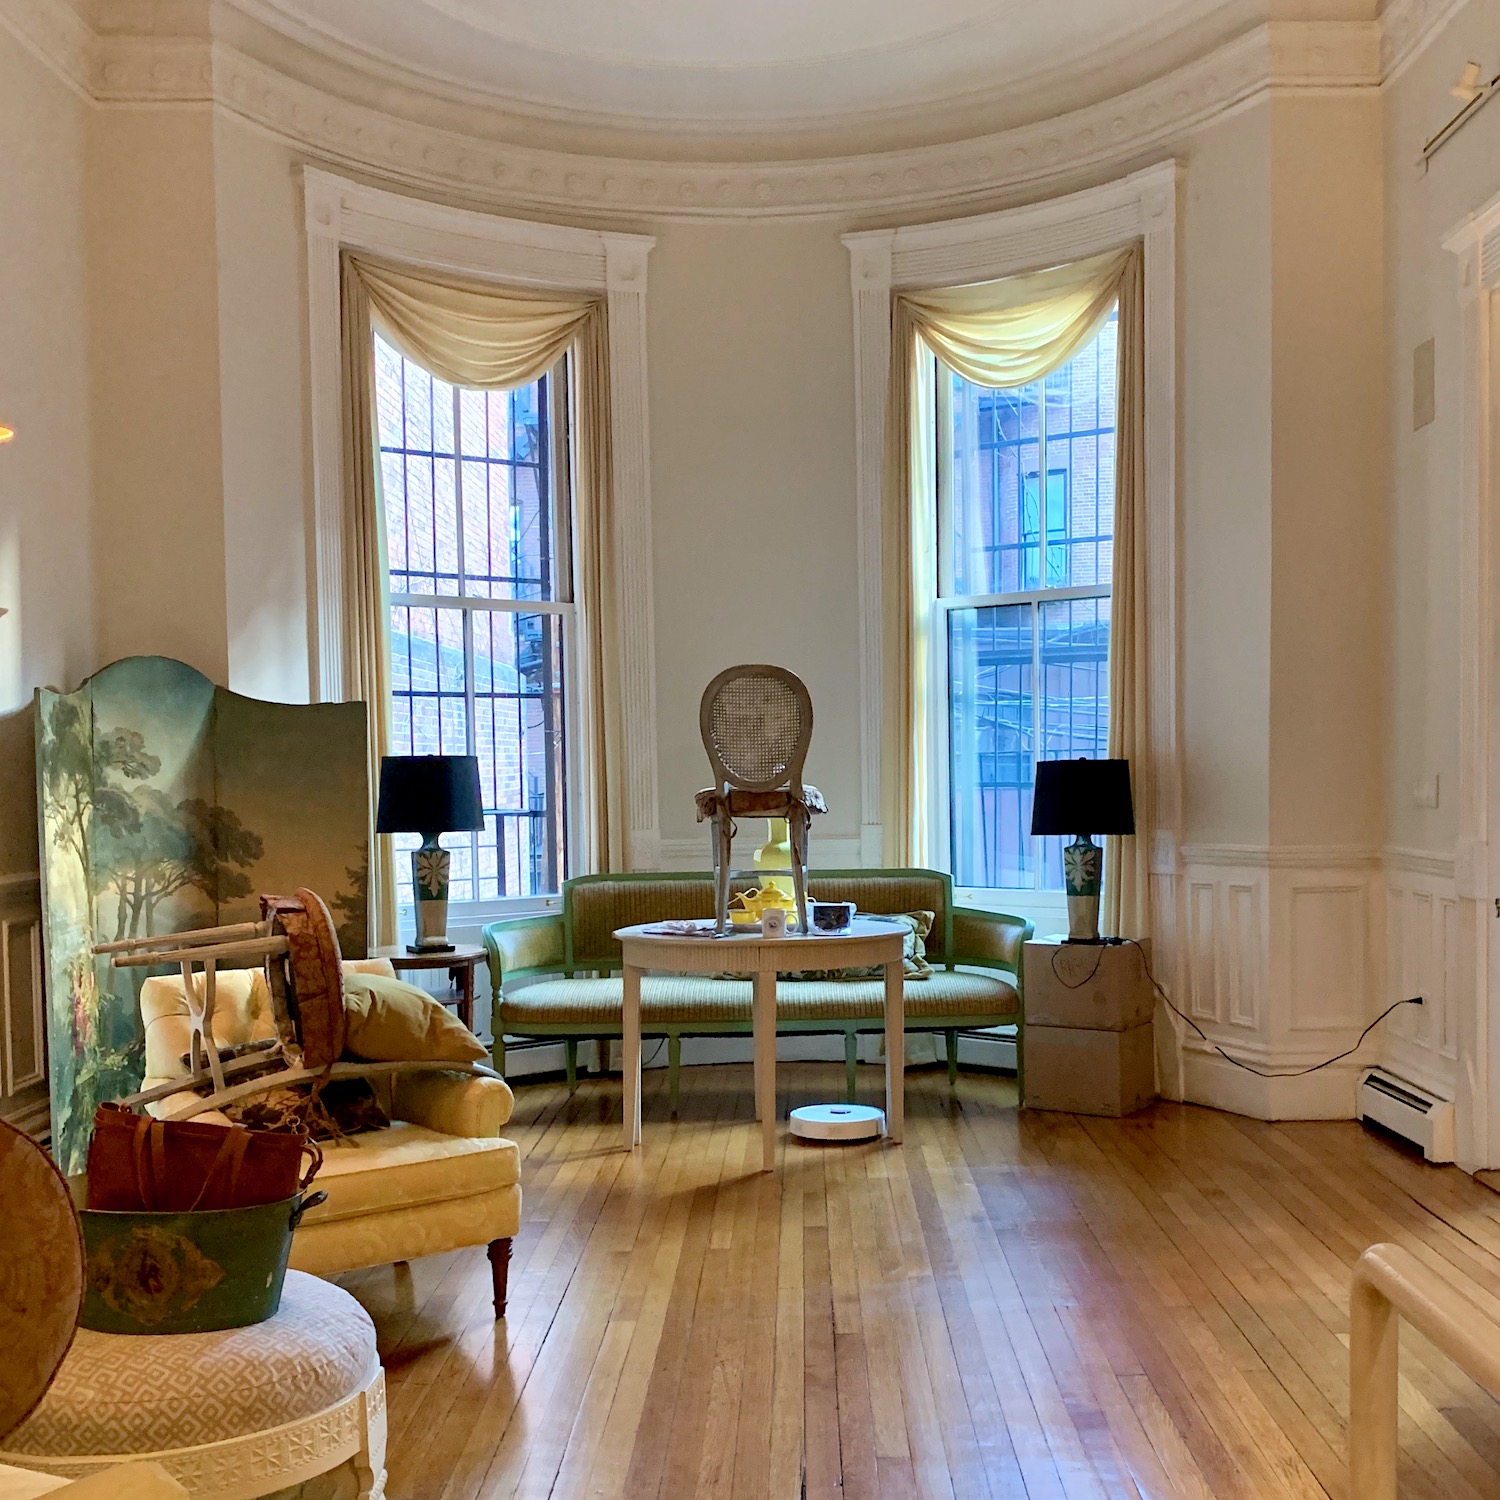
The photo above was taken shortly after I moved here and was trying out my new Roborock.
Anyway, these window coverings were mounted on a small board like the one used for the Roman Shades and in the same location. Does it look bad? I don’t think so.
I apologize that the image from part 1 exaggerated the curve of the casing due to lens distortion which I can’t control. But, please understand that the header casing, which is 11 feet up from the ground, is the ONLY curved element related to the window. Everything else is straight, including the window, sash, window sill, panel moulding, and baseboard heater. All are flat. So, why would you do a curved Roman Shade?
Going on, while I understand the thinking behind a curved board for the Roman shades, it’s impossible.
If your board is curved, your shade must also be curved. You cannot have a curved Roman shade. And even if you could, why would you do a curved shade over a flat window?
But, Laurel, I think it will look terrible if the board sticks out.
Again, please have a little faith. This is your imagination, and maybe the need to be a contrary? Roman shades can go on a very narrow board.
The 1 x 2 is actually 3/4″ x 1.5″. The narrowest part of the inset is at least 1/2″ but might be 5/8″. I promise that you will not notice that slight overhang of the board. Did you notice it in the original treatment?
This is a common practice in interior design to run the little board so the skinny side is what gets screwed into the header. It only sticks out a week bit and no one notices.
In post-war architecture, most double-hung windows only allow for a very small reveal where the shade can go—usually only about 1/2″. We had this same situation in our New York townhouse. (In the post, you’ll see a Roman shade, with a Greek Key border in my client’s home, which also stuck out 1/4″. BTW, that was done 26 years ago!)
I apologize for the horrid real estate pics. I hardly recognized our home in these photos.
But then, some of you said you preferred the “inside mount.”
Please note that all three possible shade placements are inside Mount Roman Shades.
Below is what an outside mount would look like.
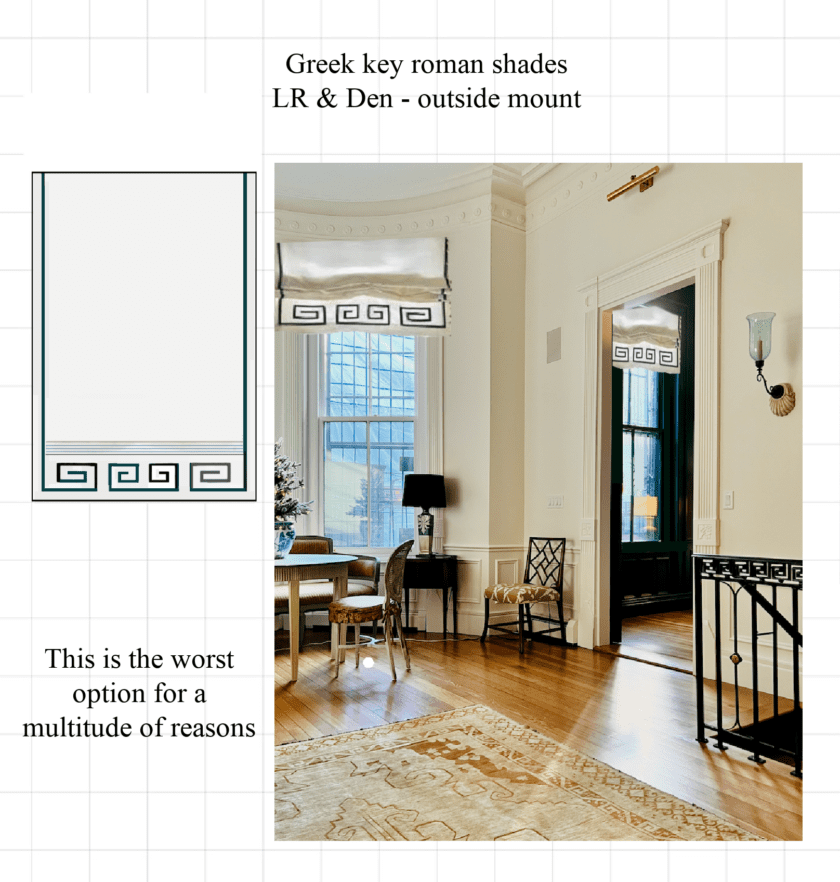
Outside means outside the casing. The shade covers the entire casing and should extend about an inch on each side to ensure the casing is completely covered. Unless there’s a compelling reason, I rarely did outside-mount Roman shades. It would be absurd to do on these windows, in any case.
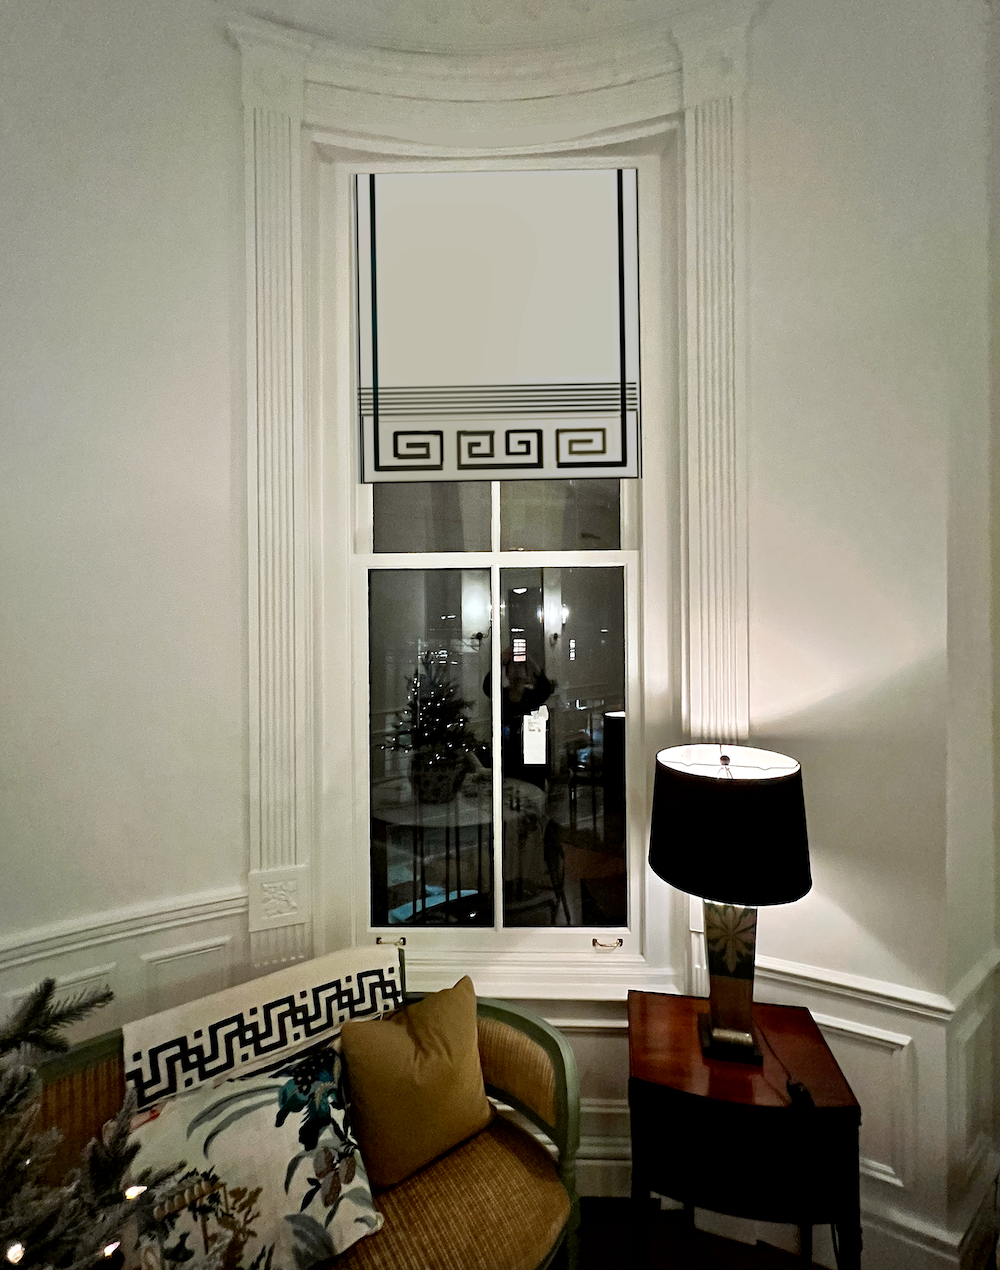
Below is a new and better image that shows what the new Roman Shades will look like—virtually.
It isn’t easy to get the perspective exactly right, but at least this is a real shade instead of a drawing of a shade. I was chastised for one shade because my two-dimensional line drawing looked “stiff.”
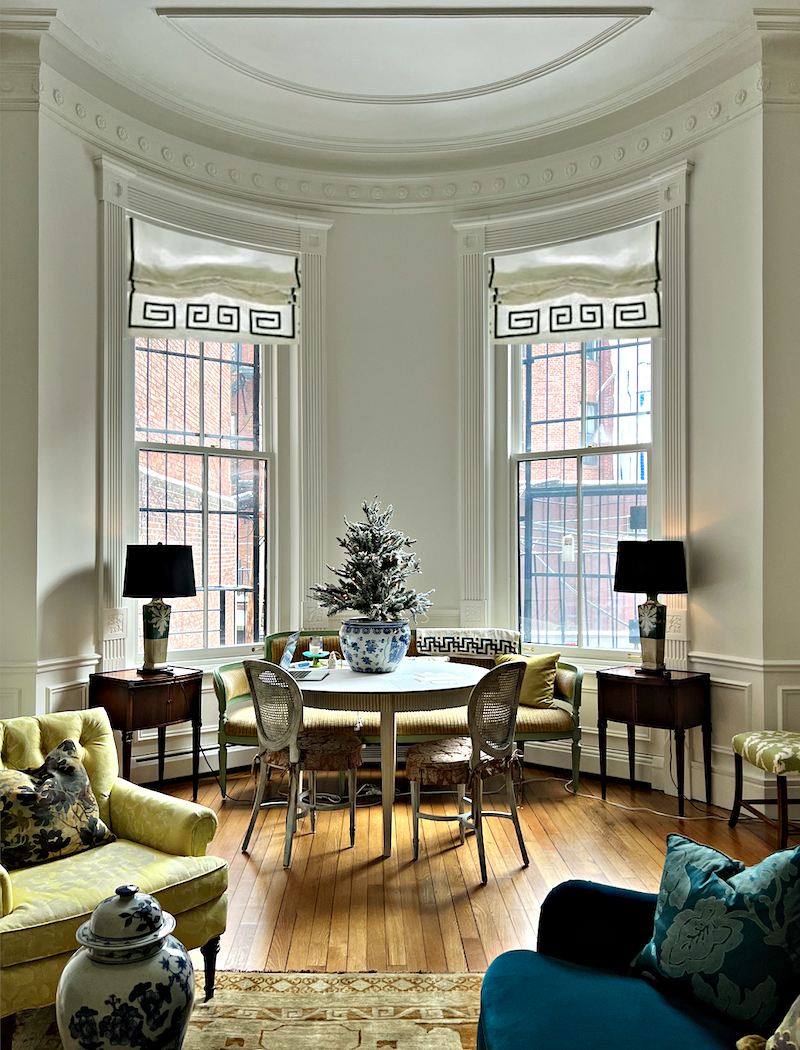
Note. It also will not be noticeable that the board is straight and the header is curved. There isn’t a choice. However, rest assured that it will be fine.
Moving on… You may have seen in my comments that I have decided on the 6″ size for the design, and I’ve also decided on the 5/8″ trim.
I considered 3/4″ but I think the thinner trim will be better. Another thing is that there is no question that it needs to be black or almost black. While I love light trims and have used them numerous times, a light trim, in this room will look blah and fall flat. The trim is also not taking anything away from the windows. It adds visual interest.
Of course, you may do whatever you like in your home, but please allow me to do the same in mine. That is all I ask. I love you all, but as I’ve had to say a lot recently.
Please be kind.
Most of you are– incredibly kind.
In case you’re still struggling with any part of what I’m saying, or even if you’re not, I went over everything in detail in this short video. Plus, you’ll get to see my hair, which was just done. LOL, I love the color. It’s more auburn like it used to be, and I think it suits me better.
Okay, I promised you a pattern for the trim and have already spent hours on it!
Alas, it’s almost finished, but I need to make one tweak and then put every measurement on it. So, Thursday is for sure unless something impedes that from happening. Also, I want to review the fabric I chose, the rejects, and why they didn’t make the cut. Then, we’ll move on to another topic.
Window treatments are tough!
xo,
***Please check out the recently updated HOT SALES
There is now an Amazon link on my home page and below.
Please note that I have decided not to create a membership site. However, this website is very expensive to run. To provide this content, I rely on you, the kind readers of my blog, to use my affiliate links whenever possible for items you need and want. There is no extra charge to you. The vendor you’re purchasing from pays me a small commission.

To facilitate this, some readers have asked me to put
A link to Amazon.com is on my home page.
Please click the link before items go into your shopping cart. Some people save their purchases in their “save for later folder.” Then, if you remember, please come back and click my Amazon link, and then you’re free to place your orders. While most vendor links have a cookie that lasts a while, Amazon’s cookies only last up to 24 hours.
Thank you so much!
I very much appreciate your help and support!
Happy 30th Birthday to my son, Aaron!
Related Posts
 Heckfield Place – Get The Exquisite Georgian Look for Less
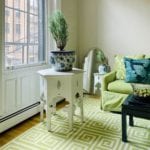 Three Home Furnishings Trends Revisited 7 Years Later
 I’m Afraid Our New Rustic Home Will Be Depressing!
 Granny Decor Mistakes You Might Be Making!
 My Tiny Living Room Has Perplexed Me For 20 Years!
 Bookshelf Styling-The Ultimate Guide with Templates!
 My Favorite Timeless & Classic Dining Chair & Table Combos


89 Responses
I’m working on historic house windows right now and this has been very helpful. Thank you. Your choices are going to look great!
Your hair is lovely too.
WOOO HOOOOOO!!!!!!
I just caught up! I happened upon something about your embrasure doors a few months ago and saw that you were nearing the end of a major renovation. Well I forced myself to go back to the beginning of your Boston home search and read forward from there…no peeking! Was that 2018? I can’t remember.
I’m here! I’m all caught up! I thought you were going to get a 54″ table, why’d you go back to 60? 😄
Also, you’re doing everything wrong 🤣🤣. I have read very few comments as I have been working so hard to here, but I gather you’ve been getting some *ish* lately. I will never give you that. Besides, why would I? I love everything!!
Oh my goodness, I’m so excited. I’m generally reserved so you may not hear much from me going forward, but I’m so happy to be following along. I’ll probably buy all your guides soon. 😃
Your choices, like your taste, are impeccable. I thoroughly enjoy sharing in your process of planning and executing since it’s similar to what we all go through on various decorating projects. You have given us all such great tips and learning moments that really help and we appreciate it. Enjoy the process and I cannot wait to see the beautiful home you create. Thank you, Christine Kennedy
I just love that you have included several videos of your renovated home over the last few months. It is SOOO nice to see the space and hear you talk about the decorating decisions you are making or have made. Love it!!
Laurel, your blog is the BEST at showing the slow, week-by-week, real-life process of making design decisions and implementing them. I’m so excited for you! Every square foot of your home is just so beautiful! My home is so very different from yours … 21st century suburbia, no millwork, and I’d be surprised if there’s a finish carpenter in this town, trim just isn’t done here. And yet I glean so much from your posts, because you’re such a good teacher. The sofa is beyond gorgeous, and your Roman shades will be, too.
You’re the designer with final say. Years of thinking and planning. Your home.
Looking forward to seeing the finished windows….
And thank you for all the detailed explanations…
Laurel – you’re the best!
When I read your posts, I know it is about going through the design process and problem solving. It’s the process that I find so interesting and informative, and I know you will always arrive at the best solution because of your vast experience and knowledge. And I still get a kick out of seeing the work that has already been done – the beautifully restored woodwork, the new stairwell and railing, the kitchen, etc. I never get tired of seeing the progress that has been made in each area.
The design of the Roman shades you have decided upon will look great. Carry on!!
Laurel, As a fellow designer, I’m rather gobsmacked that some of your many readers, presumably not designers or window treatment professionals, are commenting that your design specs are not good. I started out 20 years ago as a window treatment designer (educated, certified, board member of the WFCP, and award winning window treatment designer) and evolved into design. I agree 1000% with your design. One would think with your talent and experience, they’d believe you know what you’re doing. You’ve addressed this very nicely. It is a definite downside of the HGTV phenomenon that everyone thinks they know our profession. I think it’s a case of you don’t know what you don’t know. It’s like watching TV shows or YouTube videos about woodworking that make it look so easy, but until you do it yourself, you don’t realize all the little things involved. I don’t know if you’ll publish this comment or if you even approve comments first, but I wanted to share with you my support and amazement that some are not giving you the respect you deserve. Maybe it’s good for the blog traffic to have readers so sure of their opinions but I’m rather taken aback! Fortunately, you do have lots of wonderful readers who do respect your knowledge and experience. The flat is looking gorgeous!
Your hair looks fabulous! Thanks for the video clips – not only are they informative, but it gives us another glimpse into your wonderful personality and makes us feel even more like your friends :] Your window treatment is going to be just right for your home and your taste, which is impeccable. I can’t tell you how much I appreciate your example of grace and forbearance with some of the comments. When I read them, I find myself shaking my head. But in the end, most of them aren’t intended to be malicious, but are just ill-informed. Thank you for educating all of us so patiently!
After reading both part 1 and part 2 of this post, I want to express gratitude for you and for the knowledge you share. It is a privilege that you share this content with us and I am truly sorry for the bad behavior. There are very few blogs that have the level of detail yours does. It is highly informative and has saved me on several occasions from making poor design choices in my own home. Wish you the best.
New color is fresh and lively! Video works great on my IPad Pro.
The shades will complement the elegance of the windows and room. Just a couple of questions about Roman Shades. My experience with them is that when I raise them I always have to manually adjust/straighten the folds. How do you do that with such high windows? Where will you put the cords and cleats?
Can’t wait to see them hung!
Just an FYI since I don’t know if I’m the only one having this problem. For some reason, your videos are not coming through – but only recently. I’ve tried both the Chrome and Safari browsers without success. Anybody have any insight? I’m running Sequoia 15.2 and everything’s up to date.
Hair looks fab as will the shades!
I’m sure they will turn out lovely, as your other design elements have. Spectacular apartment. Regarding the Roman shades, however, it sounds like the plain wood frame that bothers you will be partially exposed anyway, since the shades won’t come all the way down. Would adding moulding to the plain wooden frame perhaps make the frame look more like it belongs, rather than being an afterthought to address “too narrow windows for the opening.” I look forward to the coming attractions in your appartment design. So far, everything you have done is fabulous.
Love, love, love the hair!!! ❤️
It’s going to be fabulous!
Hi Laurel,
Just a question…you mentioned your Roman Shade specialist, but given she is in Alabama, who do you use to measure and install properly in your home. Also, have you ever asked her to use fabric you’ve already purchased?
Thank you…and I love everything you’ve done to your (now) beautiful apartment!!
Stay warm.
Sharri
So very interesting! Love the larger Greek key. It’s going to be stunning. Workarounds fascinate me. It requires stepping outside the box and often genius or at least ingenuity. It’s your home and your dream. You know best. One last thing: never underestimate a dancer’s abilities to move through space. An overlooked asset to designing living spaces.
Hi Laurel,
I love the new hair color. But I loved the previous color also. I think you’re one of those people that can do any color & look fabulous.
Now that I know the shade is attached to a 1×2 I understand that the curved portion of your casing won’t be an issue. I made the assumption the mounting board was bigger. This lack of understanding comes from not being a professional. You’ve got this! And it’s going to be beautiful.
Stay warm!
Wow! Your readers are very invested in the design decisions of your Roman shades. When you first posted about your Roman shades I was in the process of selecting material for inside-mount Roman shades in my dining room and guest bedroom. I need to go back and read everything you have written about Roman shades.
At the moment I have settled on two different silk taffeta fabrics for Roman shades. I am curious if there are any drawbacks to using silk taffeta that is lined other than keeping them dust-free and clean? A previous owner installed plantation shutters on the bottom sections of the bay window in the guest bedroom. I am thinking of removing them.
You make complete sense to me and I think the shades will look fabulous!
Good morning,
I LOVE the new hair color. So pretty!
Stay warm, even if you have to wear a hood to cover that beautiful do.
XO
Hi Laurel,
To me, this post emphasizes how incredibly valuable your blog is for “laymen” like me. As previously stated in the comments, if I had to choose Roman shades for windows like yours (without professional help), I would have chosen the width that just covered the windows. After reading all of your comments and part two of the post, I now understand that I would have made a costly mistake. Thank you so much for taking the time (and patience) to teach people like me!
Hi Laurel,
Hair color looks great! ( first things first-ha!)
Thank you for the explanation. I totally get it now! Holy optical illusion, Batman!
6” Greek Key-yes, Black, but may be a “lighter“ Black. I love Roman shades!
And it’s freaking miserably cold in Milwaukee as well!
Hi Laurel,
All excellent choices and impressive with your gracious restraint, patience and finesse.
Stay warm!
Ps My Camellia’s are in peak bloom in my historic Bayard Thayer greenhouse and the 197th annual Massachusetts Camellia Society flower show (oldest flower society in the country) is on Feb 1st. If you’re free let me know and I’ll send you the invite.
Cheers!
Kelly
My first thought when I saw your window up close and the curve of the window trim is that it’s very pretty, and also that I hope you never have to replace the windows! I do not want to know what the cost is to replace a 9-10’ tall historic window. 🫣🤣 I love the Roman shade with the Greek key design. It’s simple but elegant.
Thanks for Educating me on Roman Blinds
Good call on that window. I think where you are mounting the shade will “clean up” the space inside the window. I don’t think anyone will think about the tiny projection once they are in place. Are you still able to mount on the smaller 1″ side of the board without using cordlocks? That has caused a lot of issues in the window treatment business when faced with some shade placements (since cordlocks are basically outlawed).
Hi Amber,
I did most of my Roman shades with one workroom who never used cordlocks. We always tied up the cords on a cleat out of reach of small children and pets.
Thanks for sharing this information & drawings of how to deal with your gorgeous—but tricky—window. Your rendition showing what it will look like with the shade in place, felt like a Master Class in how to feature the beauty of the grand size of the window, and the lovely curved moulding, and still make the shade practical for daily use. I love it 👏🏻❤️
Hi Laurel, I definitely prefer the 6”, the 5” looks squished when you go back and forth between the two. They are going to be lovely, as is everything you’ve done. It must be wonderful to live in such a beautiful home!
I wouldn’t know what to do with this. It has just occurred to me that this is why renovation projects completed by ordinary people get so many little details wrong. Cheapskates won’t employ a good designer, and the end result shows. I do know what I wouldn’t do—I wouldn’t cover up even an inch of that delicious trim work. I wonder what previous owners did. Drapes maybe? Nothing? Bed sheets? If you don’t need the window treatments for privacy, then you probably want them for a bit of light control or just to finish the room. I know designers say that hardware is the jewelry of the room, but I think it’s actually window treatments, and that’s something home owners tend to skimp on. Drives me a bit batty (as if I had far to go). Thanks for the information on this–I had no idea Romans could be hung with vertical brackets–that’s really clever.
The house is lucky to have you.
After all the thought and work that has gone into your home, I am astonished that you would think about having the Roman shade be flat stick out a bit in the center of the curved window frame. I know I get very tired at the end of projects and let those details slide. I would get a curved piece of wood (or metal) and have the shade fit perfectly inside, just inside the molding in the room. If that extra piece of wood by the window needs to be reduced, so be It. Would a router be the tool of choice here? Not sure, but would definitely have the top of the shade line up perfectly with the inside of the magnificent window frame. Slight curve though it is , I think you will be happier in the long run. This, of course means the bottom piece of the Roman shade should match that curve also. I am assuming the windowsill is curved like the top. Your place looks gorgeous!
Hi Ruthie,
There are many things to be astonished about but this isn’t one of them.
Please have a little faith that I know what I’m doing. Thank you. I very much appreciate that.
Nothing else is curved, including the window glass, window sash, window sill, panel moulding and baseboard heater. The next inset is also straight.
It will not be noticeable. I promise. The only reason I brought it up is because I’ve done similar mounts before and not everyone understands that you can do this.
It will look fantastic just like the old window treatments did with a similar mount.
You can see them on the home page.
Looking at the size of the window, the length of the room, and the drool-worthy mouldings, I prefer the 6 inch design because I would be concerned that the grosgrain ribbon at 5/8”, on a 5” Greek Key design, would be too small overall. Also, not sure of the size of the mouldings themselves but wonder how that might visually relate to the size of the design, if at all. Hope that comment made sense… Regardless, they will be stunning. 🤩
Looking at a two dimensional view, it is hard to know exactly how things will look in in real life. In the rendering with the outside mount the top of the shade appears to be crowding the curved moulding, which is the star of the show here. Would it be better if it were possible to mount the shade two or three
inches lower? Could a filler piece be inserted in the top of the window and painted to match the woodwork?
When you are in the upper entry or the kitchen, eyes will be drawn to the lovely curved moulding. The shade being so close seems to interrupt the flow.
Hi Kathy,
As I said in the post, the angle of the images is not one that is seen in real life. We will go over this again tomorrow, but no filler is possible or necessary. If you go to my home page you will see the original window treatment.
Lots of math goes into this… good work on those formulas…. Lost me in there . I vote for whatever allows the most daylight in during the day on those to die for 9 foot windows and the most privacy at night. Plus has Greek key trim cause that is gorgeous n complements alot of other features throughout the space. I hope you share the fabric choice and finished pictures because I know it will be dreamy and wonderful.
Hmmm. Personally I prefer the narrower shade. Based only on the rendering, the wider version almost seems a little overbearing and that it cuts over the graceful curve seems apparent and ill fitting. It’s great that you do these renderings, very helpful.
Actually, the inside mount is the best choice since the outside mount looks odd and ill fitting and seems to be fighting with the curvature of your wood frame. The smaller key design will be a better fit for the narrow window. Good luck!
Good luck to you too, Josephine!
The millwork is absolutely gorgeous and no need to hide any of it! My vote is for the inside mount over the window only which looks precise and perfectly elegant! The option for the outside mount appears that someone did not measure accurately and so you must live with the error! Either size Greek design will look spectacular.
With the size of the windows I believe the larger Greek key design works better. I can see the problem with center appearing to protrude, but I still believe the wider mount is better. With windows as large as those you don’t want anything to appear skimpy.
Great post. I would do the wider shade to help with the halo glow around the roman. Will these be lined/regular or blackout? You mentioned doing a smaller board up top-possible to have the workroom extend the dust cap fabric a couple inches to be tacked along the curve to help with the light gap and fix the halo above the shade. Hopefully that makes sense.
Regarding the den-google blackout shades light gap sometimes the halo is off putting around darker walls, outside mount can help reduce this some.
Hi Nightdraper,
There is a huge wood frame around both windows, Effectively, it’s like a double window frame– 6″ wide all the way around. So, there will not be any halo to deal with. However, the frame is not part of the window casing. We will go over this tomorrow as either my explanation wasn’t clear enough or the images weren’t clear enough.
I prefer the the 6 inch Greek Key but that might just be how it looks on screen instead of in person. Everything you wrote makes sense on the length of the shades and I agree with you that the width should go to the first curve. Those mock up photos feel right. I just wonder if you would need light control or privacy for the lower part of the windows? I really love the Greek Key design!
Hi Laurel, The window treatments are an expensive and very important part of the whole project. If you are having any doubts at all, you should just slow down and think things over carefully. A party should not be a reason to hurry up and make a decision.
LOL. AM, I am not having any doubts. There was only one detail to work out and I have done so. This has been 52 months of planning. I hope that’s enough time.
I think the wider shade will be perfect. Looking at the photo where you’ve used the orange paint it looks like the amount the shade might protrude in the middle will be minimal. Plus you’re using the same colour for the shades and the trim which camouflages any slight variation. And finally, the contrast Greek key design will draw the eye away anyway.
Thank you so much for taking us on this journey with you! We’ve had all of the fun and none of work.
Like the five inch trim with inside mount.
Hi Mary Ellen,
They are both inside mount. Inside mount means inside the window casing. That’s the part with the fluting that sticks out a good inch from everything else.
I would go with the inside mount.The outside mount is odd looking – too stiff and looks ill-fitting. Honestly, imo, the angular design of the Greek key, as much as I like it for itself, only serves to emphasize the curve of the window, though I know the fabric will soften it a bit. To me, the curve and the angular fight each other for prominence. You can’t have two divas! But since you like it I would definitely go with the smaller, less shouty design, and use less sharply contrasting ribbon.
Hi Yolie,
They are both inside mount, and the real shade will not be at all stiff. It will look more like it does here. Please remember that this is not a real shade, but a flat drawing of a shade in scale.
I will go over this tomorrow and share what an outside mount Roman Shade would look like. But, that curve is 11 – 1/2 feet up. Please note that the window is not curved, and neither is the center sash, or the window sill or the baseboard heater hugging the floor.
Hi Yolie,
Both shades are inside mount. I’m 100% posiitive where the shade needs to be, but I will go over it in greater detail for the next post. The inner inside mount is what’s wonky. That inner frame is really connected with the window not the window casing. There are a lot of step backs with this big window. So, it’s understandable why people are confused.
In this case, the high contrast black or nearly black ribbon is what I long to see. I’m sorry that my image exaggerates the curve of the window casing. I tried to convey that, by showing the window from a distance. I was standing very close and pointing the camera up to get the entire window in the shot. That’s why it looks like someone is ten feet tall and looking down on the settee. The perspective is quite warped, but I used that image because the window was reasonably straight and it is meant to convey the design of the trim.
Personally, I prefer the inside mount that covers just the window, as shown in view #1. I love seeing the beautiful architecture and the curve around the window. Having the shade smaller lets the woodwork do the same thing a matting around a picture does. The wider shade stops my eye from focusing on the height of your windows. I realize that would be the case mostly when your shades were lowered, but to me the wider shape looks out of proportion with your window and it looks like you are fighting with the curve. Embrace your lovely tall, narrow windows. I like the smaller Greek Key and the larger flap, regardless of which width you choose. Obviously, my opinion shows how little I know about decorating. 🙂
IMHO. i prefer the 6 inch pleat. To my eye its more balanced.
Hi Diane,
I’ve come around to the 6″ Greek key design, is what I think you meant. But, anyway, I think the larger one is better.
I like the more square 6″ Greek key and I think the taller window can handle the longer flap but honestly, they both look good.
Hi, I think the 5” looks good. However, I prefer the look of the shade inside the window.
What makes it look odd in that configuration is the left and right side ribbons. You might try the plain shade with only the key design at the very bottom. That way the shade design
flows into the beautiful window architecture rather than distracting from it, Just a thought.
Love the idea of the permanent last fold. The outside mount is , to me, the only solution. If it were me, I’d print out the key design in both sizes, cut out the last panel size, tape it up there and stand back and look at it. Almost impossible to decide online.
Thanks for the last fold idea. It’s a gem. ❤️. Plz share what format allows these images . They are fantastic.
Hi Anita,
I do all of my renderings and mockups with Picmonkey. I considered drawing the trim lifesize, but today, I put up similar elements and can see that the 6″ is better.
I know you are racing toward a deadline and have a firm vision in your mind. I think whichever size you pick will end up looking great. But really I’m rooting for a secret third option of using the den fabric you were considering in both the rooms; I like bringing some of that darker room into the living room and am a pattern girl. And I think it would work well with your lovely new sofa!
Hard for me to gauge whether the 5″ or 6″ design looks more in proportion to the window from the images. Vicki makes an excellent point about the Fibonacci proportions. And of course as you already said, the shade should cover the casings on either side of the window or it looks chintzy. Plus the casings on either side might be the only areas large enough to place your mounting bracket. Another tricky problem I know you will resolve elegantly!
Hi Marsha,
The inside mount Roman shades don’t require mounting brackets. An electric drill screws long screws right into the casing. They are relatively easy to put up, compared to drapery rods which can be quite difficult.
What about half shades? I think just plain off white linen shades would be gorgeous. Your windows are stunning. You have a lot going on. I wouldn’t detract from those beautiful windows. Just my opinion.
Hi Janet,
I had plain linen shades in my old townhouse in New York. The trim will not detract from the windows, and I have been dreaming about this design for nearly 4.5 years for these windows. What detracts from them are the hideous prison bars outside the windows! More than ever, I have to figure something else out. I am looking into security film and hope I can get approval to do something like that.
Either way it will be elegant. Since you are asking for opinions, I think I like the smaller inside mount with the smaller trim. I think the board extending beyond the curve is just a bit awkward in the mock ups but in person it may not be at all noticeable. If you were going with a fabric other than cream, seeing the extra wood strips might look odd, but with cream, it all just sort of blends in.
Hi Mary,
The fabric is a very close match to the trim, but if you look at my home page, you’ll see that even if it wasn’t, it’ll be fine to have it sitting on the wider inset. We will go over this again. Thank you for commenting.
Hi Laurel,
I just made a Roman shade for my daughter’s house, so I understand the conundrum. But I’m not a professional so I’m interested in learning what the solution will be.
And my vote goes to the 6” design of the Greek key. In my head it seems to work because of the scale of the large windows.
It’s always something. And nothing is easy.
I’m wondering if you want a curved mounting board. Would that make the shade fall funny? You curve a board by steaming in a box or cutting kerfs (slits partway through the board).
Hi Janet,
We did a curve like you’re talking about when we updated the wainscoting in the living room. It was for the new basecaps.
Otherwise, no, we cannot do a curved mounting board. It would still stick out and wouldn’t work for the shade. Besides, the window is flat. There is no curve in the sash or sill, etc.
I like the larger Greek Key, inside the window.
Laurel, I think you like the 5″ Greek key on the 8″ flap because it is part of the Fibonacci sequence.
Oh, good catch, Vicki! However, I’m sticking with the 6″ on a 9″ flap.
I love following your renovation/transformation. As a layperson, I am learning so much.
About your shades…from your renderings, I instantly chose the 6” because when I saw the 5” it looked out of place, dwarfed by the scale of the window.
I love your Roman Shade design! The larger Greek Key is more pleasing to my eye as it seems more balanced with the large size of your beautiful windows!
Such fabulous windows! I prefer the smaller inside mount in order to see the entire curve and frame. Also, I don’t think I have a preference to the size of the Greek Key trim, but I would consider less of a contrast in color – maybe one of the tones in your lovely carpet, instead?
By the way… your kitchen is scrumptious!
Love the Greek Key design. Prefer the 5 inch version. Can the mount for the blind be curved to echo the curve of the window or is that overthinking it? I absolutely love your windows and old curved or wavy glass just makes my eye very happy.
Hi Anne,
The windows have no curve whatsoever. While these rounded bays are very common in Boston, I would estimate that maybe only 10% of them have curved glass for the windows. In any case, it’s so high up and my camera, because of lens distortion and the angle exaggerated the curve. The long shot image in the post gives a far better perspective, albeit too far to see much detail.
I think I would prefer the smaller key design. Can you do a mockup and tape it to the window to see which one is more pleasing?
Laurel, wow. I guess back when the building was new, the owners would have covered those beautiful windows with layered draperies? I think I like the smaller 5 inch. While the larger appears better in the post, I wonder if it will look overly large on the real shade when installed? Also am wondering about your privacy – are your windows high enough so that folks walking by cannot peek in? I used to take a language class in the late afternoon at 170 Beacon. My favorite thing to do on the walk back to the parking garage at the Common was to look up at the windows to see if I could see into any of the lovely interiors. I did see a couple who had their lights on.
Hi Marlene,
I took some night-time shots, but they never made it into any of the posts. Privacy is not an issue. No, you cannot see in from the alley. Looking up, I can’t see anything below about one foot beyond the bottom of the chandeliers. There are few windows across the alley and they are all dark except for some security lights as they are all retail spaces, or staircases. There might be some residential units on the top floors across the way, but they can’t see in. Sure, if one stands right in front of the window, it’s possible to see in.
In front of my bedroom is the wall of my garden which is about 80″ high. The window treatments are for light control which I desperately need because the sun does come beating down in the living room. Every morning that it’s sunny, I run in and cover up the sofa with a white sheet!
I love your Greek key design and prefer the proportions of the larger 9” flap.
Best,
Kelly
Too much math!!! I’m not a perfectionist so either size would be good to my eyes.
Love the Greek Key design. My preference is the larger one.
Good morning,
I also prefer the larger Greek key. Either way it’s going to be gorgeous!
Stay warm,
Julia
Since I am not a designer and have no training, I would design the Roman shade to just cover the window, and I doubt that I would question how it looks once it is installed. Since the woodwork is white, and the Roman shade is white, it probably wouldn’t be noticeable if I had made a mistake.
It’s going to be beautiful !! I prefer the larger Greek Key but you’ll choose the best for you. Somehow I missed your post for a pattern to make the Greek Key. Can you direct me?
Hi Cindy,
No, you haven’t missed the pattern. I think I said it was coming up, but at this point, it looks like this coming Thursday night.