Hi Everyone,
Aside from my normal 60-hour-a-week work, there is so much going on. Well, something has to give. And since I do not wish to live in a construction zone for more than a few more months, I have to focus on what needs to get done so that *I’m* not holding up the job.
Here’s the latest on the renovation front:
Yesterday and today, I ordered 100s of feet of mouldings:
Chair rail and panel mouldings.
Now, A Brown put a bee in my bonnet concerning the height of the wainscoting, quoting dear Brent Hull in a comment on the recent post about wainscoting:
No 36-inch wainscoting! It should never be 36 inches!
Brent makes a compelling argument that I don’t disagree with.
***You can follow along in more detail in his fantastic blog post from 13 years ago, The Misused and Confused Chair Rail.
I love his article. He explains things in a way that makes a lot of sense. I’d like to add something I’ve said before.
No matter how high the ceiling, the elements at eye level and below should relate to the human form.
In other words, we don’t make a dining room table higher just because the ceiling is higher. No, it is always going to be around the 30″ mark. So, it follows that the applied wall mouldings should mirror this scale. Of course, the moulding elements can go higher but should follow the classical idiom.
Brent goes on to say that in ideal classical proportions, the chair rail should be 1/5th the height of the ceiling.
But, then, he backtracks a bit and says for a lower ceiling, 1/4 the total height is fine. He also thinks the ideal chair rail height should be 28″ – 32″.
Again, I don’t disagree.
Interestingly, according to Vignola, the pedestal height, which corresponds to the proper wainscoting height, is four widths of the doric column, comprised of 19 parts, each equal to one column width.
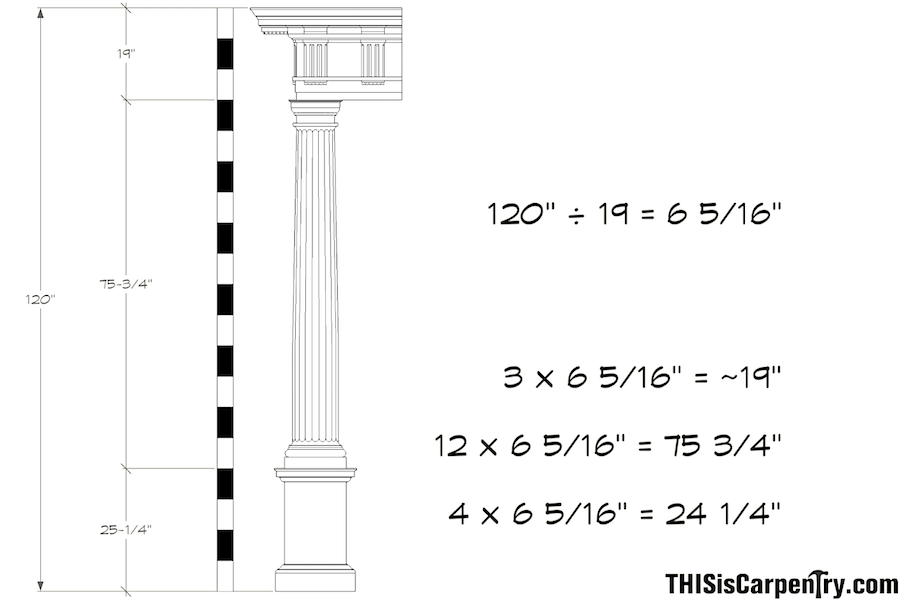
For more on this topic of perfect architectural proportions, please check out this post.
So, I measured my window sill, which is in two parts. But, the lower part is at 28″, so I thought, what the hell, let’s see what this looks like on the fireplace wall elevation.
First, I drew the lines.
I was fully prepared to say I hate it.
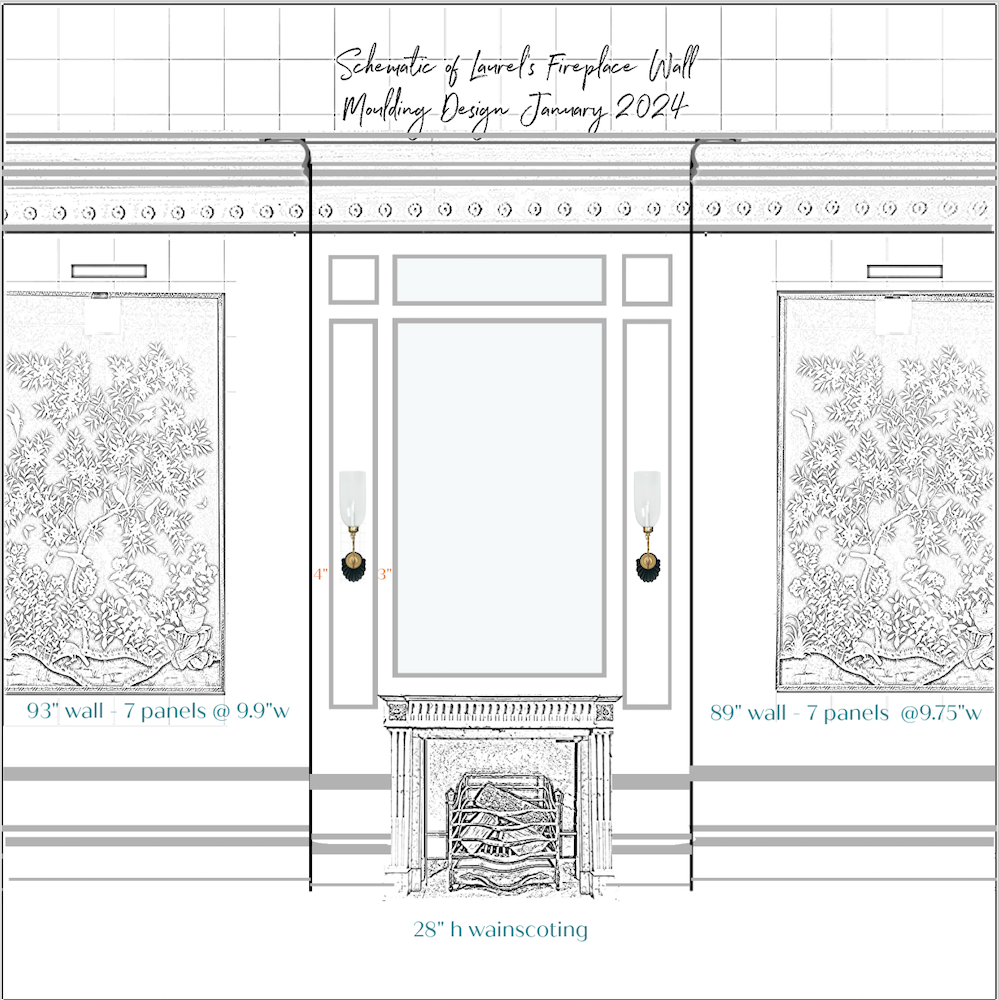
And, I did.
At first.
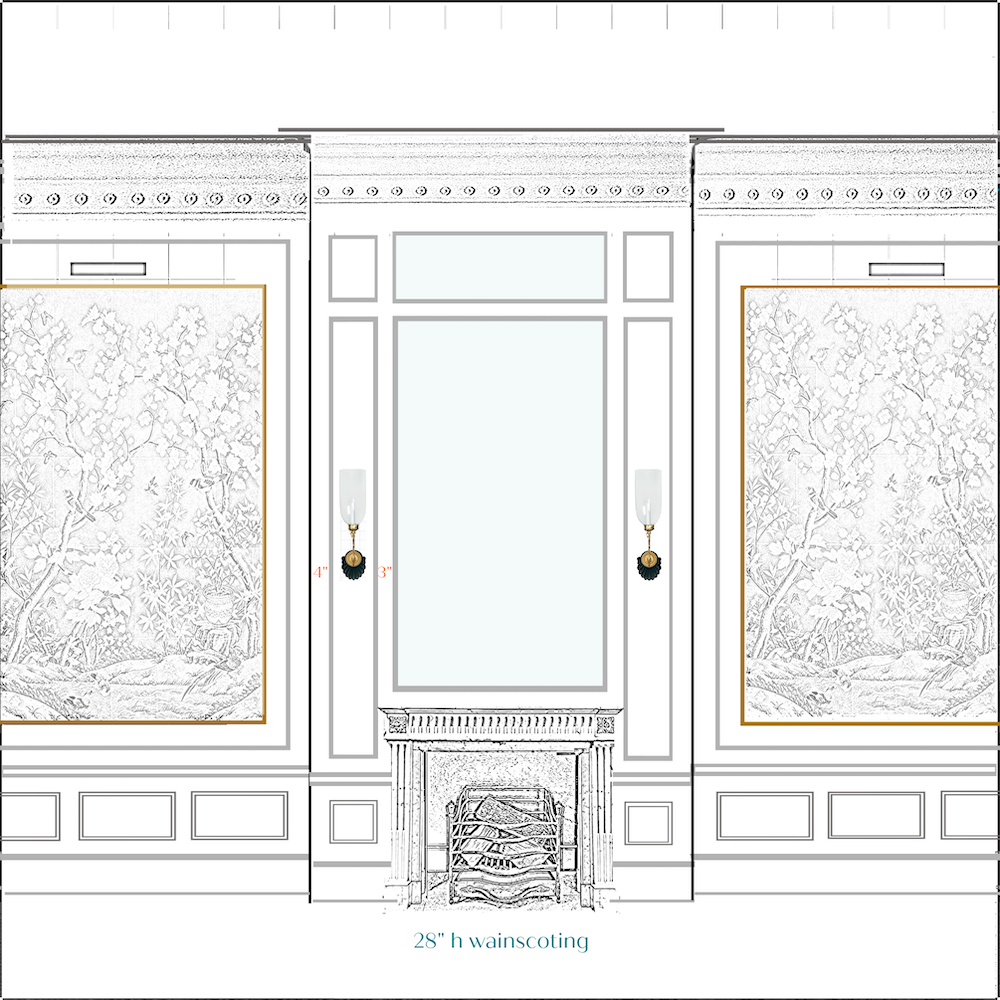
However, after I added more detail, not only do I not hate it, I rather love it. Please note this view doesn’t exist as it’s only about 10 feet from the front of the mantel to the beginning of the staircase. The living room feels larger than it is because of the 13′-6″ ceiling height. The dimensions are 15′-4″ x 21′-6″, not including the bay, which adds several more feet at the mid point between the two windows.
This time, I put everything in perspective because it’s closer to how it will be in real life.
As you can see, the panels are horizontal, with far fewer of them.
Another advantage is I can save a lot of money doing a lower wainscot with fewer panels.
But, there’s always something to mess things up.
Yesterday, I received the unfortunate news that I had to do a rabbeted base cap over the existing baseboard minus the original 3″ base cap, which is actually a crown moulding.
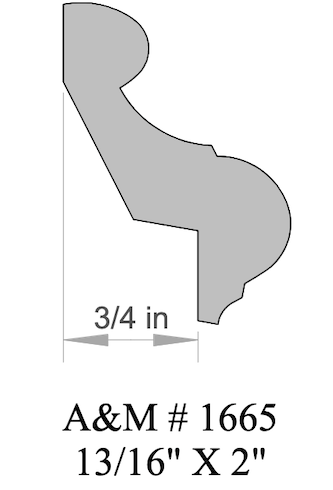
Anderson McQuaid rabbeted base cap #1665
We have to do a rabbeted base cap because there’s a gap that needs to be covered. We can’t build the wall out any further because of the door casing.
Could they have ripped out the baseboard?
I suppose, but it would not be easy, and then there are the baseboard heaters, which are eight inches high.
The thing is that this increases the height of the baseboard to 9.25″; therefore, 28″ is not going to work.
The baseboard is supposed to be 1/4th the height of the pedestal (wainscoting in this case). So, the baseboard shouldn’t be more than 7″. (1/4 of the entire wainscoting. Okay, we could stretch that to eight inches, but 9.5 is out of proportion.
Okay, I thought I would split the difference and make the height 32″.
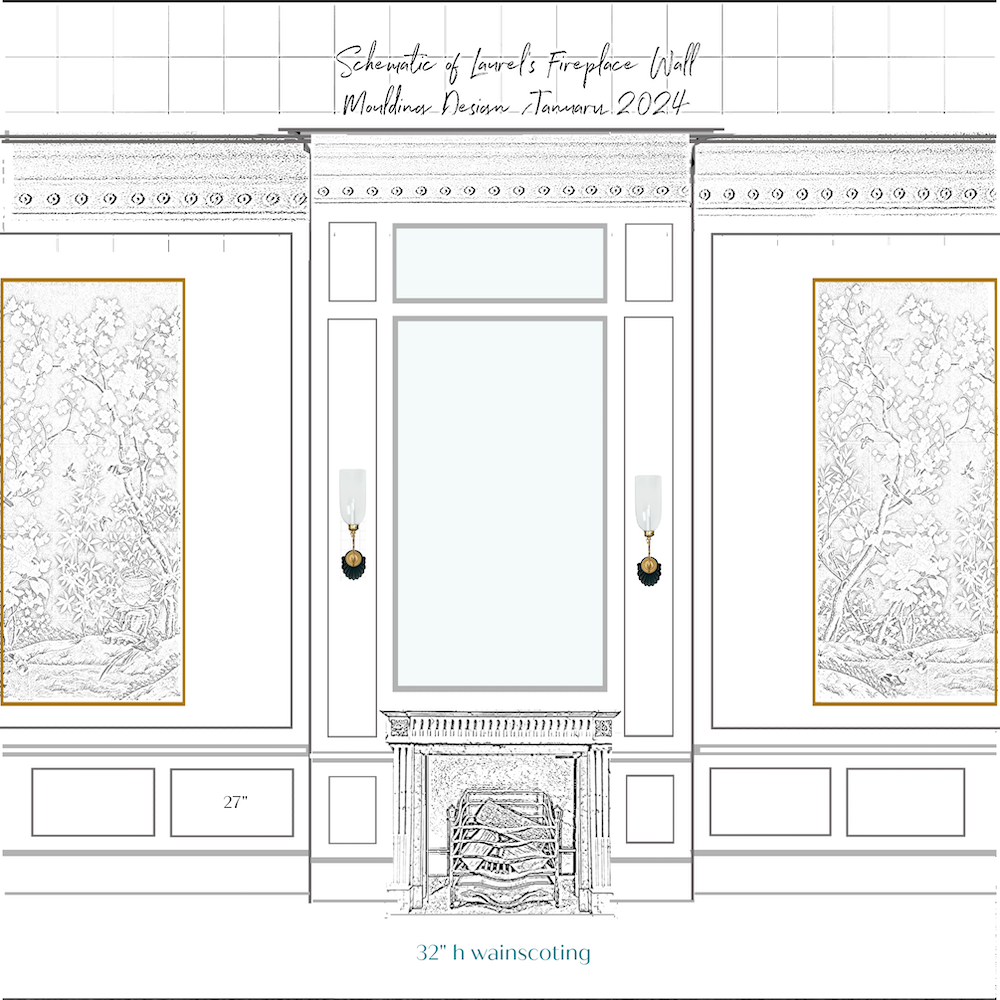
I think, overall, this is better.
But, Laurel, 9.5″ is about a quarter of 36″.
Yes, just 1/2″ off.
However, I do like the lower height. I like the larger panels because it’s a bit less busy.
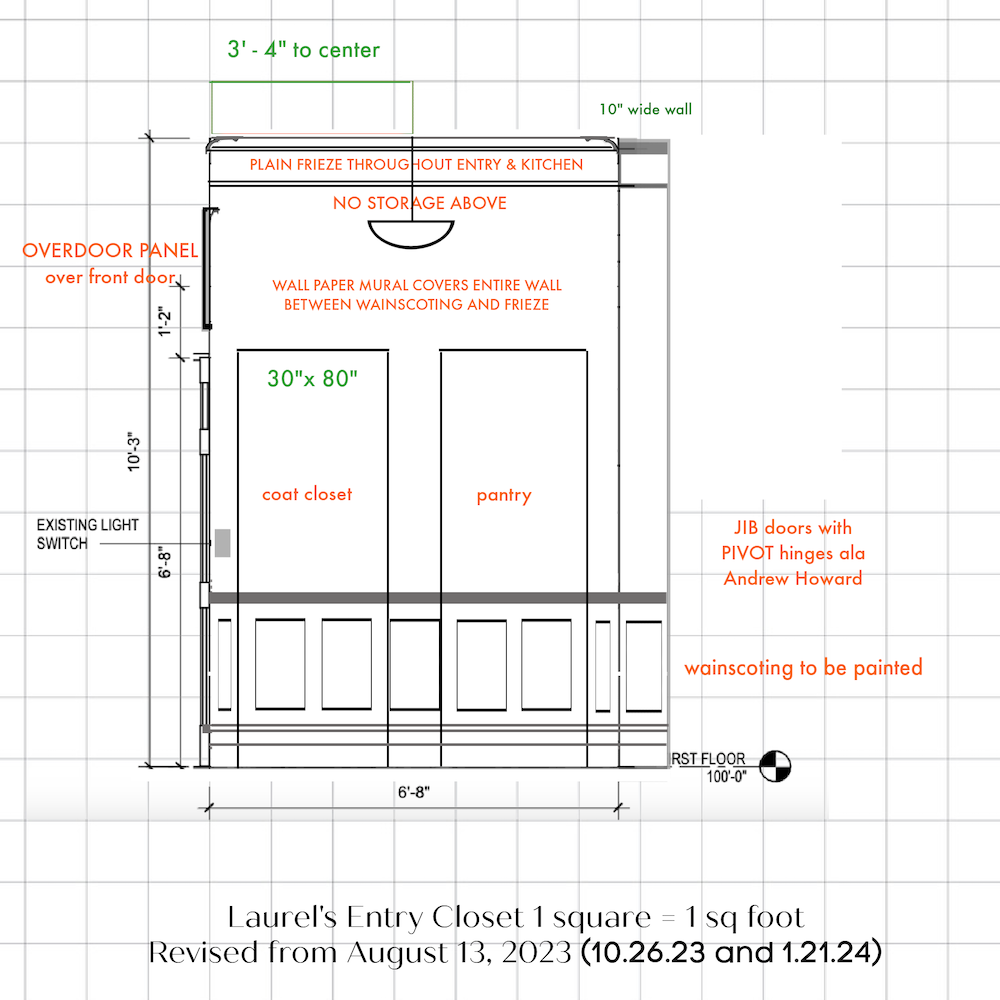
In addition, the panels in the entry wainscoting will return to vertical. This variation makes sense in the smaller space and provides a variation on a theme that provides interest.
There’s one more point. The floor in the den is a good inch higher, and the carved floral plinths vary in height by 3/4 of an inch.
I do want there to be enough of a difference between the chair rail and window sill to look intentional and not like a mistake. Therefore, the top of the wainscot cap (chair rail) will be around 33″.
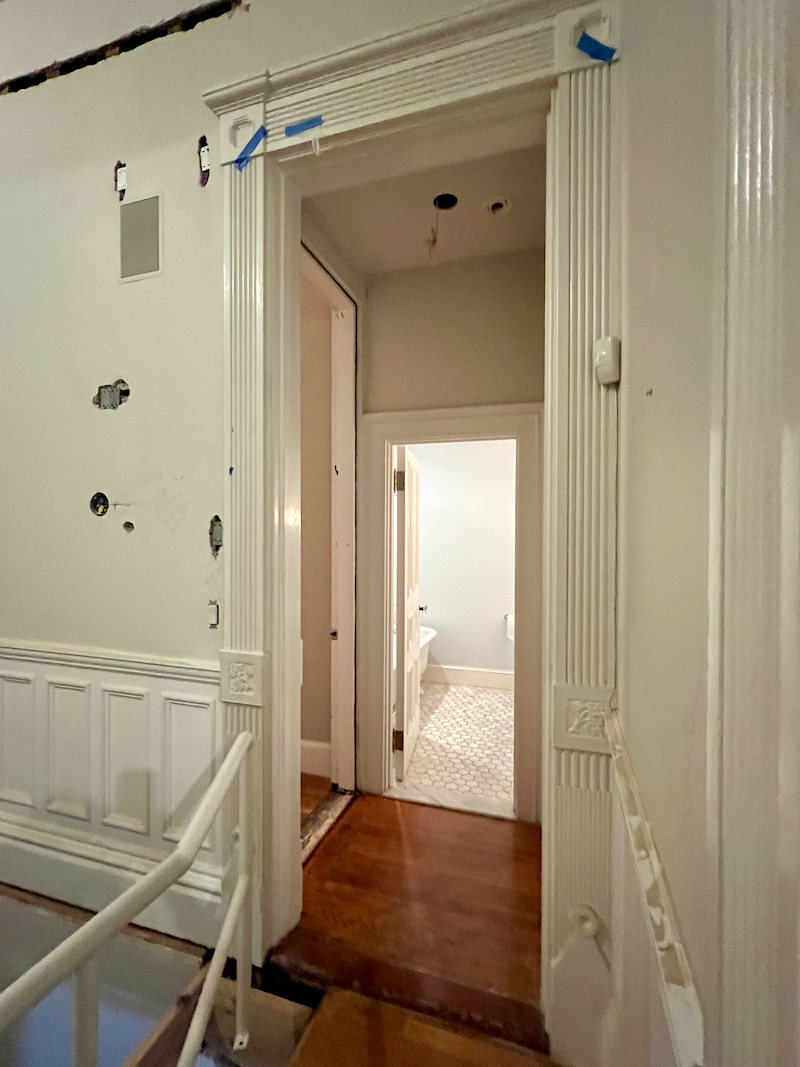
This height is also well below the Rosette/plinth block and ties more into the change in the fluting pattern.
In the end, I made one change. I did go with the P8030 moulding from Orac for the panel moulding.
The overriding reason is that with the wider boxes, I do think we’ll need a moulding that comes in the flexible version, as well as rigid.
Also, I looked at AB Kasha’s Instagram profile, and they are using some pretty substantial mouldings for their panels.
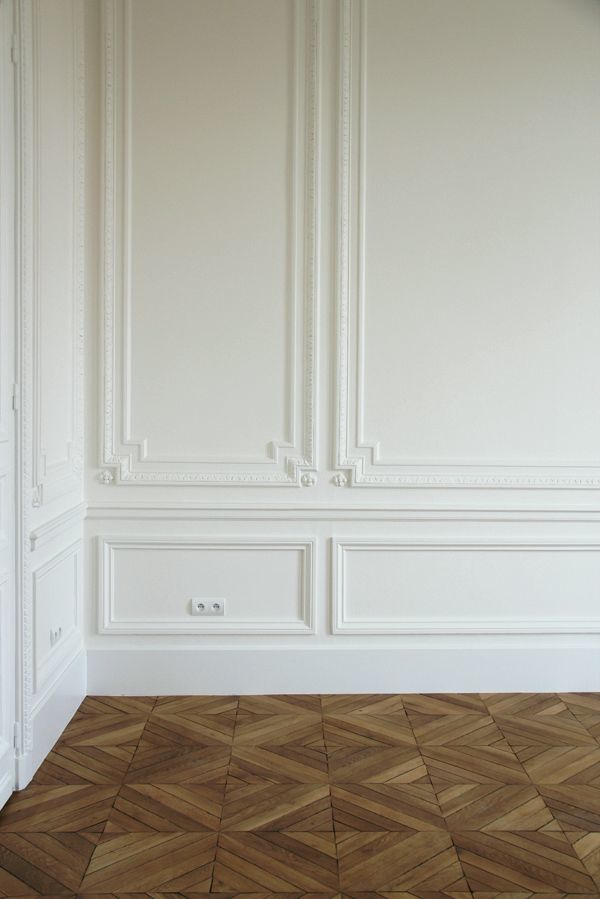
I have adored this image by ABKasha for probably the last decade or more! Here, you can see a wainscoting height that looks to be about 24″- 28″ and no more. We can’t even see the top of the wall panel, so this is a super high ceiling.
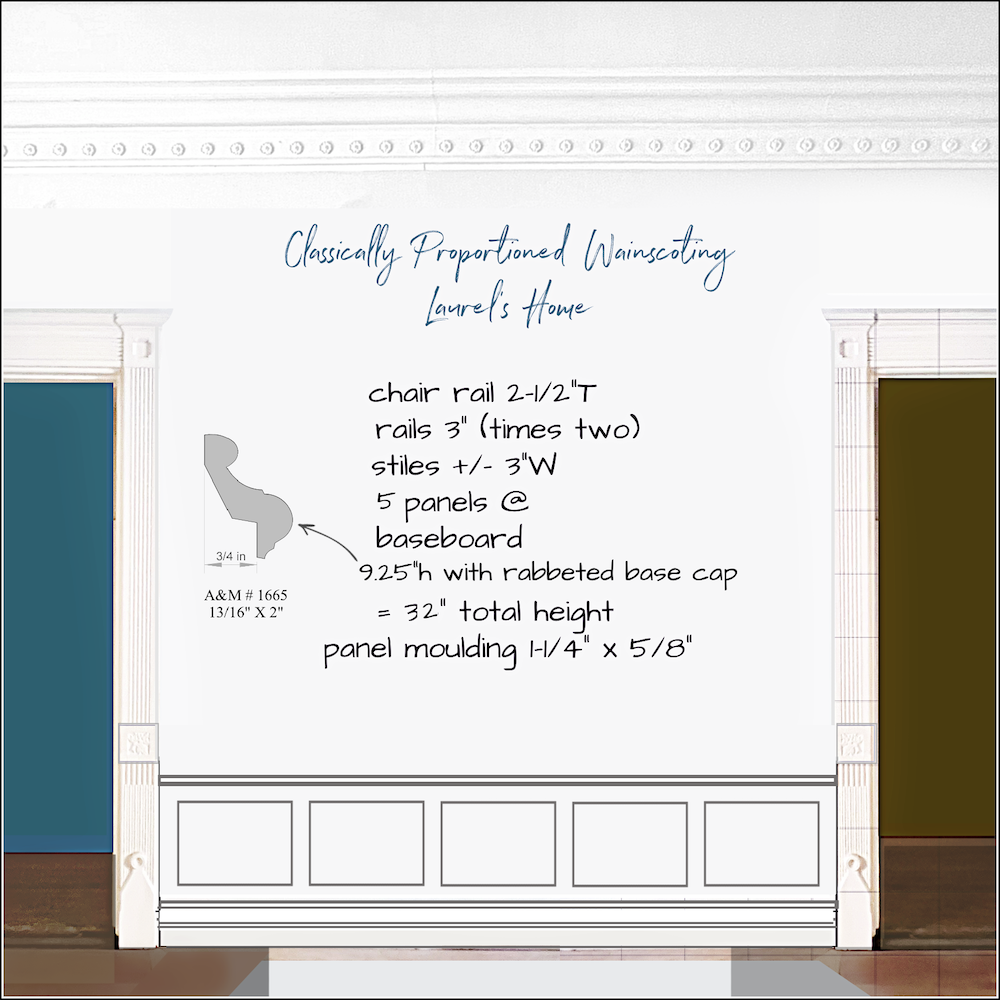
My new wainscoting design January 2024 – 32 -33 high. I think this far less busy design will look much better with the X railing.
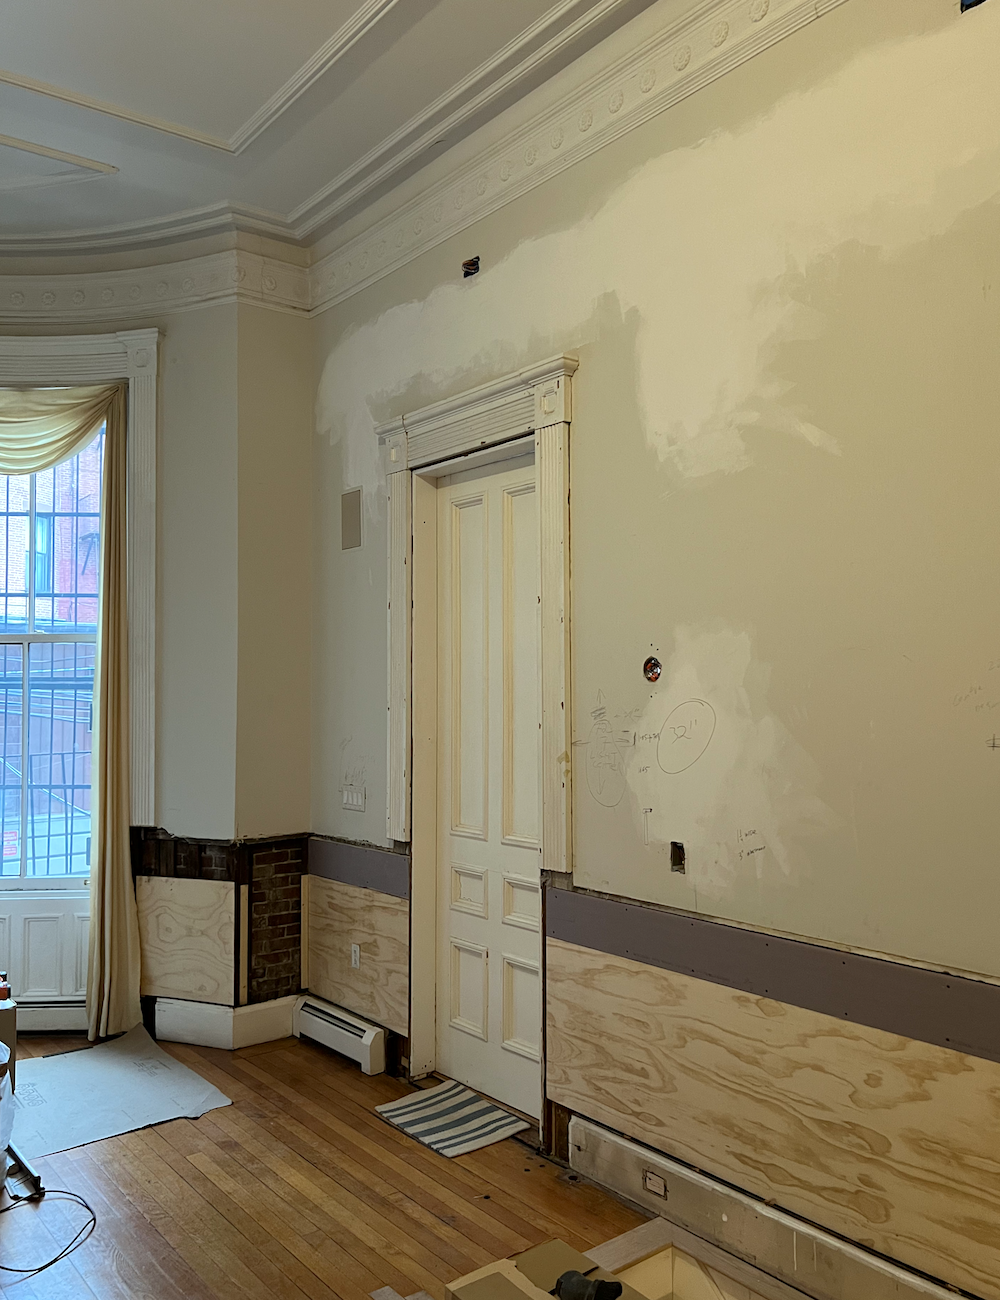
Above, you can see that the guys have been busy putting up plywood at the height of the new wainscoting. However, it will end up being about an inch higher than the plywood here. The blueboard shows you how high the old wainscoting was at nearly 41.”
Oh, dear Laurel. My wainscoting is 36″. Is that a mistake? If it is, I don’t care because I love it!
Strictly speaking, in Fibonacci terms, 36″ on an eight-foot-high ceiling is a superb proportion. The gold mean is 1 to 1.618. (I remember that because my son Cale’s birthday is 6-18. Anyway, 3 x 1.618 = 4.85 (or 5) 5 x 1.618 = 8. Therefore, 3 + 5 = 8 is an aesthetically pleasing proportion. However, it has nothing to do with a Doric Column.
That is the difference.
Therefore, my conclusion is that both are correct.
Of course, if one has a ceiling higher than eight feet, the formula doesn’t work.
It comes down to this. While it’s unlikely wainscoting will ever be too low, it can be too high. I’m not discussing the Arts & Crafts or Tudor-Style 3/4 of the wall panel moulding. That’s a different species of the same animal.
What I mean is a low wainscot that’s not meant to be tall but is a fair amount taller than all of the low furniture in the room.
I think it’s better to go a little too low, as that is one way to make the ceiling appear taller.
Okay, I promise to move on from the wainscoting!
Never mind. haha – I promise to move on– one day!
I’ve spent so much time on it because if I’m spending thousands of dollars getting this fixed, I want it to be right. Although, as we’ve seen, there is no ONE right. There’s a range of rights.
However, before we move on, one last look at the fireplace wall.

Because I ran out of room, we can’t see the entire length of the living room.
Therefore, I redid this elevation at a smaller scale and embellished it.
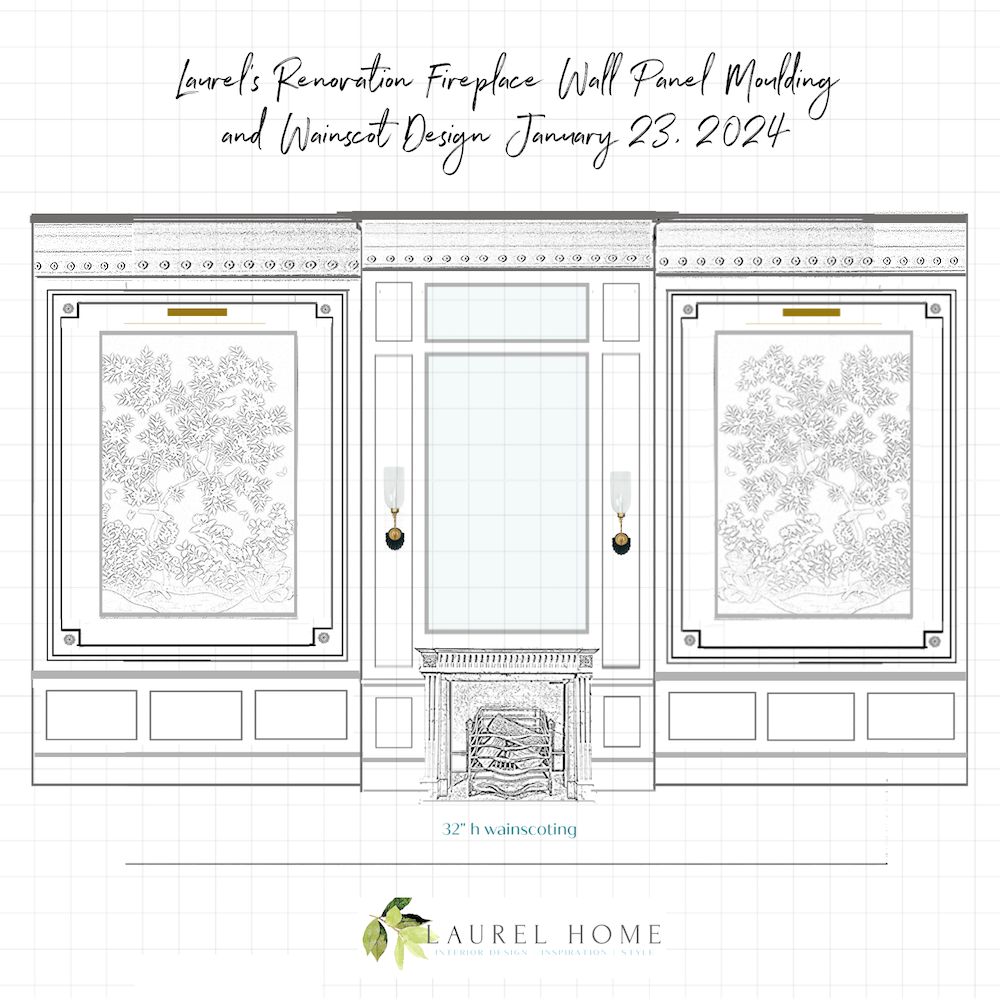
I hope you’ve enjoyed following along with this process and learned something along the way as I have.
xo,

***Please check out the recently updated HOT SALES!
There is now an Amazon link on my home page and below. Thank you for the suggestion!
Please note that I have decided not to create a membership site. However, this website is very expensive to run. To provide this content, I rely on you, the kind readers of my blog, to use my affiliate links whenever possible for items you need and want. There is no extra charge to you. The vendor you’re purchasing from pays me a small commission.
To facilitate this, some readers have asked me to put
A link to Amazon.com is on my home page.
Please click the link before items go into your shopping cart. Some people save their purchases in their “save for later folder.” Then, if you remember, please come back and click my Amazon link, and then you’re free to place your orders. While most vendor links have a cookie that lasts a while, Amazon’s cookies only last up to 24 hours.
Thank you so much!
I very much appreciate your help and support!
Related Posts
 Laurel’s Home Renovation 2024 – News & Deets!
 The Historic Nichols House Museum, One of Boston’s Jewels!
 Renovation News and Deets!
 Decorating on a Budget Without It Looking Cheap
 The Problem With the Ultimate Neoclassical Fireplace Mantel
 6 Farrow & Ball Archived Colors They Should’ve Kept Forever!
 Renovation Update 10-2022 Please Forgive My Sins!











28 Responses
Wow, the game has been officially changed!! I find it amazing how this change resulted in so much more elegance and sense of grandeur. I can’t wait to see it installed!!!
I would love to know what white is used in the Kasha pictures? That pictures keeps haunting me, it’s so beautiful! I also would like to know what white you ended up using is your new kitchen? It may have been discussed in an earlier post, but I did not find the info?
I love your vision, Laurel! Each iteration gets better and better. Can’t wait to see it all come to fruition :]
Don’t know how I missed this post a few days ago — but it is a great post. I so enjoy and appreciate the discussions and reasoning that you present. This newest design looks so good; fewer panels that are horizontal seems both simpler and more elegant.
I follow along religiously and it never, ever occurred to me to flip the panels horizontal. Brilliant and perfect.
I can picture the X panels on the stairwell and this new design will look better with it.
Laurel,
I just sent my son, who is an exceptional carpenter [Mom’s gotta brag], your link. he’s impressed!!!
I really like the look of your new design. I’m one of the ones who could not see why you had to change the old stuff but I can tell that this looks more peaceful and pretty.
I have a question- Why do the guys have to install plywood on the walls? Does it have something to do with your building being old?
Hi JA,
Actually, they don’t have to, especially with this moulding that gets glued on except for the base cap which is wood. The other mouldings are all polyurethane. It is an exceedingly lightweight material, and molded rather than milled. It comes pre-primed ready for paint. It’s a fantastic material in that it will not shrink, rot, or get eaten by termites. Most of it can even go outside if the proper paint is used. So, yes, it can go in bathrooms as well! In fact, I’m putting a little crown inside my shower.
The reason they did wood upstairs is because real wainscoting is a wooden panel with raised rails and stiles, thus recessing the panel inside the moulding box on the wall. This one will be flat. However, from a distance, it’s almost impossible to tell if the inset panel is recessed or not.
32 inch looks marv! Diana, Dar, and Heather said it well. Your new more encompassing drawing is breathtaking.
Hello Laurel,
Just a couple thoughts…
Seems initially everything was designed and coordinated on the vertical rectangle: windows, doors, tall ceilings, wainscoting/panels, door panels etc., basically. Now horizontal panels are introduced along side the vertical door and lower window panels and other wainscoting/panels elsewhere. What would the past “experts” say about the mix? Does it all become less noticeable after the furniture etc. gets placed?
Just curious, what happened to the old wainscoting that was removed? The old columned fireplace?
Last question: Was adding more of the wainscoting panels – extending downward onto the stair well wall – to help meld the two(living room wall and stair well wall) as one rather than having the suspended wainscoting bridge, ever considered? It might make the stair opening look more “original”, authentic to the space(?). Handling the baseboard and small ledge would take some design effort, but is doable. Or what about removing the wainscoting/baseboard all together from the beginning of the stair over to the door?
Always interesting to see what happens next.
Thanks Laurel,
Bill
Hi Bill,
In order to make vertical panels, they would need to be quite narrow, like only 8 or 9 inches. I think over-all, it looks better to have the horizontal shape.
Not putting the moulding on the staircase wall has been brought up numerous times as I’ve been writing about the staircase for years. lol It would look odd if it wasn’t there.
I would love to run it down the stairs, but we’ll have to see after the stair rail goes in. It might be too busy. However, we will be beefing up the skirting. Also, there will be a handrail on the wall side of the staircase.
The horizontal panels in the living room are a spot on change. Feels much more serene and appropriate now. Good job hashing it out!
This is just fascinating, and I have enjoyed following your thought process. Your renderings illustrate things so well, and I feel like I have learned so much!
I do feel that if you have grown up around correct architecture, often you do have an inherent sense of what is correct. It’s interesting to see that there are mathematical formulas that pretty much explains why your eye can differentiate between right and wrong.
I am going to throw out my dilemma just for fun: I am renovating a space that was carved out of an attic, the previous owners have put in walls with sloped ceilings. I have painted the entirety a very light cream color to hopefully blur the line between ceiling and wall. But this area is on two levels, and they have a banister and railing to keep someone from falling from the top level, and also to have something to hold on to for the four steps down. Boy, the railing looks too high and out of proportion. It may be a similar situation to wainscoting, but when you have very short walls and long, sloped ceilings, it is hard to get the correct proportions in mind!
This post made me pull out my yardstick! I live in 100+ year old colonial revival with original wainscoting- 9-10’ ceilings depending on the room- ends right at 32”. So I guess they knew what they were doing back then in Indiana!
Love all that you are doing- and educating at the same time. I am learning so much.
When my ex installed beadboard in our bathroom years ago, he installed it at 48”. His thinking was that since the beadboard sheets were 8’ tall, he could get 2 installed out of 1 sheet. When he was done it made the room look like it was cut in half. 🤦♀️
Hi Mary,
Bless your DH. He could’ve gotten three widths installed out of one sheet! Each would’ve been 32″h, then if doing a rabbeted wainscot cap, it could’ve been up another inch or two making it 33″ – 34″.
Absolutely LOVE the horizontal panels! It looks “right” now!
Brilliant! This post came at the perfect time for me. Thank you for sharing this detail! It’s going to be fabulous.
Never mind the last part, found it.
Yes, the link is in the post, but just in case others can’t find it, here it is again. https://www.thisiscarpentry.com/2010/12/03/misused-confused-chair-rail/
This should be required reading for everyone in the home building industry (including interior designers) as well as DIY folks.
I like this so much better.I can’t wait to see it finished!
I can’t find Brett Hull’s response, I try to read them all. It’s all so interesting.
Hi Laurel
Bottom line, if you like it , that’s all that counts.
Please put your health over a reno.
You are very special to all of us.
Thank you, Diana. It’s a little like being pregnant. There’s some discomfort and one’s life has to be modified to some extent or another to accommodate the new life growing inside. However, it’s temporary.
This looks just perfect, Laurel! I really like the change to the horizontal panels. This rendering is so graceful and pleasing. Your hard work and attention to detail is unparalleled!
I love your last rendering. It’s absolutely elegant. I do like the wainscoating a little bit lower because it makes the whole wall look much grander and the ceilings higher. Brilliant!
It’s been wonderful watching your renovations and your design approach and process. I’ve been following your blog for about 8 years. For much of that time, I was restoring a 1911 home and your guidance was invaluable. I consulted your blog at every juncture and your wisdom was a core element of my success. Alas, I ran into health trouble. We were out of energy and money so we sold the place. Now, after a year of renting, we’ve purchased a 1990s patio home (a strata rancher). It’s in a perfect location and I can afford it without a mortgage. It’s dated and a classic decor just isn’t right for the architecture. I think a modern or Scandinavian style would work well. Once your renovation dreams are realized and you’re looking for blog topics, I’d love to see a post with modern decor and designers you love. I’d love to see one of your “why it works” style posts focused on Scandinavian design.
Can’t wait to see your finished apartment.
I love the way things look in your last sketch. It’s absolutely beautiful. You have worked so incredibly hard on your home. Bravo to you!