

Hi Everyone, this is a continuation of the living room wainscoting post. If you’ve read part 1, please click the link below to skip to part 2. If you’re just starting out, please continue from the beginning.
Part 2 Begins Here
Hi Guys,
If you missed it in last night’s love note to subscribers who receive the Hot Sales, I am blessedly on my new Macbook. It’s wonderful!
Yesterday morning, Robert, my contractor, and I had a terrific meeting to discuss the mouldings. Well, the focus was on the crown moulding.
I believe the guys have the day off on Monday, but on Tuesday, bright and early, they’ll be here to rip out the 144-year-old living room wainscoting that runs throughout the living room.
WAIT, Laurel. I missed that. You’re doing what? You can’t rip out original moulding! I’m shocked that you would even entertain such an idea!
Please calm the freak down. It’s getting removed to be replaced with something a lot better.
At the risk of sounding phenomenally pretentious, just because something is old doesn’t mean it is a great design. Most of it is, but, in this case, they screwed up a little.
While the architect of my house, Samuel Dudley(!) Kelley was a prolific designer; he was no Peabody and Stearns. To quote from the fabulous anthology Back Bay Houses, Conrad Bunting said of SDK: “…these houses lack unity as a group or as single units, and their individual elements compete for the spectator’s interest.”
Indeed. This is evident in my place.
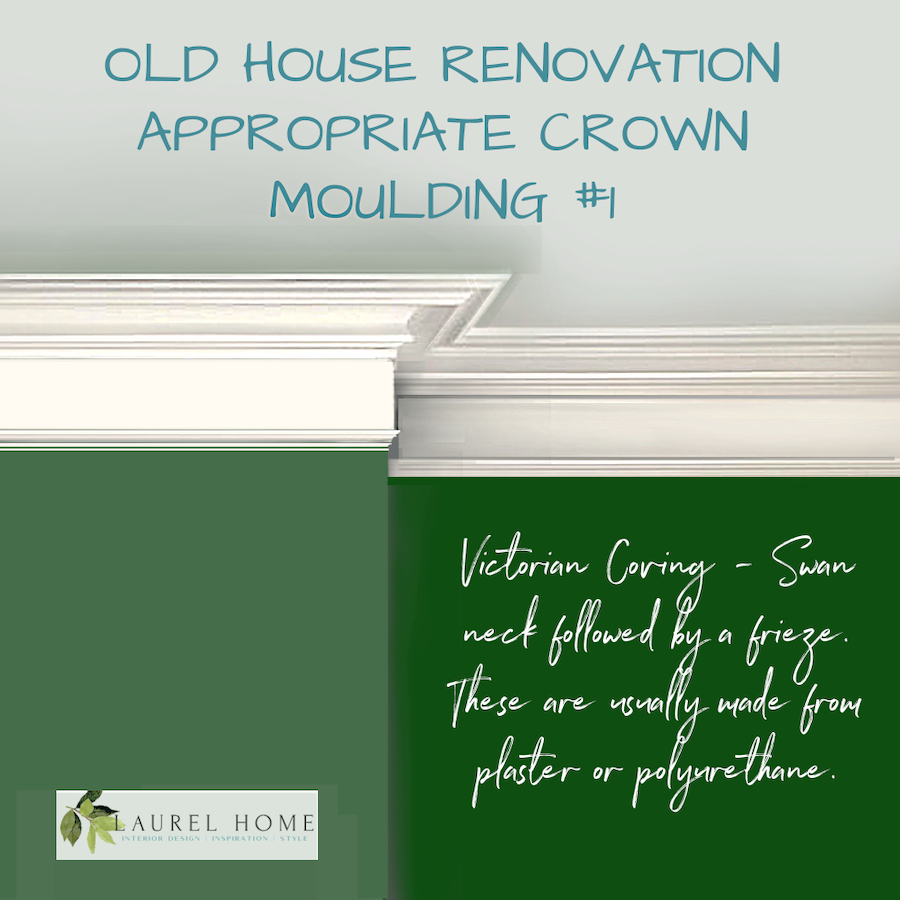
The Victorian coving is in good proportion; the frieze is decorated with circular rosettes. That’s all fine. However, when it comes to the door and window casing, we begin to see what Bunting was talking about.
Directly underneath the rosette studded frieze is a plinth corner block with a shallow cross design. It is neither round nor square. Underneath is a fluted casing interrupted by another plinth with a carved floral design. That is the element that first catches one’s eye. Underneath that, the fluting changes its design. He should’ve stopped right there, but to finish it off, there’s a rowboat paddle stuck to the bottom.
Outside my unit is the common front center hall. Here, the wainscoting is very strange, with shaped stiles reminiscent of a Swiss chalet, perhaps, and geometric carvings on the insets that have no business being there.
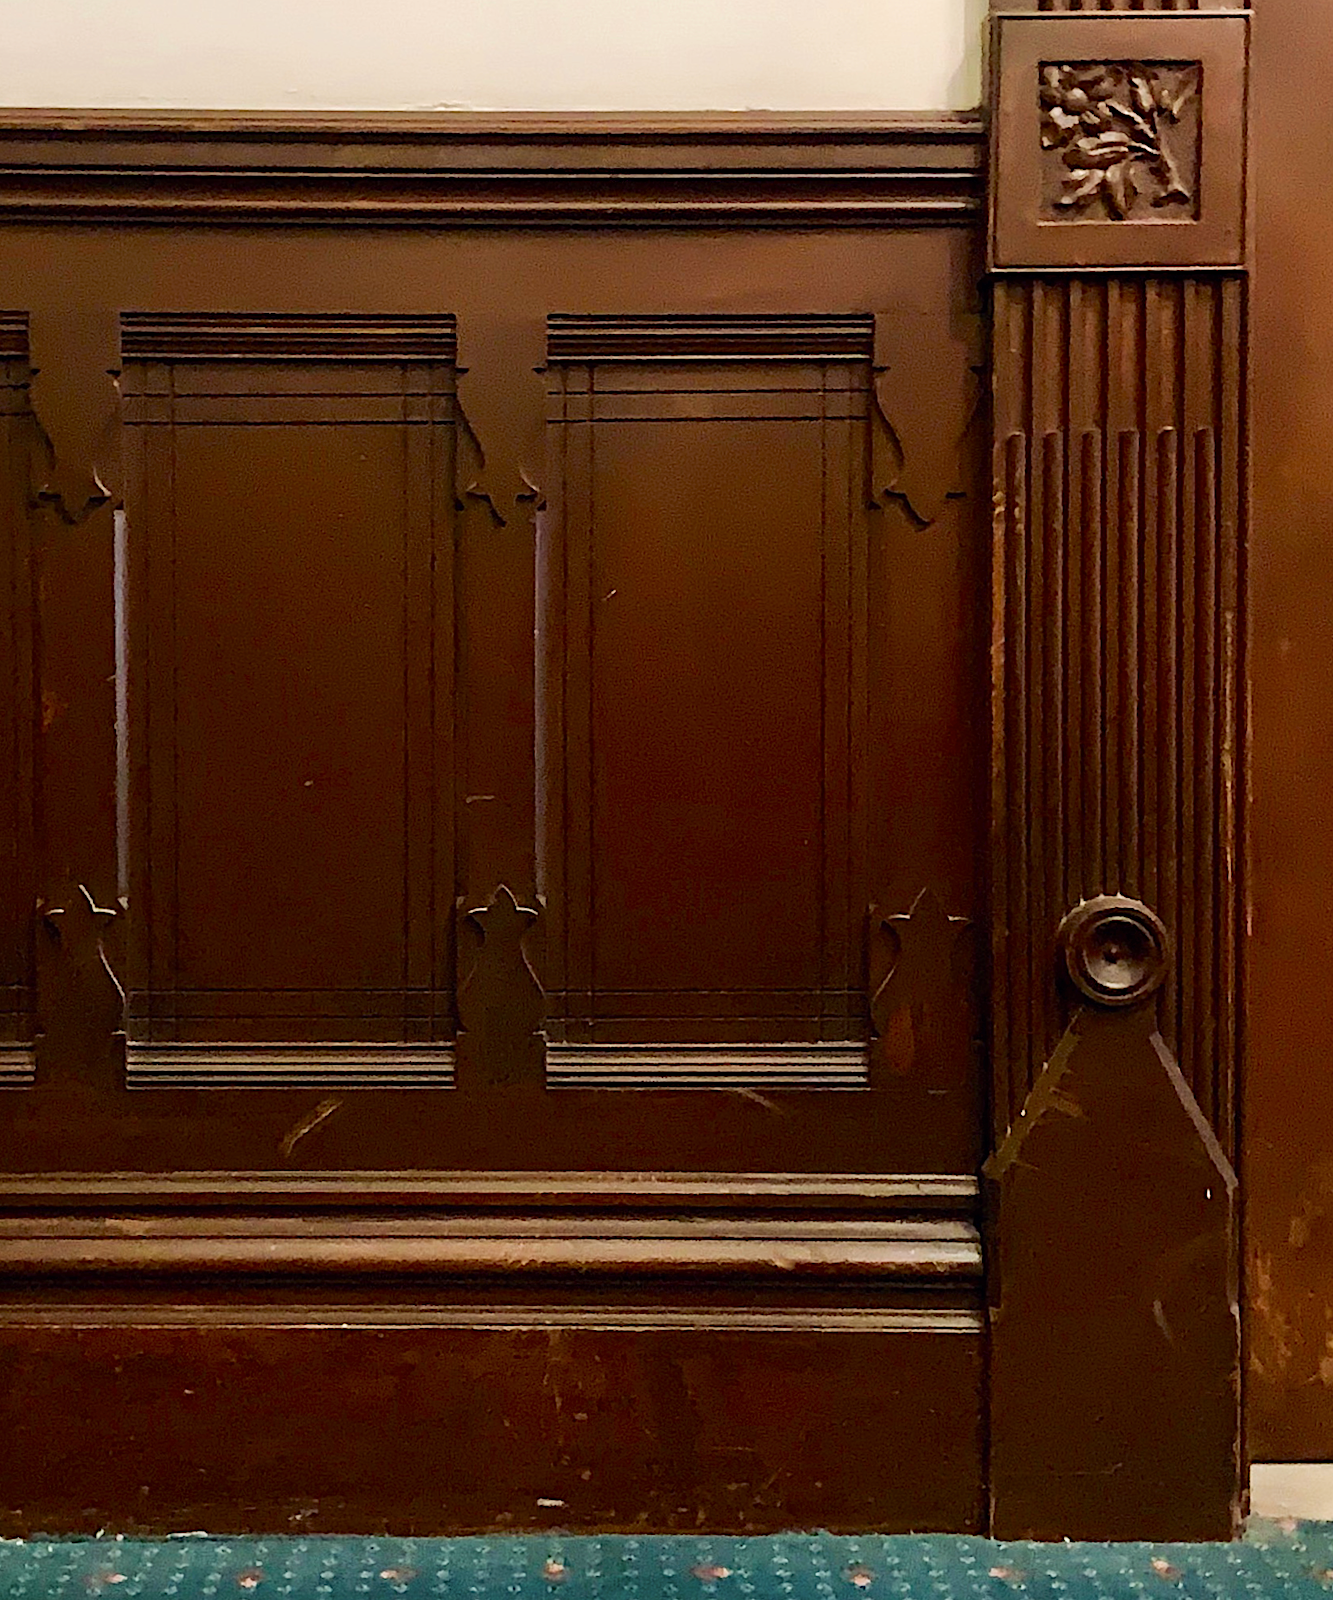
Please note that I am not allowed to share images of the common areas of my building. However, this is my door from 1978, and this is a small piece of the wainscoting.
Okay, Laurel, yes, the wainscoting in the hall is strange, but yours is lovely.
My photos look lovely because I only show bits of it at a time. Plus, it’s a photo.
- The gloppy paint, especially on the chair rail and baseboard, is issue number one.
- Issue number two is the height. While some may argue that the height is in proportion to the room, that, I feel is a slippery slope.
The living room wainscoting should be the same maximum height, whether the ceiling height is eight or 18 feet.
We’ll get to that in a sec.
- In addition, my new fireplace mantel is only about a 1/2″ taller than the living room wainscoting.
Yes, I knew this all along and got the fireplace mantel, anyway. I wrote about the mantel in this post last July. By the way, I did research this before purchasing. Paris has many gorgeous interiors with soaring ceilings and fireplaces about the same size as mine.
The size I got makes sense also because my firebox is only 27″ square.
- Another problem with the wainscoting is the irregular box sizes. There are a few places where the choice that was made looks odd.
- The baseboard is too high. I would love the 11″ baseboard if there were no wainscoting. However, the proportion is wrong, even for the 41″ high wainscoting.
- Oh, there will also be 36″ wainscoting in the entry and the den. Not only will it be new, it will be nearly five inches lower.
- Finally, while the mouldings need to be hunky, they are a little too hunky.
Below are the mouldings we used for our living room wainscoting in 1996
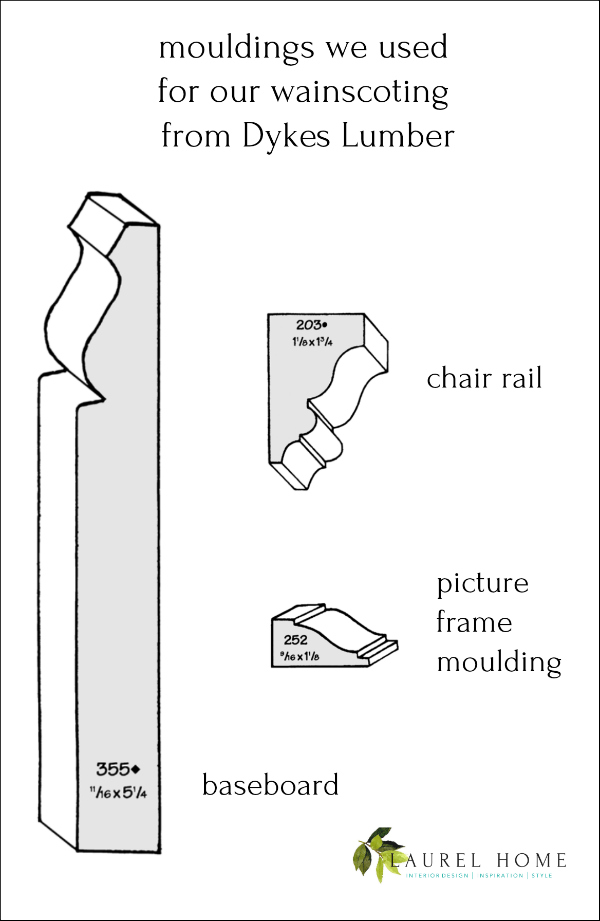
The other issue when choosing the best mouldings is ceiling heights from 9′-1″ to 13′-6″.
Therefore, I need to choose mouldings that will stand up to the grand living room and not over-power the hallways and bedroom.
Can’t you do different mouldings?
I could downstairs, yes.
Now, for the best part of this post, and by a lot. I researched and found a fascinating article by Brent Hull in 2010 about the misused term “chair rail.”
Brent is adamant that the term “chair rail” has nothing to do with chairs or furniture of any kind. In fact, until modern times, it was not called a chairrail. It was called a dado rail or wainscot cap. And, 36″ high was not the common height. It was more like 18″ – 30″. But probably under 24″.
His post is excellent, but the comments are terrific, too.

My rendering of the bedroom wall.
Looking at my bedroom elevation, you’ll see that I drew the chair rail at about 32″-33″ high. I think this looks terrific with the nine-foot ceiling. I think I would prefer a lower than 36″ height for the downstairs entry, as well. Then, there’s the bathroom.
Breaking News Bulletin
Monday, Robert’s stone mason is coming to survey the downstairs door moving.
And we are confirmed for the operation living room wainscoting demo on Tuesday.
Laurel has reserved a room at the Copley Square Hotel. lol
I got a terrific rate. After all, only a lunatic visits Boston in the middle of January. ;] The small fee is only to cover the heat and cleaning service.
So, getting back to the living room wainscoting, do we design or select mouldings first?
I think a little of each.
However, it is now several hours later. It’s a challenge to specify, design, draw, and write about it. George said I should make videos. He’s right, except never mind.
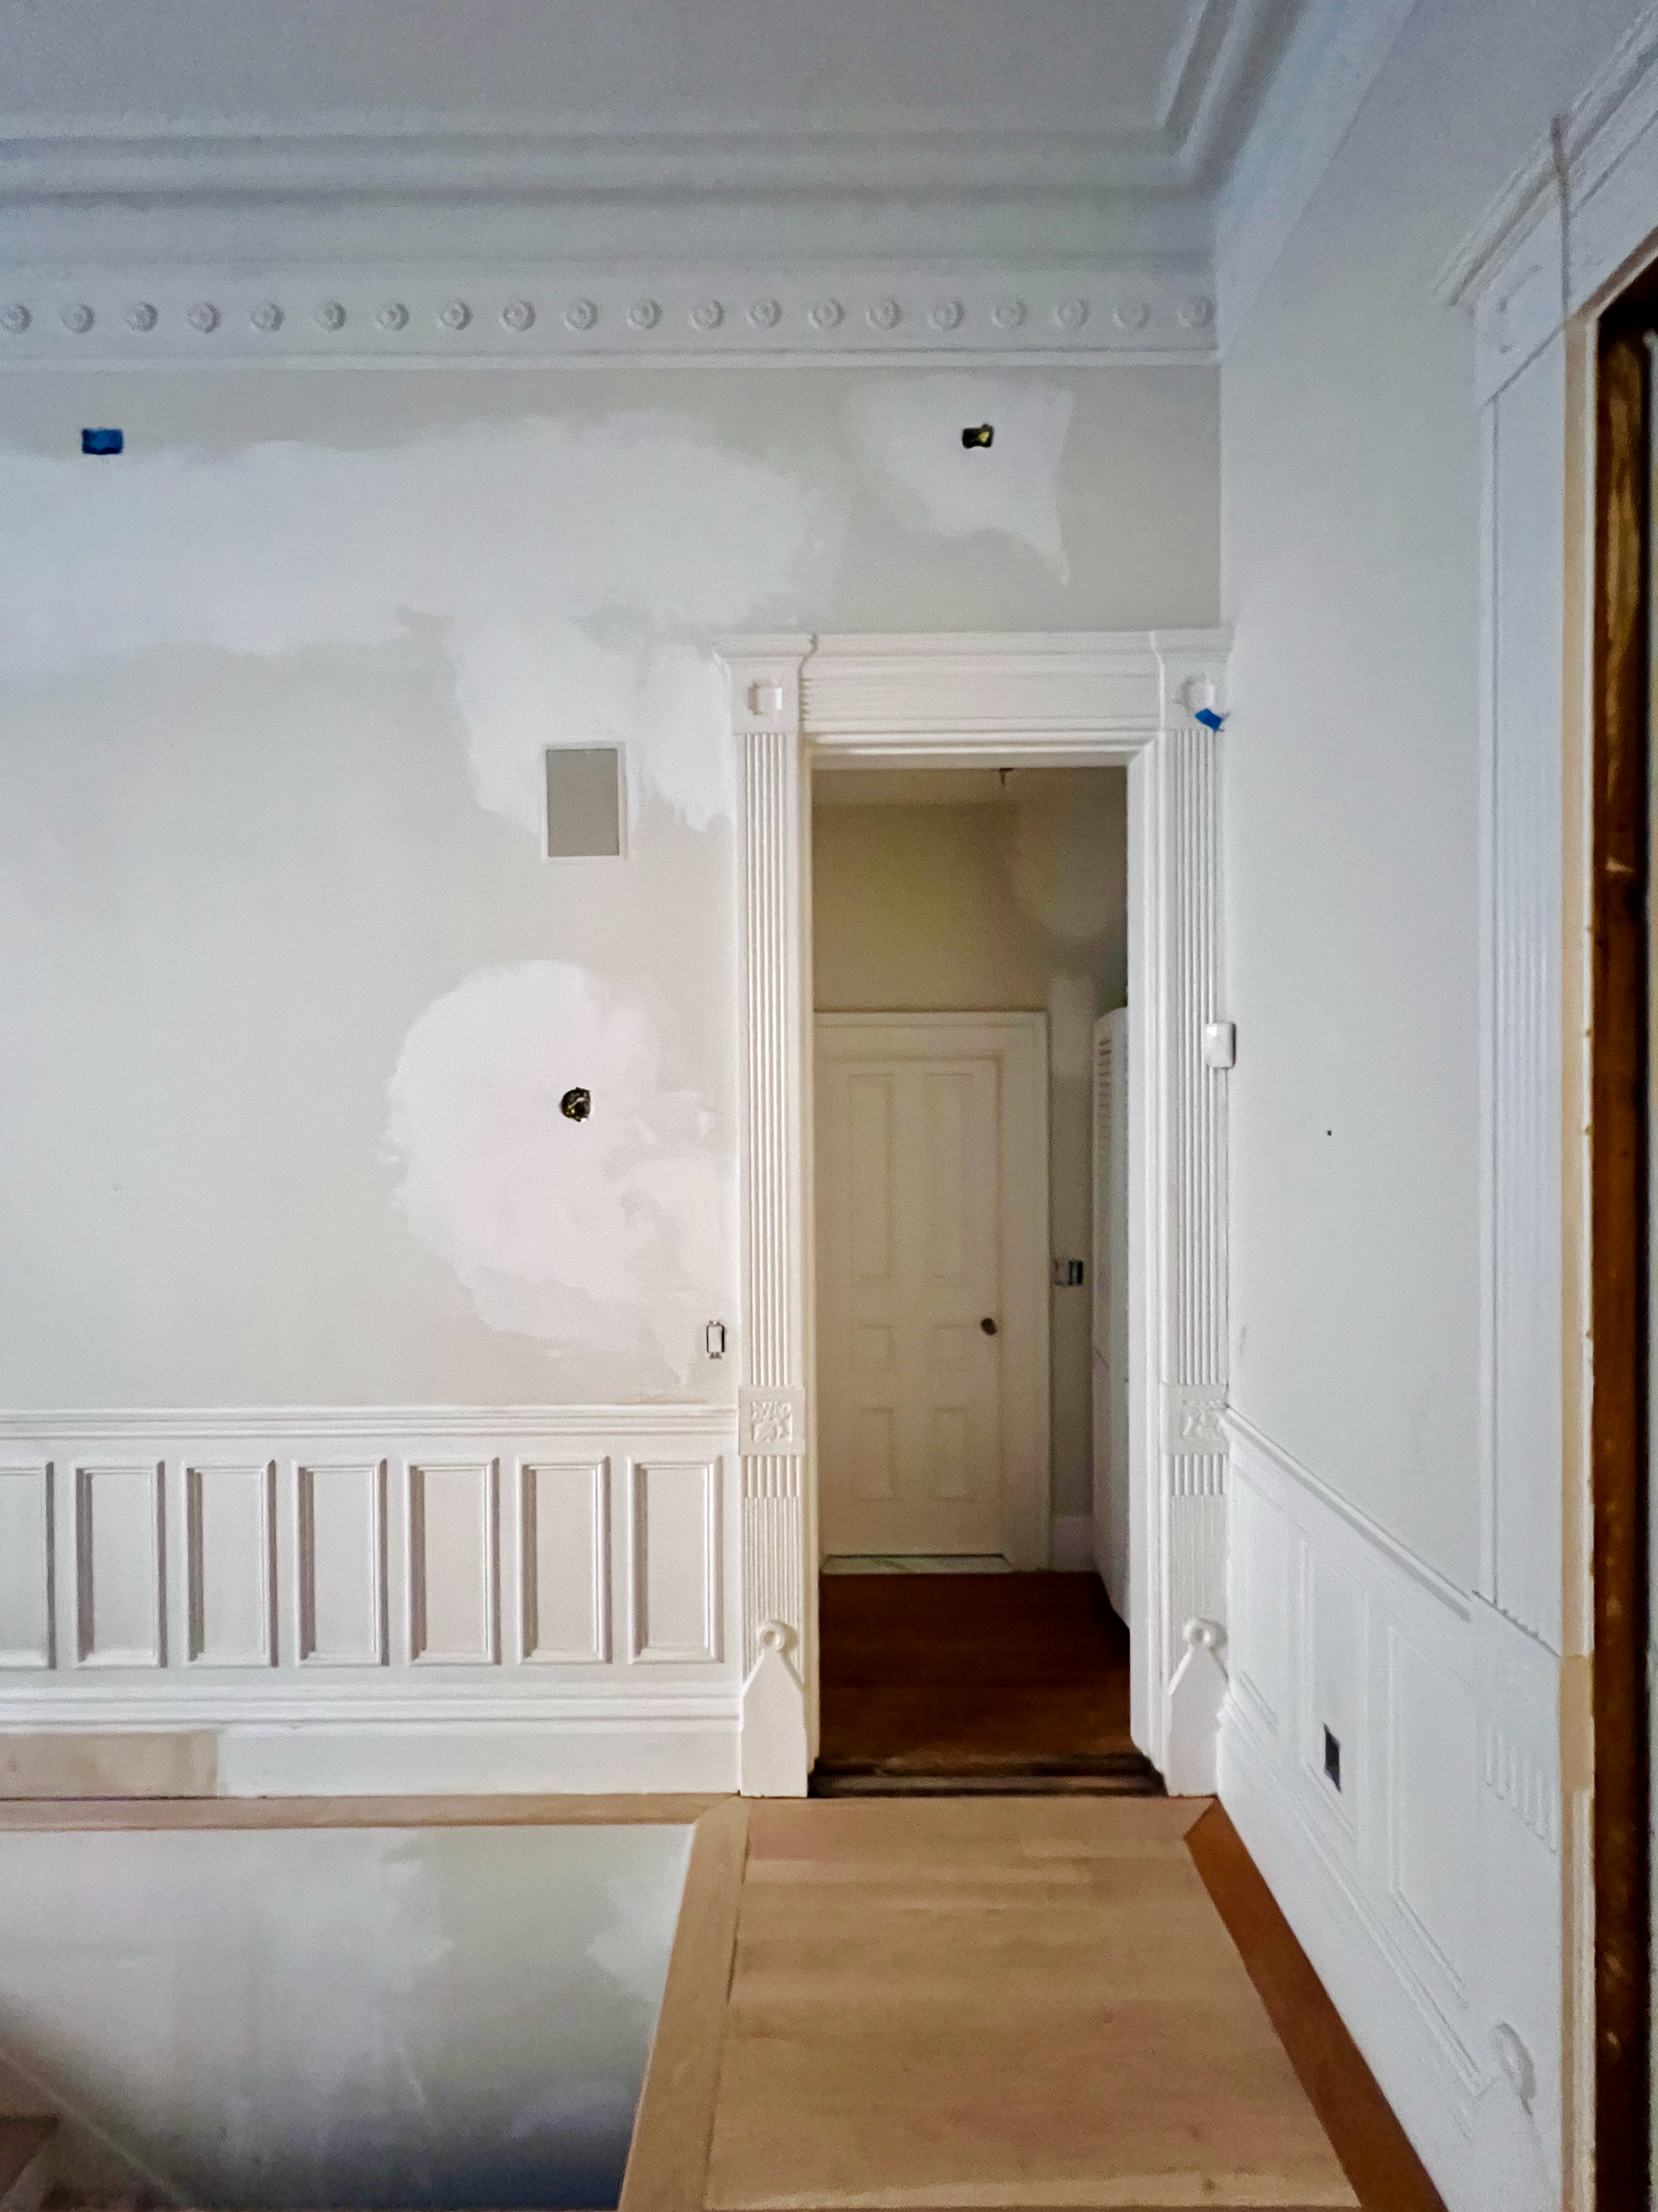
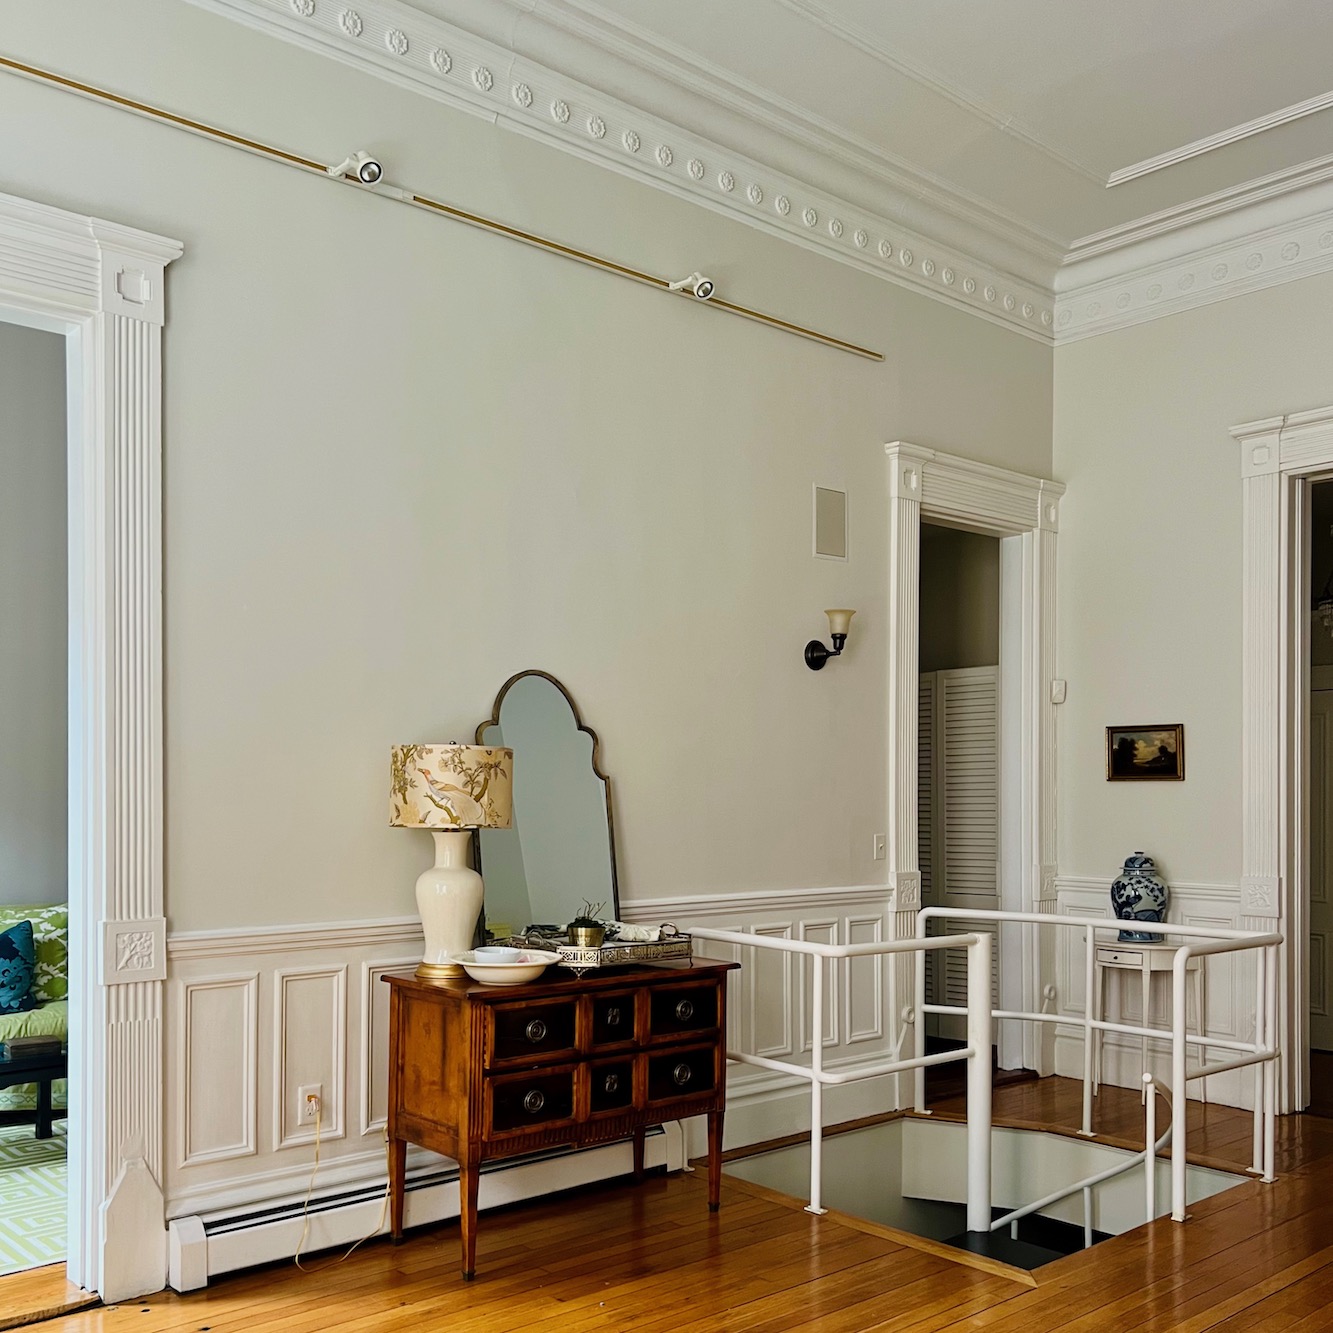
So first, let’s look at the only image I have of the naked living room where the staircase wall is.
By golly. In this rendering from 20 months ago, I got the hole pretty much where it ended up being.
I think I’m going to cry, especially after everything we’ve been through with the codes...
Did you see the finished staircase? Anyway, here you can see that my furniture looks diminutive against the 41″ high wainscoting.
But, Laurel. The living room wainscoting is in proportion to the room.
Ummm… We just went over this, but it’s fine. Brent Hull had the same issue if you read his comments. We’ve been brainwashed. However, Brent thinks the wainscoting should be no more than 32″. Given the layout, the 36″ height will be perfect.

See this image I made last year. This was wishful thinking. haha However, the new wainscoting will be about one inch lower than this.
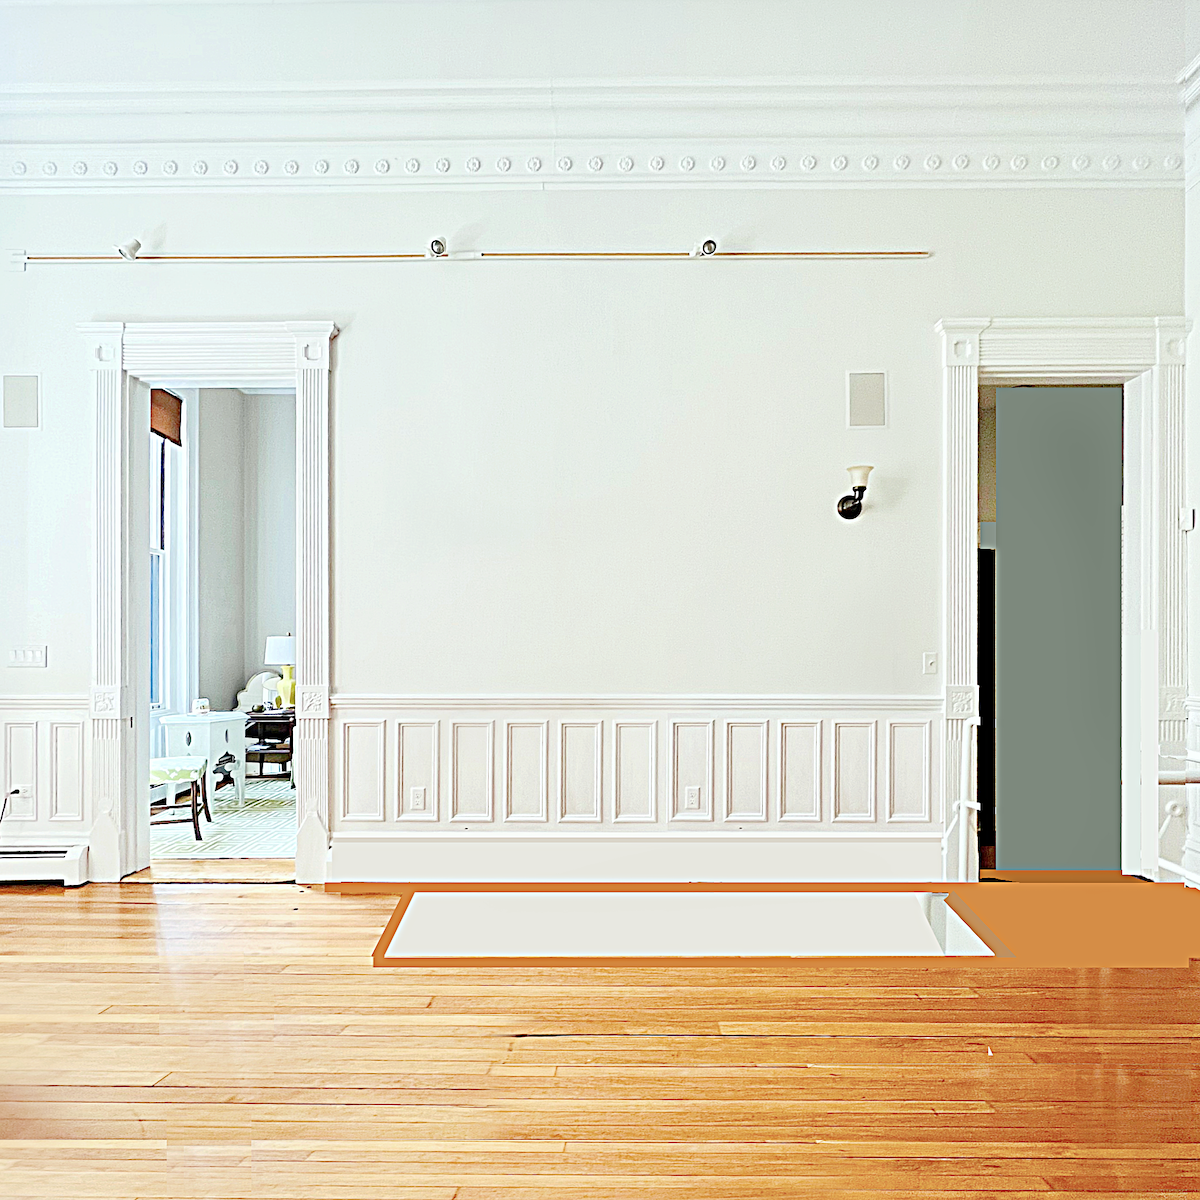
Below is a rendering with the new living room wainscoting proportions.
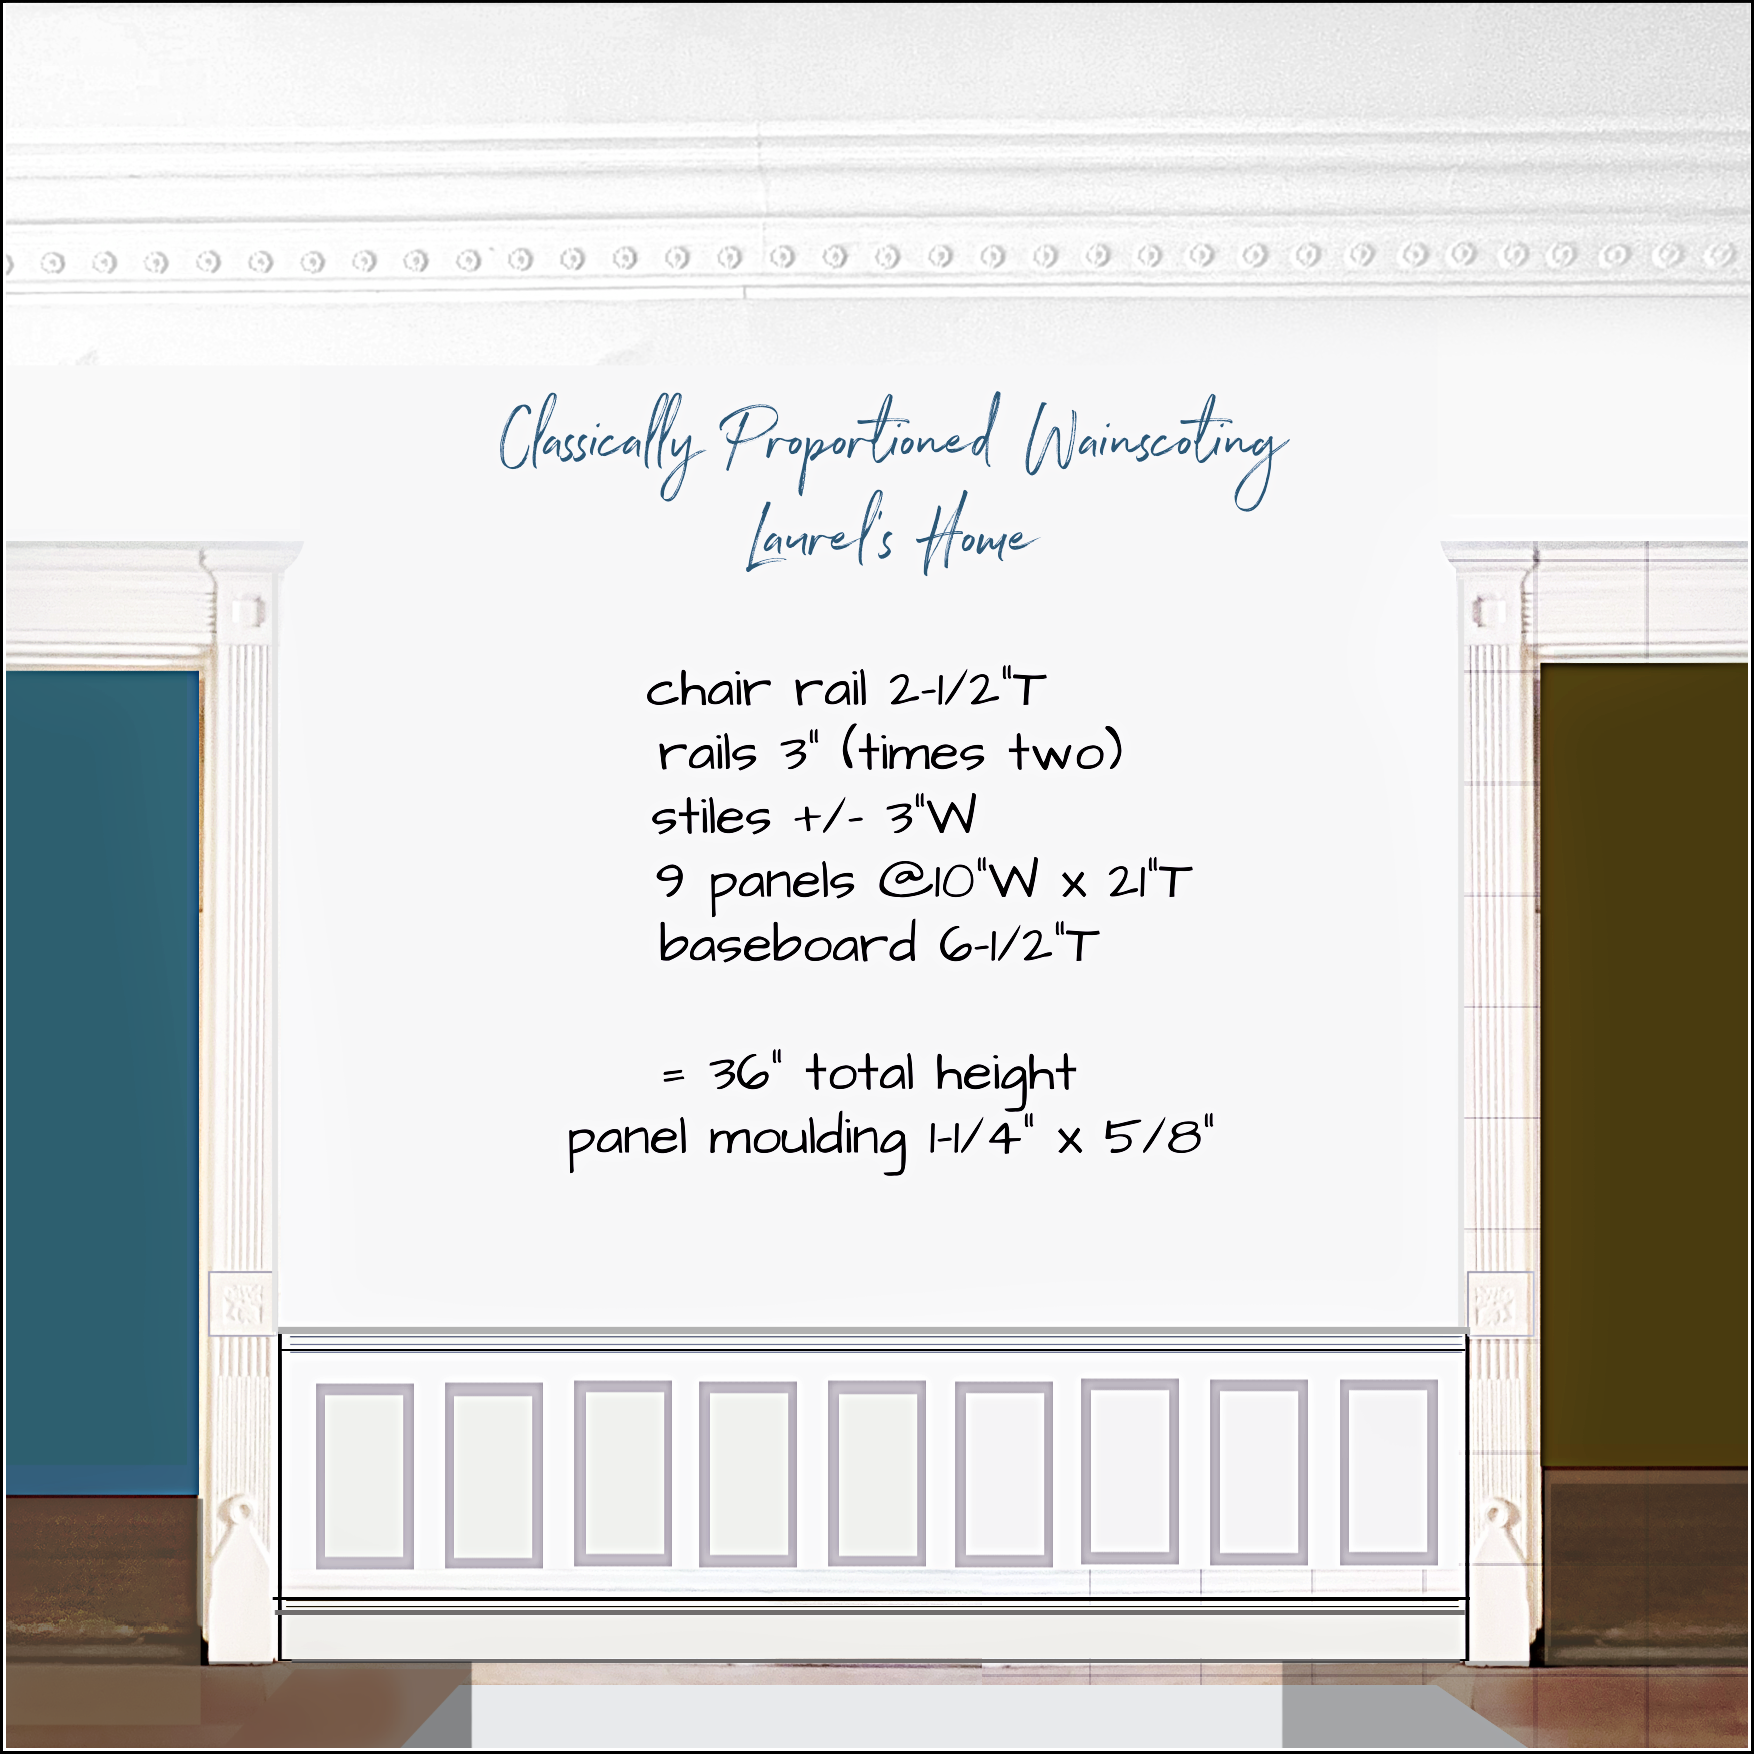
This is so much better!
See how tall it is? Plus, the widely varying-sized boxes. There should be one where there are two skinny ones by the lamp.
Behind the Chippendale chair, there should be two boxes instead of three. Another thing is that typically, there is about 3″ between panels. These stiles are only two inches.
Okay, we will finish this up next week.
I’ve ordered all the crown moldings, and I’m 95% sure about all the rest.
The magnificent work of AB Kasha! They always knock it out of the ballpark! Please follow ABKasha on Instagram.
Please check out the Best Proportions for Interior Trim.
I promise to get off of this topic soon. However, after lighting, the architectural elements are the most important aspect of the interiors.
Since the stairs have gone in, I think a lot about the furniture I’d like to put in the room. I’ve always wanted to have a sofa in the living room.
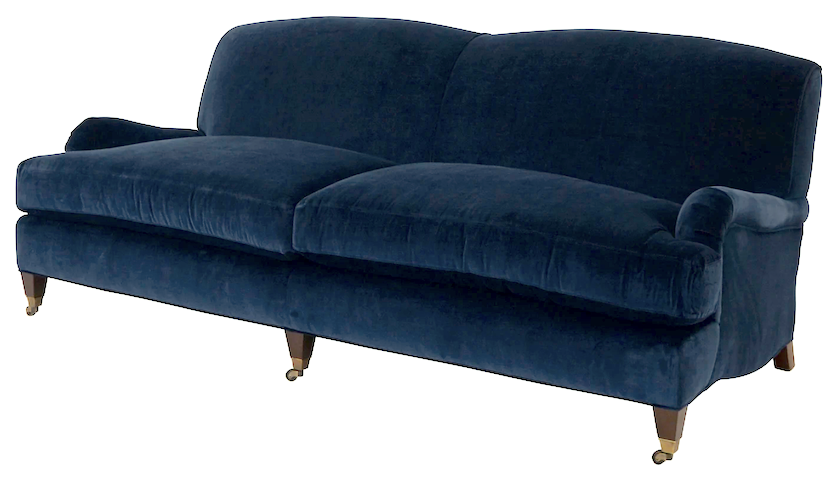 The exquisite English roll-arm Morgan sofa from Jayson Home.
It’s my number one sofa style!
Someone also asked iI’dve picked out my paint colors.
Haha!
Why don’t you look at your paint guide, Laurel?
You know, that’s a bloody good idea! ;]
xo,

*********************************************************
Part 2 Begins Here
Hi Guys,
How are y’all doing?
Things are getting handled with the hidden door situation.
I had a great meeting on Friday with my contractor, Robert. I sent him a comprehensive to-do list, and he sent a brief one back to me.
My renovation to-do list consists of:
Doing the final design with drawings and getting the wainscoting mouldings ordered.
Order tile for the bathroom.
He didn’t say, but I should order the tile for the kitchen range backsplash, too.
Since I really do have to get this moulding ordered, I’m still on this topic. Hopefully, there will be something you can take away to use for yourself now, or sometime in the future.
Here are the pieces I’m ordering.
Chair rail
I prefer chair rails to be somewhere between 2″ – 2.75″ tall. Yes, they can be a little bigger. It all depends.
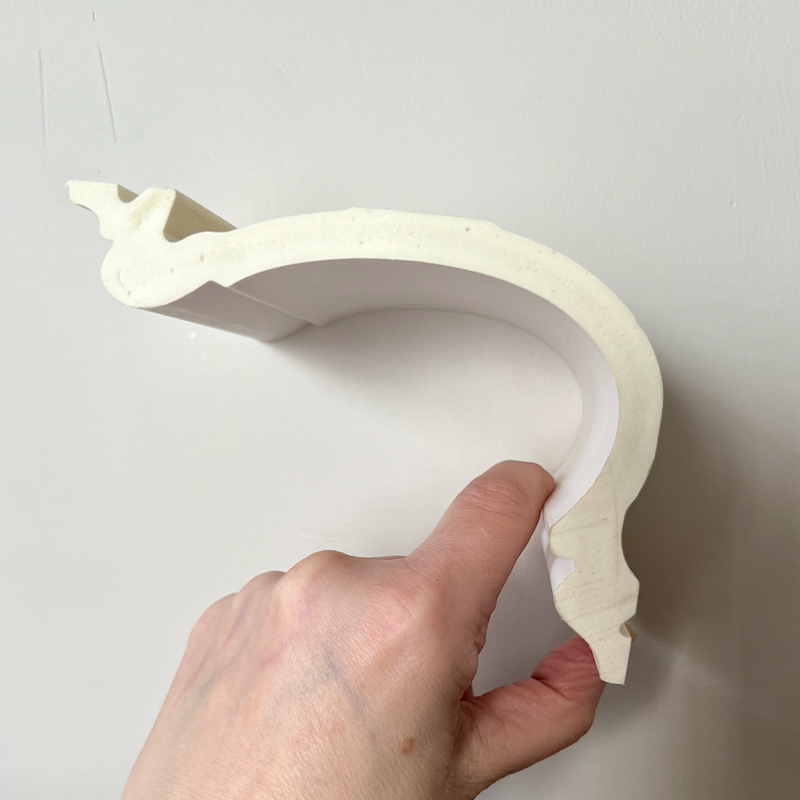
The one I’ve selected comes in both rigid and flexible versions. I’ll need a flexible version of the chair rail for the upstairs and downstairs curves.
The perfect chair rail for all of the wainscoting is:
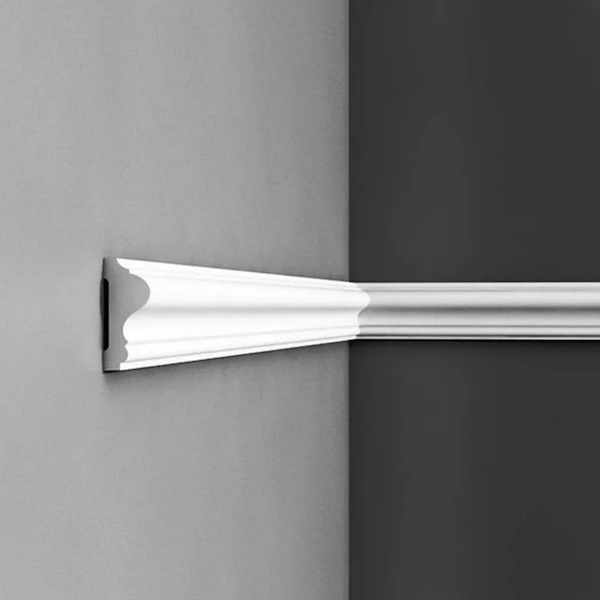
Orac Decor P8020 and FP8020 (flexible). It is 2-3/8″ tall with a one-inch projection. This one is not too big but hunky enough to stand up to the existing mouldings.
The panel moulding doesn’t need to be flexible because they are not very big and can bend enough for the panels.
I still would love to use a polyurethane moulding however. While Orac Decor has some nice ones, none are quite right. A companion is moulding P8030 @ 1-5/8″. I showed it to you the other day. It is perfect for our baseboard, which I’ll get to in a sec.
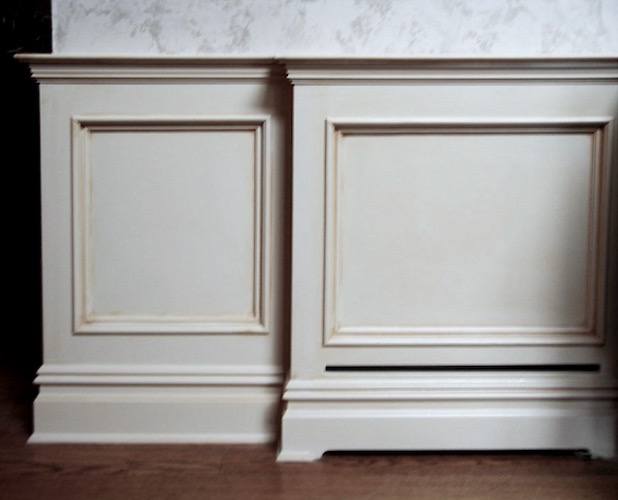
While using a panel moulding at this width is fine, I prefer 1-1/8″ – 1-3/8″ wide.
I find the smaller panel mouldings with a more square outer edge give the sense that the rails and stiles are raised above the inset panel. It’s an optical illusion because they are all on the same plane.
This is a lovely integrated wainscoting and heating system from Sunrise Woodworking. However, one thing to watch out for is doing a crown as large as this for the chair rail. While I love and used to have a solid crown, it shouldn’t be more than about an inch deep. As you can see, that’s a pretty sharp corner to get jabbed with, and if you have younguns running around, well, you get it.
After an extensive search, I found the perfect panel moulding.
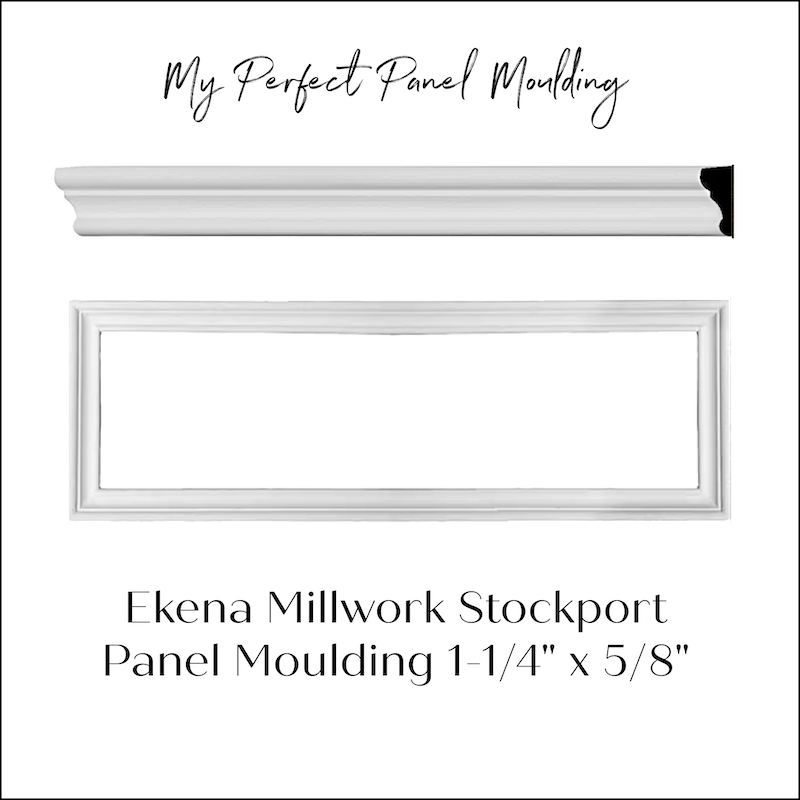
It is the Stockport panel moulding from Ekena Millwork.
The baseboard is a little more complicated. We need to keep it at 8 inches upstairs.
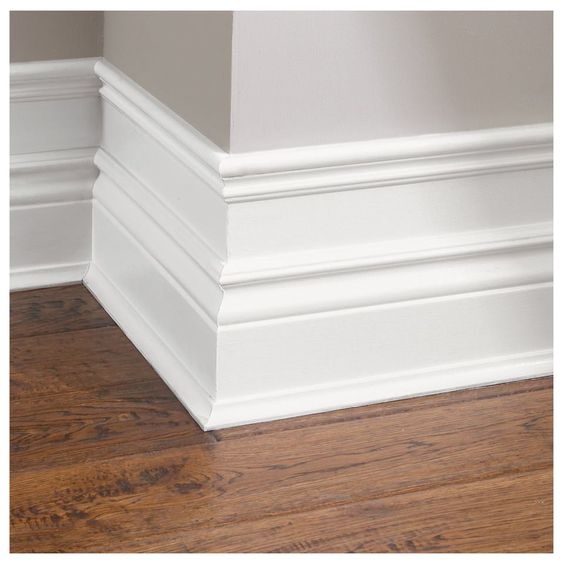
This is the kind of Victorian moulding that one can make with a panel moulding or base cap on top and a regular smaller moulding on the bottom. The wall is in the middle. However, the illusion is of a grand baseboard, which is wonderful with high ceilings.
Now, this one is super tall! The bottom section alone is nearly 8 inches. (It will be linked later at the end of the post.) By the way, this is the P8020 chair rail moulding used for the base cap. The 8030 (bigger number, but smaller moulding) is used for the panel moulding. I do like it, but I would like to reserve the P8030 for the baseboard’s base cap and the picture frame moulding downstairs.
I’m also using the P8030 for the ceiling moulding in the kitchen, along with this beauty.
You lost me, Laurel. What ceiling moulding?
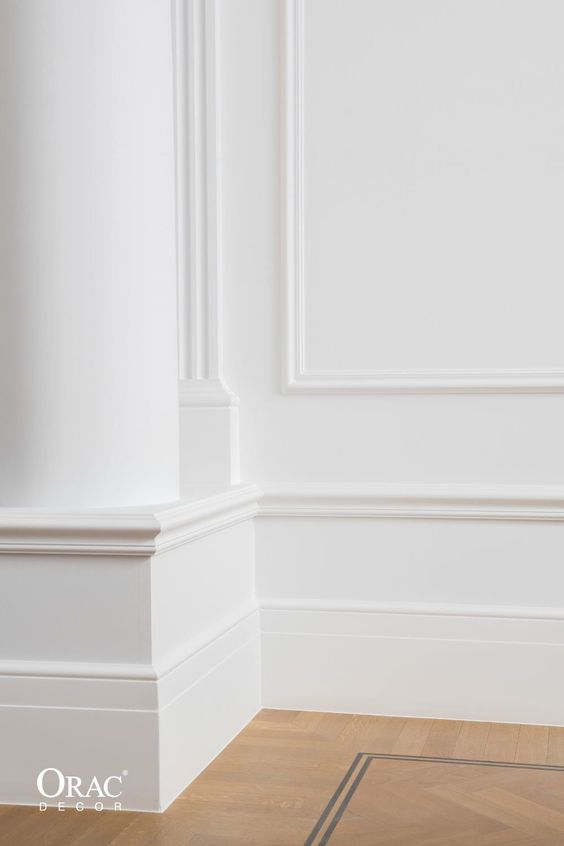
It’s an additional piece of trim on the ceiling to extend the crown out further.
It’s one of the hallmarks of Victorian-style molding. We discussed it recently in this post. You can see it in all of the old homes in Boston where they haven’t ripped it out.
Above is the 8020 chair rail, but then they repeated it on the panel moulding. I feel it’s way too big here. Plus, it would be better to do something different and let the chair rail be special.
I imagine this is all a little confusing. If so, hopefully, in the coming weeks, when I show how it looks in real life, it’ll begin to make sense.
But, here, let me show you a revised living room wainscoting image.
We began looking at this in the most recent entry of the renovation news post.
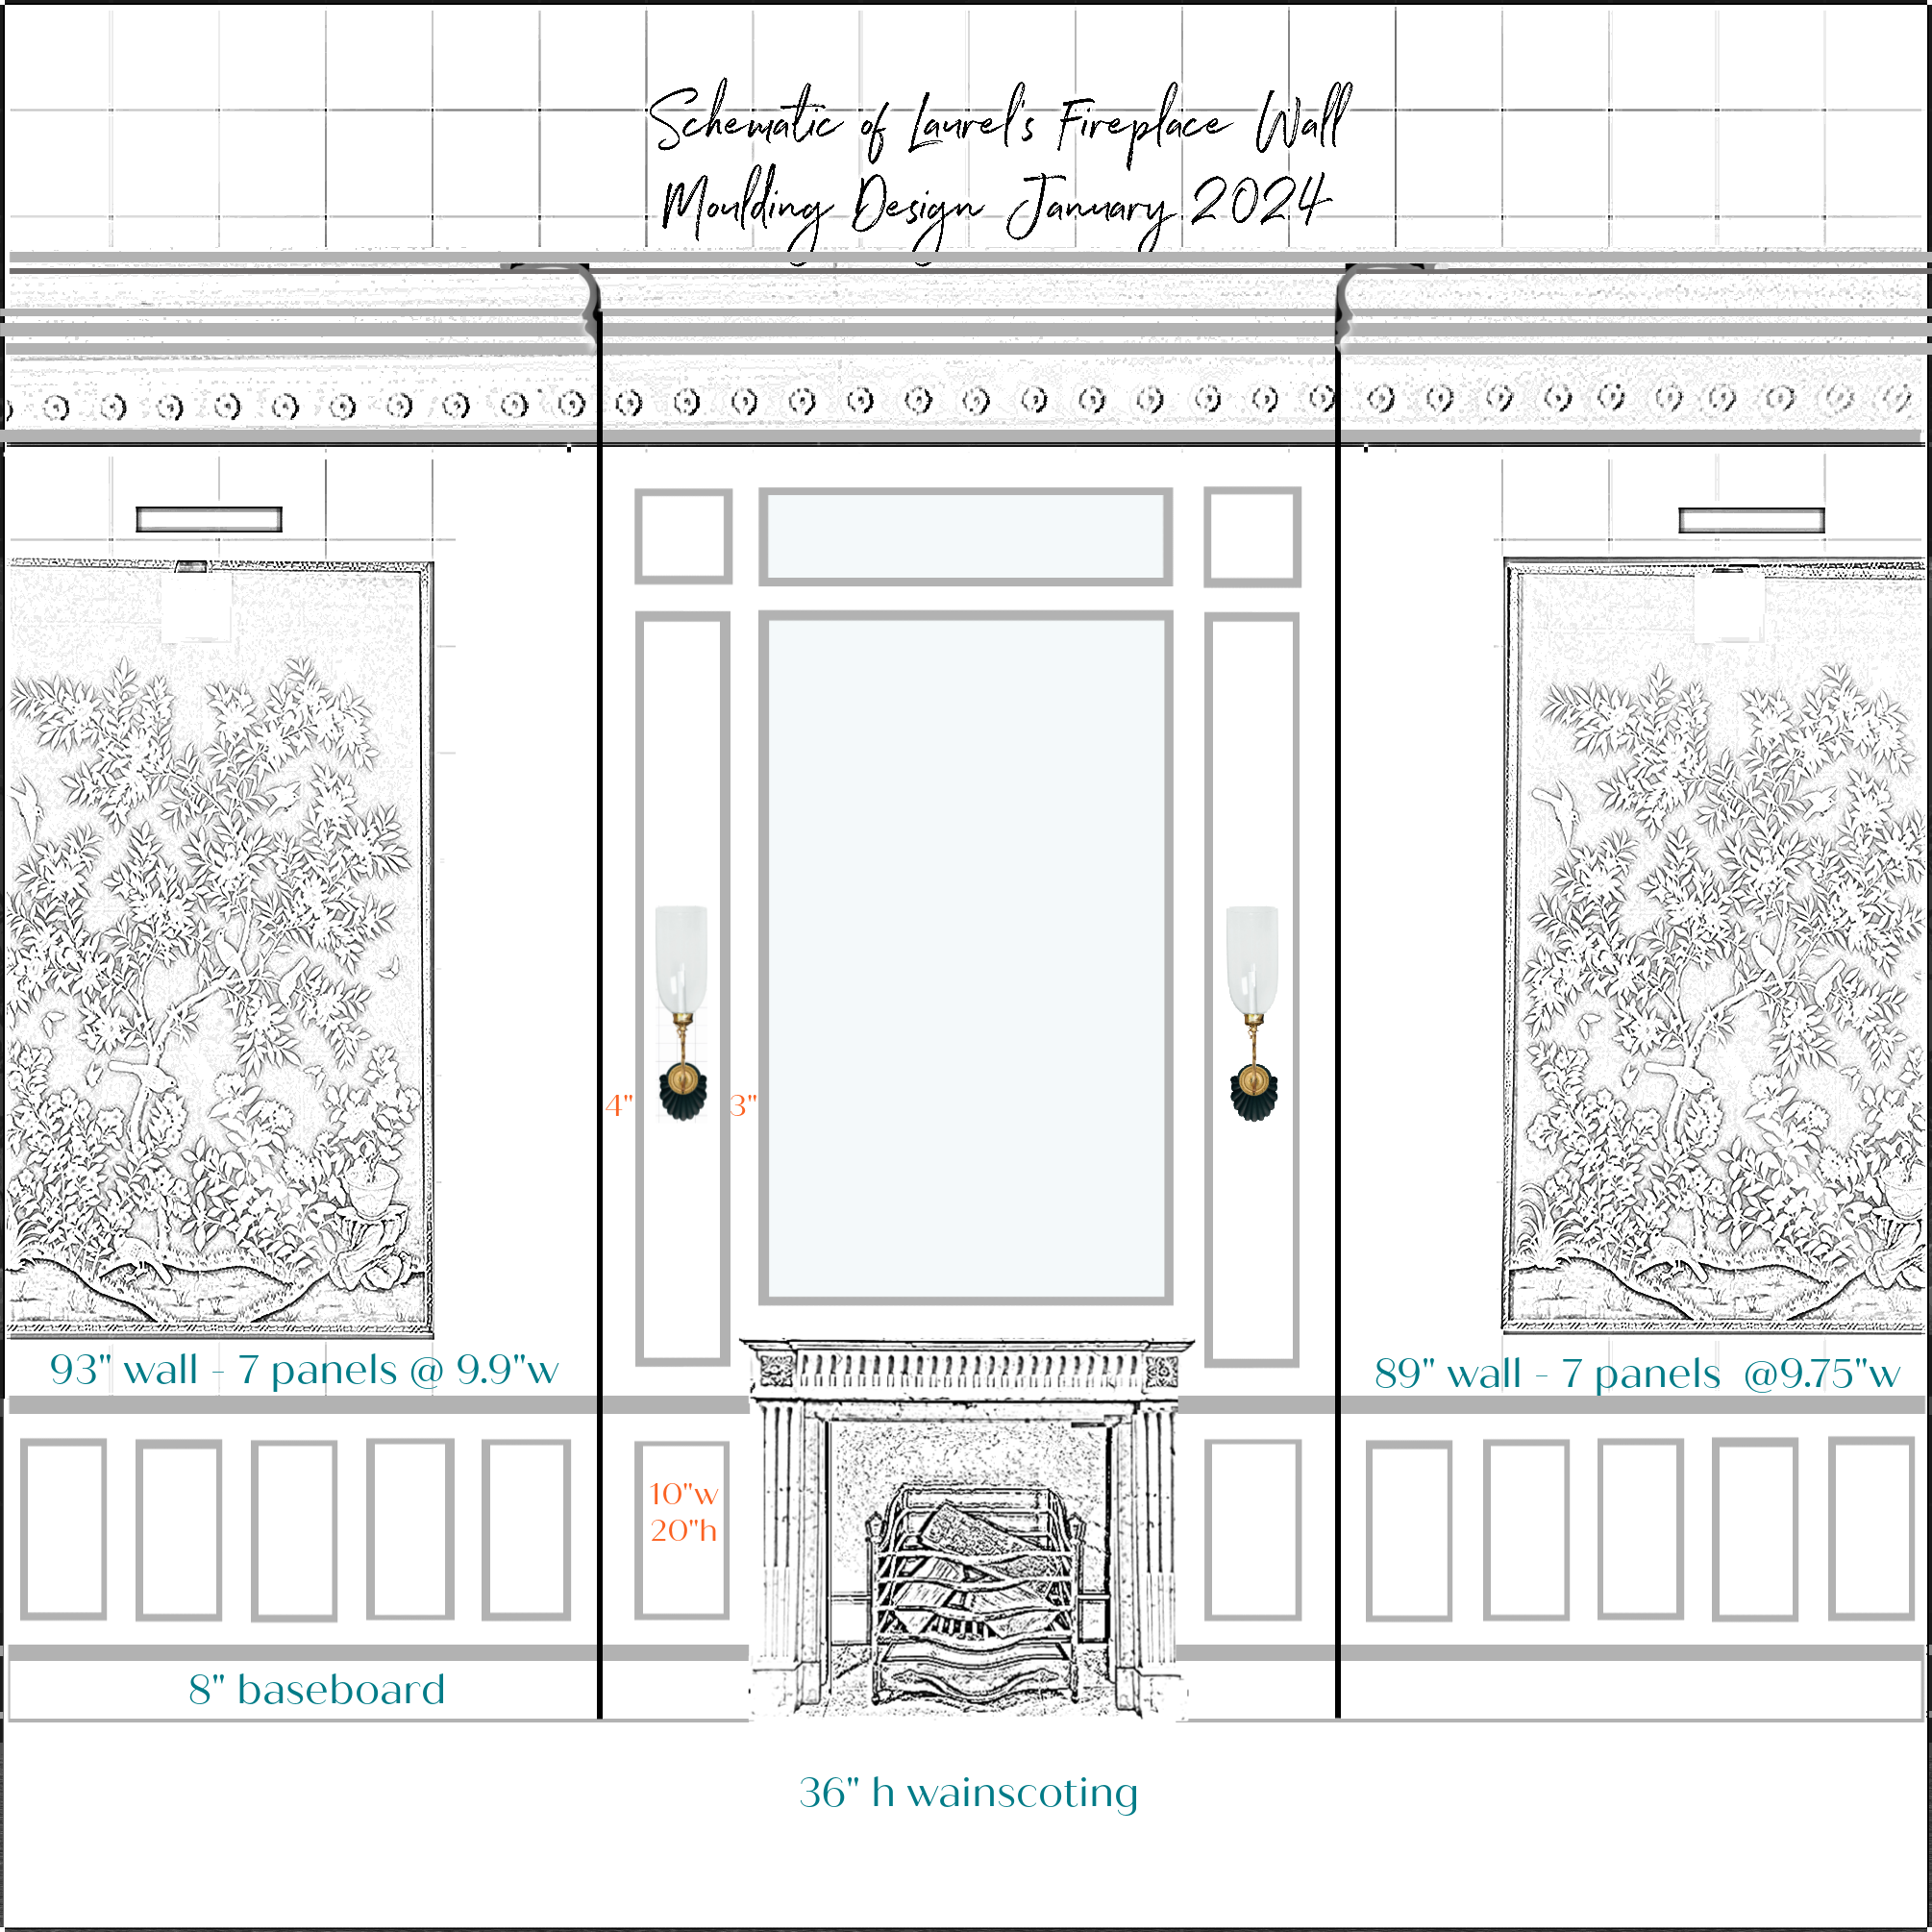
Today, I spent a few hours working out the precise sizes of the panel mouldings and stiles.
Most of the stiles are around 3 inches wide. Stiles, if you don’t know, are the vertical pieces between the panels. Rails are horizontal and are consistently three inches.
Most of the panel mouldings hover around 10″ wide. I redid this elevation because I had made an error in the size of the fireplace breast. It’s a little tricky because the two sides flanking the bump out are four inches different. However, there’s enough space between that no one, not even crazy ol’ me, would notice a quarter of an inch variation.
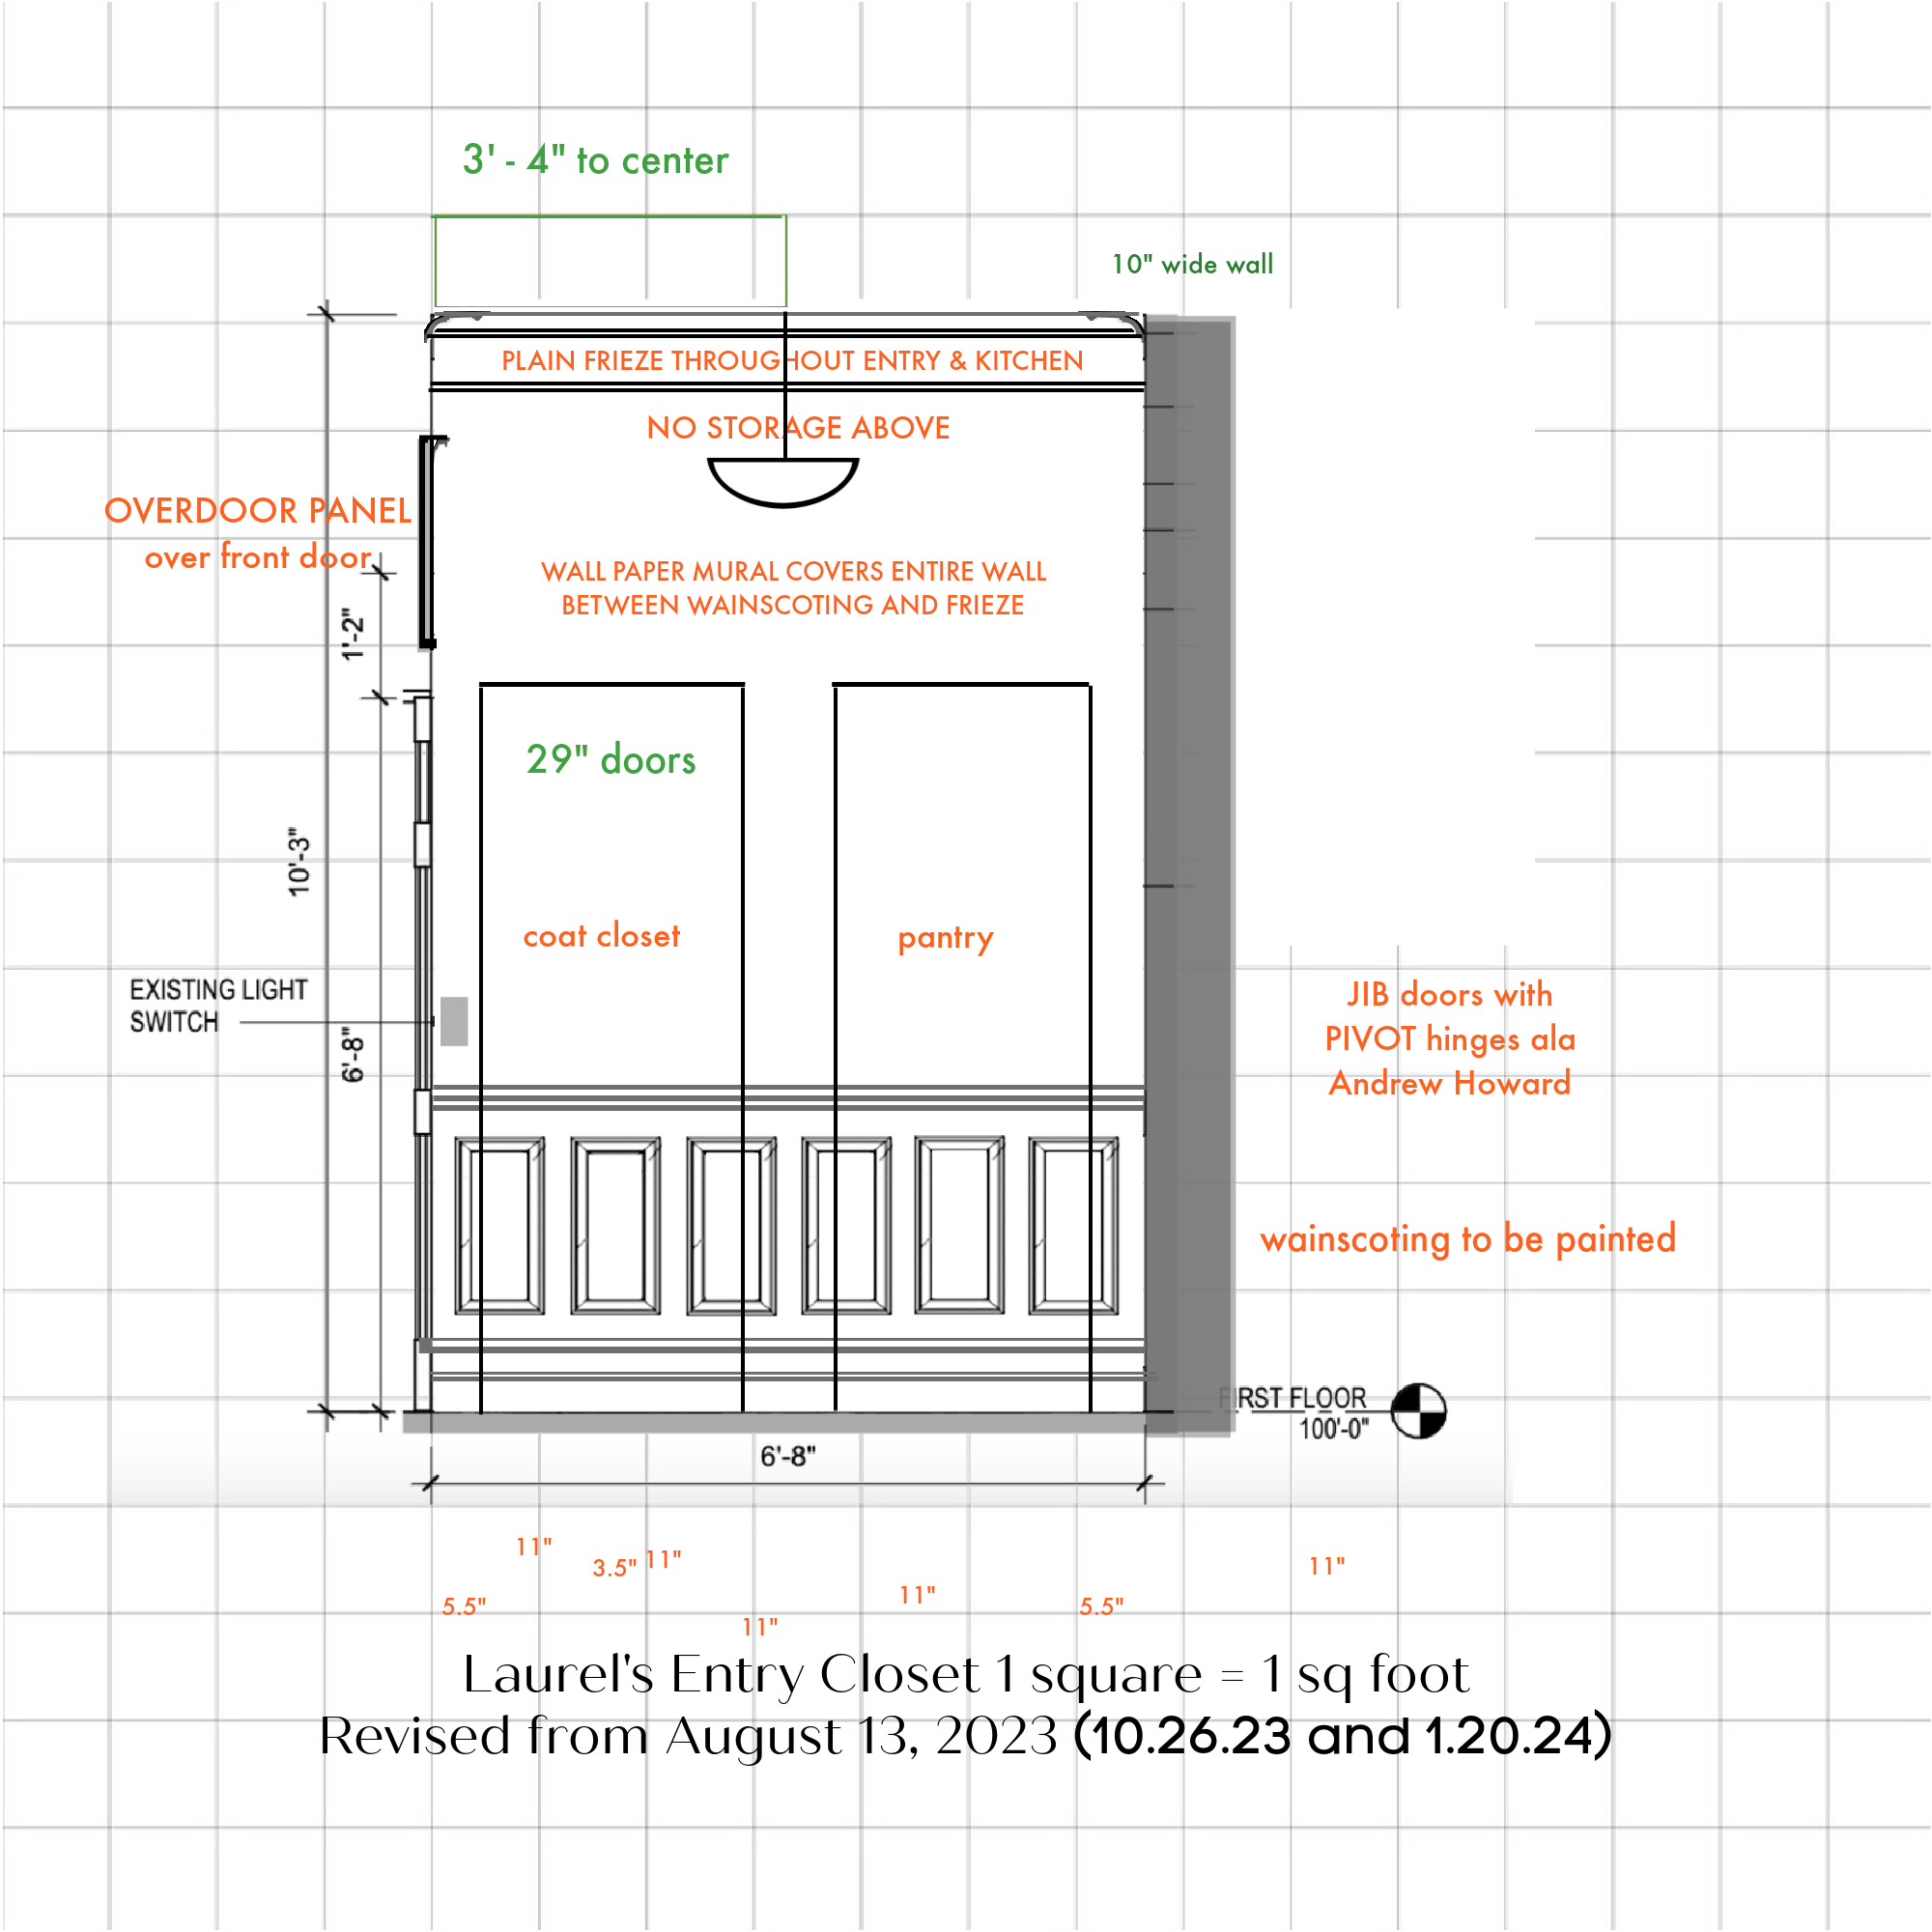
I also redid the entry closet wall.
I know what you’re going to say.
How are you going to get the doors open, Laurel?
hehehe…
Please stop looking so smug with yourself. You are right, if using a traditional hidden hinge.
However, remember Andrew Howard’s magnificent jib door to this lovely powder room?
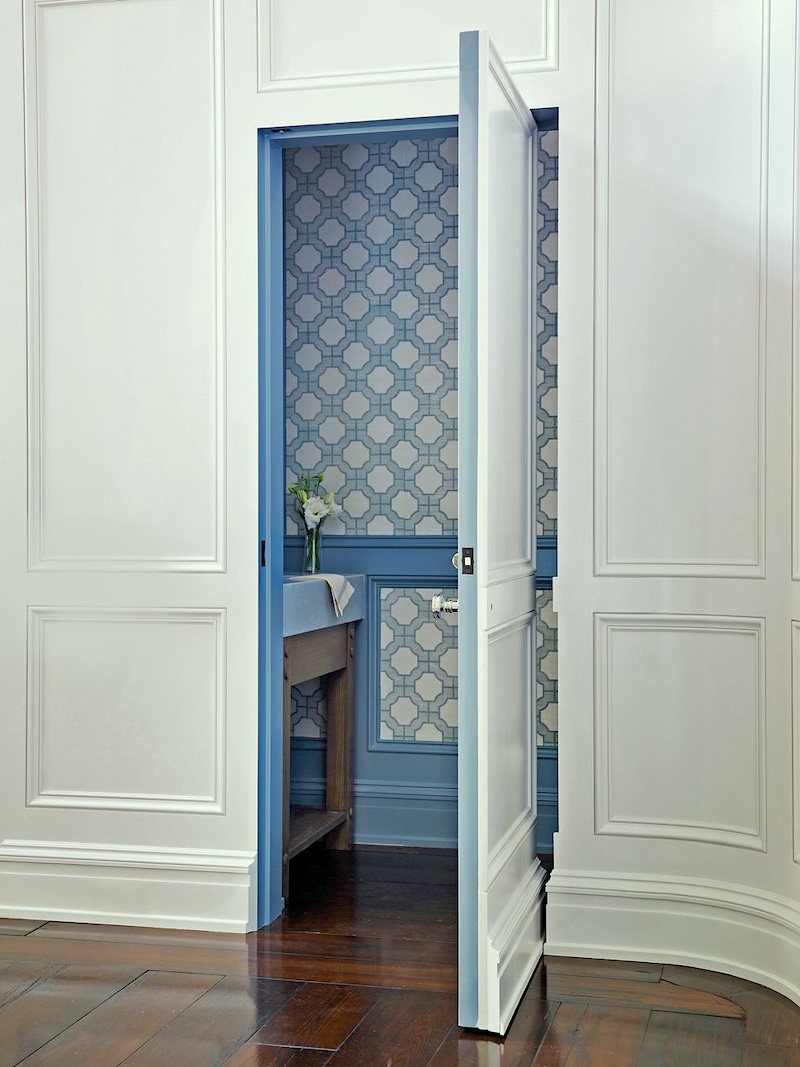
He used a pivot hinge so that when the door opens, the mouldings don’t get in the way of each other. Oh, I’m hoping we can do this!
The door guy is coming over on Tuesday for one last go-through before we order the doors.
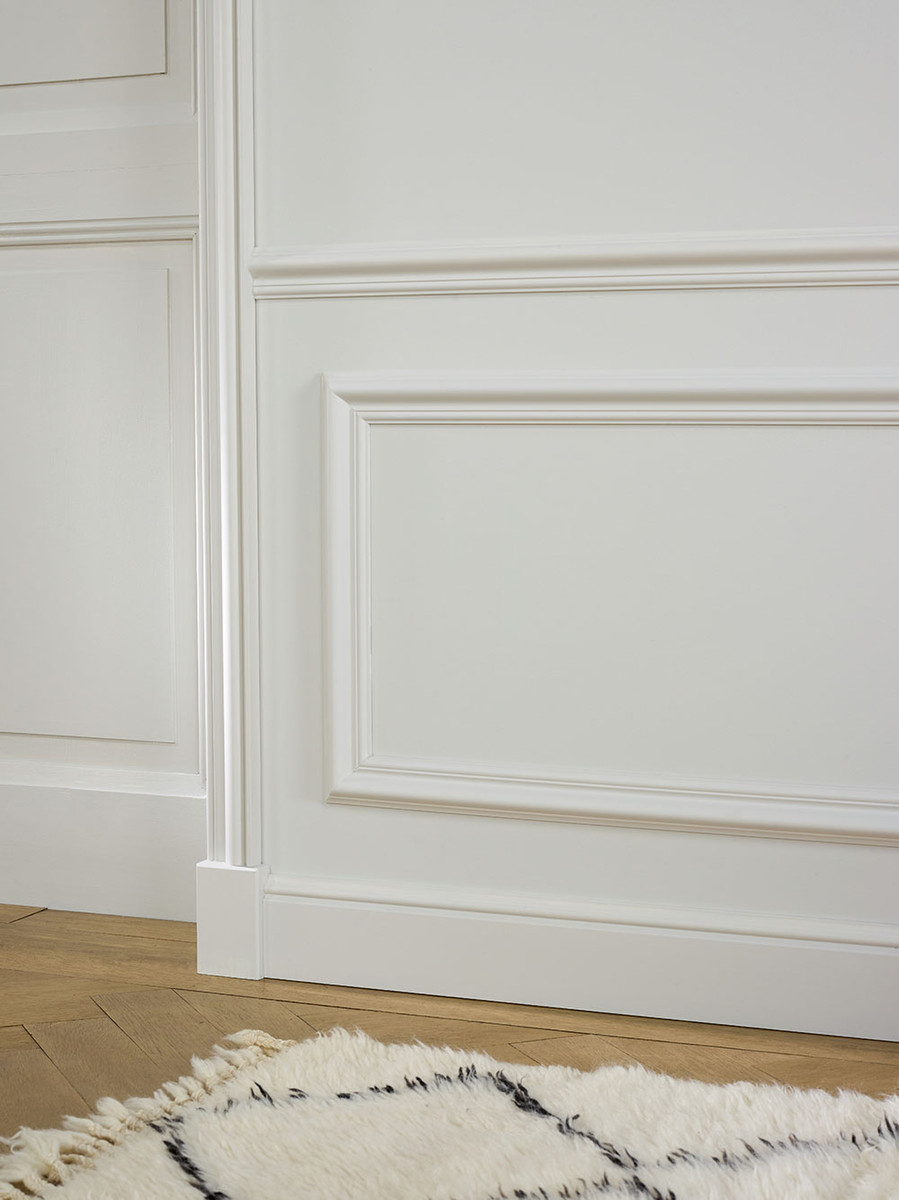
Please also notice the lovely baseboard Andrew has done. And here is a beautiful example of the authentic raised stile and rail wainscoting.
Below is a mini widget showing the mouldings in this post and one or two others.

A Brown asked a question about the height of the wainscoting in the comments.
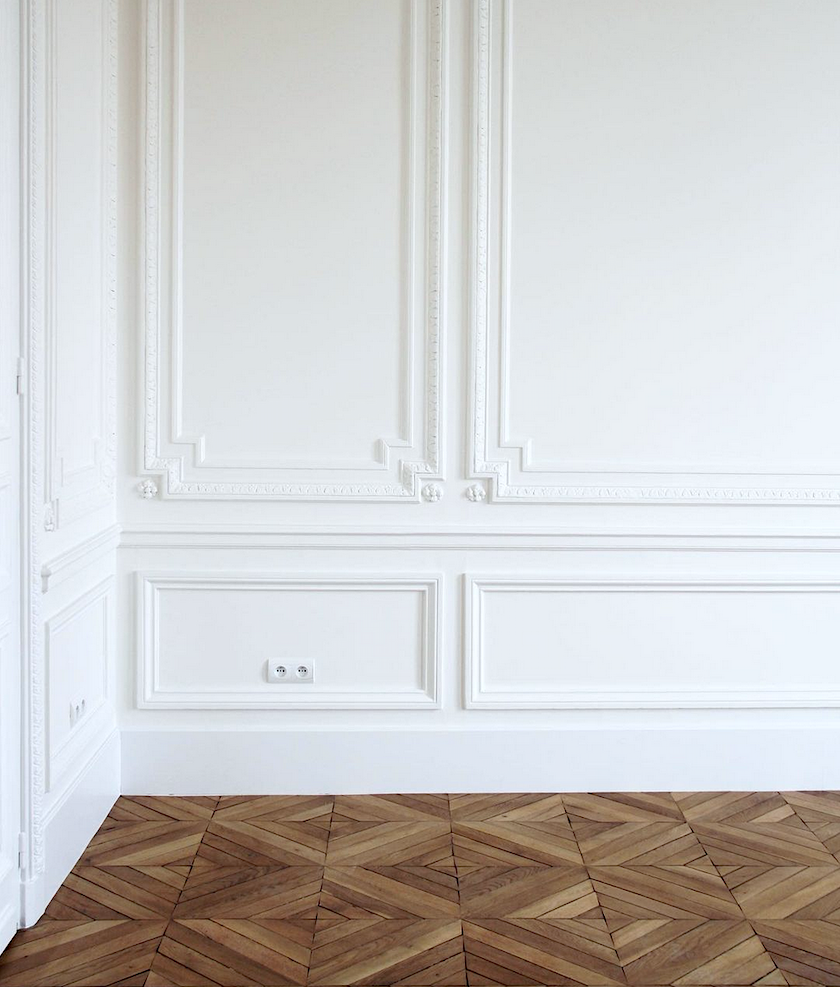
I went over it briefly in part 1, but there’s so much here, it’s easy to miss. Below, I sharing a photo I’ve shared a few times by the fabulous Jessica Helgerson.

This is a superb example of a classically proportioned dado rail. Please notice that there are no individual panels. It consists of a high baseboard, I am estimating 10″-11″ high, then a space slightly smaller and then a handsome roughly 4″ dado rail. So, the total is abouto 24″. I am estimating this ceiling height to only be about nine feet even though it looks to be at least ten feet. One reason is because of the extended ceiling mouldings.
As you can see, panels on wainscoting/dado of this height would look odd. Although if the baseboard and chair rail were half their current height, it could work to have some panels wider than they are tall, like I’m doing under the windows.
For more on this topic, please see my response to A in the comments.
xo,
***Please check out the newly updated HOT SALES!
There is now an Amazon link on my home page and below. Thank you for the suggestion!
Please note that I have decided not to create a membership site. However, this website is very expensive to run. To provide this content, I rely on you, the kind readers of my blog, to use my affiliate links whenever possible for items you need and want. There is no extra charge to you. The vendor you’re purchasing from pays me a small commission.

To facilitate this, some readers have asked me to put
A link to Amazon.com is on my home page.
Please click the link before items go into your shopping cart. Some people save their purchases in their “save for later folder.” Then, if you remember, please come back and click my Amazon link, and then you’re free to place your orders. While most vendor links have a cookie that lasts a while, Amazon’s cookies only last up to 24 hours.
Thank you so much!
I very much appreciate your help and support!
Related Posts
 All About Wainscoting + The One Thing You Must Never Do
 He Loves The Phony French Country Kitchens
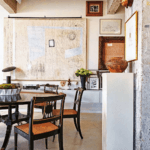 50 Interior Design Trends for 2020 – In or Out?
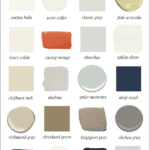 My 20 All-Time Favorite Benjamin Moore Paint Colors
 A Common Renovation Mess – Can it be Fixed?
 Can You Do A Guestroom Suite on a Shoestring Budget?
 Contemporary Interiors – Are They Trendy or Timeless?


58 Responses
Hi Laurel,
I love the mouldings you have chosen. We have many mouldings in our home. It creates such beautiful details. Our next project is to add floor to ceiling panels, crown and base mouldings to our entry way and do an invisible jibb door where the closet is. I’m grateful to have a husband who is an Architect and also able to do the work himself. We are painting everything white. When opening the door, are you using finger touch? I’m worried about the paneling getting dirty. I’m considering a crystal knob but that kind of defeats the purpose of the invisible door. What are your thoughts?
I sometimes wonder what your GC would do without you providing such detailed instructions. I hope he appreciates you. Most folks don’t know how to have millwork installed properly. I known I certainly wouldn’t.
Thanks Mary. It’s a pleasure working with him. He really does aim to please. Attitude is everything.
Thank you for sharing your renovation journey in such painstaking and informative detail. I always learn something new in each post, and I learn more about the whole process at the same time. I have no valuable information or opinions to contribute; after each post, I only want to say “thanks” and “atta girl” and other things that don’t warrant repeating.
As for this post, at first glance, I thought, oh, what a lot of wonderful trim in that big living room. Starting with the second glance, I started to see the flaws, though I never saw them all until your patient explanations. Historic is nice, wear and tear can be nice, but ugly and damaged and disproportionate are what they are. I agree with many comments here that you are honoring the building you live in by making it what it should have been, but wasn’t. Not forgetting that so much is being done by skilled hands, not to mention your educated eye.
It’s going to be beautiful and just right for the space! I’m wondering, will you use the same panel moulding on the kitchen walls?
Hi Kristi,
Good question. I’m not 100% sure on that one yet.
Laurel, I completely agree with you on all your decisions – you design so well and your eye is wonderful. Just love the kitchen, and thank goodness you are fixing the moulding mistakes. Once you pointed them out, I can’t unsee them!
As for sofas, on the west coast I was able to get an English roll arm sofa a la George Smith proportions from Couch Seattle. They are built in LA. It was a 12+ week wait and while they have a ton of fabrics to choose from, they don’t do COM. I think there is also a sister store in Portland Oregon by a different name. We upgraded to 8 way hand tied, reinforced joints, latex cushions, etc., and it was half the price of GS. So still expensive but worth it.
A quick note – someone was concerned about the poly mouldings being shorter in length and requiring more seams. We had these installed 14 years ago by someone who knew what he was doing. Using “tricks of the trade” such as impressive bias cuts on long runs and attaching at corners we never notive any seams. And the work was done quickly as he said the material was “very forgiving”. Not sure what that meant.
Thanks so much, for sharing your experience, Randy. This is a wonderful point. There’s nothing to shrink or crack, rot or warp. Therefore, once it’s painted there should be no visible seams. That’s why this is such a fantastic material.
Have a question regarding the image of your fireplace facade. How did you decide on the installation height of your beautiful sconces?
Hi KM,
With great difficulty. lol. Actually, I totally messed up the first time. While they were fine for the fireplace they were too low for the staircase side.
Most of the sconce is above the box. They are at 72″ on center. Normally, that would be a little high for a sconce, but since this ceiling and doorways are so tall, it looks pretty good to my eye.
First of all, brava Laurel. Your home will be spectacular and a well deserved triumph when compete. I agree with taking out the old and bringing in the new, but much more accurate for the space, molding. Currently it resembles someone who left the house wearing ALL her jewelry. A bit much. The thing that still confuses me is the 36” height on the dado. Brent Hull always says no rail at 36”. I trust your calculations and impeccable eye so it’s me who is just fuzzy on how you got there.
PS What is the cabinet color in the kitchen? It is one of the prettiest kitchens I have ever seen.
Hi A,
Yes, Brent’s in part 1 of this post. No worries if you missed it. My chair (dado, wainscot) rail/cap is at about 32″ downstairs. Upstairs is my problem child. If this was a gut reno, yes, I could make it any height I like. First of all, I think Brent means no 36″ for the standard 8′-10′ ceiling height. But, a few things.
One, he’s correlating the dado with the pedestal of a column. However, the panel moulding consisting of a horizontal piece, panels and baseboard is not a pedestal. That doesn’t mean I think it’s wrong to have the wainscoting pedestal height which is approximately 1/5th of the total height. He then went on to say that 1/4th of the total height is okay for the wainscoting, but not 1/3. Well, 1/4 of my ceiling is 40.5″, the height it was! 1/5 of the ceiling is 32.4″.
28″ is the height of my window sill.
I just added the wonderful Jessica Helgerson image to the bottom of the post. This is not wainscoting in the traditional sense. It IS a proper dado rail which I can see does correspond to the pedestal of a column.
I love this and I also love the treatment I showed in the post where Orac decor did something similar.
I do believe that wainscoting that’s at about the 36″ height is also a valid design solution and was created to protect the walls from the chairs which were about 35″-37″ which is the height mine are. The dado rail is more decorative in nature, although both are decorative.
There are additional considerations for me, as well. One of them is the other mouldings in the room, plus the height of the furniture.
I’ve planned on doing the 36″ height in the entry because that will create an even line with the kitchen countertops.
My window sills are at the standard 28″ height. Does this mean I could do a dado rail ala Jessica Helgerson at that height? Well, I’ve already considered this and the answer is I think it’ll look quite strange. If the room were punctuated with more windows it would help, or if the windows were a little lower.
We did a chair rail and panel moulding at 35″ for an eight-foot wall in our old townhouse in New York, and it was wonderful. I never thought for one second that the height should’ve been lower.
However, I’m willing to explore this even though it’s really the 11th hour.
It’s me, I’m the lunatic, lol. I was in Boston for just the day on Monday. Trust me, I thought of you while walking around. Knock knock, I am here for the tour of your stunning kitchen. My mother’s first leg of her trip to Vietnam had her going to Boston. So I joined her, made sure she got to her next gate (Boston to Seoul) took an uber to downtown, enjoyed Newbury St., had clam chowder and flew home Monday evening. It was 22 degrees warmer in Boston than at home. It’s artic in the Midwest.
Just chiming in because someone was wondering about a manufacturer that makes the English roll-arm sofa in various depths, and I know for sure that Cococo Home does it! I have one from them and is an absolute dream (and yes, it’s on casters!) I also just saw the English roll-arm sofa at a Serena & Lily’s show room upholstered in a soft brown mohair velvet (!!) absolutely to die for, they even told me that it was on sale from something like 8k down to 5k! I know, but still, cheaper than George Smith:-) For me, it’s two things I must have in this life before I go to my grave, that’s a George Smith sofa (cannot decide between the English arm or Chesterfield) and the Josef Frank round table with the turned legs. Hope everyone in the NE is enjoying the weather!
Fascinating. The mismatched moldings and proportions make me wonder what the trending fashions were at the time that the architect may have thought he was echoing. Why did he feel the need to “gussy up” the trim? Or, as you say, he simply was clueless and focused on the money.
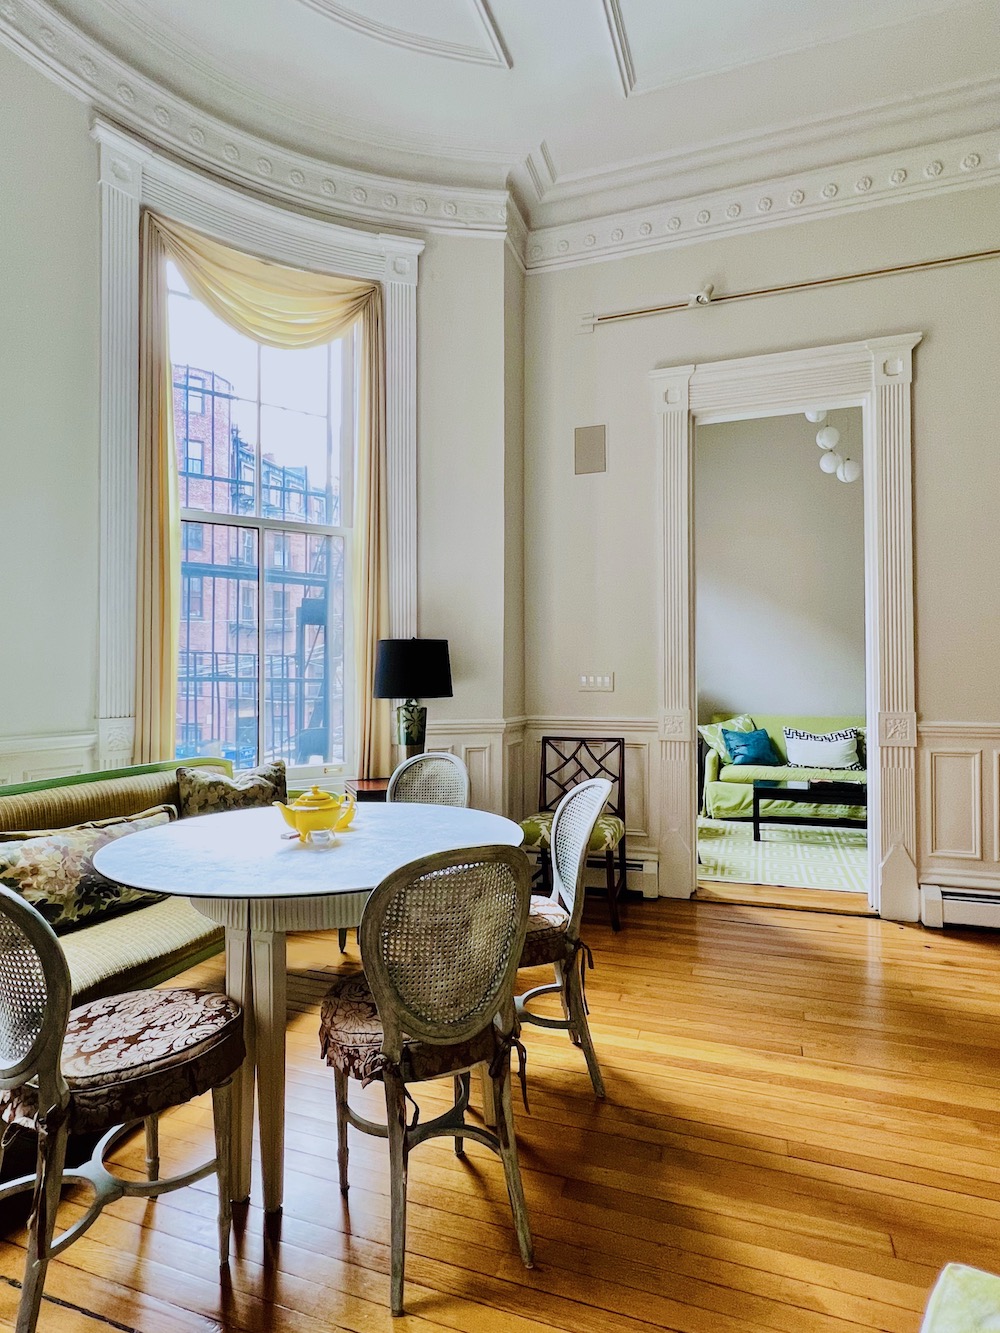
Seeing the photo with the new kitchen cabinets to the right of the living room shows clearly that the wainscoting is too high. I am so glad you included that photo for perspective, and I can’t wait to see the new and improved version. Thanks for bringing us along on this journey!
Check out Roger & Chris. Excellent quality sofas.
Hi Denise,
Yes, I know them. They’re in Laurel’s Rolodex.:]
Laurel, since the wainscoting is 144 years old, do you need to test it for asbestos and lead paint? Forgive me if you discussed this at some point, and I missed it. Thanks!
Hi Susan,
It’s wood, so I don’t believe there would be any asbestos, but there is definitely lead. That’s why I’m vacating the premises tomorrow evening into Tuesday afternoon.
Laurie, I ordered a custom English roll arm from Century brand. I did modify the depth because my husband doesn’t like a deep couch. It never made me happy because it doesn’t look as well without that depth. To me it lost the beautiful proportions. I ended up selling it.
Hi Laurel: I absolutely think you are spot-on with removing the old painted over, wainscoting and going with something in proportion to your furniture. Yes-you will be making your place better. Once your project is completed and your furniture is in place our (your readers) eyes will adjust and your new installation will look like it belongs because it does belong.
About the English Roll-arm sofa. This is my absolute favorite style. However I am short (5′ 1″) and the original George Smit proportions don’t work for me. Do you know of any manufacturer who makes this type of sofa with the ability to customize the seating depth?
Fantastic information. My granddaughter and I are installing trim in our Victorian doll house mansion so this is seriously helpful. The sofa is beautiful.
Couldnt see it at first but as usual you do a wonderful job clarifying your process for those of us with a tenuous relationship with architecture. Love the idea of saving molding for habitat re-store or one of those arch salvage firms. Thank you for sharing this project! (I use the Amazon link before every purchase!)
As someone that used to have a custom shop replicating wood mouldings … please consider carefully removing the pieces and making them available for others. Perhaps Habitat for Humanity or another Boston recycler of these items. They could be just the ticket to finish off someone else’s project.
Nothing distracts me more than those dramatic TV scenes of people crowbarring a cabinet to death when it could have been removed and reused.
Thank you for being bold enough to take out the current wainscoting. People seem to want to fill the wall when ceilings are high, but it’s all about how it relates to the furniture. And you are correcting the sizes of the panels also. You are making it better!
Thank you Cyd. I need to take some more pics of the defective wainscoting. Some of it is inaccessible at the moment, however, the entire baseboard is falling off the wall where the old (not original) mantel was. That’s another thing. I want to wrap the wainscoting around the chimney, so I would have to match what’s there. Some will say I got the wrong mantelpiece.
Alas, there wasn’t one according to the people who’ve been here since 1978. The one that was here was salvaged from a home being torn down in Brookline, MA.
Laurel
I agree 100% with you. Not that you need anyone’s approval. It’s your home. But will really finish the room off and I think is the detail that will make a huge difference. Just because it’s original doesn’t make it right.
Enjoy your hotel stay!
Thanks so much Ellen. I could’ve had a room for under 200 bucks at the Fairmont, but the place I’m staying two blocks away is very nice, too and nearly half the price. Still super cheap for Boston!
Hello, will you make the individual panels wider? In my view that is a nicer, less busy look. I’ve never seen them that narrow before.
Hi Vanessa,
Yes, most of the panels will be wider and spaced a bit further apart. Three inches is standard and these are only two inches making them seem cramped.
Laurel, as soon as you said that the paint jobs over the years had made those mouldings gloppy, I immediately agreed with you no matter what else you found wrong with them. That’s one of my biggest pet peeves. When I go to the trouble of painting something if you aren’t going to do a good job. Seems like the goal of a paint job would be to make things look better. However, these apartments probably went through rental phases over the years and landlords just threw on some paint. And I’m all for keeping historical components whenever possible, but historical isn’t always right. If you were just ripping it out and not doing anything to replace it, that would be sad. But you are correcting a bad job. To make it beautiful for the next 100 years. And it’s one of those situations where everything else around it would be clean and gorgeous, And this would really show up then. Not in a good way. And now that you point out that the chair rail is taller than the backs of your chairs and even your dresser, good grief that’s a tall rail. In photos, I hadn’t noticed that before. Just because something is historical doesn’t mean that the original architect had good taste in design. I can see where if it had been painted well, you could leave it as a quirk. But I have to say that the Swiss chalet mouldings of your common entrance is rather odd and not something I would really want. Some designers and architects do something just to be different, not to make it better. Different is not always the right choice. I’m still on my quest to get you featured somewhere nationally, so I’ll be sending a few more tweets with this post attached.
Hi Robin,
You’re a doll! Thank you so much!
Now is the time, with everything torn up and (I’m sure what feels like) money flying out the window daily 😉 , to get things exactly the way you want them! You don’t need our blessing but I think fresh woodwork will suit your style and your apartment’s, and be beautiful.
Love the teal sofa! I thought about tight-backs like that when we replaced ours this past year but with young kids, ultimately went with the three cushion/English arm combo. Next time!
I’m so relieved that you’re moving out again. Nobody wants to be in their house during dusty renovations.
I love the sofa you’re considering. I bought the same style from my local Ethan Allen when I moved 2 years ago. Does Boston have EA stores?
Your new wainscoting is going to look so nice. And with everything freshly painted it’s going to be so yummy.
Hi Mary,
It’s just for one day, this time. However, I’m going to do it again, when they blast through the masonry wall to move the door downstairs. I was hoping for two consecutive days, but at this point, that’s probably not happening.
Well I would never have noticed the wainscoting issues until you pointed them out. Personally, I think they are all cool and wouldn’t touch them but you are a designer so you have a better eye than I do! Nobody but you would ever notice them! Ripping all those out will be a huge mess. The things that bothered me during my renovation don’t bother me at all now. Just sayin.
Hi Janet,
I beg to differ. When it’s all done, left as is, it will be a glaring mistake. BTW, some of the moulding was already changed (I don’t know when in some cases) or is missing!
Laurel, after reading all the other comments, I have to say I agree with removing the old, unmatched mouldings. I never looked closely at the pictures until you pointed the differences in sizes out. It would drive me crazy. Just because it is old does not mean it was done in good taste. And your renovation to date has been so careful to maintain classic period design while incorporating the comfort and convenience of the present. By the way I love, love, LOVE your sofa pick. That is the one I also want for my living room. And dark navy is such a good color.
Why does the sofa have casters on the front legs? Beautiful though.
Hi Nelle,
That’s the style from Edwardian England. However, sofas had casters on them far earlier. It made them easier to move.
Hi Laurel. I haven’t commented in a while but I just wanted to share a sofa with you that’s a similar option at a lower price.
bloomingdales-artisan-collection-charlotte-velvet-sofa
Best regards, Terry
Hi Theresa,
I want an English roll arm sofa. That piece is not at all my cup of tea– with odd contemporary styling and splayed legs. Please understand, I appreciate the kind gesture in trying to help out, but I’ve been breathing in interiors, architecture and furniture for over 35 years. What I really want is a George Smith!
I’ve long thought that the original architectural elements of your duplex were working against one another. It seems as though the styling becomes more and more Victorian the farther down the wall, from the classical rosettes at the ceiling to that rowboat paddle! I for one am glad that you are going ahead and replacing the wainscoting.
The Victorians often went to stylistic excess. This is the perfect time to make it right.
Hi Caryl,
Thank you. It would’ve been better to have had it demoed last June, but at that time, I was wondering how I was going to pay for the rest. Fortunately, in July, the ad revenue picked up considerably. I’m exceedingly grateful!
I know this is your decision and you have given it a lot of thought, but I am not sure I would replace this wainscoting–maybe there is a way to get some of the old paint off? If you look at the original, the baseboard aligns with the triangular shape at the bottom and the top of the wainscoting aligns with the middle of the square with floral design. Your new design will move down a couple of inches, but be essentially the same–I would leave the top and bottom as is and save your money. Maybe you could realign some of the boxes to be more visually pleasing, where they bother you but save the top and bottom.
Hi GGG,
The least of the issues are the boxes and the biggest issue is the height. Plus both the chair rail which is massive and the 11″ high baseboards are in horrible condition.
I 100% agree with you, especially regarding the panels in the wainscoting…an abundance of errors! You are doing a truly amazing job. Your eye for detail is unparalleled.
Thanks so much, Elle!
Hello Laurel, I can see your point about wanting to design your own moldings and paneling, and I admit that some of what you inherited is a little on the awkward side, but on the other hand I am not big on tearing out antique original woodwork. Some people would sententiously say do nothing that cannot be reversed, and I admit the wisdom of this. However, your designs have been very carefully worked out by someone who knows her historical design onions, and I am sure the results will be magnificent. We could also point out there there are many people today who would have simply torn out all the old woodwork and replaced it with Sheetrock and gray vinyl. We also have to wonder if the person who selected that interior circular stair railing thought it would enhance the looks of the place. (But we are not those kinds of people who make drastic and de-authenticating modifications.) So, there is a part of me that hates to see that SDK woodwork go, and at the very least please save samples of it!
–Jim
p.s. The initials SDK are very familiar to anyone who works with computers, as Software Developer’s Kit. These are issued for every commercial program so that other programmers can integrate their own programs, or build extensions onto the purchased programs. I used to have shelves full of SDK’s!
Hi Jim,
Funny about the SDK coincidence.
I love everything you do, Laurel! It’s been great reading about your renovation, and it’s going to be awesome. You have been through the wringer, though, and I wish you many years of happiness in your new place.
The chair rails in my old (1924) house are 27″ high, and I always thought they were too low. But after reading your post, they sound just fine!
Gosh. I’m disappointed you are replacing the wainscoting. What about history? The quirkiness of what someone did before? The fashion/style of the time? If everyone keeps ripping out the old there will be nothing left to refer back to. Sigh.
Hi Sandra,
Okay, so I guess you’re saying I’m a total nincompoop? Sigh…
That means I should’ve saved the 1978 oak kitchen with the terra cotta floor. Oh, and that adorable steel spiral staircase. Right? They’re part of history too. I am all for historic preservation. However, not everything from the past is worth saving, or even remembering. I think it’s important to make that distinction.
Please realize that Mr. Kelley was the 19th c. version of the mass real estate developer posing as an architect. At best, he was phoning it in, and as I said in the post, he had a rep for creating designs that were not in good taste, and had lost the respect of his peers. Please review the weirdtastic wainscoting in the center hall which also runs up the entire main staircase of the home!
The 41″ high living room wainscoting is poorly executed, in bad condition and just plain wrong. Putting in the correct proportions in the room’s furnishings and surrounding areas is going to make it look cartoonish. Plus, I would have to spend a fortune restoring it. It’s the proverbial putting good money after bad.
There are numerous other quirks I am keeping. And others I’m getting rid of, like the idiot who added sheetrock on top of sheetrock which is burying the front door casing.
I encourage you and others to reserve judgment until it’s finished. I always strive to do what’s best not only for me, but for the integrity of this historical home in Boston.
We still call it a dado rail here in the U.K. I looked up the etymology:
‘dado’ – “Origin: mid 17th century (denoting the main part of a pedestal, above the base): from Italian, literally ‘dice or cube’, from Latin datum ‘something given, starting point’.” No chairs.
Thanks so much, Kim!
Hi Laurel,
Love the sofa! Not my style but the fabric and color are gorgeous!