

Hi Everyone,
Thanks so much for all of your terrific comments after I shared the odd-looking entrance to my new bedroom. Before we get into the post, there is some important news at the end of the post: a looming deadline on the 31st.
This is part 1 and a follow-up to part 2 about the issue of the irregular entrance wall into my bedroom. I answered many of your questions and responses in the comments. To skip ahead please click the link below.
If reading for the first time, please begin after the link.
Part 2 Begins Here
Uh oh, Houston, we have a problem.
Fortunately, it’s not a life-or-death kind of problem, like the possibility of being incinerated while attempting to land a spaceship back on planet Earth.
Still, it’s a renovation mistake, a problem that hundreds of hours of meticulous planning failed to avert.
Actually, that’s not true. It could’ve been averted, but it would’ve meant having a scant 8′-4″ to accommodate a bed and two nightstands in a master-mistress-primary bedroom.
AND – also to get the closet door open without hitting the bed.
There has to be a minimum of 24″ between the bed and the wall parallel to the length of the bed, regardless of the size of the nightstand. That means an absolute minimum of nine feet. But, even that’s a little tight.
Therefore, about three weeks ago, I decided to take the one-foot bump out of the wall and keep the entrance wall to the bedroom on one even plane.
I realize this isn’t very clear.
I’m confused, and I’ve been eating and breathing this project for over three years.
Basically, when the steps went in, they took up more space than the calculations said they would.
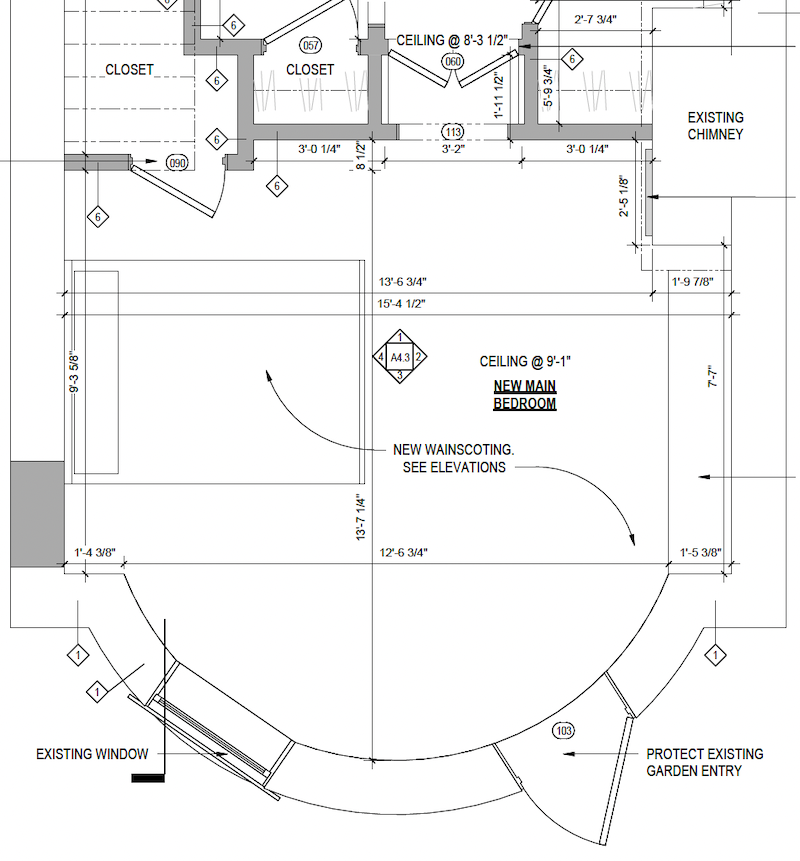
With the bump out, I was supposed to have 9′-3″.
Nope; not even close.
When finished, the bottom of the stairs will be exactly six feet from the wall. They are supposed to be 6′-1.5″ from the wall. That one’s close enough. However, on the bedroom side, we are off by a good foot or more.
Below shows what was supposed to be vs. what is.
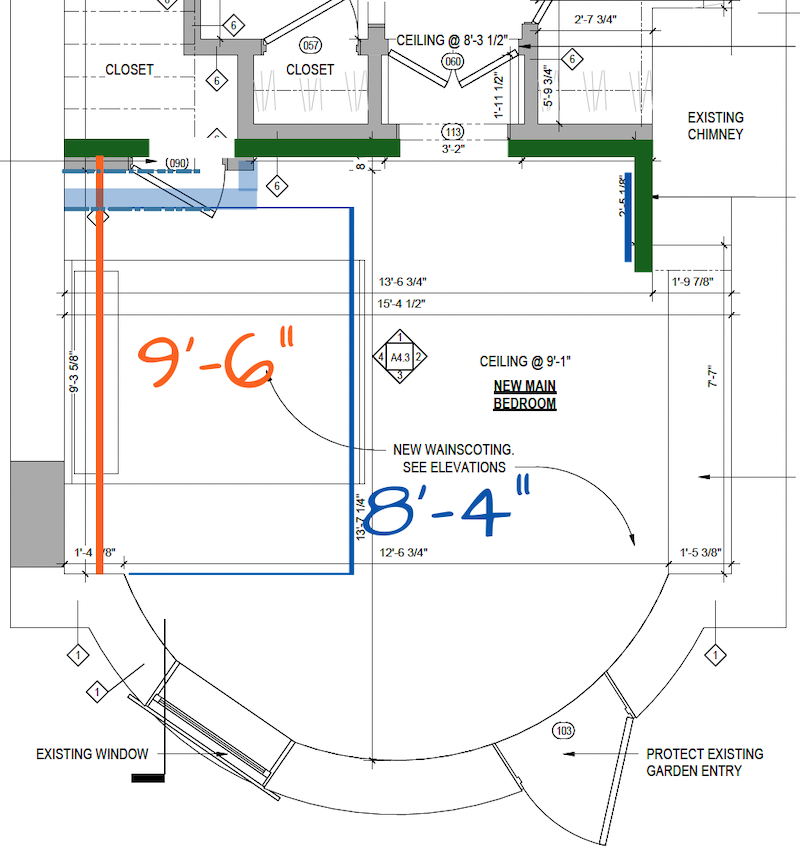
The green represents what has been built. The shaded blue is where the stairs are breaking through. If we had built that wall out as planned, (to hide the stairs breaking through), we would only have had 8′-4″ for a bed and two nightstands. 9′-6″ is fantastic, even for a queen-sized bed.
However, there’s an aesthetic price to be paid.
Brace yourselves. Heads down! We’re about to crash. (metaphorically, of course.)
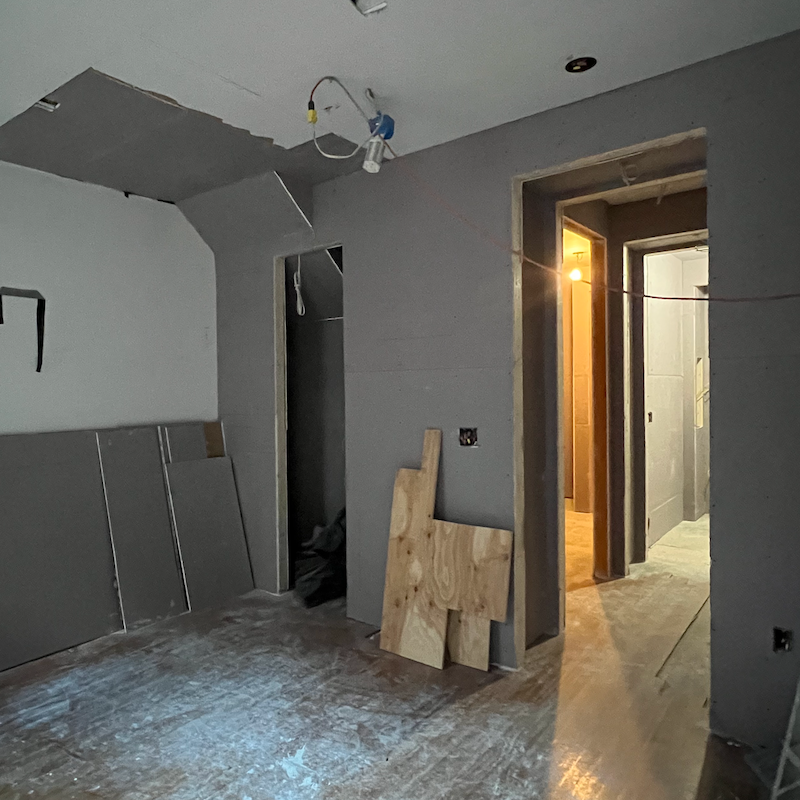
Adorable, ain’t it? :/
Yes, this is what I was TRYING to avoid. I have counted the treads. There are 15, as there should be, and the treads will be 10″. I don’t know why the staircase is 15″ longer. Maybe the space is 15″ shorter.
Perhaps, one day, when things are cleaned up, I’ll investigate the why more thoroughly, but not now.
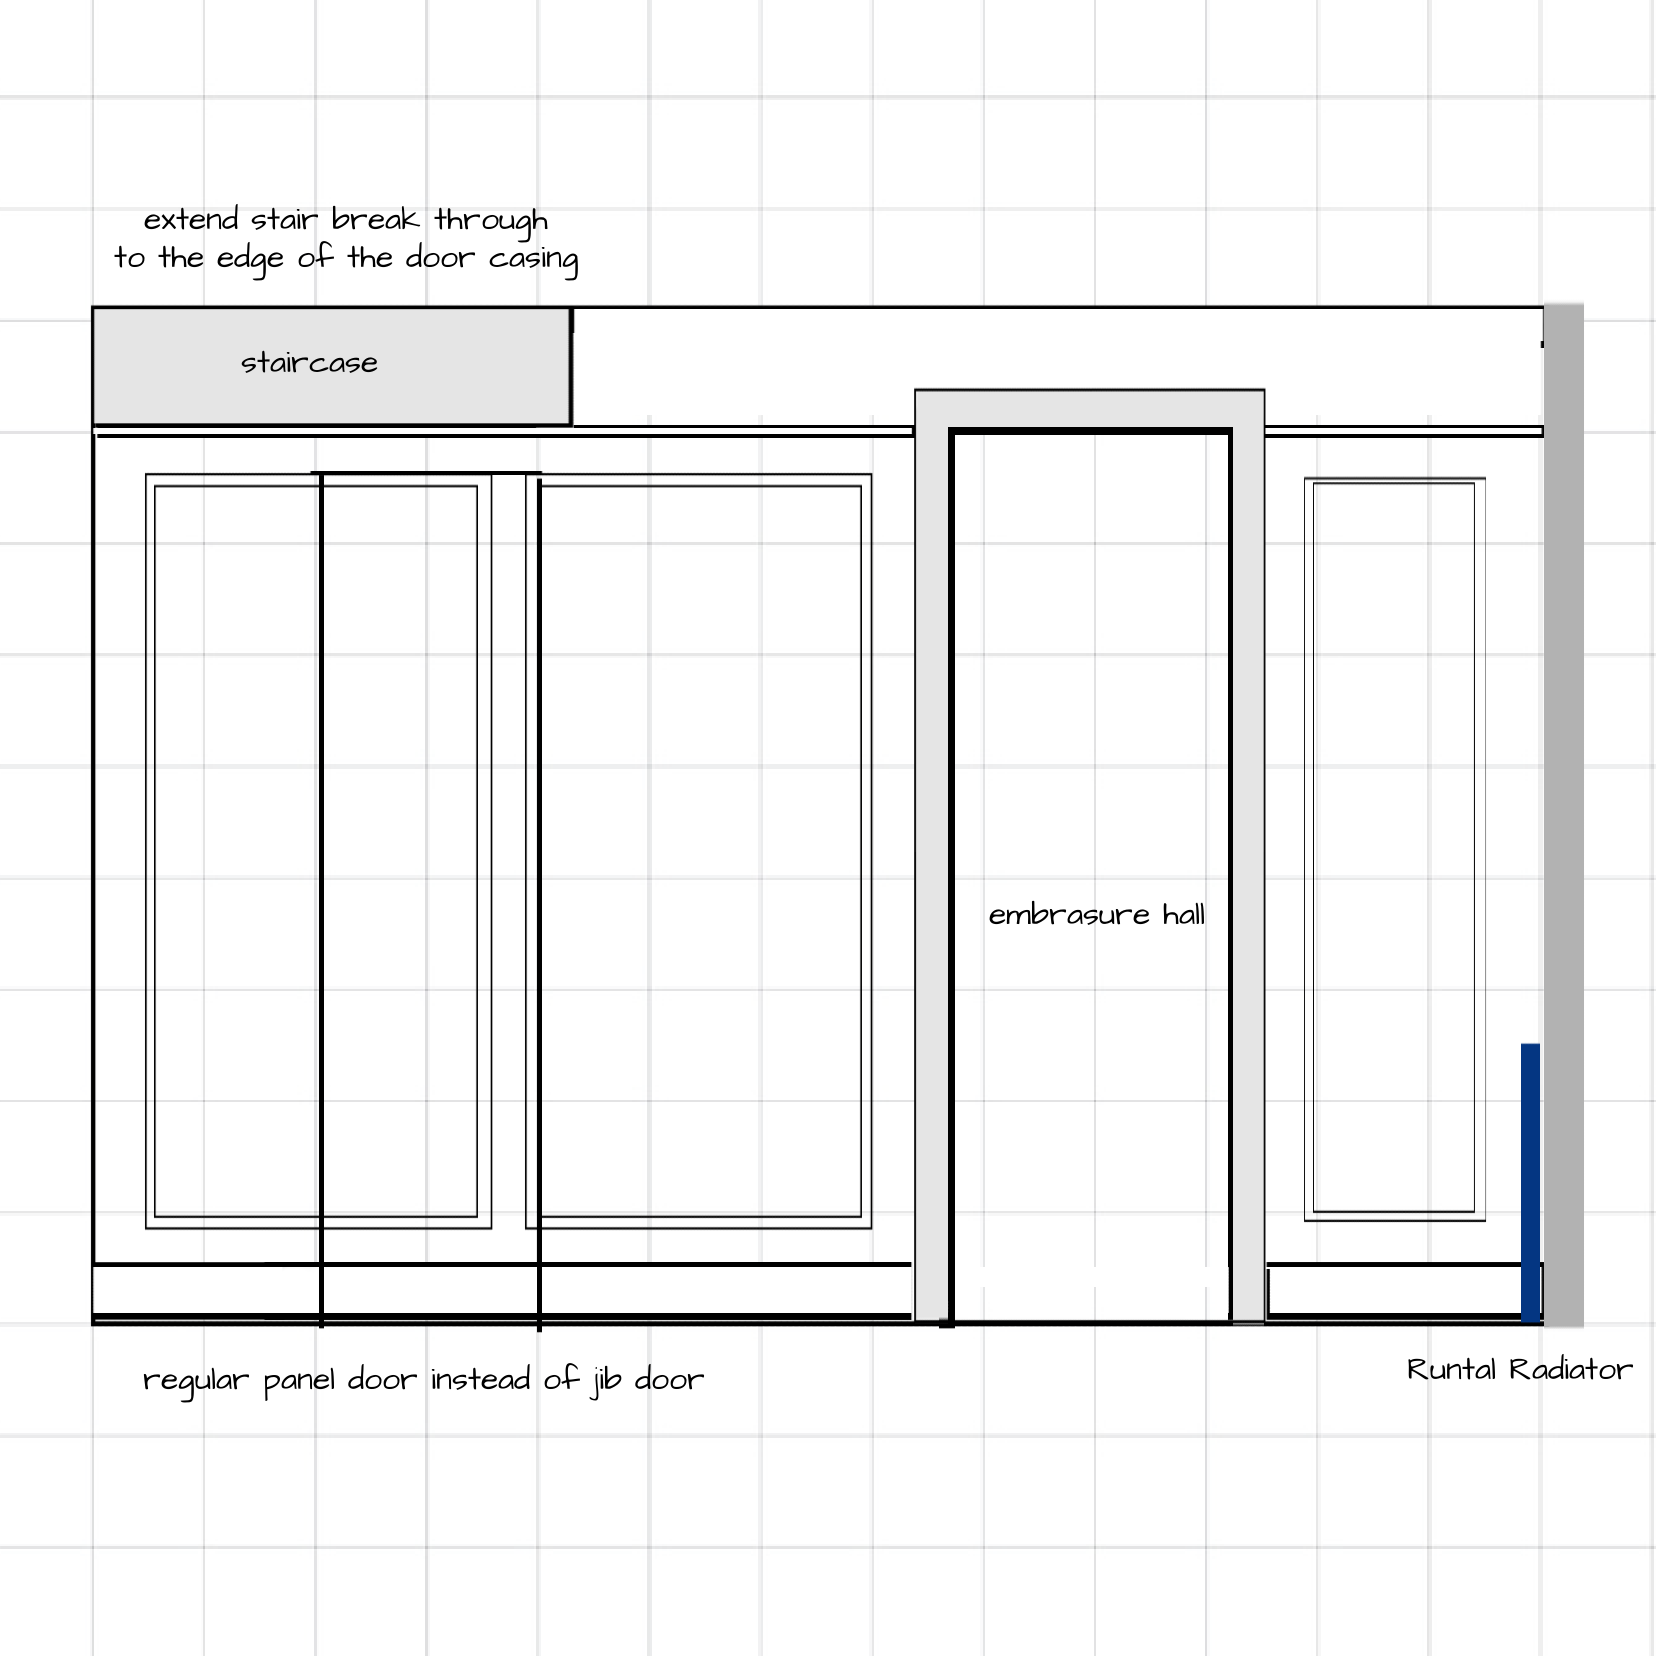
Now, let’s look at this entire wall, head-on, as it has been built.
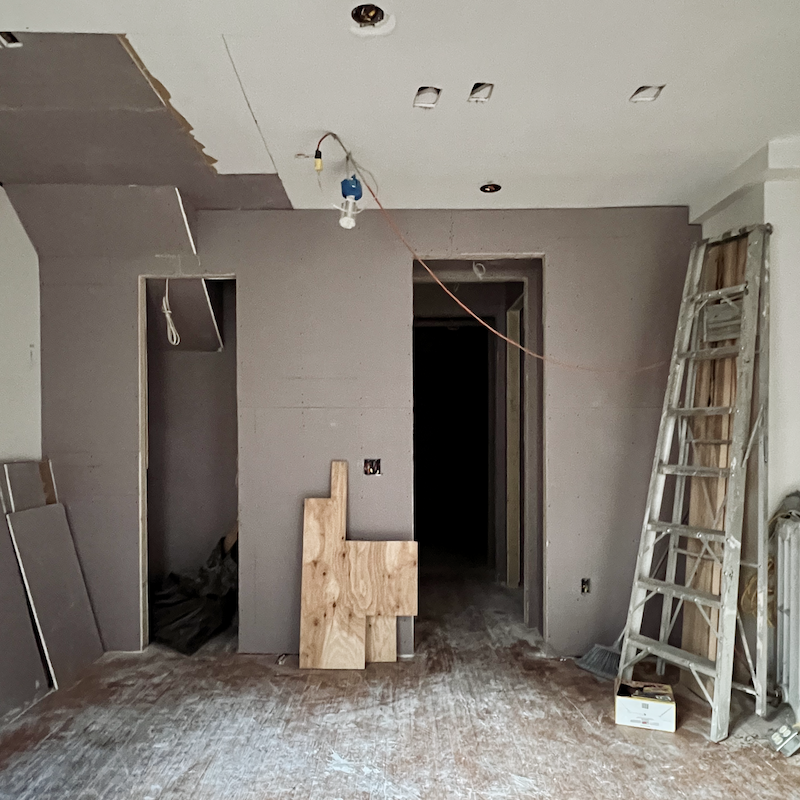
Sucks, doesn’t it?
Laurel, can’t they raise the door on the left?
No, there’s a header beam necessary for construction behind the sheetrock.
The difference between the two doors in height is 5″.
Can you make the door on the right lower?
Yes, it’s a possibility. We’ll get to that in a sec. But, first, let’s look at things as they have been built, in elevation.
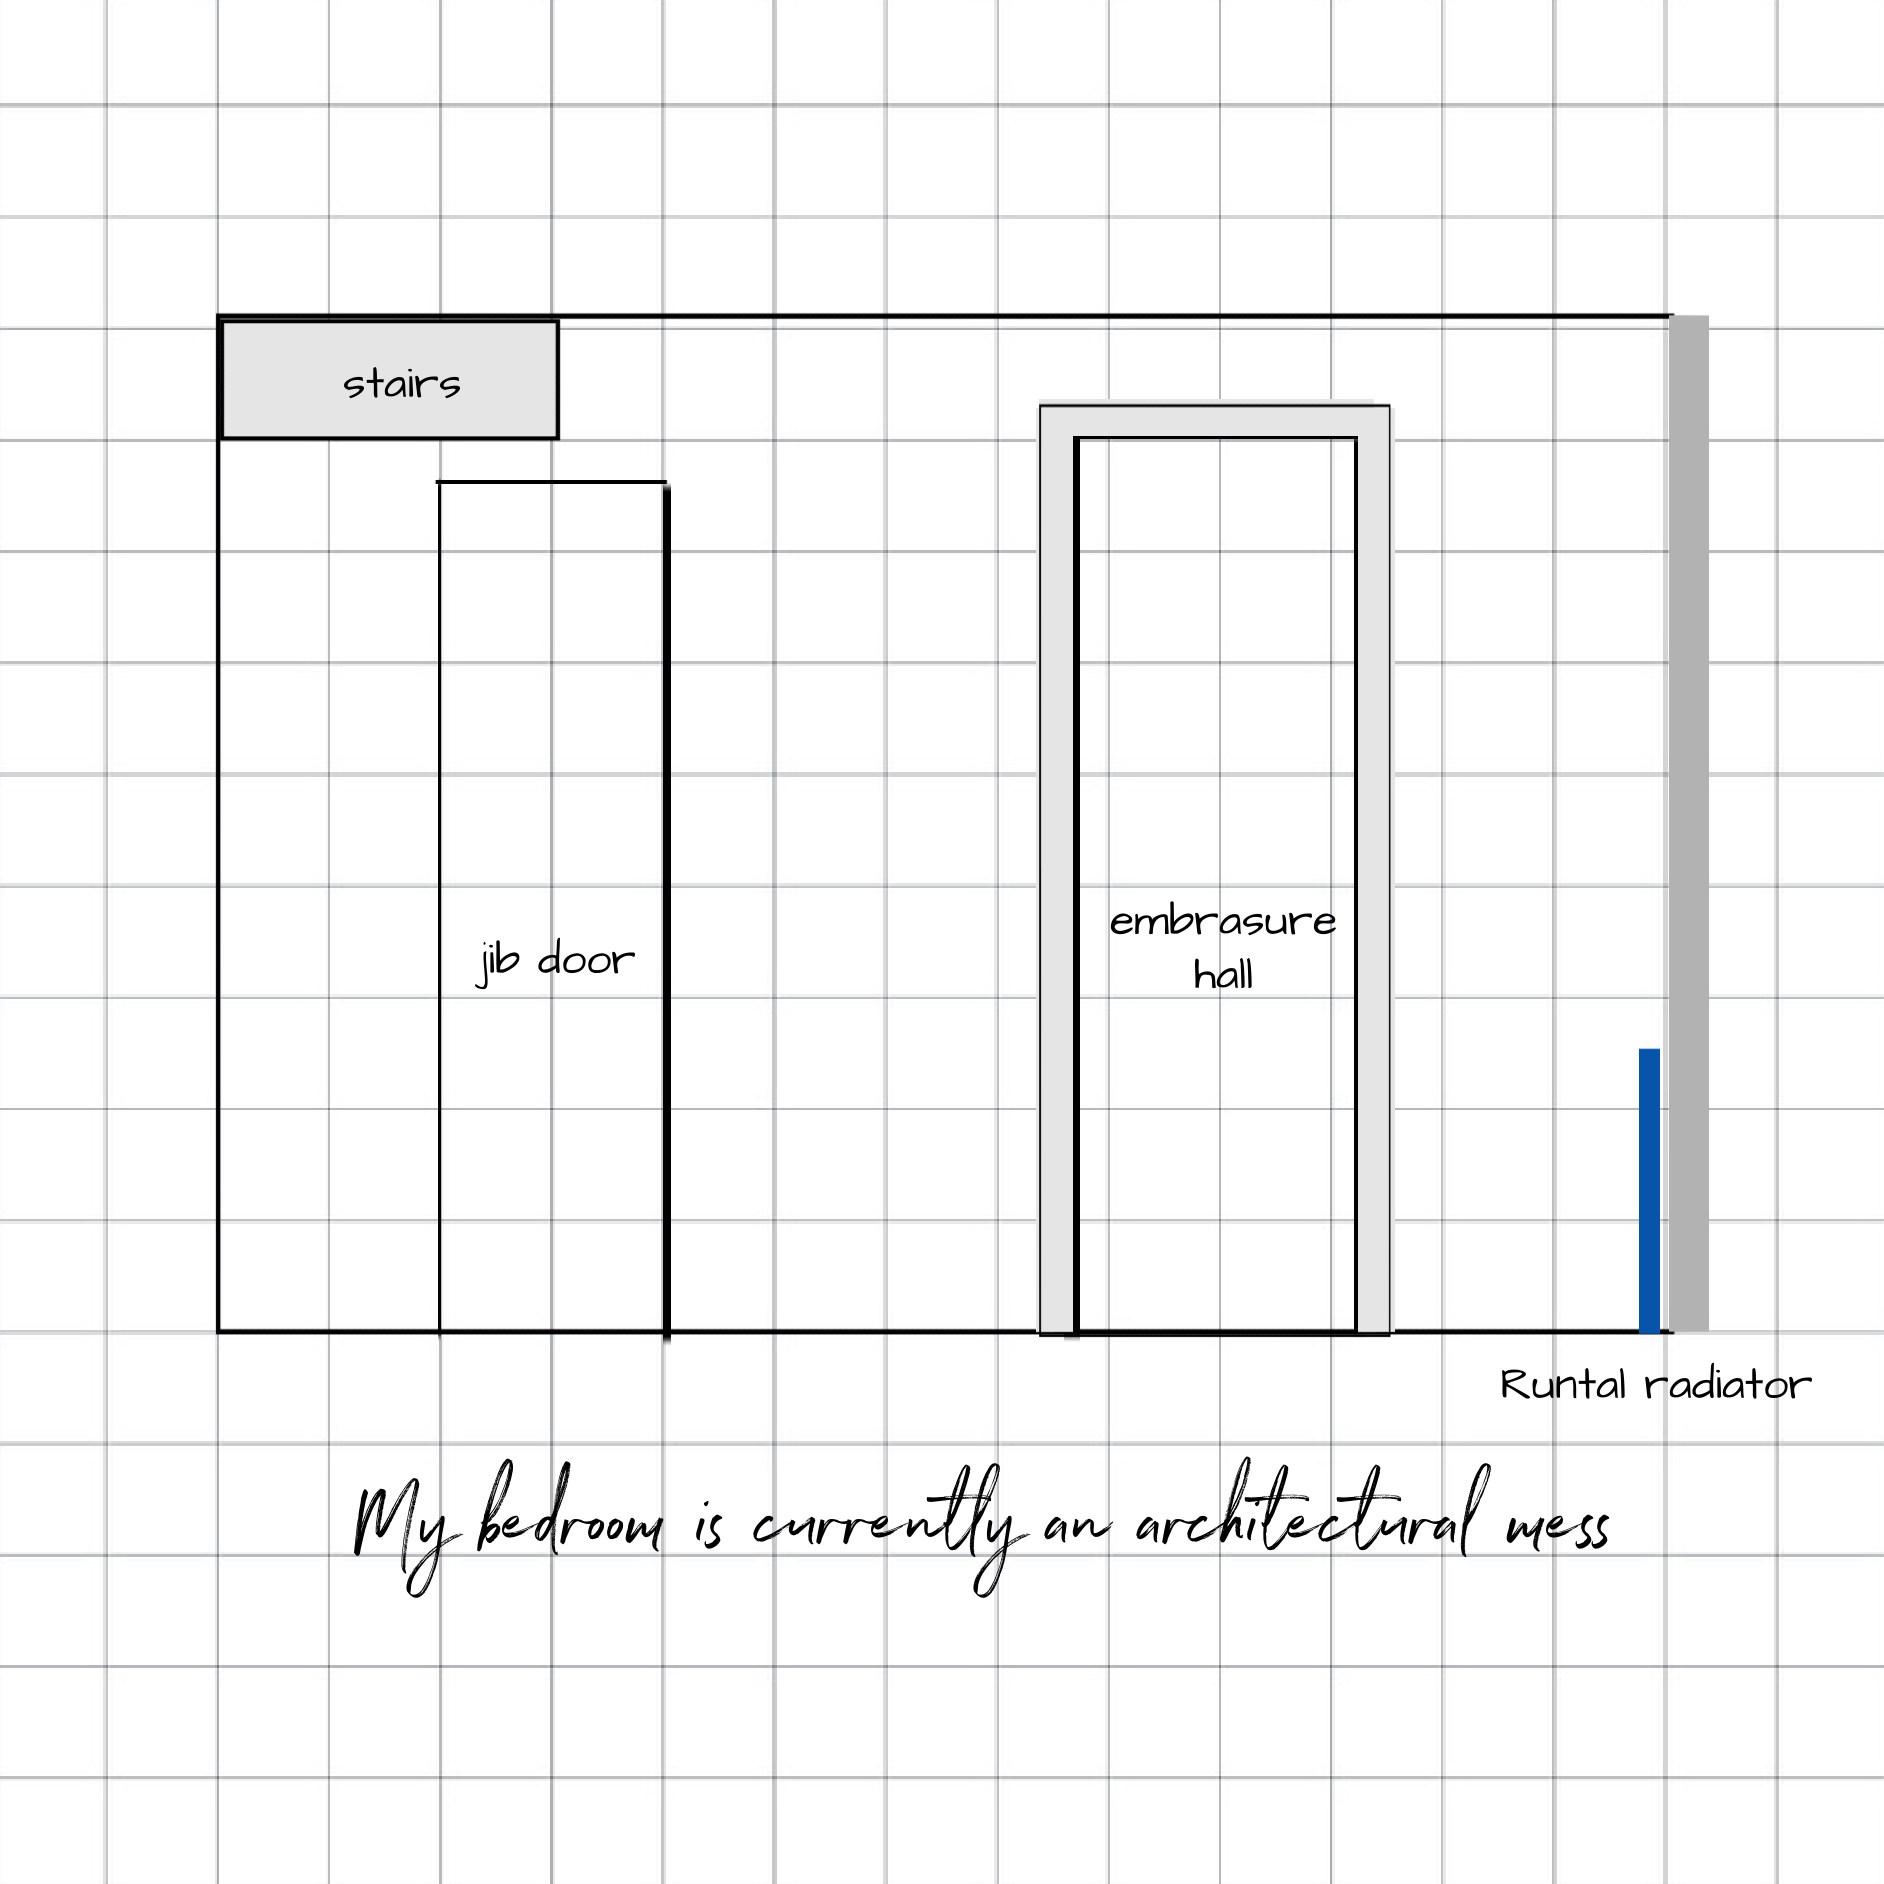
I did add in the door trim.
Laurel, how do you feel about the stairs breaking through and just ending in that random spot?
Is that a trick question? You know good and well how I feel about it.
It SUCKS! It’s AWFUL! GRRRRRRRRRRR
Alas, that’s life. While it’s giving me angst, in the grand scheme, this is trivial. Besides, I’m up for a challenge to make this elevation work!
The only thing good about this wall is the view won’t be visible unless one is coming in from the garden.
Okay, gang, we are going to pick this up Thursday evening. I came up with four plans.
Three of them are viable, and one of them is not.
What’s wrong?
Okaaaaaaayyy…
Here they are.
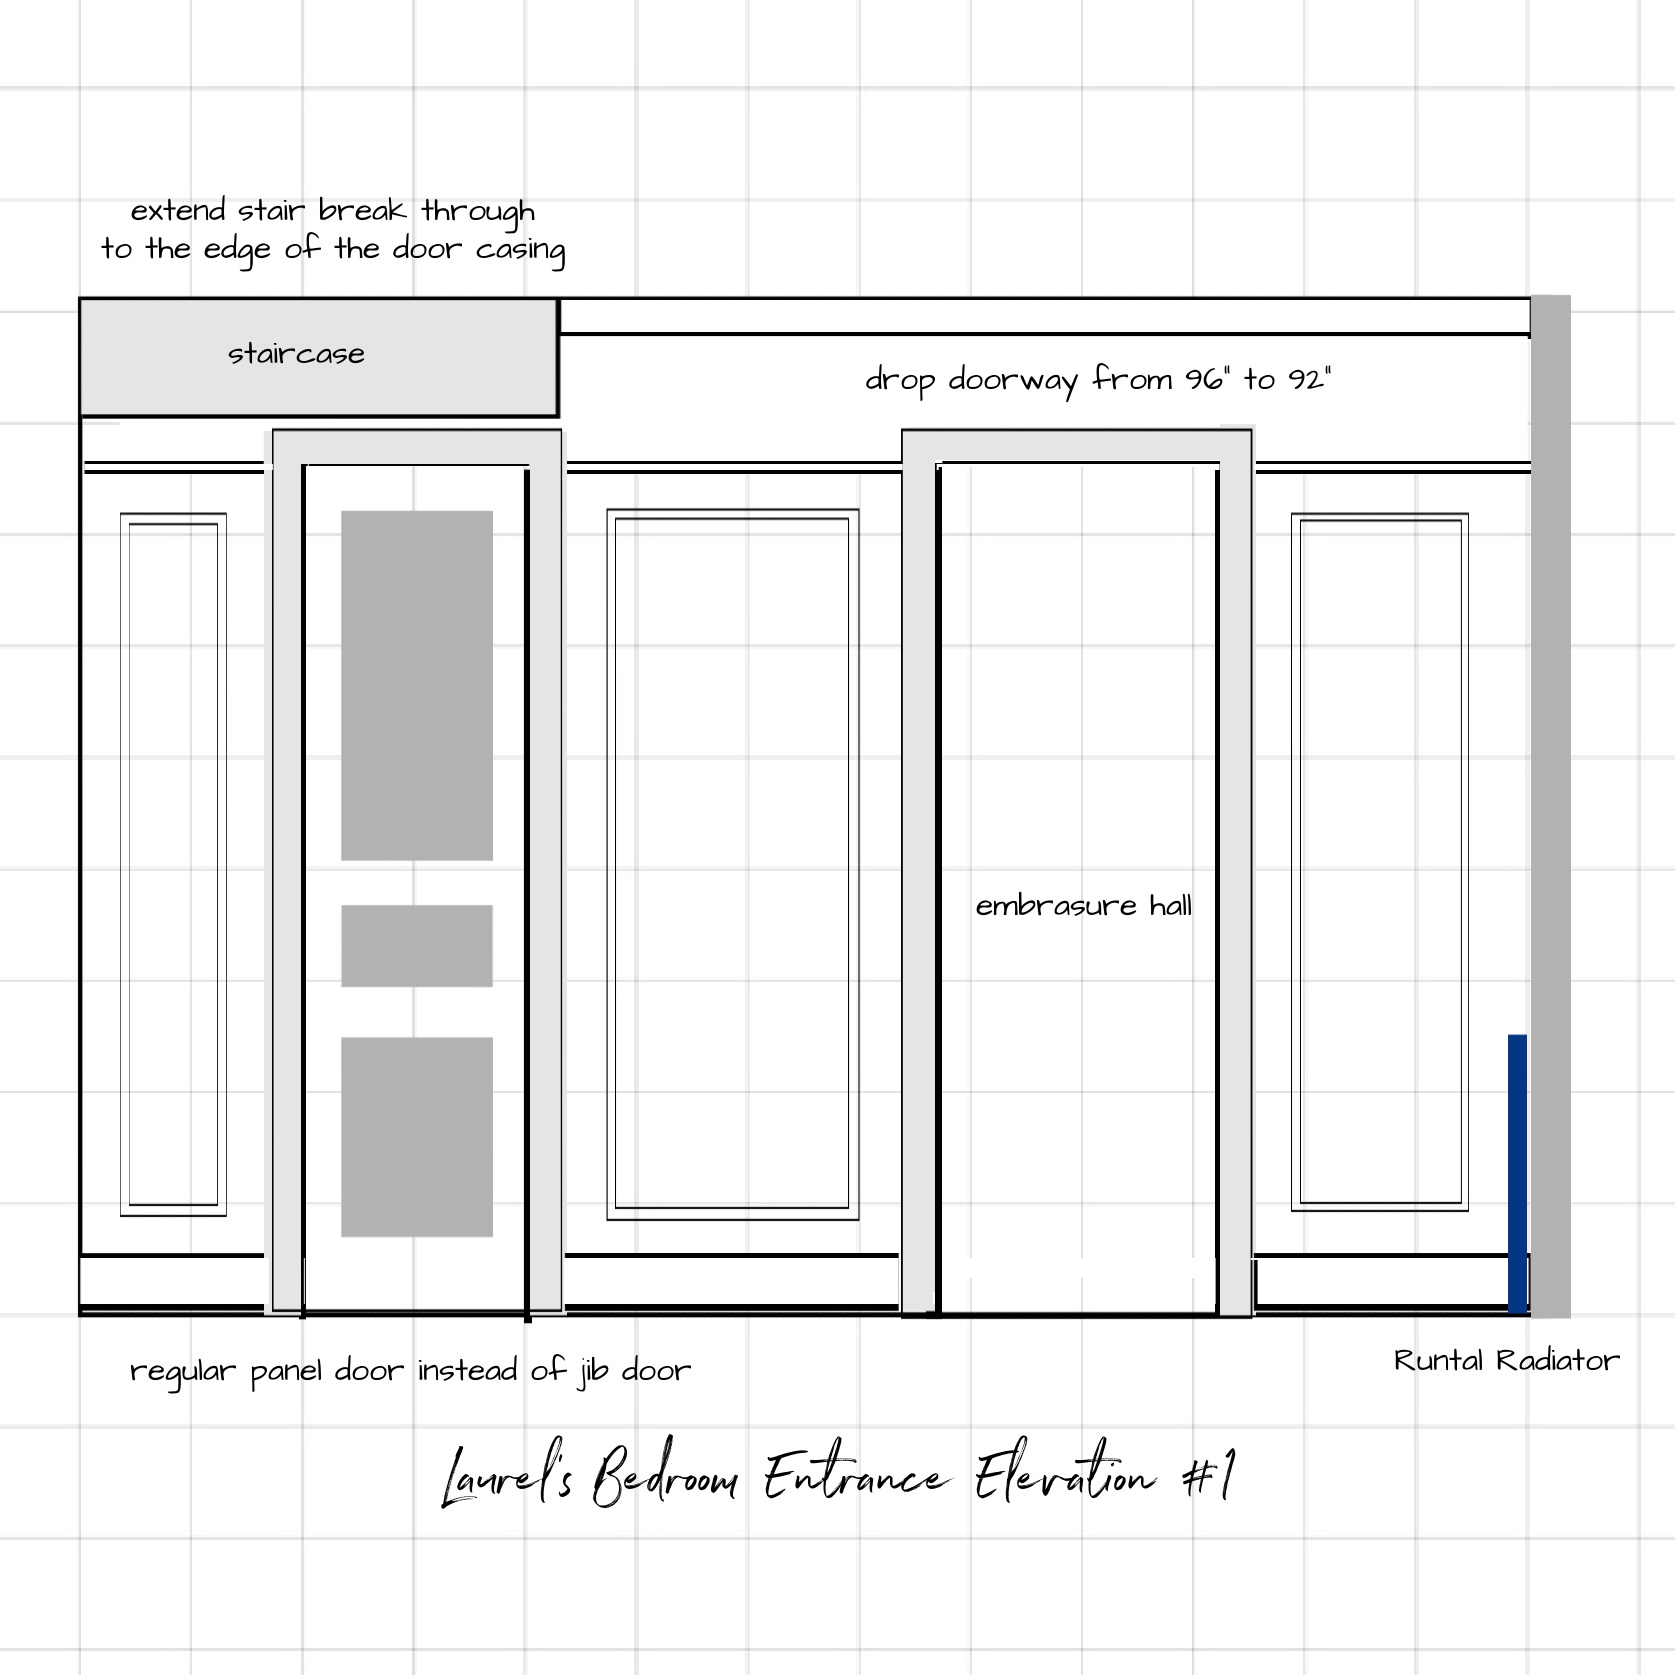
For #1, I did make the door openings the same height, and the closet is a regular door not a jib door.
The question is, do we then have to lower ALL the other doorways? If so, it’s ten other doors and doorways that would all need to come down. The doors haven’t been ordered yet. Robert was wise to wait. Still, I would rather avoid that. There is still so much left to do!
I stole the idea of the picture rail coming to the height of the door from my old New York apartment. I loved this detail and the eight-foot doors with the nine-foot ceiling.
This one’s horrible.
Let’s move on…
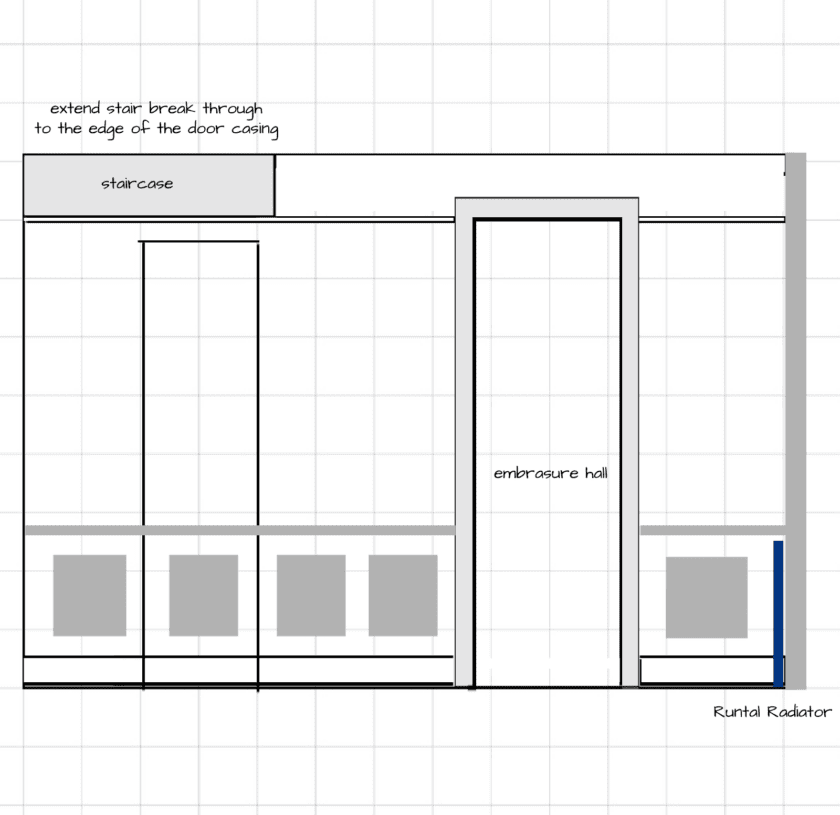
This version isn’t terrible, but I think I can do better. The boxes represent wainscoting.
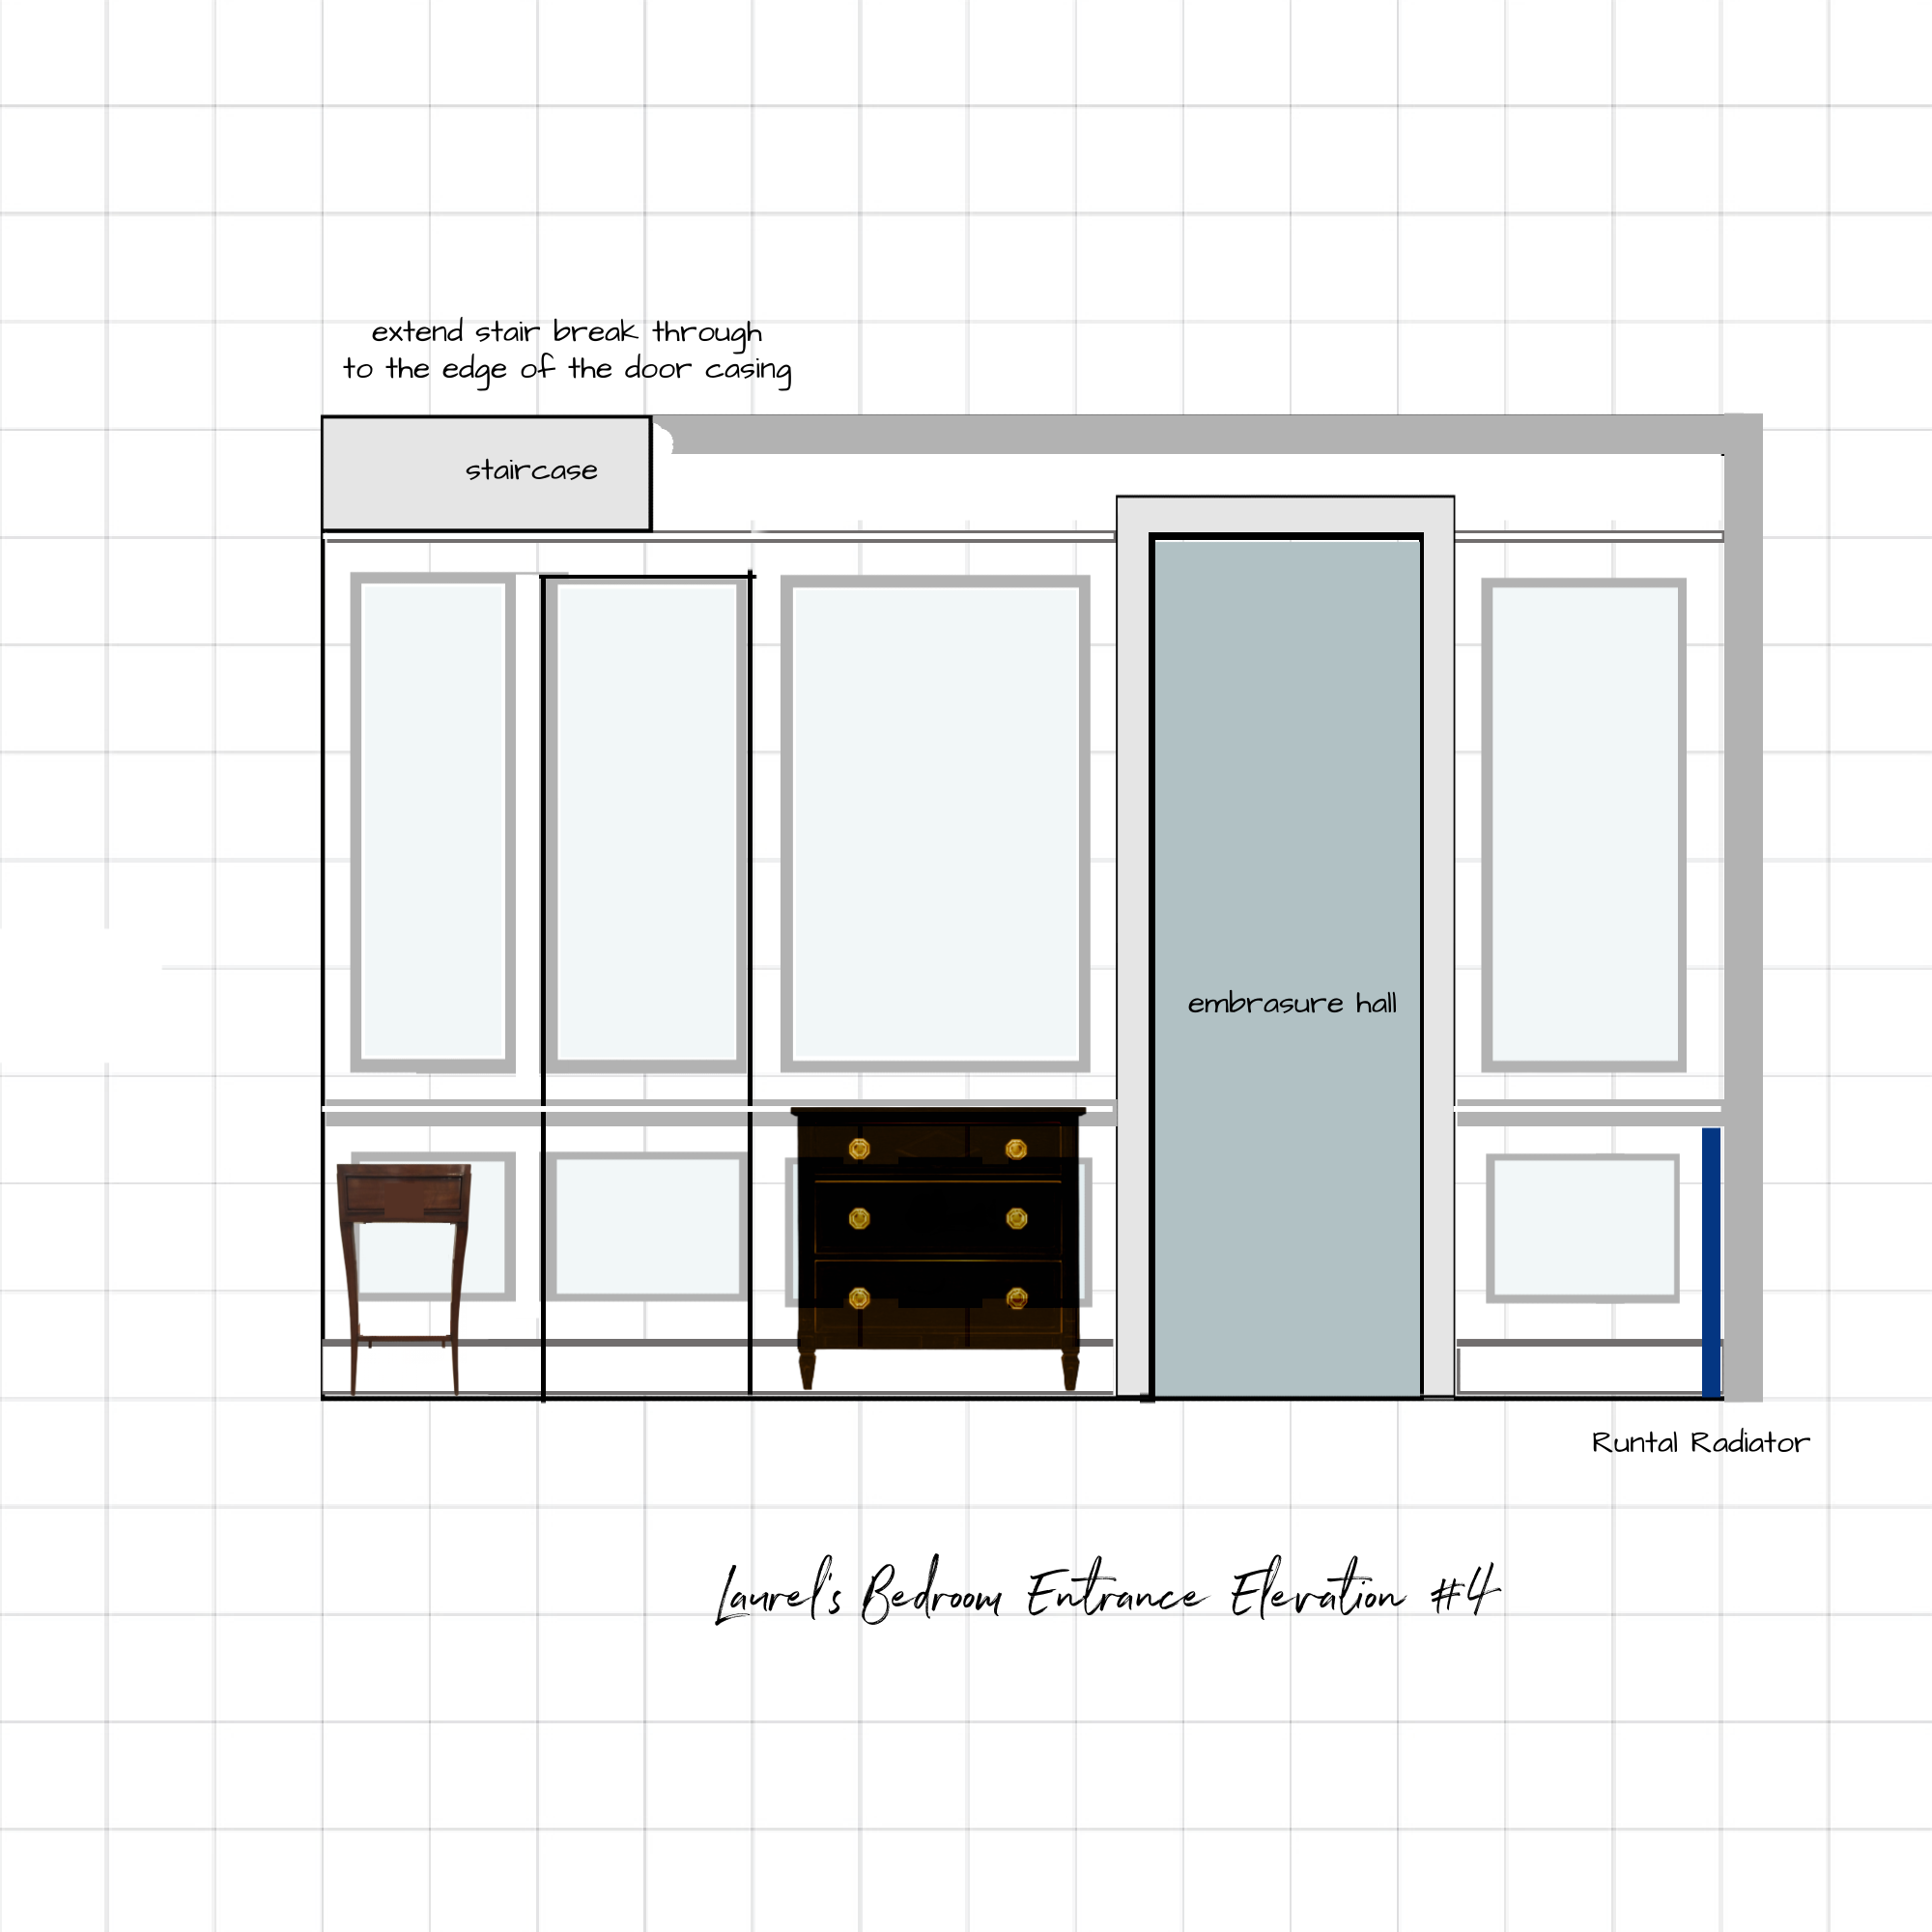
Adding the upper panels makes all the difference! That was the plan, in any case. Now, the hidden door is barely noticeable.
Later, I realized the panel moulding should probably go outside the door, not on the edge of the door.

The trim will not be a contrasting color, most likely.
However, by tying the jib door into the panel moulding, it looks intentional and not like a mistake.
I also left the staircase as is and didn’t extend it.
As for the varied widths of the panel moulding, no one (meaning me, lol) will pay any attention to it. Plus, the wall will usually be viewed at an obtuse angle. My eye will go towards the beautiful embrasured doors.
I think when all the moulding is up, and everything is painted and furnished, it will be fine.
Okay, I’m sure some of you have some ideas or questions, so please fire away.
*********************************************************
Part 2 Begins Here
The closet is staying. There is no other access to that space under the stairs other than that one spot. We did, however move the door over as far as possible to accommodate the nightstand.
As for the jib door itself, I am investigating building techniques.
This guy above has some excellent videos about hidden doors and how he constructs them to look truly hidden.
One thing I learned is that when doing mouldings incorporated into a jib door, we need a hidden pivot hinge. He recommends Rixson pivot hinges. This allows the door to open without interference from the moulding.
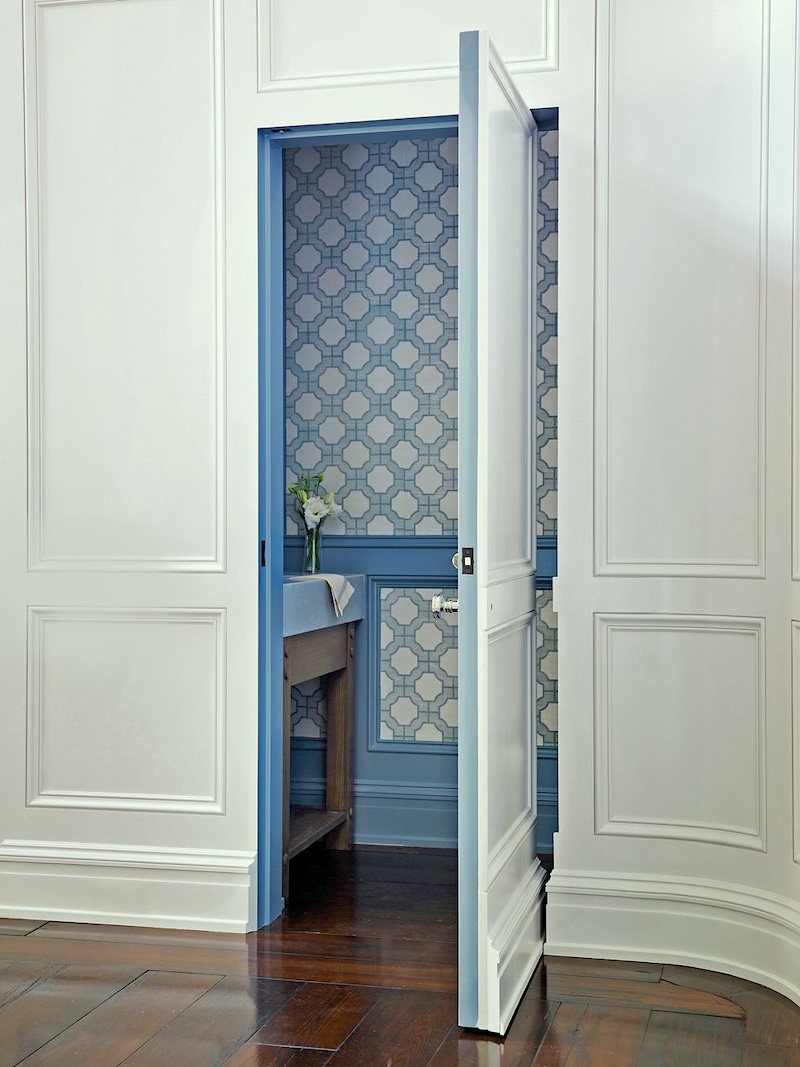
Interior design – Andrew Howard
Above, we can see a splendid jib pivot door in action.
Yes, when open, the door takes up a good four inches, and my door will only be 22″. That’s fine, and the door actually goes into the space a few inches instead of swinging out.
In Andrew Howard’s link above, you can see this home with the door shut, but unfortunately, it was shot with a big flat-leafed plant in front of it. In the same image is another jib door under the stairs, similar to what I plan on.
For more cool hidden doors please go here.
And for more hidden storage ideas, this is a fun post.
One of my goals with this renovation is to incorporate many cool but less common elements.
After all, if you wish to see the same thing over and over, then please watch HGTV.
Thus, this renovation has become a laboratory of sorts. During the process, I have and will continue to share the process. If you’d like to do something similar, you’ll have something you can show your builder.
Some of you misunderstood, or else I did. However, there are no longer any space issues now that we pushed the wall by the head of the bed back. In addition, the only wall large enough for the bed and nightstands is the wall the bed is on.
Okay, there are a few more things to address, which are important lessons for all of us.
The first one is the idea of squaring off the angle and then carrying that soffit across to the fireplace bump out.
In theory, it makes sense, but is it better?
I don’t think so, and here’s why.
The box would need to be built. That means it will be at least a 15” box running 14 feet. We could stop right there because this would be like covering up a small pimple with a huge glob of red lipstick.
Please understand, I know, because I’ve already made this mistake. It was 25 years ago.
We had our unfinished basement turned into a rec room with two storage areas. We decided to box in some exposed pipes running near the eight-foot-high ceiling.
One day, I went down to check on things and was horrified to see a BIG box hanging from the ceiling. It looked awful, and I said, I know this will cost a little more, but please take it down.
Lesson learned.
Therefore, the box idea for this space is not going to work. There may be other situations where it could work, but not here.
What about keeping just the angle all the way across, Laurel?
I considered that but thought it would look quite odd, and that would interfere with the entrance door height and the lovely crown moulding I’m planning to do.
As some of you suggested, and I agree, the stairs won’t be a factor when it’s finished with the mouldings, paint, and furnishings. Neither will the different-sized panels. There are three other walls, with lovely things to see on each one.
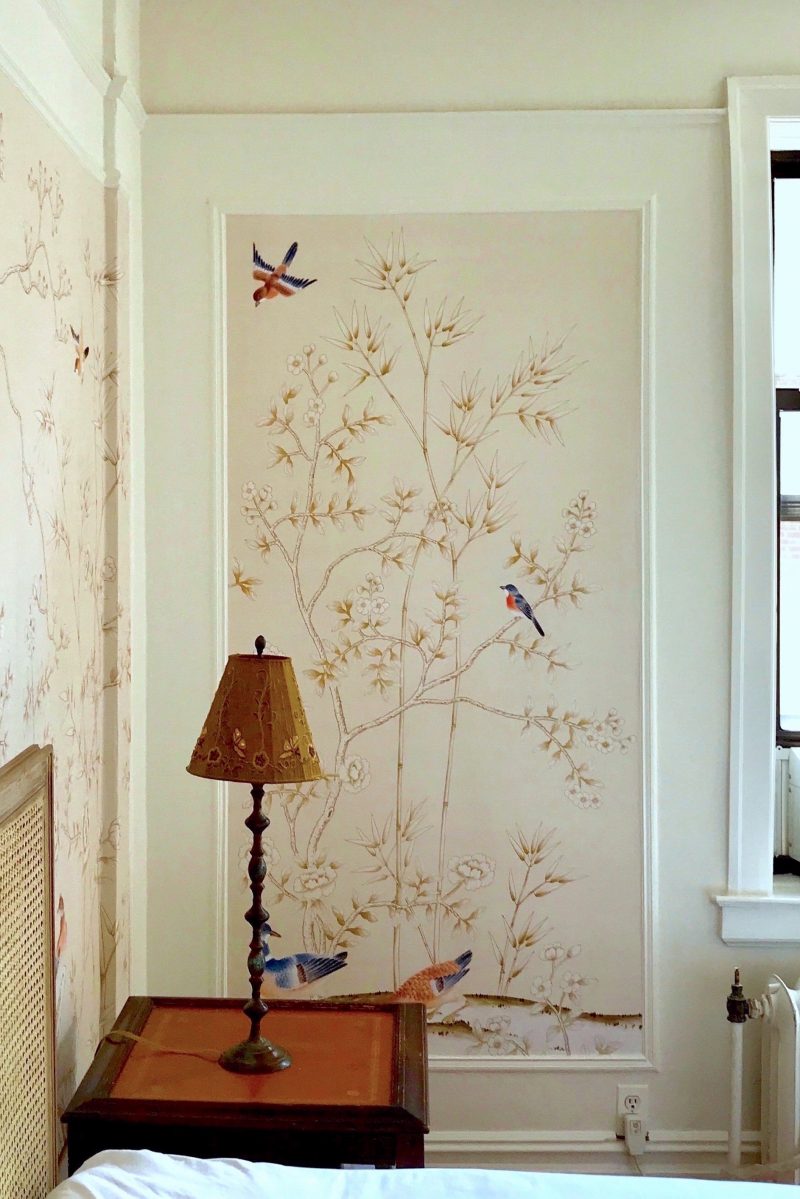
However, there is one more eyesore,: the little soffit surrounding the fireplace bump out.
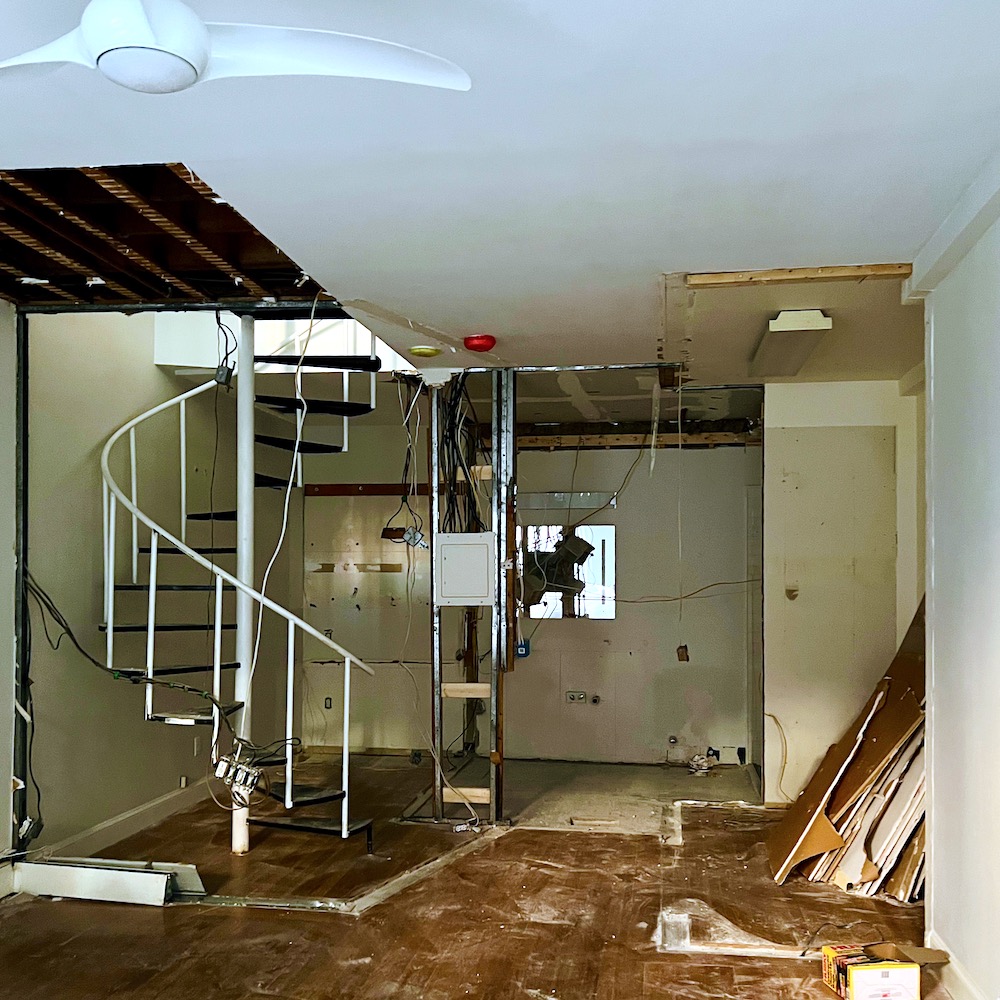
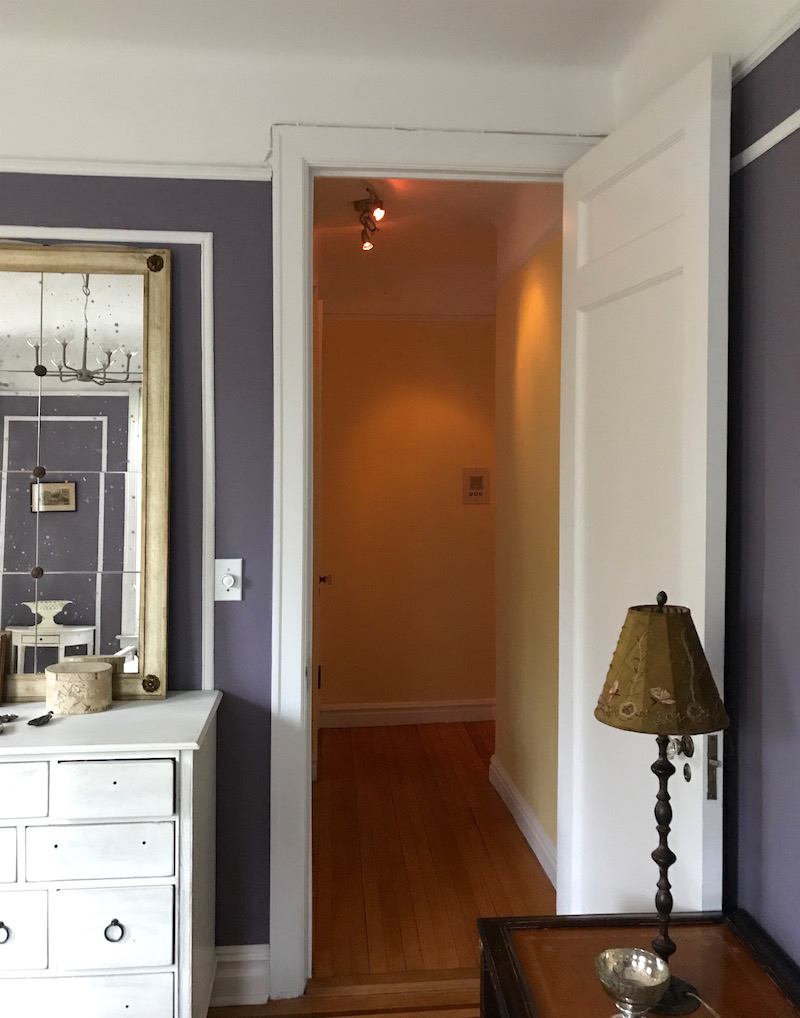
You can see it near the upper right corner in this image taken July 31, 2023. Look how far we’ve come in five months.
The soffit wraps around and protrudes 8″ on the side, we can’t see. The front, we can see isn’t a problem. Both walls need to get built out and the radiator situation solved. The section of wall between the fireplace and bay is 91″.
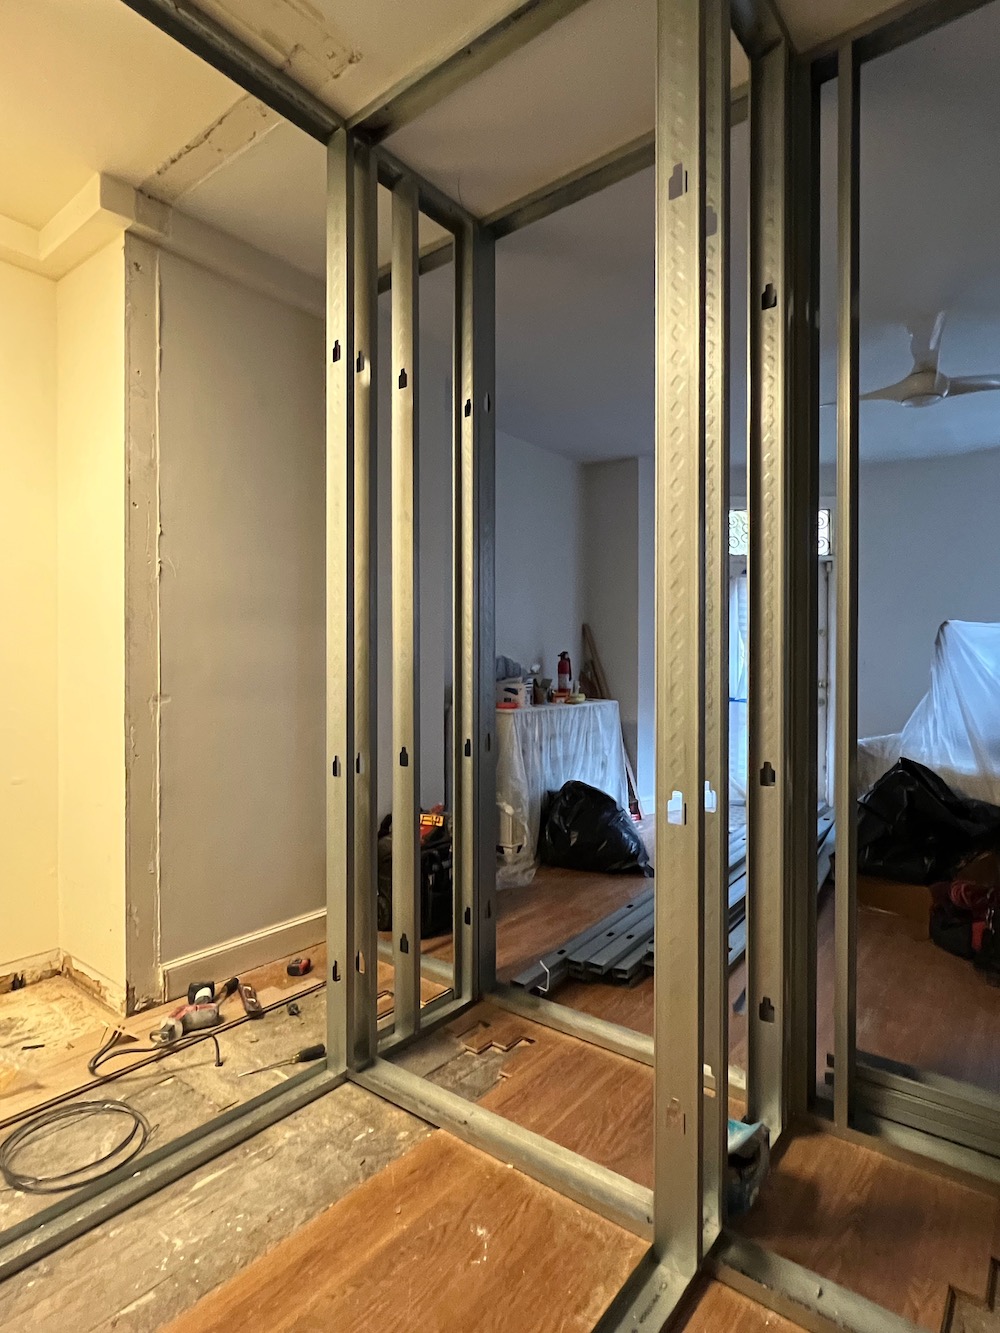
Above is an image where you can see the soffit on the other side.
The issue is I want to put my painted 84″ bookcase in that nook. (where the dresser with plastic is in the pic above)
Please don’t hurt your brain, lol. The bookcase is 1″ too big, as 8″ (the part that needs building out) takes the width down from 91″ to 83″.
What’s in the little soffit? There is at least one of the 1″ copper pipes carrying hot water.
Worse case scenario, they’ll have to cut down the top of the bookcase a little.
Okay, I believe I’ve addressed either here or in the comments most of the ideas and questions regarding the entrance wall into the bedroom.
***But, guys… If you want to take advantage of the spectacular deal going on with my rockin’ interior design guides, you don’t have much time left!

***Laurel’s Guides Special Sale through December 31, 2023!
***Please check it out here***
And find out how to get a FREE 333 Rules & Tips AND Etsy Guide for 2024!
All of the guides’ prices are going up January 1, 2024!
***Gifting is available and easy.***
When ordering, click the gift icon, then follow the prompts.
(Click on the links below to learn more about my interior design guides)

Laurel’s Rolodex (just released for 2024) – A unique shopping guide that shares hundreds of my favorite sources, especially for decorators and designers, tells you the best sources that sell directly to the design trade. You will always get lifetime, annual updates with this guide.

The Essential Paint Color and Palette Collection (two volumes)

Six-Figure Income Blogger. (This should be required reading for everyone who has a website and wishes to get the most out of it for their business)

333 Decorating Rules & Tips You Need to Know

Or, order the all-new 2024 Etsy guide on its own
Thank you, as always, for your kindness and support. I appreciate it more than I can say. Please have a blessed new year!
xo,

PS: Please check out the newly updated HOT SALES!
A link to shop on Amazon is here.

Related Posts
 Club Chairs and the Newest Trend We’ve Been Waiting For
 Coffee Table Styling Using What You Already Have
 The Spectacular Unknown Furlow Gatewood Homes!
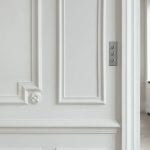 All About Wainscoting + The One Thing You Must Never Do
 Ceiling Lanterns – How to Figure Out What Size to Get
 Stainless Steel Sucks – What You Should Use Instead
 Renovation News and Deets!


66 Responses
“Thank you for sharing this informative post! It’s always great to come across quality content like this. The insights you’ve provided are valuable and will be helpful for anyone interested in this topic. Keep up the good work!”
Reading your latest update (01/03/2024) I’m wondering if your bookcase will fit since the soffit only protrudes 7 inches on the side. I’ve got my fingers crossed that this is the start of a new year with things working as you hoped they would.
Hi Susan,
Thank you. I will keep my fingers crossed for you, too. :]
I’ve measured that bookcase at least a half-dozen times, but since it became available this morning, due to the work being done upstairs, I just had the plaster/sheetrock guys measure the bookcase– again. The case itself, is 82″. With the top it’s 84″. When the wall is built out to hide the soffit, the alcove where the bookcase is to sit will also be 84″. (It’s currently 91″.) If we can move the soffit back a bit, then great. Like I said, that was supposed to have been dealt with. In fact, I’m going to speak to the guys after I finish my note.
The bottom line is even if we can’t move that soffit back an inch or two, we can trim the top a bit on each side, and it’ll be absolutely fine.
First, I love your blog and am following your wonderful remodeling project like it’s my job. Now that you’ve shown us the little boxed-in problem on the other side of your bedroom, I wonder if creating a cove ceiling in the bedroom would work to eliminate (hide) both the staircase angle and the bit that hides the pipe(s). I know you loved the cove ceiling in your previous home, so I thought I’d mention this idea. And thank you for being so generous with your time, talent, and humor – I look forward to every post!!
Hi Kathy,
What would make sense would be a tray ceiling, except it would have to come down too far to cover the stairs. Also, the window and door to the garden are slightly different heights, but both come within about seven inches of the ceiling. That doesn’t give me much real estate to work with. As it is, I am planning on doing a beautiful cove moulding; one of the flexible ones from Orac Decor
Laurel, thank you so much for your explanation of the guides. How did I miss that they were emailed? That just shows how, being in the beginning of a kitchen reno, of which you are my inspiration, is affecting me. LOL! So sorry there is no way for you to do a Canada link. Phooey! I will be supporting you on Canada.com when I buy Kindle books. Thanks for all you do for your fans!
Jean Labrador ( like the dogs or the province.)
Complete agreement on the angled stair intrusion. So many large, intrusive squared sheetrock monsters running across a room now where older houses had a simple, minor, limited, and angled staircase projection. Great work on your beautiful project and thanks so much for all the instruction.
Hi Laurel, I have been following you for years and love your blog! First time commenting…
The stair breaking through the wall does not bother me. As another reader commented it highlights an architectural feature of the house, the stairway. I do not agree however, with eliminating the closet as that would bring the stair too low within the room and IMO that would look like a mistake. You have made me pause though, regarding a beach house I designed. We let the pitch of the roof read in the ceiling (all sheet rocked) but there were some interruptions where the ducts ran through (close to a wall). I think of it as an enclosed version of an exposed ceiling 😀 Anyway, things are not always as you envisioned and an open mind is good combined with the ability to design the best version as you go. I like elevation #4 and feel you made the best use of the elements to create a pleasing elevation. -Andrea
I am leaving my website address however, it is being re-designed as we speak. Check it out in the new year… should be up by then.
The video on jib doors was so interesting. I learned so much and was especially impressed with the way he has the moulding extend beyond the door to cover the seam. That is very creative and truly makes it a hidden door, much better than attaching the moulding flush with the edge of the door. You can never get the seam small enough. Now you only have the hinge side with a small seam.
I also realized, after studying your elevations more, that your original drawing with the bump-out for the closet took into account where the stairs would break through the ceiling, eliminating the slope you now have. In a perfect world, your bedroom would be 15 inches longer, allowing for the closet to be deeper, but we all know the world isn’t perfect.
I keep thinking how different your finished remodel would look if you weren’t there to spot problems and address them while the construction is happening. You have an eye for seeing things that aren’t going to work or would always bug you if they aren’t corrected.
The joy of reading your blogs is seeing how you find solutions to make the area you are working on functional and beautiful while working around/with whatever obstacle rears its head. The way you embrace the uniqueness of the structure is what gives it character. I’m always fascinated with your thought process and problem solving skills. Your blogs should be required material in any design course.
Thank you for this wonderful note, Susan.
Laurel,
In my opinion, you are the best decorator who is online! Love all of your blogs! Question: Do you mail your guides to Canada? I can’t be the only person in Ontario who loves you! Also is there some way you could put your Amazon page with the ability to credit you on Amazon.ca?? It distress me that I cannot help you with this from Canada! I still have some banks and charge cards in USA, so I can pay you with those things in US monies the paint guides I would like. Help!
Hi Jean,
Thank you for your kind words. The guides come via e-mail as they are digital. That’s how I can give free updates. Some people have had them printed out for personal use with a commercial copier.
The affiliate links do not work for Amazon.ca. For this in the US, to be clear, I don’t have a page. Unless I’m linking to a speciic product, you’ll end up on your own home page. From there, you can order whatever you like, however, items already in your cart will not receive credit.
You don’t need a closet??? Get a daybed??? WTH? What you’re doing is SO hard!! It’s going to be so pretty. We’re remodeling a 1977 house and with God as my witness we’ll build from scratch next time, no remodeling.
You will have a large walk in closet for your bedroom, doesn’t that qualify for the legal bedroom designation? My daughter has a closet off a hallway leading to a full bathroom and in Michigan that qualifies it as a bedroom. What does your architect say?
I would think that old buildings in Boston would have many different configurations due to changes in the use of rooms.
Hi Dianne,
I haven’t spoken to my architect since July. I need a closet close to my bed to store all of my sex toys. ;]
WOW! Solution #4 is gorgeous. This is why we’re all reading your blog. You face a challenge straight on, and use your creativity to find an amazing solution. Can’t wait to see your finished project!
I would just let them finish what is there and embrace the unexpected in that corner. It’s possible that if it is squared off it will just be more prominent. By the time you are finished, the design will be so lovely it will not be noticed. I love the picture molding that hides the door and making those squares uneven will keep the focal point on them rather than the stair jutting out in the corner. Thank you for sharing, I am enjoying your process!
Thanks to Dee-Dee for the explanation of “Durham’s flaw!” I heard it from a friend, but didn’t know the exact origin. We just stayed in our favorite Airbnb in Racine, WI, and they tastefully updated the bottom floor of the older home…left all the gorgeous wood floors, 12″ pocket doors, and one lovely fireplace with jade tile. The stairs had the same angle, but they made it a feature by leaving a wooden trim piece that I’ve seen before on the underside of stairs in certain older homes. It suites this marriage of old and new in the Airbnb, but honestly, we’ve stayed there 3 times and I only just really noticed it. So I suspect it will probably not be as awful as it looks in the current half-finishef state. I always abhor unfinished sheet rock until it’s finally smoothed and primed…something about the jagged edges…🙄
Mostly I just go back and look at your lovely new kitchen, and enjoy vicariously your “jewel-box”!
And I think I’d probably want a closet there, even if it could be optional.
Best to you as you enter 2024!!!
Well, this isn’t actually a mistake, because, I assumed there was going to be a dormer there all along anyway. I simply forgot to mention it.
#4 looks great. Since a jib door is custom, possibly consider making the two panels on the left the same size so at least two of four panels are the same size. Moreover, if doing that still allows the door to be 15″ or more, I would let form overrule function in this scenario.
Regardless of that, you commented that you did not extend the dormer in #4. Coincidentally, it appears to end exactly in the middle of your jib door. It looks good bisecting the door in the middle if it can be managed to work out that way.
I don’t know the proper treatment of crown in these awkward circumstances. You’ve returned it to the wall in your drawing. If you return it to the wall on the other side of the dormer (i.e. on the bed wall), I’m concerned that may funnel the eye toward the mistake I mean what I forgot to mention. On the bed wall I might be inclined to have it dead end into the slant of the dormer. I’m not sure it needs to be done the same on both sides. I’m in over my head in these cases.
Regarding the mysterious 15″, I’m wondering if the tread length is 11″ when rough, allowing it to be 10″ (or 10 1/4″) when finished.
No need to reply, I will wait to see the right outcome when finished. On pins and needles.
Hi Dan,
Actually the rough tread is only 9″, but of course will “grow” to 10″. As for the moulding, we’ll hold up a piece and see what looks best.
Elevation 4 looks like you designed it that way from the start. The mouldings save you. It’s going to be beautiful.
If the space feels cramped with the closet there, it might be worth checking with professionals to see if a closet really is a legal requirement for a bedroom in Boston/Massachusetts. I was looking online, and there were articles suggesting maybe not. I know (from friends selling their house) that it is OK in California it to have an armoire bolted to the wall as a legal substitute for a closet. A nook with an armoire in it might be more charming — and equally useful to — a conventional closet, and would open up the room a bit.
Hi Ann,
Okay, I checked with myself. ;] It doesn’t matter. I want the closet, and other people will too. It’s taking up no space and the room isn’t at all cramped. It’s very spacious, and I love the new size so much better!
Hi, Laurel. Yours is the only design e-mail I look forward to, and even stay up late, hoping it will show up. Is there room enough to eliminate the nightstands and, instead, use a full-size daybed with a sofa table behind it? It might free up some floor space. My initial thought about the stairway dilemma was to continue some sort of soffit across to the opposite wall, maybe even extending it downward to include hidden storage. But, looking at your floor plan, it might be too much of a good thing. So, I would probably ignore the stairway and paint it to blend with the rest of the ceiling or walls. The mouldings and door casings will lead the eyes to them. Thank-you for sharing your incredible journey toward a gorgeous arrival space.
Hi Camiij,
There is plenty of floor space. I will have 30″ on either side of the bed. That’s more than I had in New York, because the door swung in, and I couldn’t center the bed.
Hi, I love how you used the moulding to compensate for the lower height of the closet door! As others said the angle adds a bit of character. We had a cabin with a 10’3′ wide bedroom the bed was a 72″ wide Cal King. 24″ on either side was awful! I am average size and was bouncing off the walls when getting out of bed knocking over the lamp…and 16 yrs younger than I am now. Your bedroom is such an interesting shape. I recall you envisioned a lovely seating area adjacent to the exit door. So here’s my thought…Assuming it would not block your exit to the garden…Would you consider angling your full sized bed over on that wall where the angle breaks? An upholstered bench at the foot of the bed could be nice and convenient too. A reading nook worked in (under the stairs) in the area where the bed is drawn would leave plenty of room to open the door and get what’s in the closet. You might enjoy the vantage point from your bed of the beautiful paneled artwork wall you created. Seeing the wall rather than it being a narrow aisle alongside your bed could make the space feel more open.
Your talent and expertise are really shining in your reno! It has been an education thank you for including us!
Hi Leslie,
That possibility was considered a long time ago, but there isn’t nearly enough room for a bed and two nightstands, plus, the windows are exceedingly drafty, and it wouldn’t work because of other furniture in the room. The shape and configuration of window, wall and door are also making that arrangement less than ideal. If it was two windows like upstairs, then, it could work, if the windows were fixed.
I had (have) a very similar problem in my dining room – visible from the front door! I carried the box across the length of the wall to attempt to make it look like an intentional feature. I also carried a dark wall color up onto the crown and part of the ceiling with picture rail moulding setting off a center ceiling rectangle in white. I got the idea from one of your posts about trim. I still annoys me immensely that the error occurred, but I’m proud of the solution.
#4 is beautiful! Have you tried it with an extension to the stair break also? I’m curious if that would help symmetry.
My two cents. Never lower doors. Your molding idea is great, even if you design the molding to emphasize the higher door instead of blending it in. It’s a beautiful high door to a beautiful embrasure hallway, it deserves to stand out. Definitely keep the closet even if you go with two narrow doors to avoid hitting the bed or bedstand, or conversely keep the space in the bedroom but use it for a built in dresser with a brass hanging bar above and no doors (which can always be added) or flat panel shutters designed to lay flat against the wall. As for the stairway breaking through. I love that. You have spent umteen thousands of dollars to have a stairway that looks natural to your home. In the “olden” days, stairways often broke through because space was scarce. The breakthrough is a charming reminder to the bedroom occupants that this room is part of a larger whole, it adds character. It doesn’t need disguise, and it’s not a mistake, in the hands of someone with your background and talent it’s a serendipitous bonus.
In your previous post I noticed that the plumbing under your bathroom sink was not aligned/centered , drain pipe not centered with the water source coming in(hot and cold). Since these are exposed shouldn’t they be centered?
BTW I love how you take us thru solving your problems, ex: door trim should be outside of door. You are so thoughtful. I know from renovating two homes homes that sometimes what you want isn’t always what you get. You just seem to gracefully float thru problem solving(OK a few expletives are involved -LOL). I’ve learned so much from you.
Hi Kat,
You’re right. It’s off by 1.25″.
I love your solution- looks beautiful! Have you heard of Durham’s flaw? In Durham cathedral in England you will find a mistake on one of the columns. There was a tradition that the Master Mason would always include a flaw in the cathedrals to remind us that only God is infallible and perfect. Maybe this can be your Durham’s flaw! 🙂 In any case, I think your solution keeps this from looking like a flaw- perfect!
Hi Laurel! I love your final rendition with the jib door. I think after your bedroom is all finished you will not be bothered by the little angle from the staircase. Your bedroom will be gorgeous and that will just be part of the charm of an old house. I want a jib door now. They are so charming.
Laurel, I think your last solution is the best. I don’t like to have a lot of stuff, but I’m a firm believer in maximizing storage (also good for resale). I don’t think you’ll even notice the “problem” once everything is paneled, painted and done. Also, never again think of it as a mistake: always think of how smart and inventive you are in fixing the ooops. I’m so enjoying the entire process!
Laurel. This same thing happened to me but in my living room. The staircase in the plans was not correct. I just had to live with it.
Just find peace with the beautiful and a slight error.
Happy New Year.
Laurel, since the entire floor could be considered the primary suite, I think that the large walk-in closet right outside the embrasure doors would be considered inside the bedroom. I’ve lived in houses where the closets were in the ensuite bathroom, yours is a similar situation. I don’t think you need that little closet door opening into the room itself to be considered a bedroom.
Perhaps you do not need the troublesome closet door in your bedroom? You could instead access the closet space from the hallway, since as I recall, you plan to have doors built there anyway. Unless there is a compelling reason for the mini frig, I doubt it will get much use in the lower level. Having a solid wall next to the bed would give you an opportunity to make the bump out less noticeable. An idea could be to eliminate the upper panel molding giving you a flat wall to hang a lovely piece of art to distract the eye?
Hi Dianne,
I believe I do need a closet in the bedroom to call it a legal bedroom. However, even if I didn’t, that space under the stairs isn’t accessible for anyone taller than four-feet something from the stair side. I know because I was looking at a cool 60″ fridge and it wasn’t even close to being able to fit.
One thing I learned during my renovation is that the things that drive you insane at the time eventually don’t matter such as all the etching from subs leaving their tools and hot sauce on my beautiful new marble counters. My contractor didn’t bother protect them which is inexcusable. Of course we were in Europe at the time so there was nothing I could do. The list goes on. We had some weird ceiling building issues in our primary bedroom which I was upset about but now don’t even notice. I would get rid of the closet if you can but I promise you after awhile you will not even notice it if you leave it. At least it’s downstairs and not really visible. I would not change all the doors though. THAT would be overkill.
Thanks Janet. I think you’re right.
I agree with Mary. Eliminate that jib door. If you must have that bit of storage under stairs access it from hall closet. Love the picture rail and molding. Once room is painted, furniture installed and the enormous changes in the entire apartment are realized, that stair peeking out will be minor blip in perfection.
Hi Kmm,
The only viable access to that area under the stairs is from the bedroom. Strictly speaking there needs to be at least one closet IN the bedroom for it to be a legal bedroom.
buy a full size bed instead.
Hi Pamela,
The bed is a full. I’m thinking down the road. Most people want a queen.
Alternatively- there’s a paint called vantablack that absorbs all light, no one will be able to see it if you paint everything above the picture moulding that color 🤣
But if you suspend a bed canopy from the ceiling, then really the only angle you could see the stairs is standing by the doors looking towards the stairs
Hi Amy,
lol Problem solved. I’ll just paint everything black.
One suggestion -Paint!
I don’t know (or maybe remember) what color you planned to paint your bedroom, but if the walls and ceiling are painted the same color, the staircase will fade into the background.
I have never done a major renovation like this but I am shocked at all the problems that have popped up as the work is done! Good thing you are up to solving them!!!
Thanks, Maggie. Problems are inevitable in any reno, but a 143-year-old home, with all that’s being done. I think it could’ve been a lot worse.
Ok, don’t get mad at me for this idea but I would eliminate the jib door. Just drywall over the opening. It will give you a cleaner wall for your panel molding. It would save you some money. And you’ve stated your home has plenty of storage. Is that closet really needed?
As for the slanted area caused by the stairs peeking through, I don’t think it will be that big of a deal once the room is complete & painted. To me it’s a small price to pay to have a normal staircase.
Hi Mary,
How could I ever get mad at you? I think that closet is technically necessary to call it a legal bedroom.
Upon studying your drawing more, I realize the stairway is wider than the wall across the room to the left of where the window bow starts, so the soffit would be too wide if you just ran it straight across the headboard wall. Perhaps you could make it the width allowed and have it go around the corner at the stairway. If that won’t work, would there be a way to have the stairway projection squared off and extend a soffit across the entire entrance wall? There must be a better way than the sloped wall. I realize for the most part only you will see it, but ….
Hi Susan,
Running a soffit across the entire entrance wall, isn’t a bad idea. The only thing is, I would definitely have to lower the entrance door. And then we’re back to that.
Your condo is shaping up to be absolutely gorgeous! What would you say if you saw this issue in a client’s home? I often tell clients that every home has its quirks…it adds to the charm. If the quirks are bothersome and not changeable we deal with them with great decorating that distracts the eye. I’d say your options do just that.
Hi Alisa,
I agree with you completely. I’ve been in rooms with so many angles it’s dizzying. This is one small angle, still quite high up, tucked into the least visible corner.
Hi, I can’t remember the bathroom floor plan but can the bedroom closet door be eliminated and the closet be accessible from the other side?
Hi Valorie,
The bathroom doesn’t border the bedroom, and that space under the stairs is only accessible from the bedroom.
I am out of my league to offer any recommendations here. I mean, I have a full stair case IN my kitchen. Our entire 107 year old house is a design nightmare by modern standards. I just want to say though that this is a very comforting post, because if this can happen to you, it can happen to any of us. I shall not beat myself up and go into home improvement paralysis the next time something goes wrong in my plans, knowing that it even happens to the best. So thank you for humbly sharing in order to make us feel better!
Thank you, Sandy. Stuff like this, and far worse happens in all renos, even if it’s not shared.
I think #4 is the solution for that wall. I’m going to just throw this out there. I know you are focusing on how to make the wall look right, but the slanted wall still draws unwanted attention. I have no idea if this would work or if it would make it look even worse, but here is a thought (probably off the wall – hehe). What would it look like if you embraced the stairway nightmare and instead of having the slanted doo-hickey, had them square off the projection and make a soffit that extends across the entire length of the wall over the head of your bed? It might be quite dramatic. In your drawings, it looks like it might line up with where the bow of your window starts, which would make it look intentional. Could you be so lucky? With a dropped header (soffit) application, that fact that it doesn’t extend across the entire hidden door looks planned, too. You could even put lights in the soffit, if you wanted some soft lighting over your bed. I can’t wait to see how you resolve this problem. I’ll miss these blogs when your remodel is completed. It has been so much fun to watch the process.
Hi Darlene,
Yes, the moulding will require angled cuts so the door will open. The same situation exists upstairs in the entryway with two doors.
I discussed this with my GC early on in the process. Thank you for mentioning it, however.
Hi Amy,
Yes, the end cap will be repeated on the opposite side. Because of the angled ceiling dying the crown moulding into it would not look so great
I considered, a while back an arch of sorts for symmetry, however, the parallel wall is about 16” before the bay with the window and door begin.
Hi Lisa,
The electrical panel is across the entry hall that houses the stairs. However, it doesn’t interfere with any of the moulding.
Will the electrical box by the doorway interfere with the molding?
The last elevation looks good! So clever and shows how you can make the door heights look intentional. My two cents- the ceiling moulding having an end cap towards the stairs draws attention to the stairs for me (or maybe I’m reading it wrong and you’re just showing the profile) but I think it should butt up tight against the stairs. It also reminds me of some posts you’ve made about heat pumps and covering things – you could treat the area like one of those. Or you could mirror the cut out on the other side for symmetry. Would an arch over the whole bed be architecturally sound (sorry if I made you cringe 😝)? If you were Mark Sikes I bet you would canopy the area over the bed with a Schumacher fabric and turn it into a feature.
Some concern regarding your chair rail molding. We have a hidden panel door that leads to our hot water on demand tank. What we didn’t realize when we did it is that the panel with a near invisible seam really needs to swing inward toward the hot water tank to work. Ours swings outward like I think your closet does. Our chair rail needs to fold back on itself to open the door and can’t. To make ours work, we have removable pieces of chair molding that come off before we open the door. It’s not ideal but we don’t need to open it often unlike a closet. Maybe your molding outside the panel fixes this or you are using different hinges that swing the door into its own space (I can’t remember what they’re called). Anyway, something to consider if you haven’t already.