Hi Everyone, before we begin, please a gentle reminder to read the post first if you wish to make a comment.
And, also, please try to be kind. Kind is not giving advice that’s not asked for. Thank you.
This is part II of the kitchen renovation post.
It is a continuation of my design process. Only now, we’re going to go downstairs.
Part of the downstairs design process is tied to the upstairs.
Yes, the new staircase. However, I have had some revelations recently about that.
Since I’m masochistically putting my home out there a second time, please be mindful.
Okay, if you think the kitchen is fraught with challenges, the downstairs is even more so.
However, before I go on with the design process, the upstairs is nearly double the size of the downstairs.
Therefore, many of your beautiful ideas are impossible to implement. We’ve been through it all before.
BUT, PLEASE, FOR THE LOVE OF GOD, DO NOT MENTION THE WORD ELEVATOR. IT IS NOT POSSIBLE! I REPEAT, IT’S IMPOSSIBLE EVEN IF I WANTED TO PUT ONE IN, WHICH I DO NOT!
Sorry to shout. It’s just that we’ve been over that countless times.
One of the design process secrets is to “explore the possibilities!” And, I have turned this place inside and out, exploring for the last 22 months.
This post, written shortly after I had gone to contract, is a great place to start.
And, this post shares previous iterations of the downstairs redesign.
(There’s also some super chillaxing music to listen to instead of beating Laurel up.)
And, you can get a glimpse inside of how my design process works when working with a challenging design. It’s fun to look back and see how the space and ideas take shape.
Most of the earlier iterations are far better than what is currently here. However, time and desire to create have left me with more chances to improve the design.
But, let’s first look at how the downstairs was when it was first renovated back in 1978.
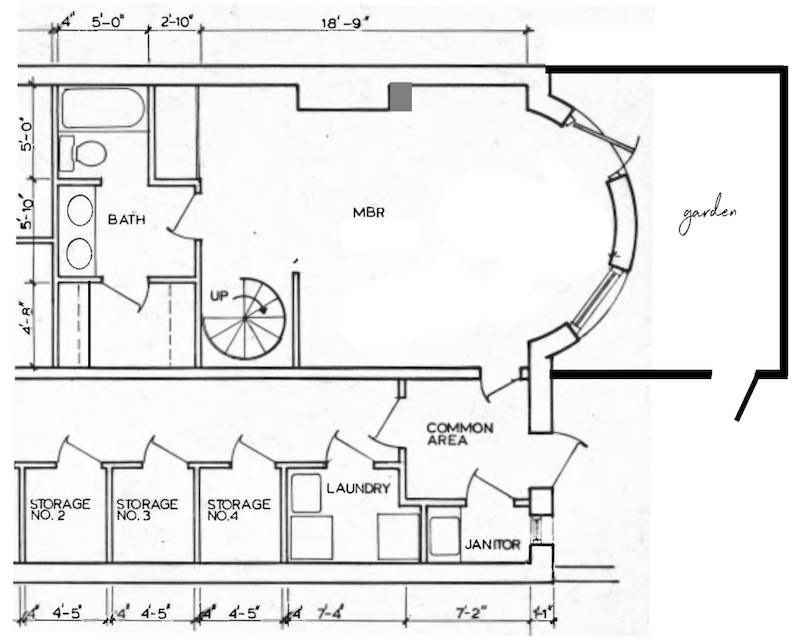 Okay, the renovators were young and didn’t have a lot of cashola. I get it. Besides, Back Bay wasn’t the neighborhood it is now. It had fallen into decay and was only beginning to be returned to the urban paradise it is today.
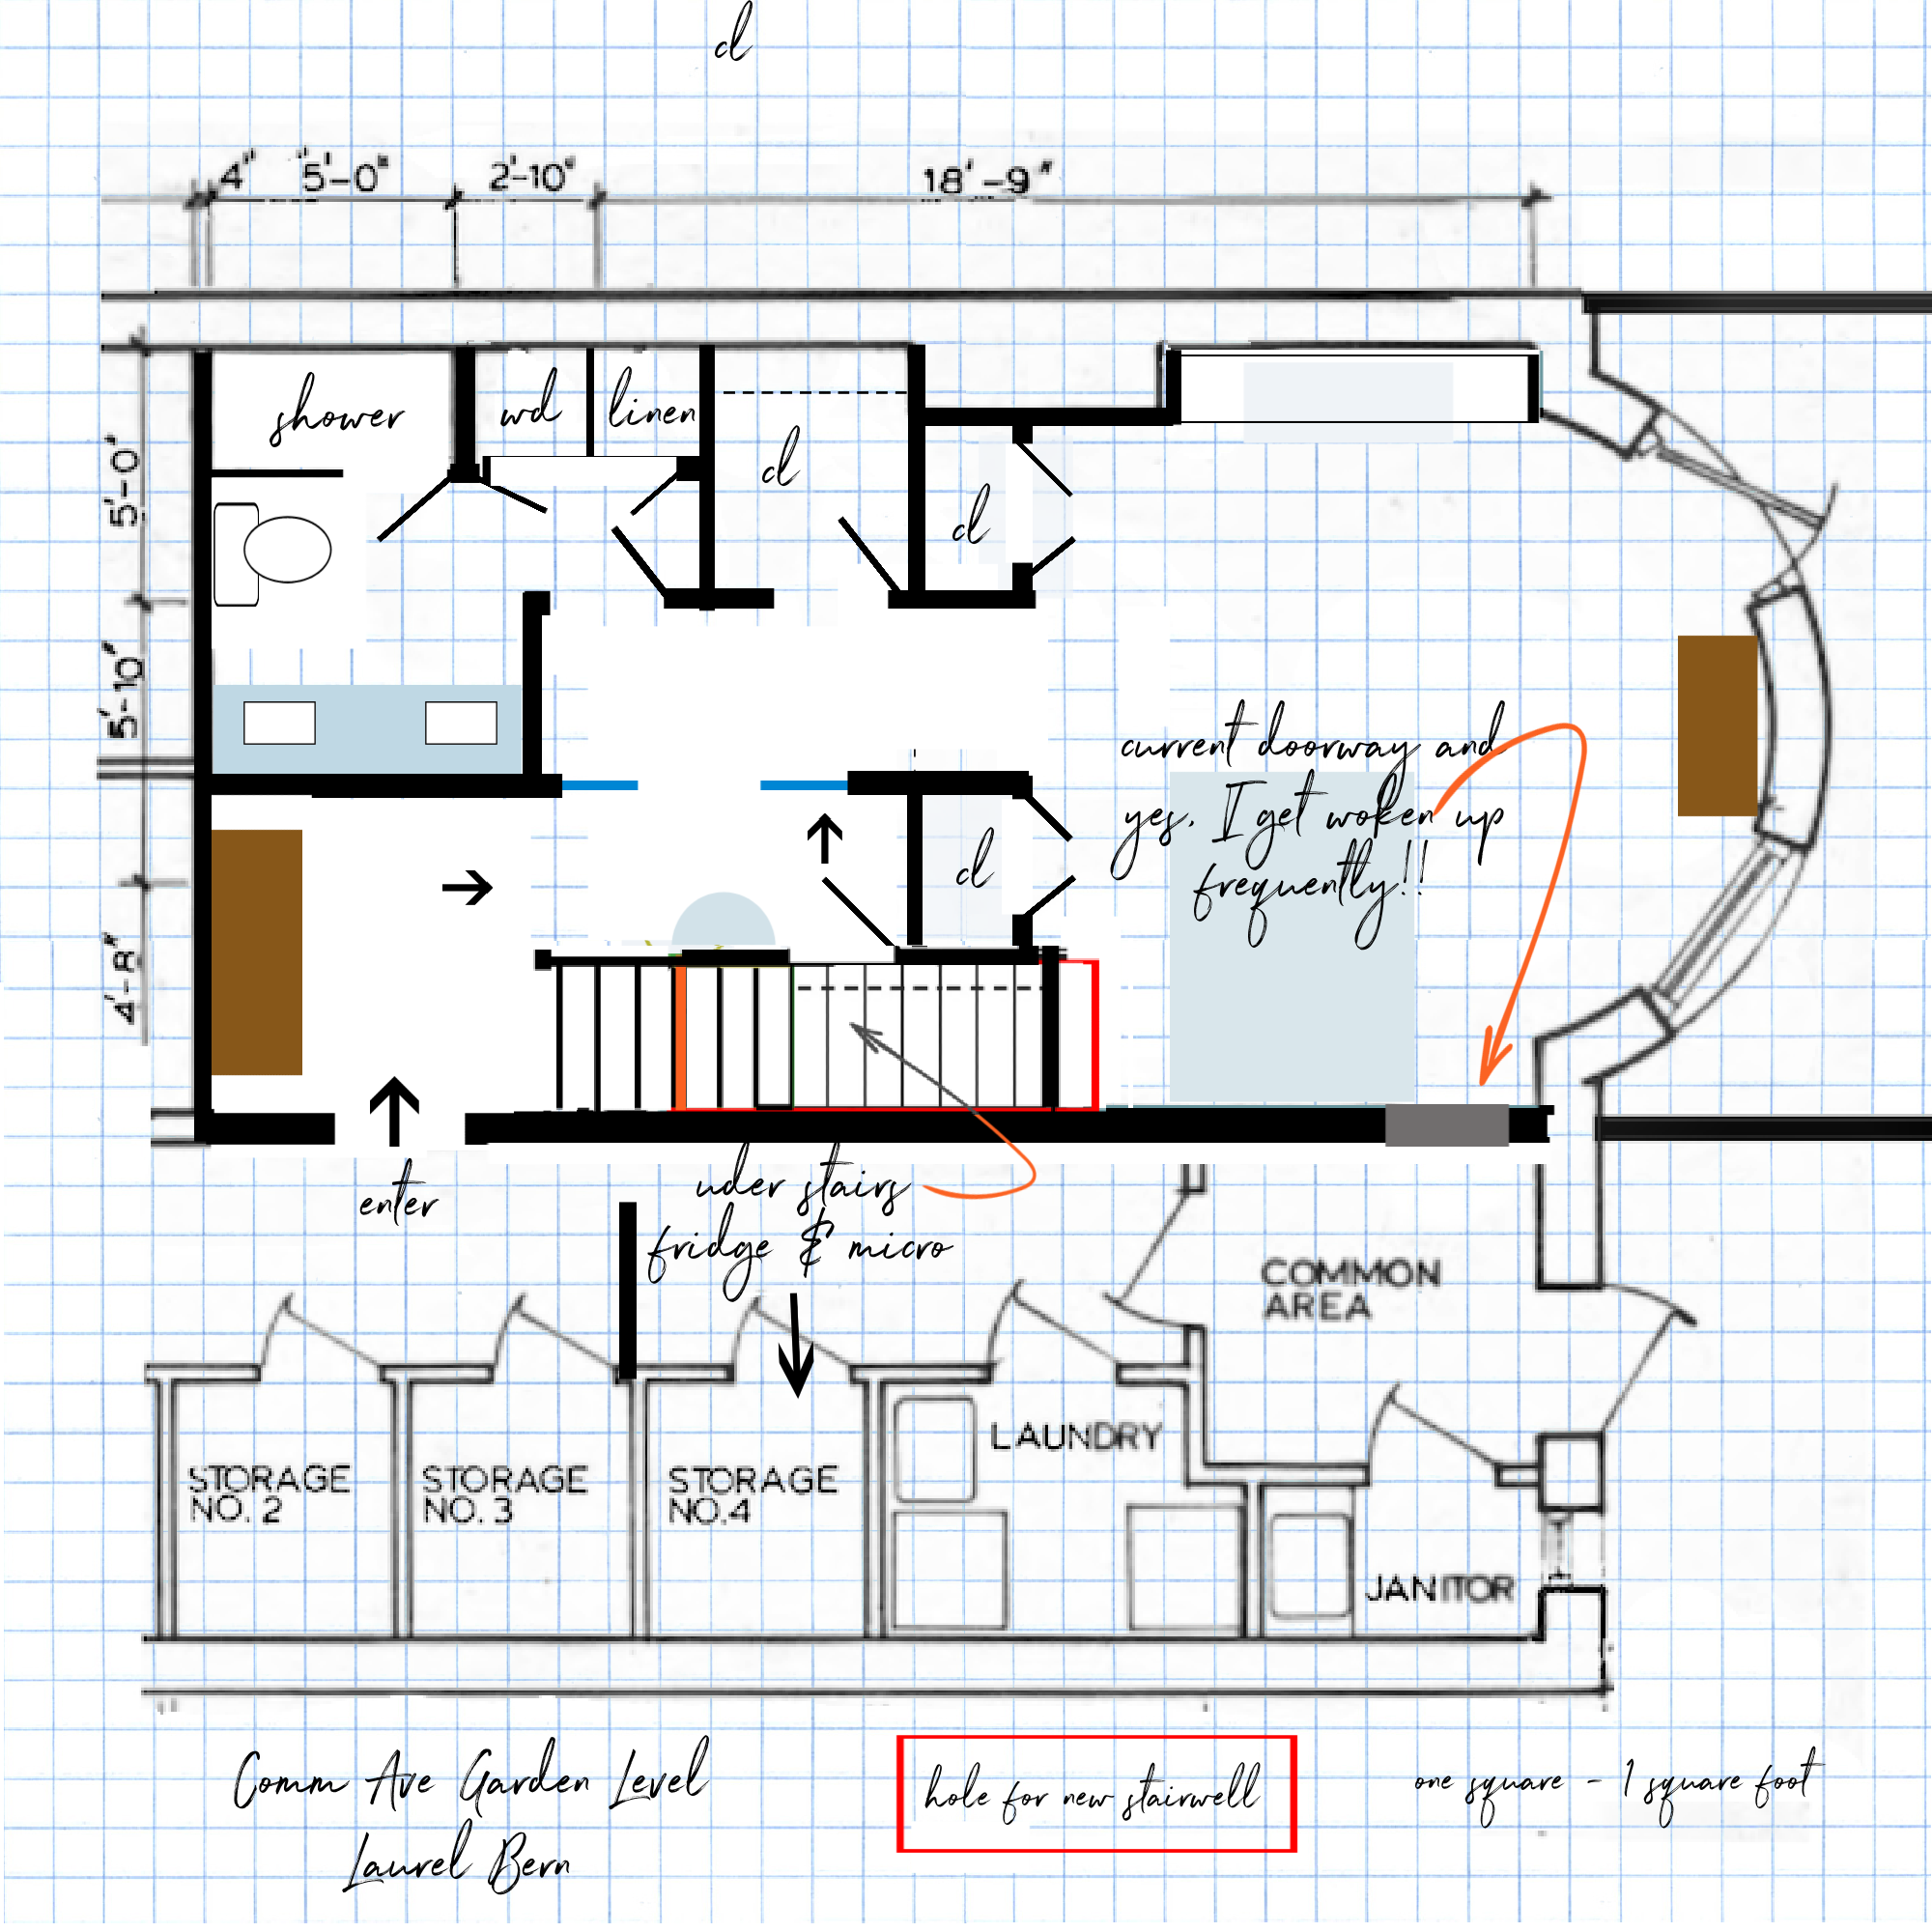
See where it says common area? Above that are my den, second bathroom, and part of the entry. The kitchen only begins about a foot into where the tub is. So, it is not the same footprint as one might assume.
Laurel, why is the door to your bedroom across from the janitor’s closet and perpendicular to what looks like the back door of the house?
Sweet, isn’t it? And yes, that one is a bloody great question.
The reason why is because that was the original door into the original KITCHEN of the home back in 1880. It is still there because, in all these years, no one has bothered to change it.
Don’t people disturb or wake you up sometimes?
Oh man, yes! And they scare the crap out of me, too. Because of some weird fluke, when I’m downstairs, and the back door opens, it sounds like MY FRONT DOOR UPSTAIRS IS OPENING! Of course, they’re not trying to disturb me. However, the walls are paper-thin. That one is easy to take care of with soundproofing sheetrock.
So, yes, we are going to move that door!
But, let’s not get ahead of ourselves with the design process.
We need to look at the downstairs as it currently is.
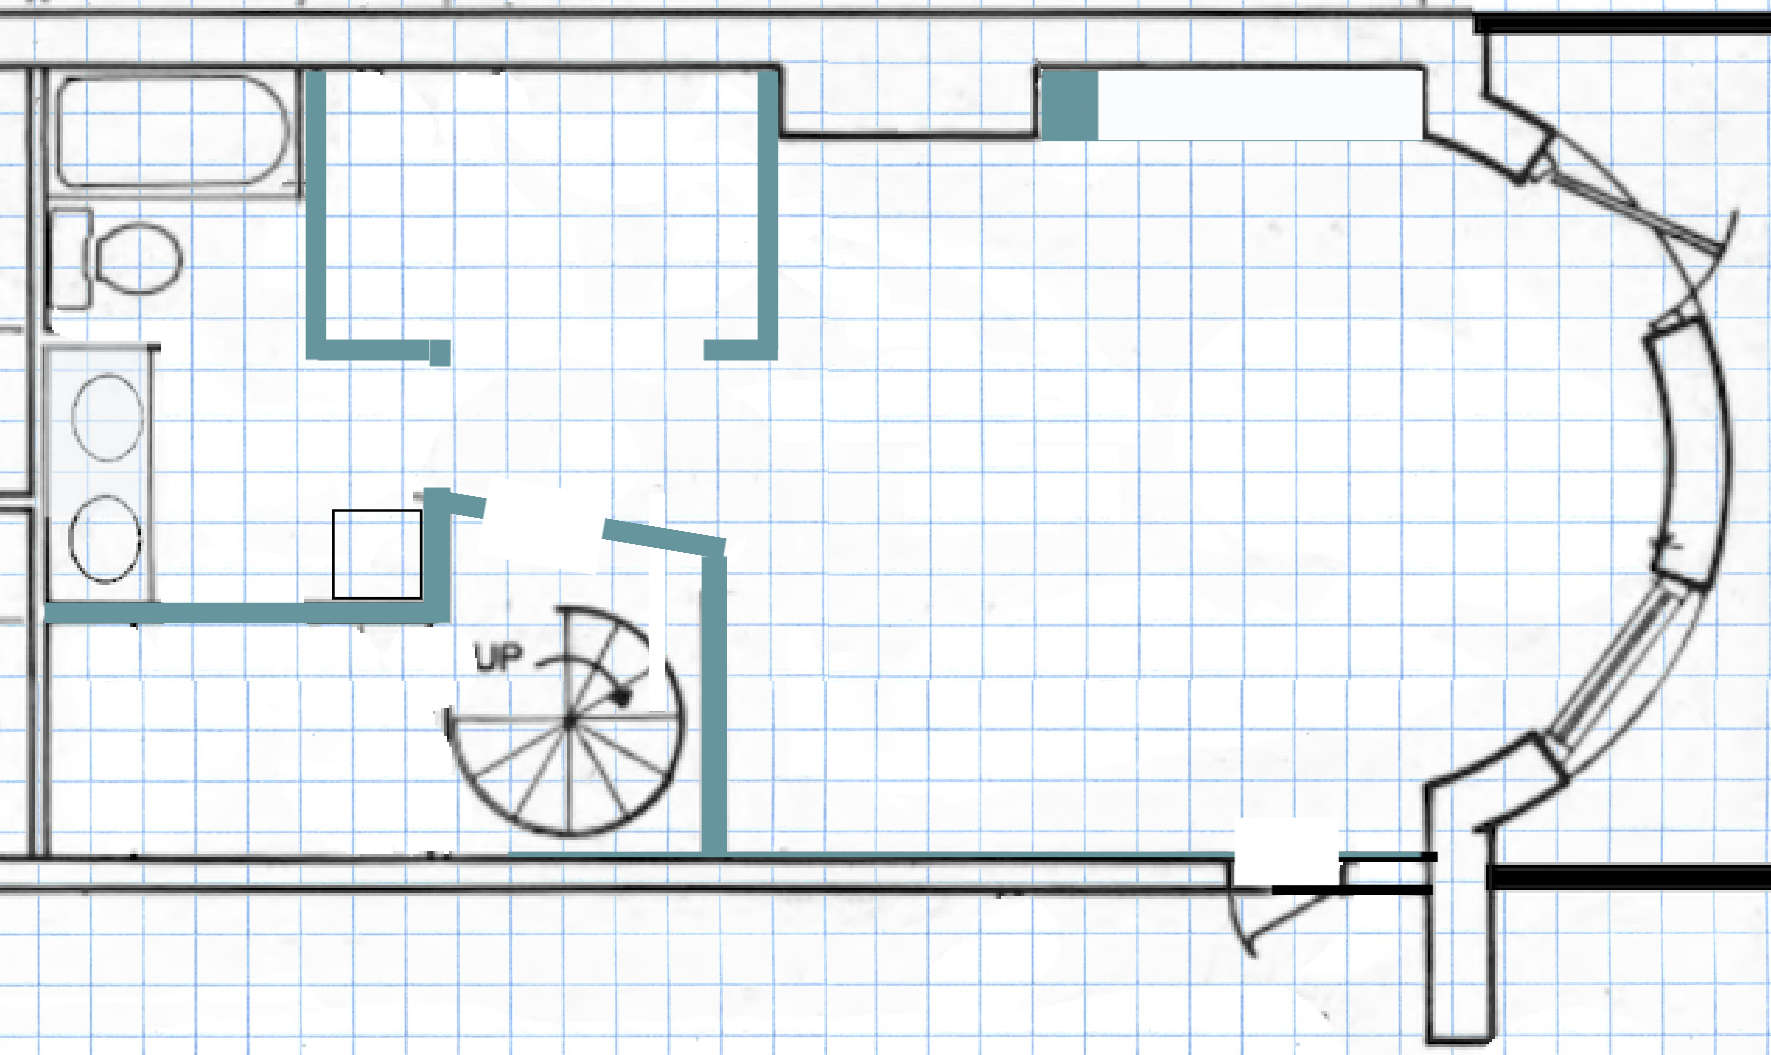
I understand that owners, maybe a couple of decades ago, created this change. The super smart thing they did was enclose the killer spiral staircase. The bedroom sits directly under the living room without a door to close it off. That’s not exactly private. But, now it is if guests are staying in the den.
However, what about the huuuuuuge closet looming in the back?
Yes, it’s ridiculous. It’s like another bedroom; it’s so large. The same owners used it as a dark room. Okay, that makes sense, but it’s not working for me.
And, of course, neither is the spiral staircase. Yes, they are slippery, and yes, I’ve had some run-ins with them and got a nasty bruise on my shin once. It was my fault. I was running to get to the oven timer before it went off. Silly girl.
Anyway, it has to go.
If you missed the last post about the proposed new stairwell and railing, please check it out here.
So, moving along with the design process, I know I MUST move the door into the apartment’s downstairs area. And, yes, I’m not allowed to eliminate it. It’s the law.
I’m going to gloss over some of this because if I write it ALL out, you will be bored to tears, and then you will want to choke me. Please listen to those beautiful strings again if you feel any homicidal urges.
Here are the basics, and a lot of this is good to know if you’re ever considering renovating your place and need a new staircase.
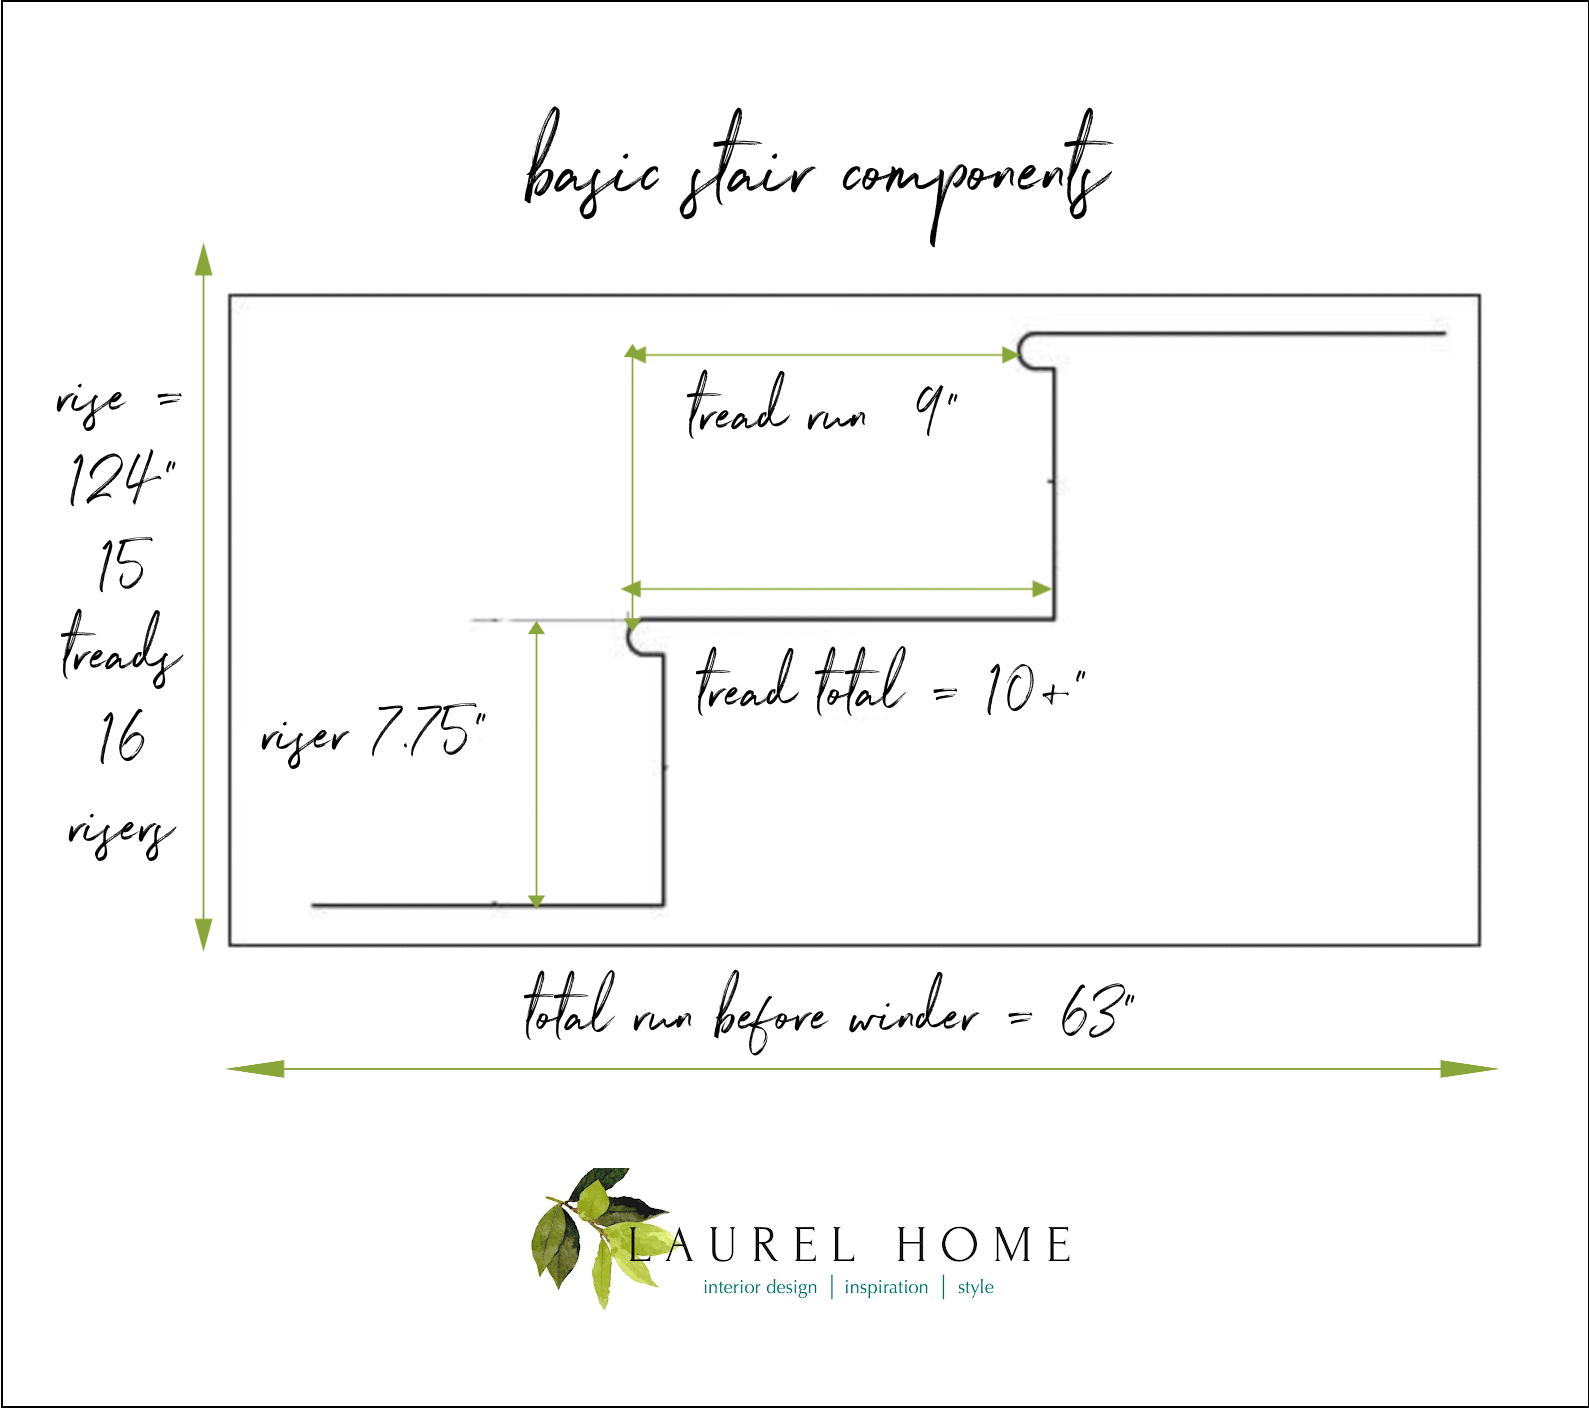
My treads must be 10″, but only 9″ will be shown in plan view because of the nosing. Please see the graphic above, or just nod your head, yes, even if you don’t understand. When I did this graphic, I thought I needed to have one more step than I will need.
However, there must be a minimum of 80″ headroom. Plus, in my case, there’s a 15″ floor joist area. So, it’s 95″ we need to clear.
The max height of the risers is 8.25.”
124″ divided by 8.25″ = 15.03 risers. So, 15 risers, 16 isn’t necessary.
However, there is always one more riser than a tread because the first step down is from the top of the floor, and then the treads begin. Therefore, I will need 14 treads.
Okay? I hope you’re still with me because we’re getting to the enjoyable part of the design process secrets.
According to calculations, we need 11.5 risers. However, the contractor can fudge the headspace. Since it’s currently open, he has to build it and can make it less than 15″ for the first step. Then we’ll be well below 80″ once we hit step 12.
I could also make the treads a little shorter. I’d rather not do that.
So, let’s assume our treads are 10″ ( 9″ in plan view). 9″ x 11″ = 99″ Therefore, our stairwell must be 8′ – 3″ long.
However, that’s much better than I initially thought, which was 120″ long!
The beauty of this is that we should be able to clear the doorway and moulding ENTIRELY.
Laurel, what on earth are you talking about?
Oh, sorry. I’m doing what some of you do to me. I’m describing something like you’re standing right here with me. Hang on a sec.
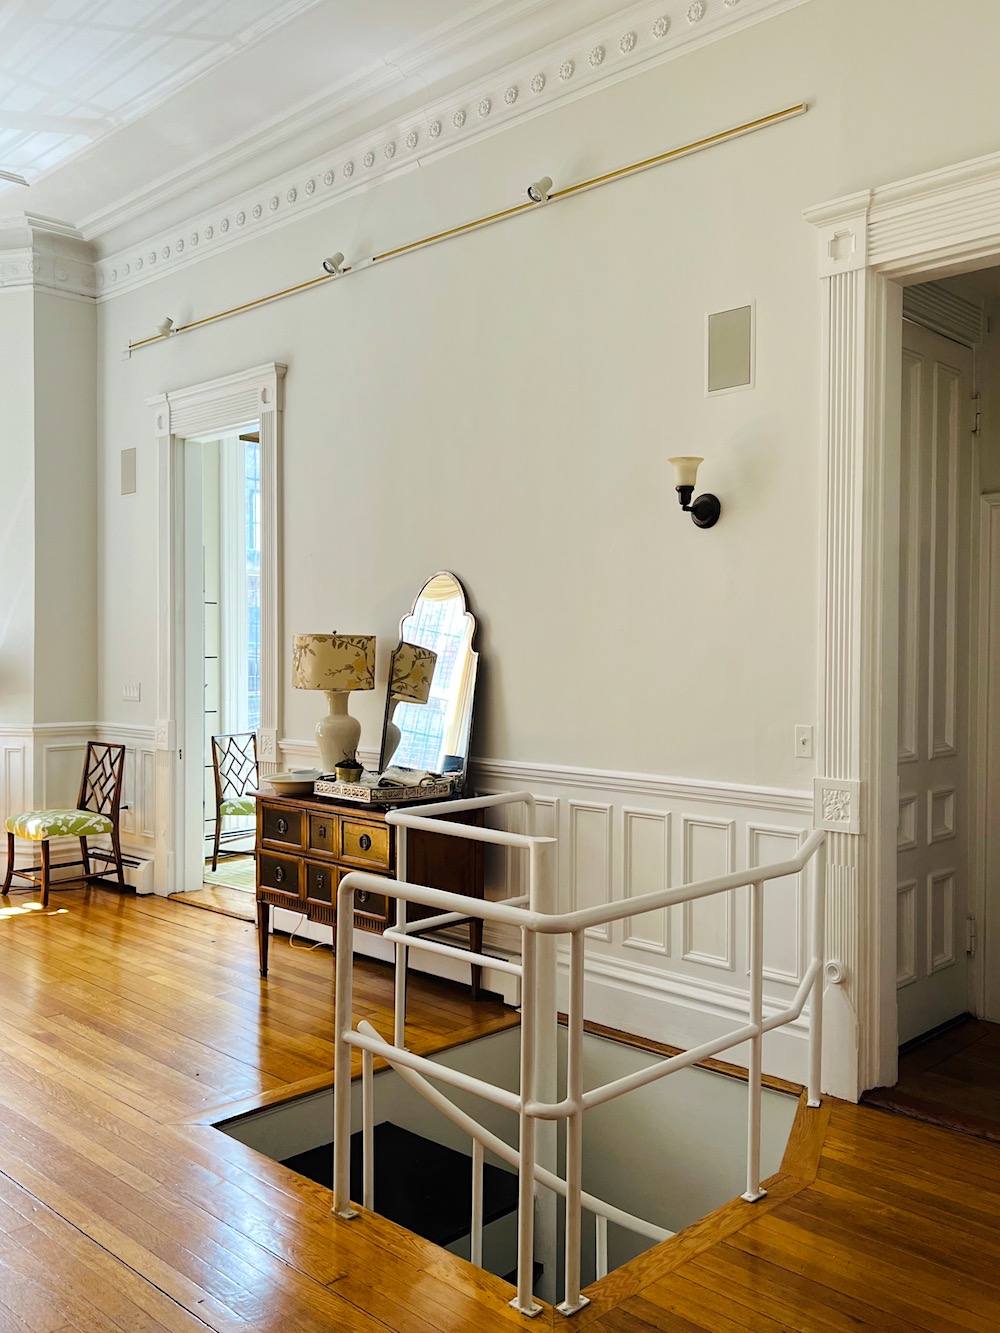
Do you see how the railing overlaps the door casing and extends beyond it? Horrible. I would’ve gotten a big fat F if I did this in design school. My new design takes the stairwell and railing just to the left of the door casing. Of course, the floor will be filled in. They can use the flooring for the part of the stairwell to be created.
And, now for the really fun part of this design process.
We have to look at what’s going on in the bedroom.

I have considered many options, but the best one is to start the staircase upstairs nine feet from the wall. But, since the first riser will be buried in the 15″, we can move that wall back about 6″.
And, yes, that means that green wall next to the spiral is moving over four feet. But, that’s fine with me. And, the 9′-6″ will still easily accommodate a queen-sized bed and nightstands.
Actually, I like making the room a little smaller. I prefer smaller bedrooms. Cozier. My bedroom in Bronxville was a little over 13 x 13.
Before last week, let’s look at the most recent iteration of the downstairs design.
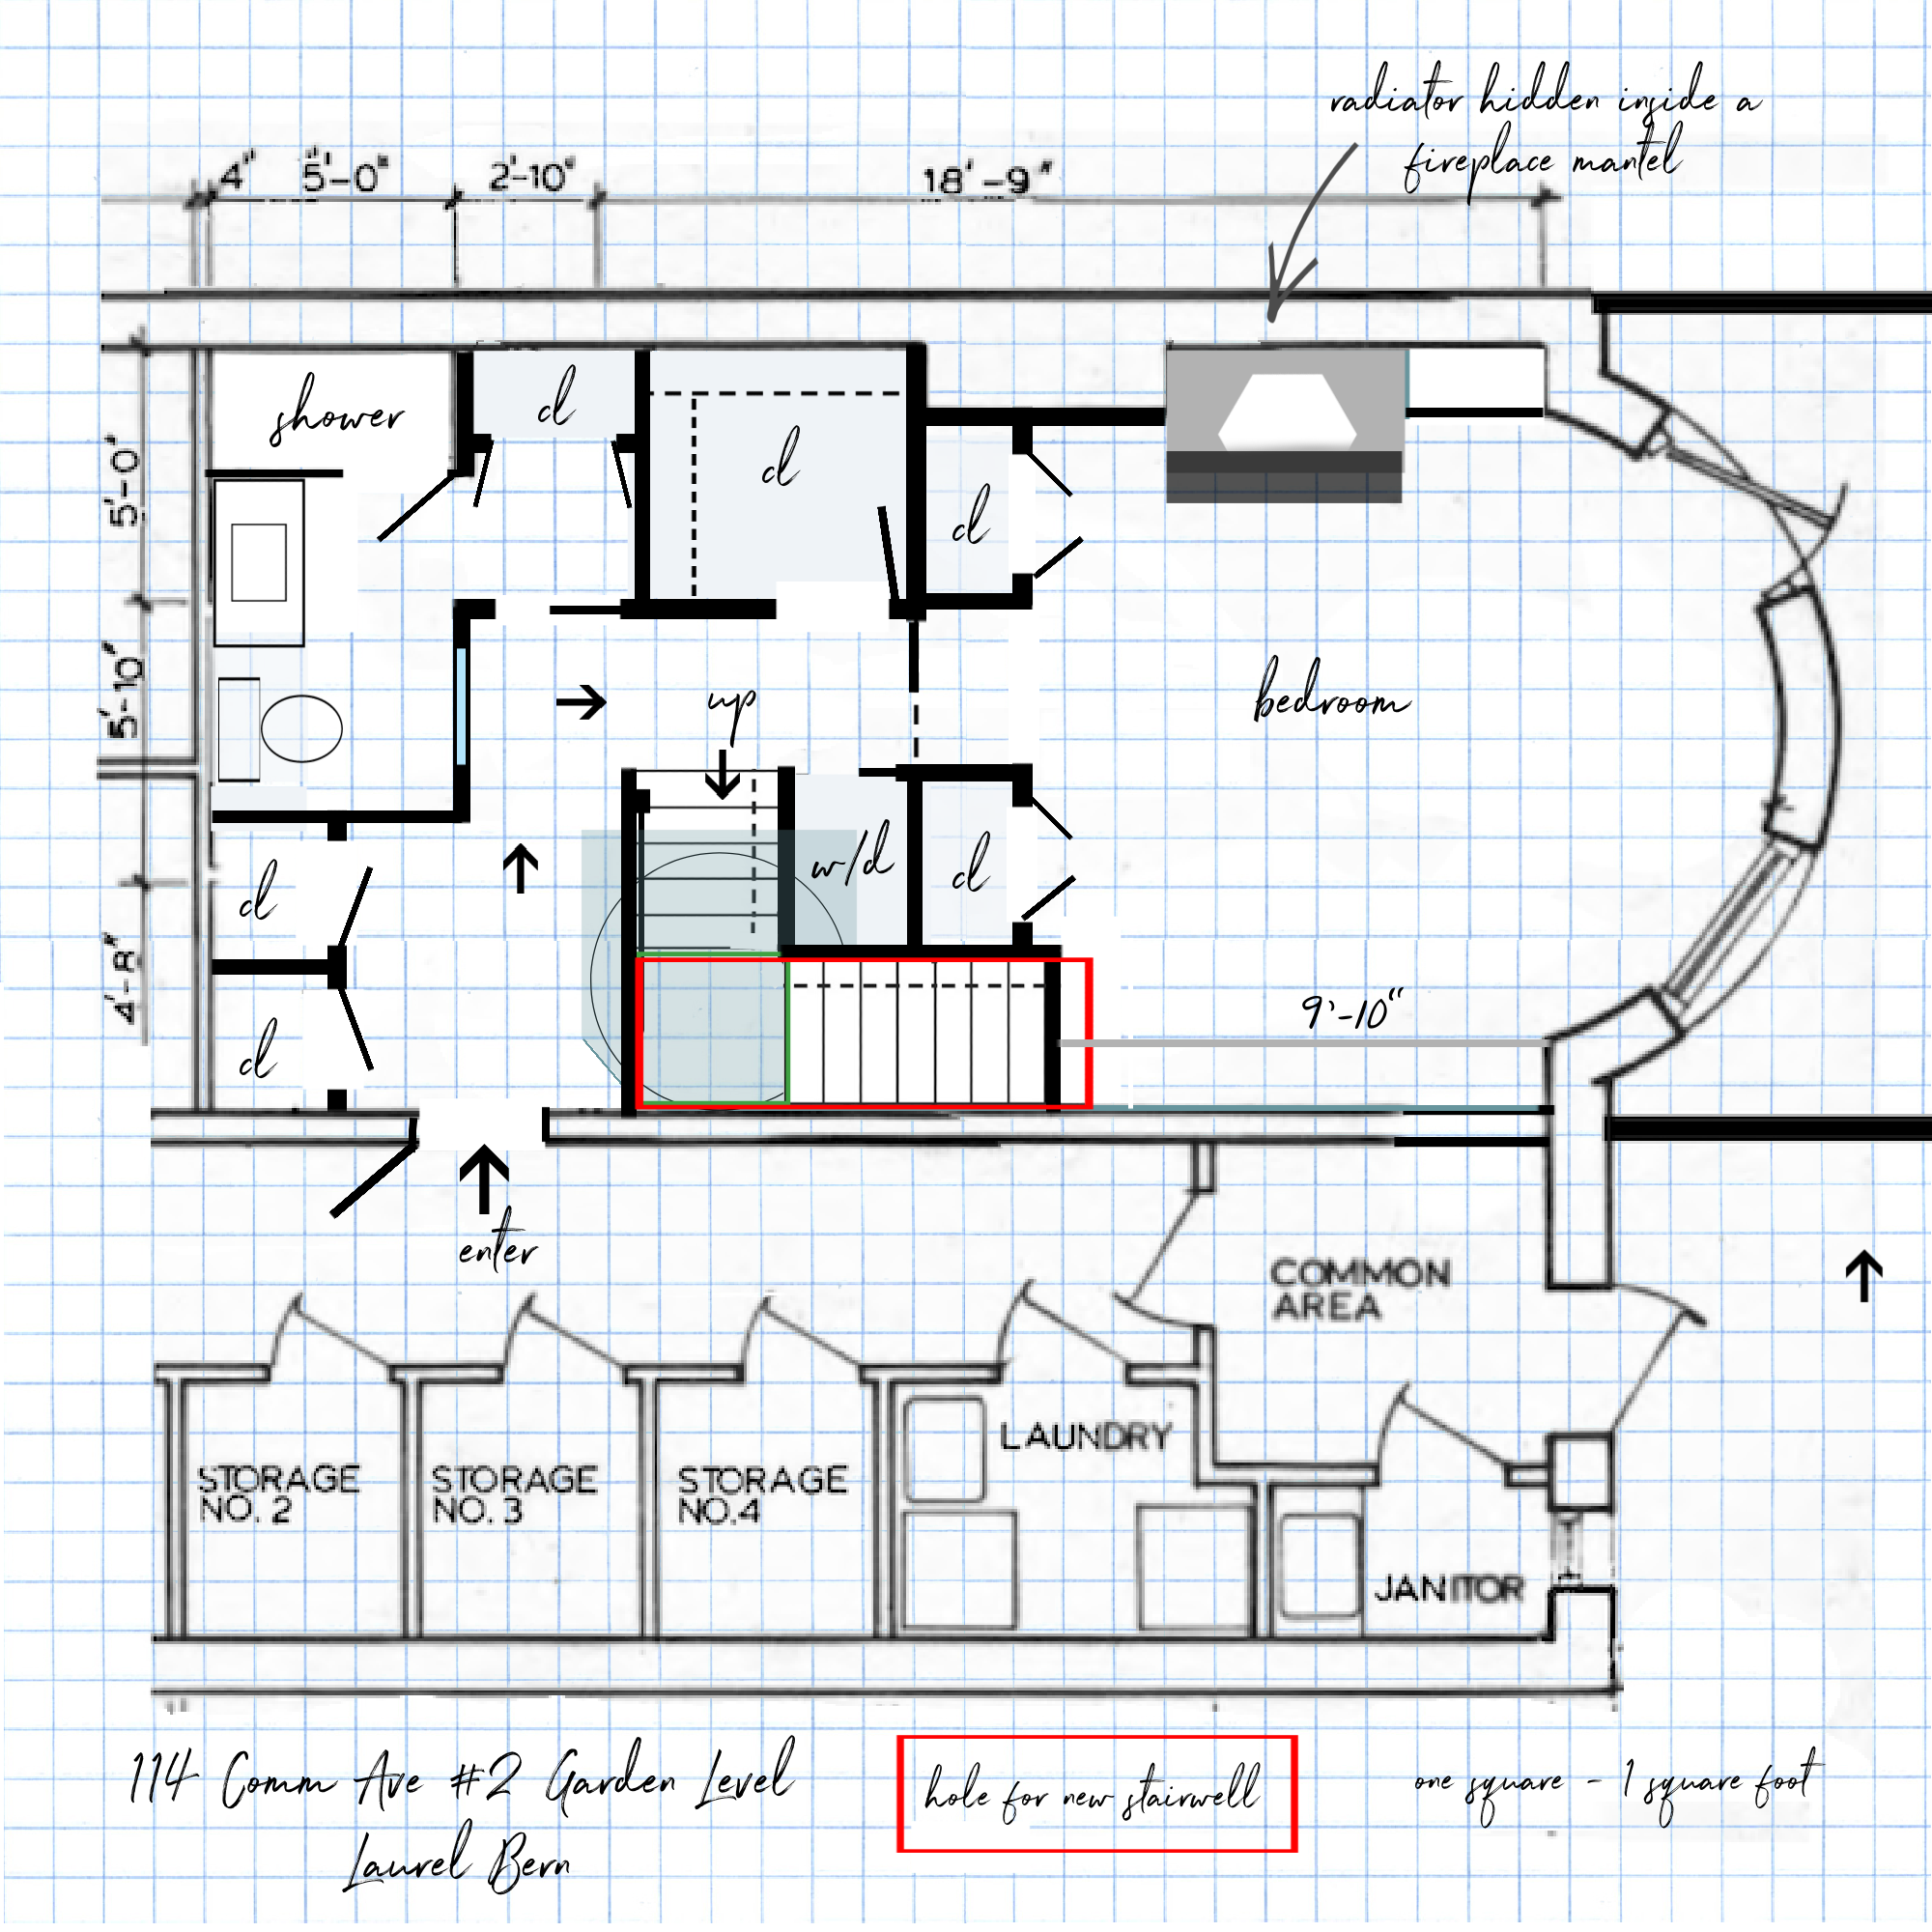 I did this in January and was very happy with it.
Yes, I know my address is there. Please don’t write me as several have: “you might want to think about removing it, just to be safe.” Umm…Safe from WHAT? The most dangerous person to me (and by a wide margin) is ME.
Remember when I was whisked away in an ambulance after I attempted to cross the street?
Oh, and remember the time I came close to decapitating myself?
Yes, indeed. If I wish to stay safe, I guess I better keep my address a secret from myself.
For the love of God! It’s a public freaking record! If you want to find my address, just google Laurel Bern address in Boston. You’ll find it in 20 seconds. (or less)
Yawn…
Sorry. I’m just tired of being treated like I’m a clueless dolt. Mind you, I am sometimes, but that’s my problem.
Anyway, let’s return to the design process and more secrets.
Last week, I took another stab at my downstairs. I’m not sure why except it’s a lot of fun.
I found some discrepancies because I should’ve just blocked out 99″ instead of putting in each stair. At that tiny scale, it’s easy to be off by an inch. But, here’s another important thing.
However, here’s something I just realized.
Winders (the three pie-shaped steps) do not save space. They only save space when needing to turn. (three steps instead of one). But, if you don’t need to turn just yet, you can get four steps in the same space that three winding steps take up.
So, I went back to the “monkey-board.”
And, then, I realized I could do a straight run of 11 treads and then simply turn the last three and be done with it.
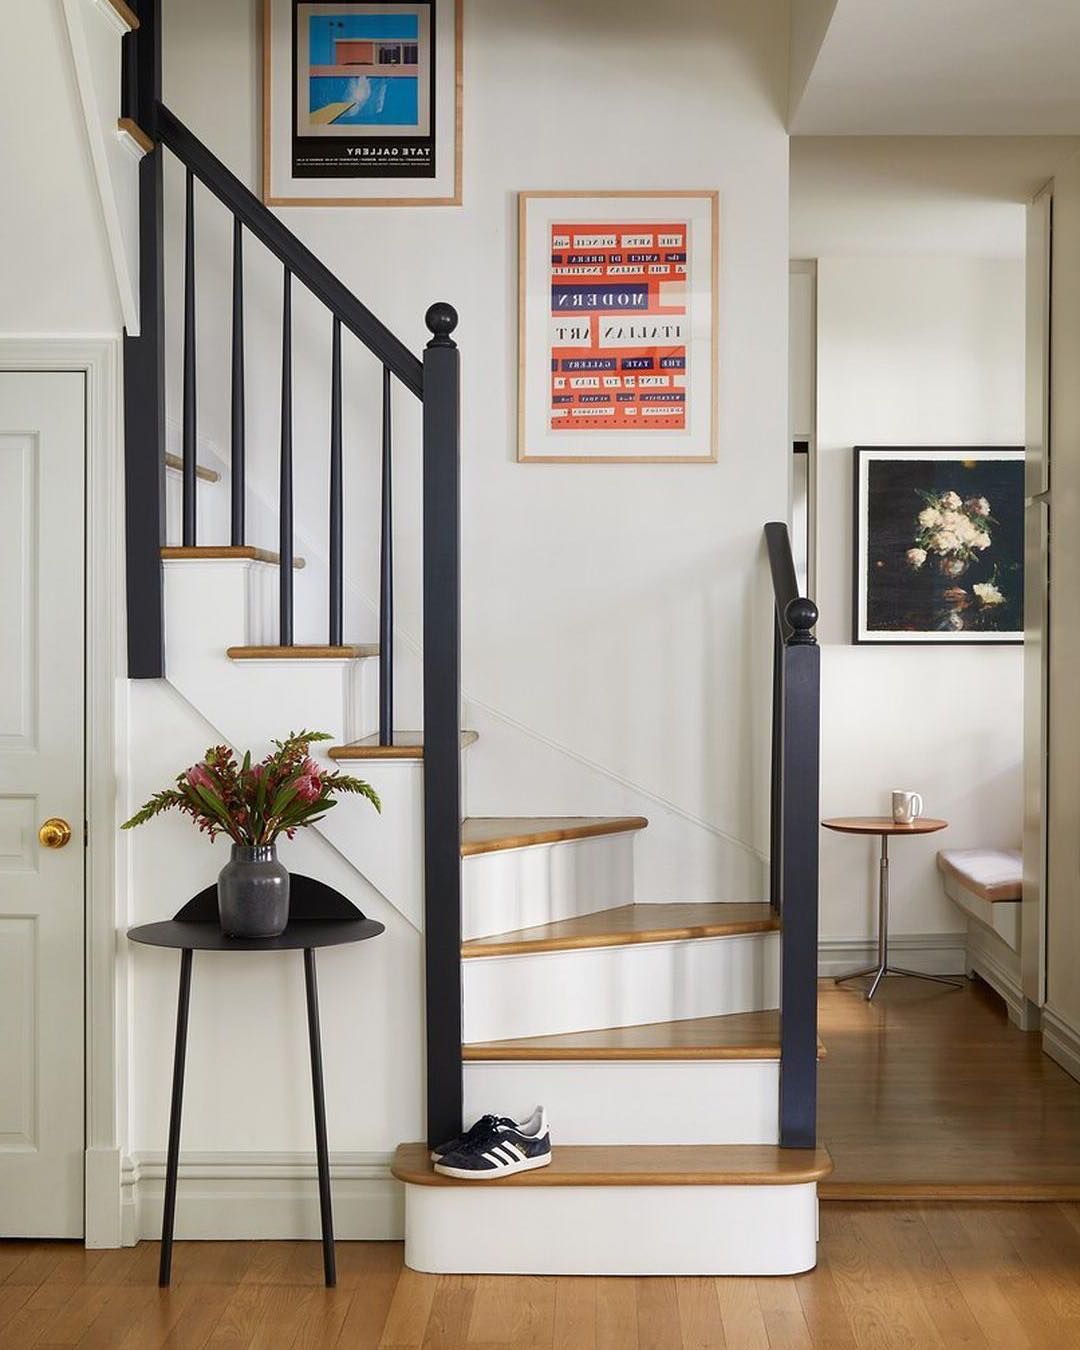
Remember this lovely from the fall of 2020? (you’ll see much more about my spiral too!)
Going back to the lovely staircase above. It won’t be this narrow, but this gives you a better idea of what I’m talking about.
And, yes, I plan on creating a little closet in that location.
I know you guys get all goosebumpy at the thought of using that hidden space underneath the stairs. Me too! Hey, maybe I’ll tunnel back to the bedroom.
Joking.
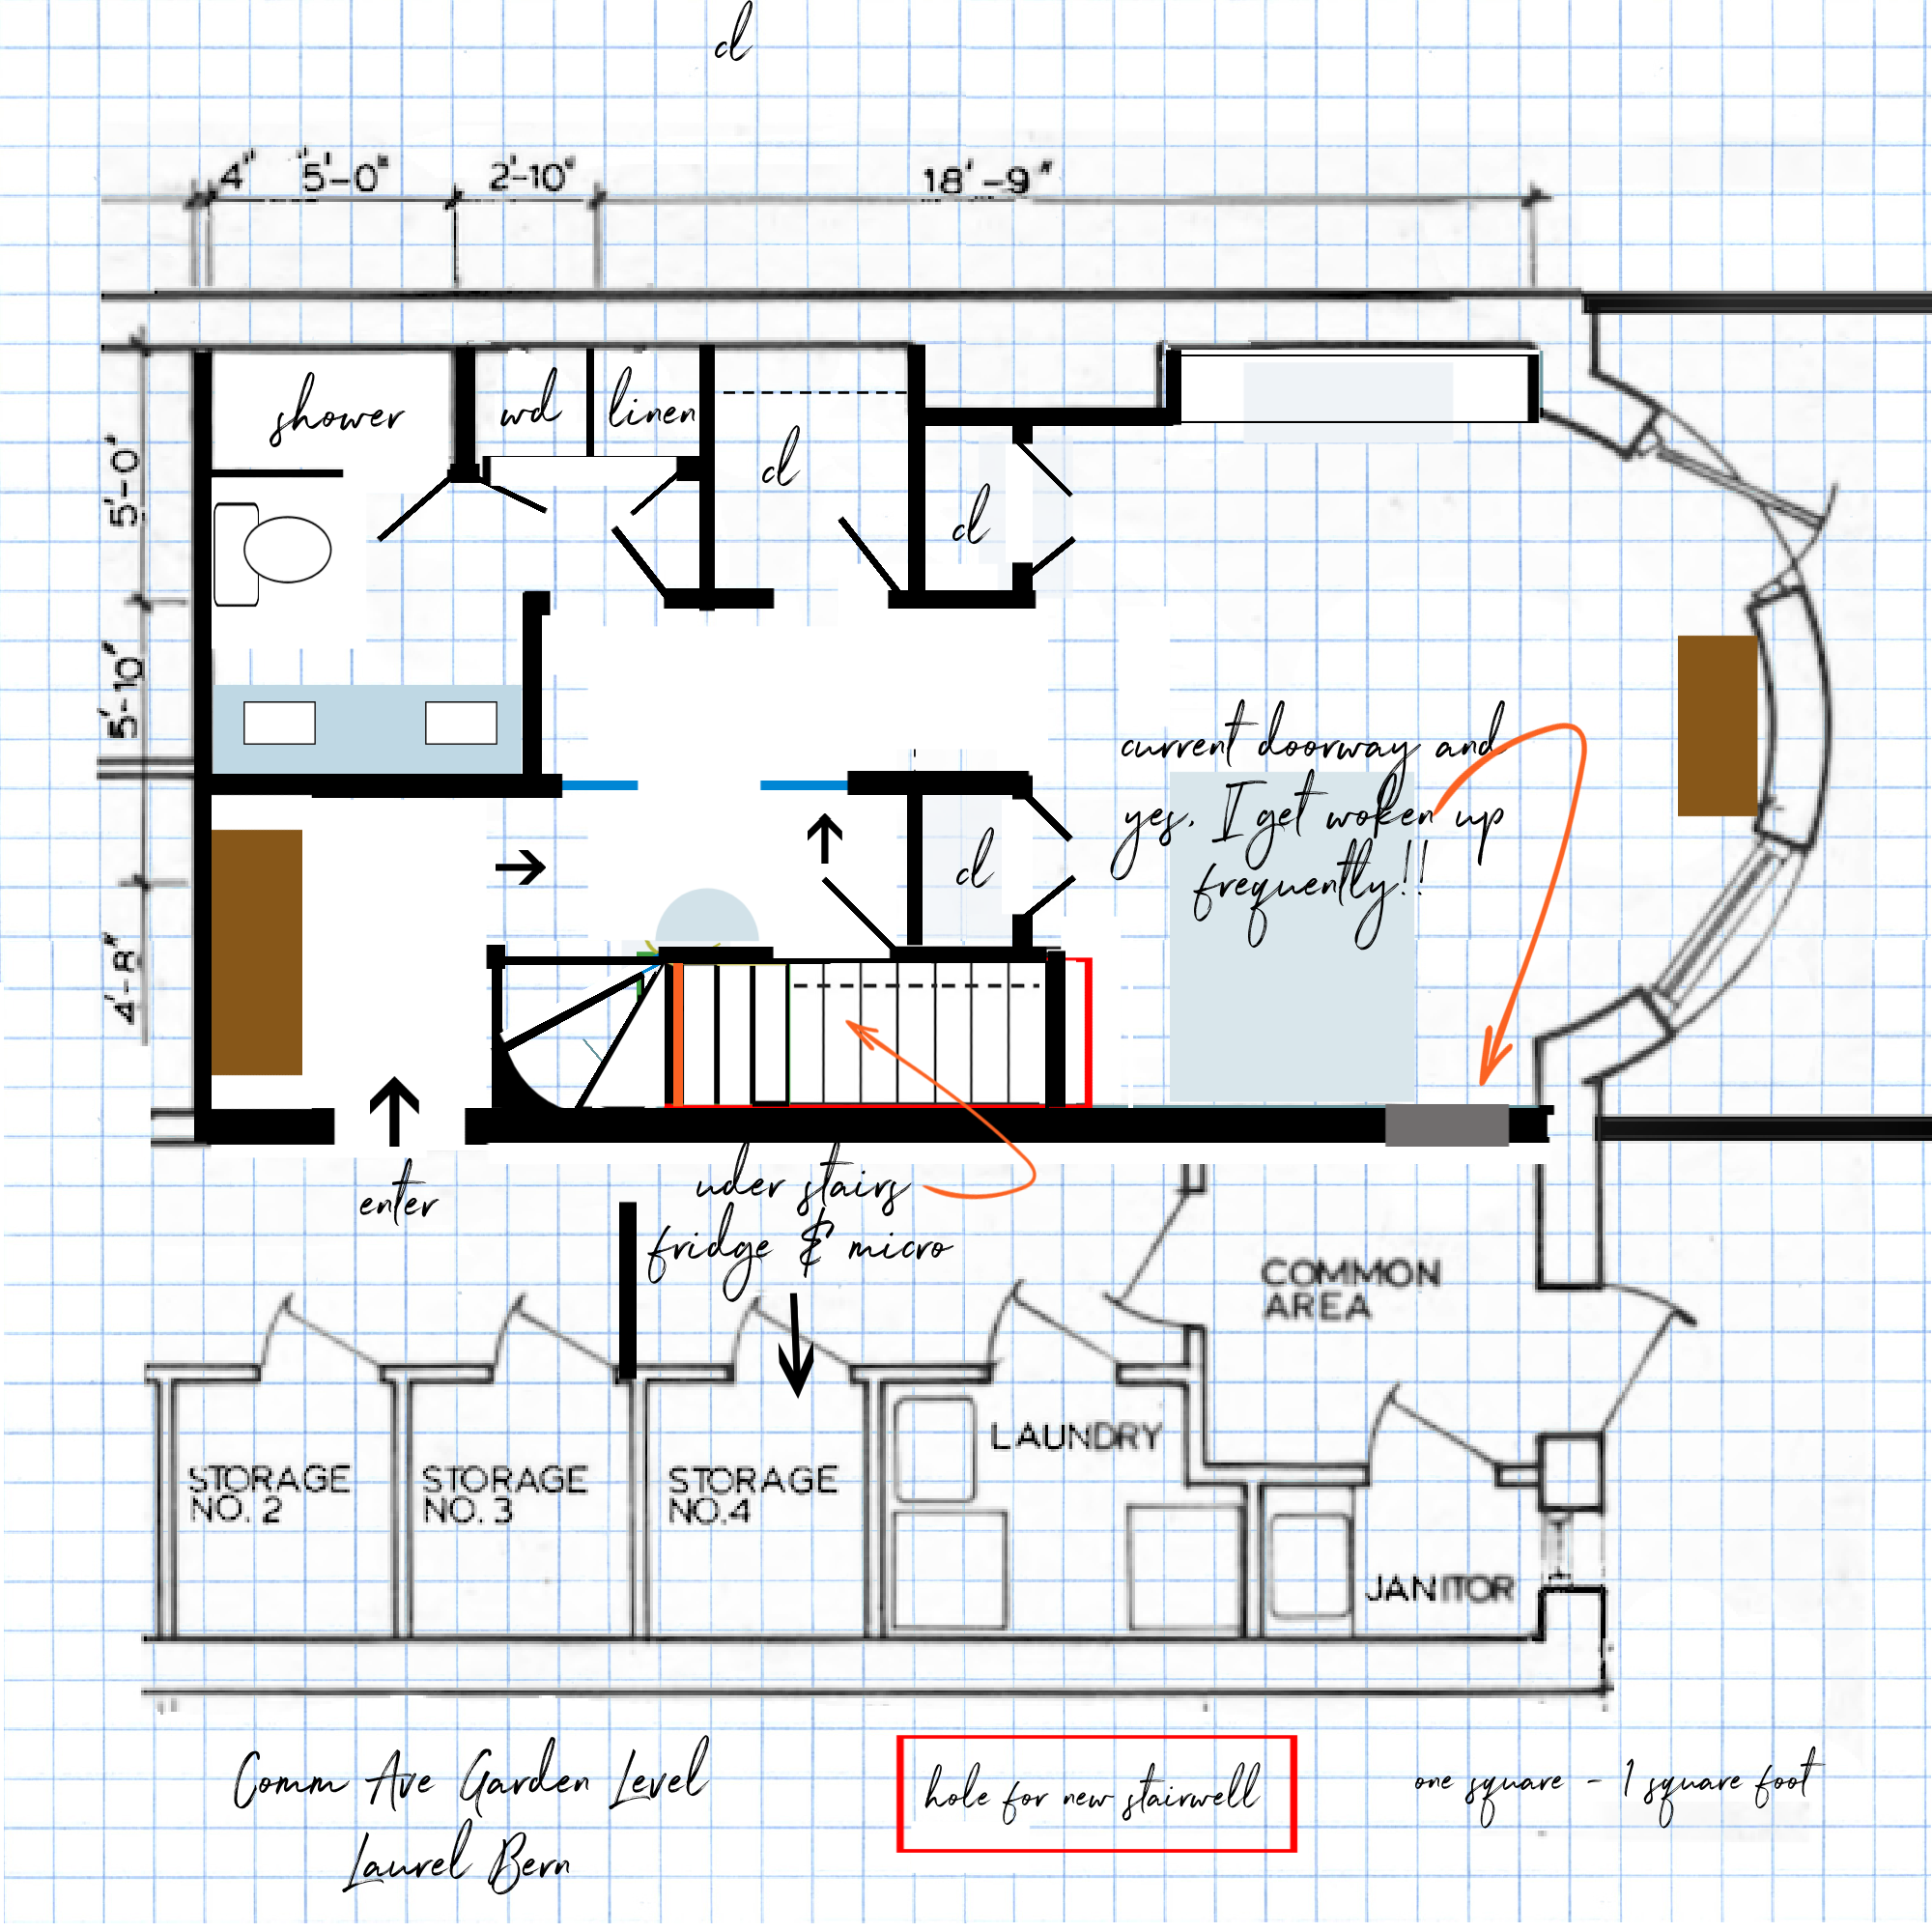
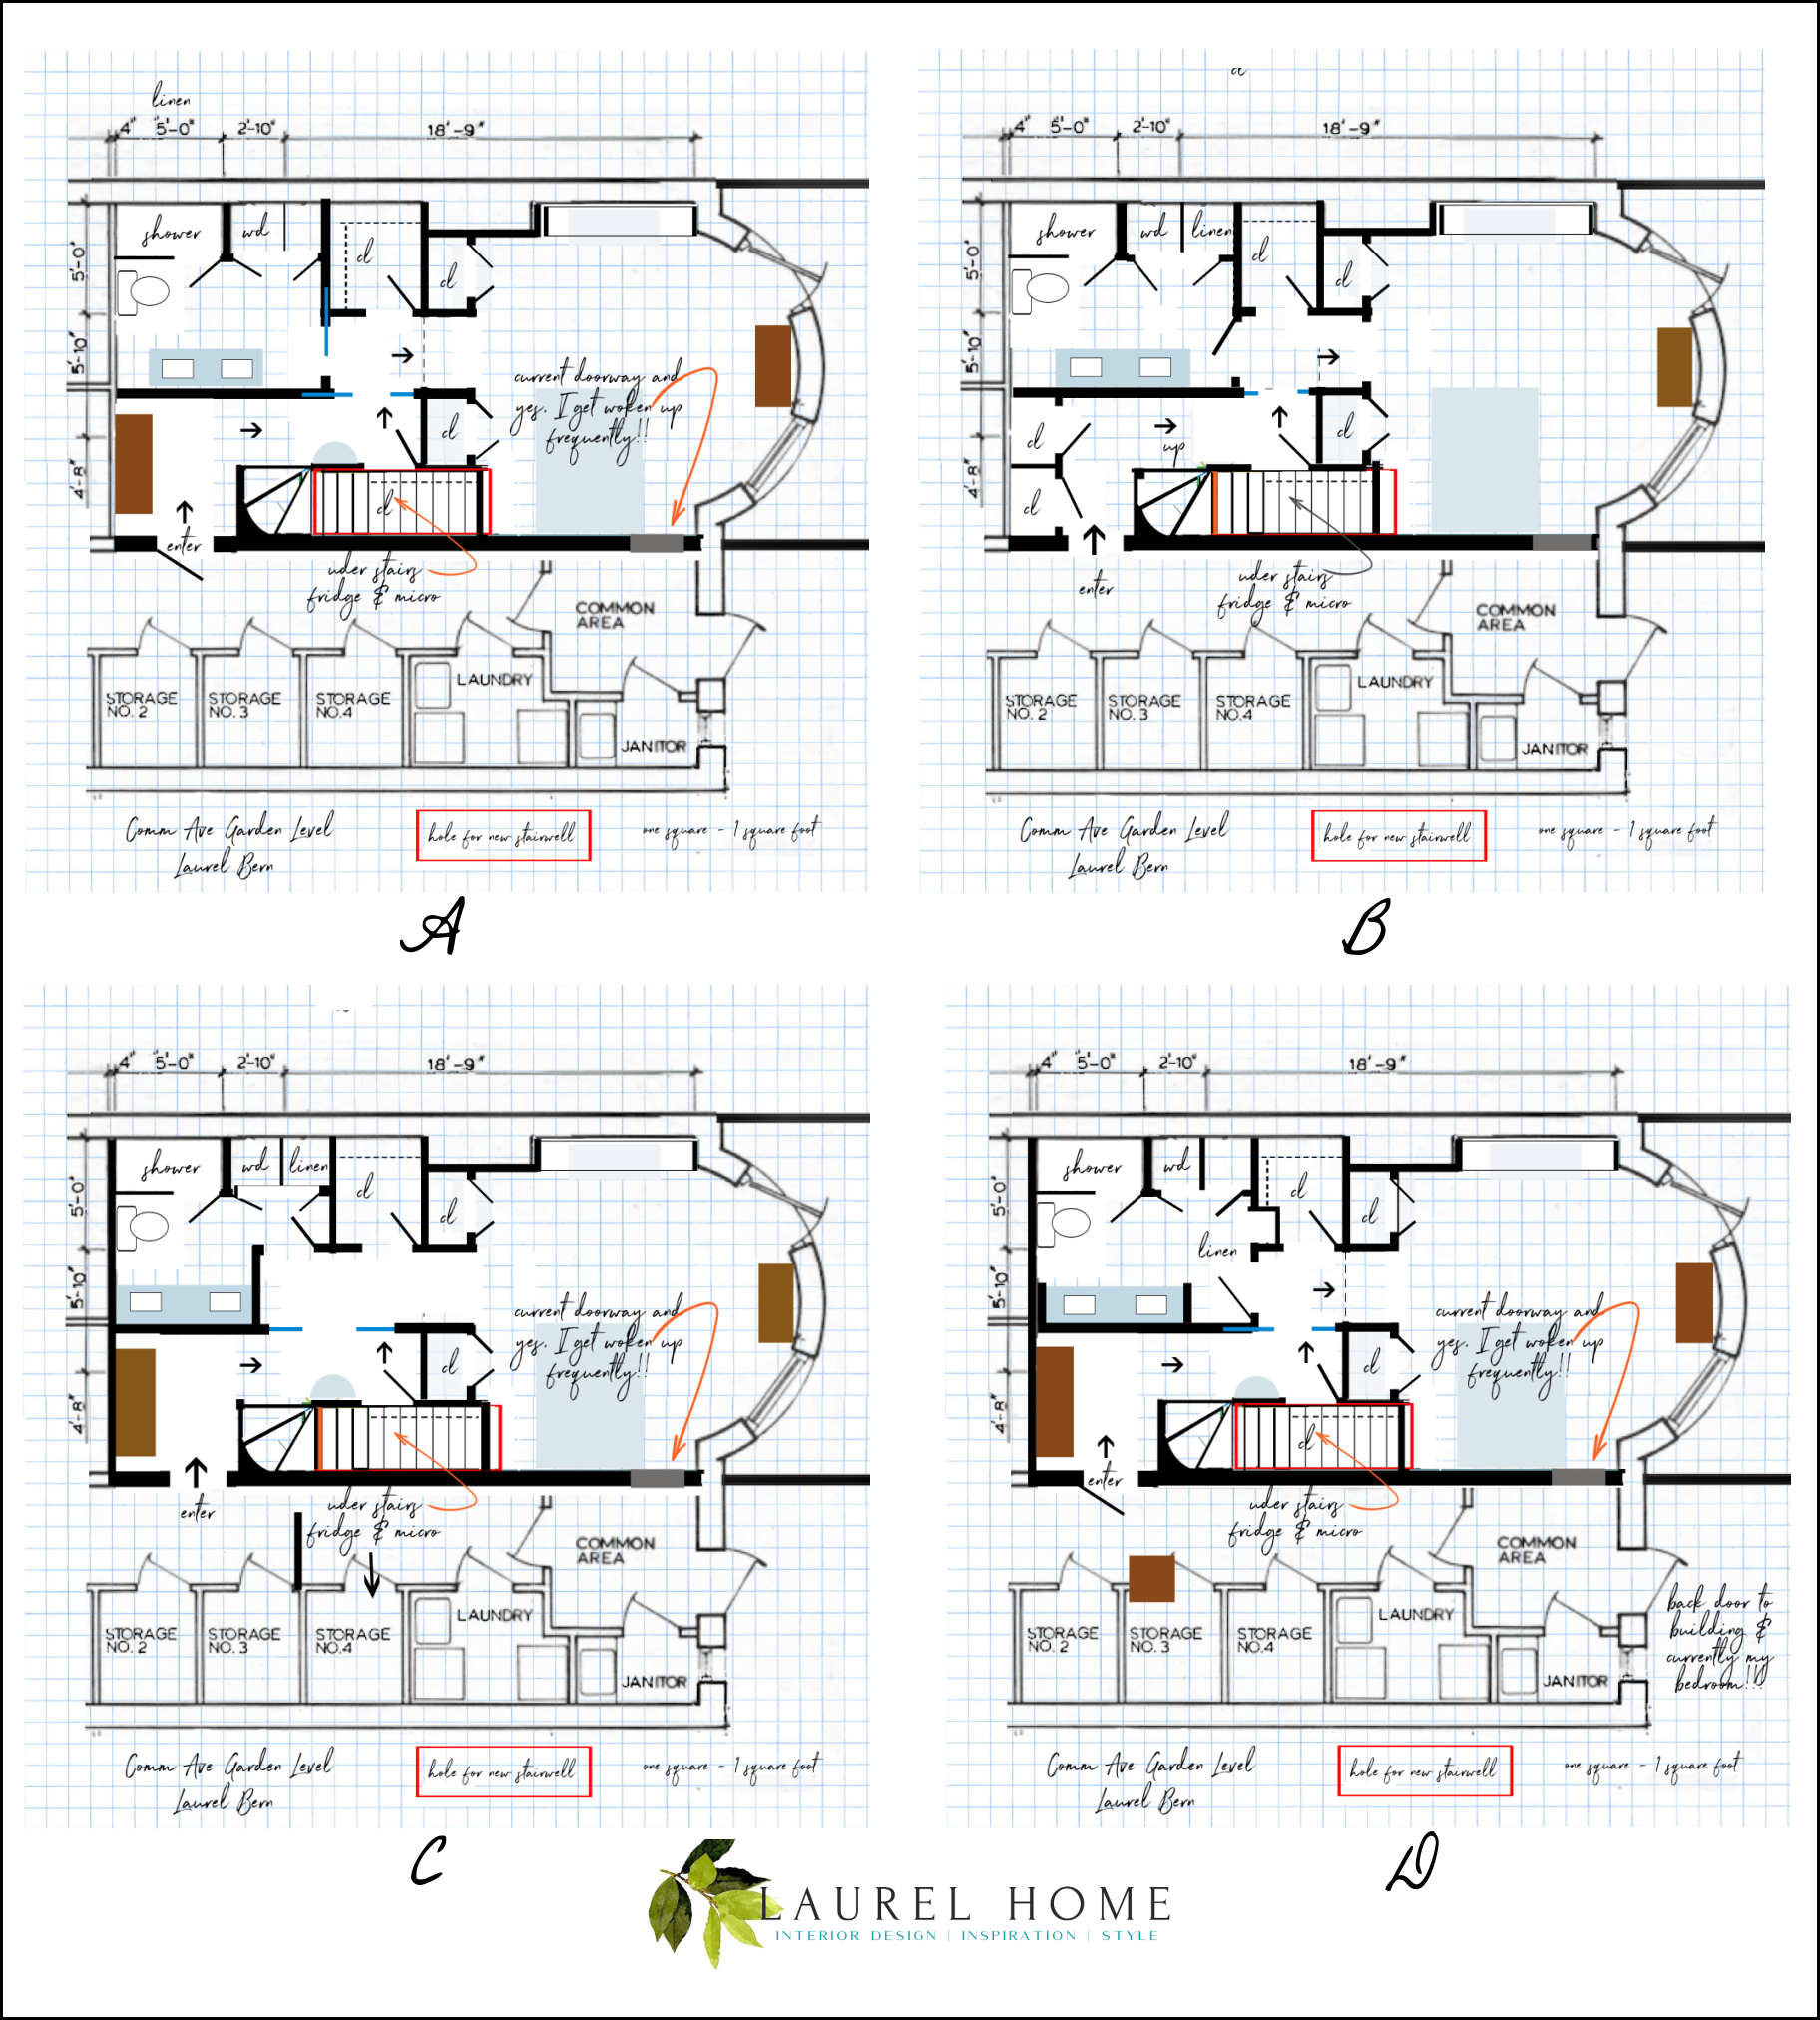
Okay, it’s time to see what this looks like in the floor plan. There are four variations on the same theme.
In this case, Yes! I would love it if you could tell me which one you prefer. Or, you can mix and match./>
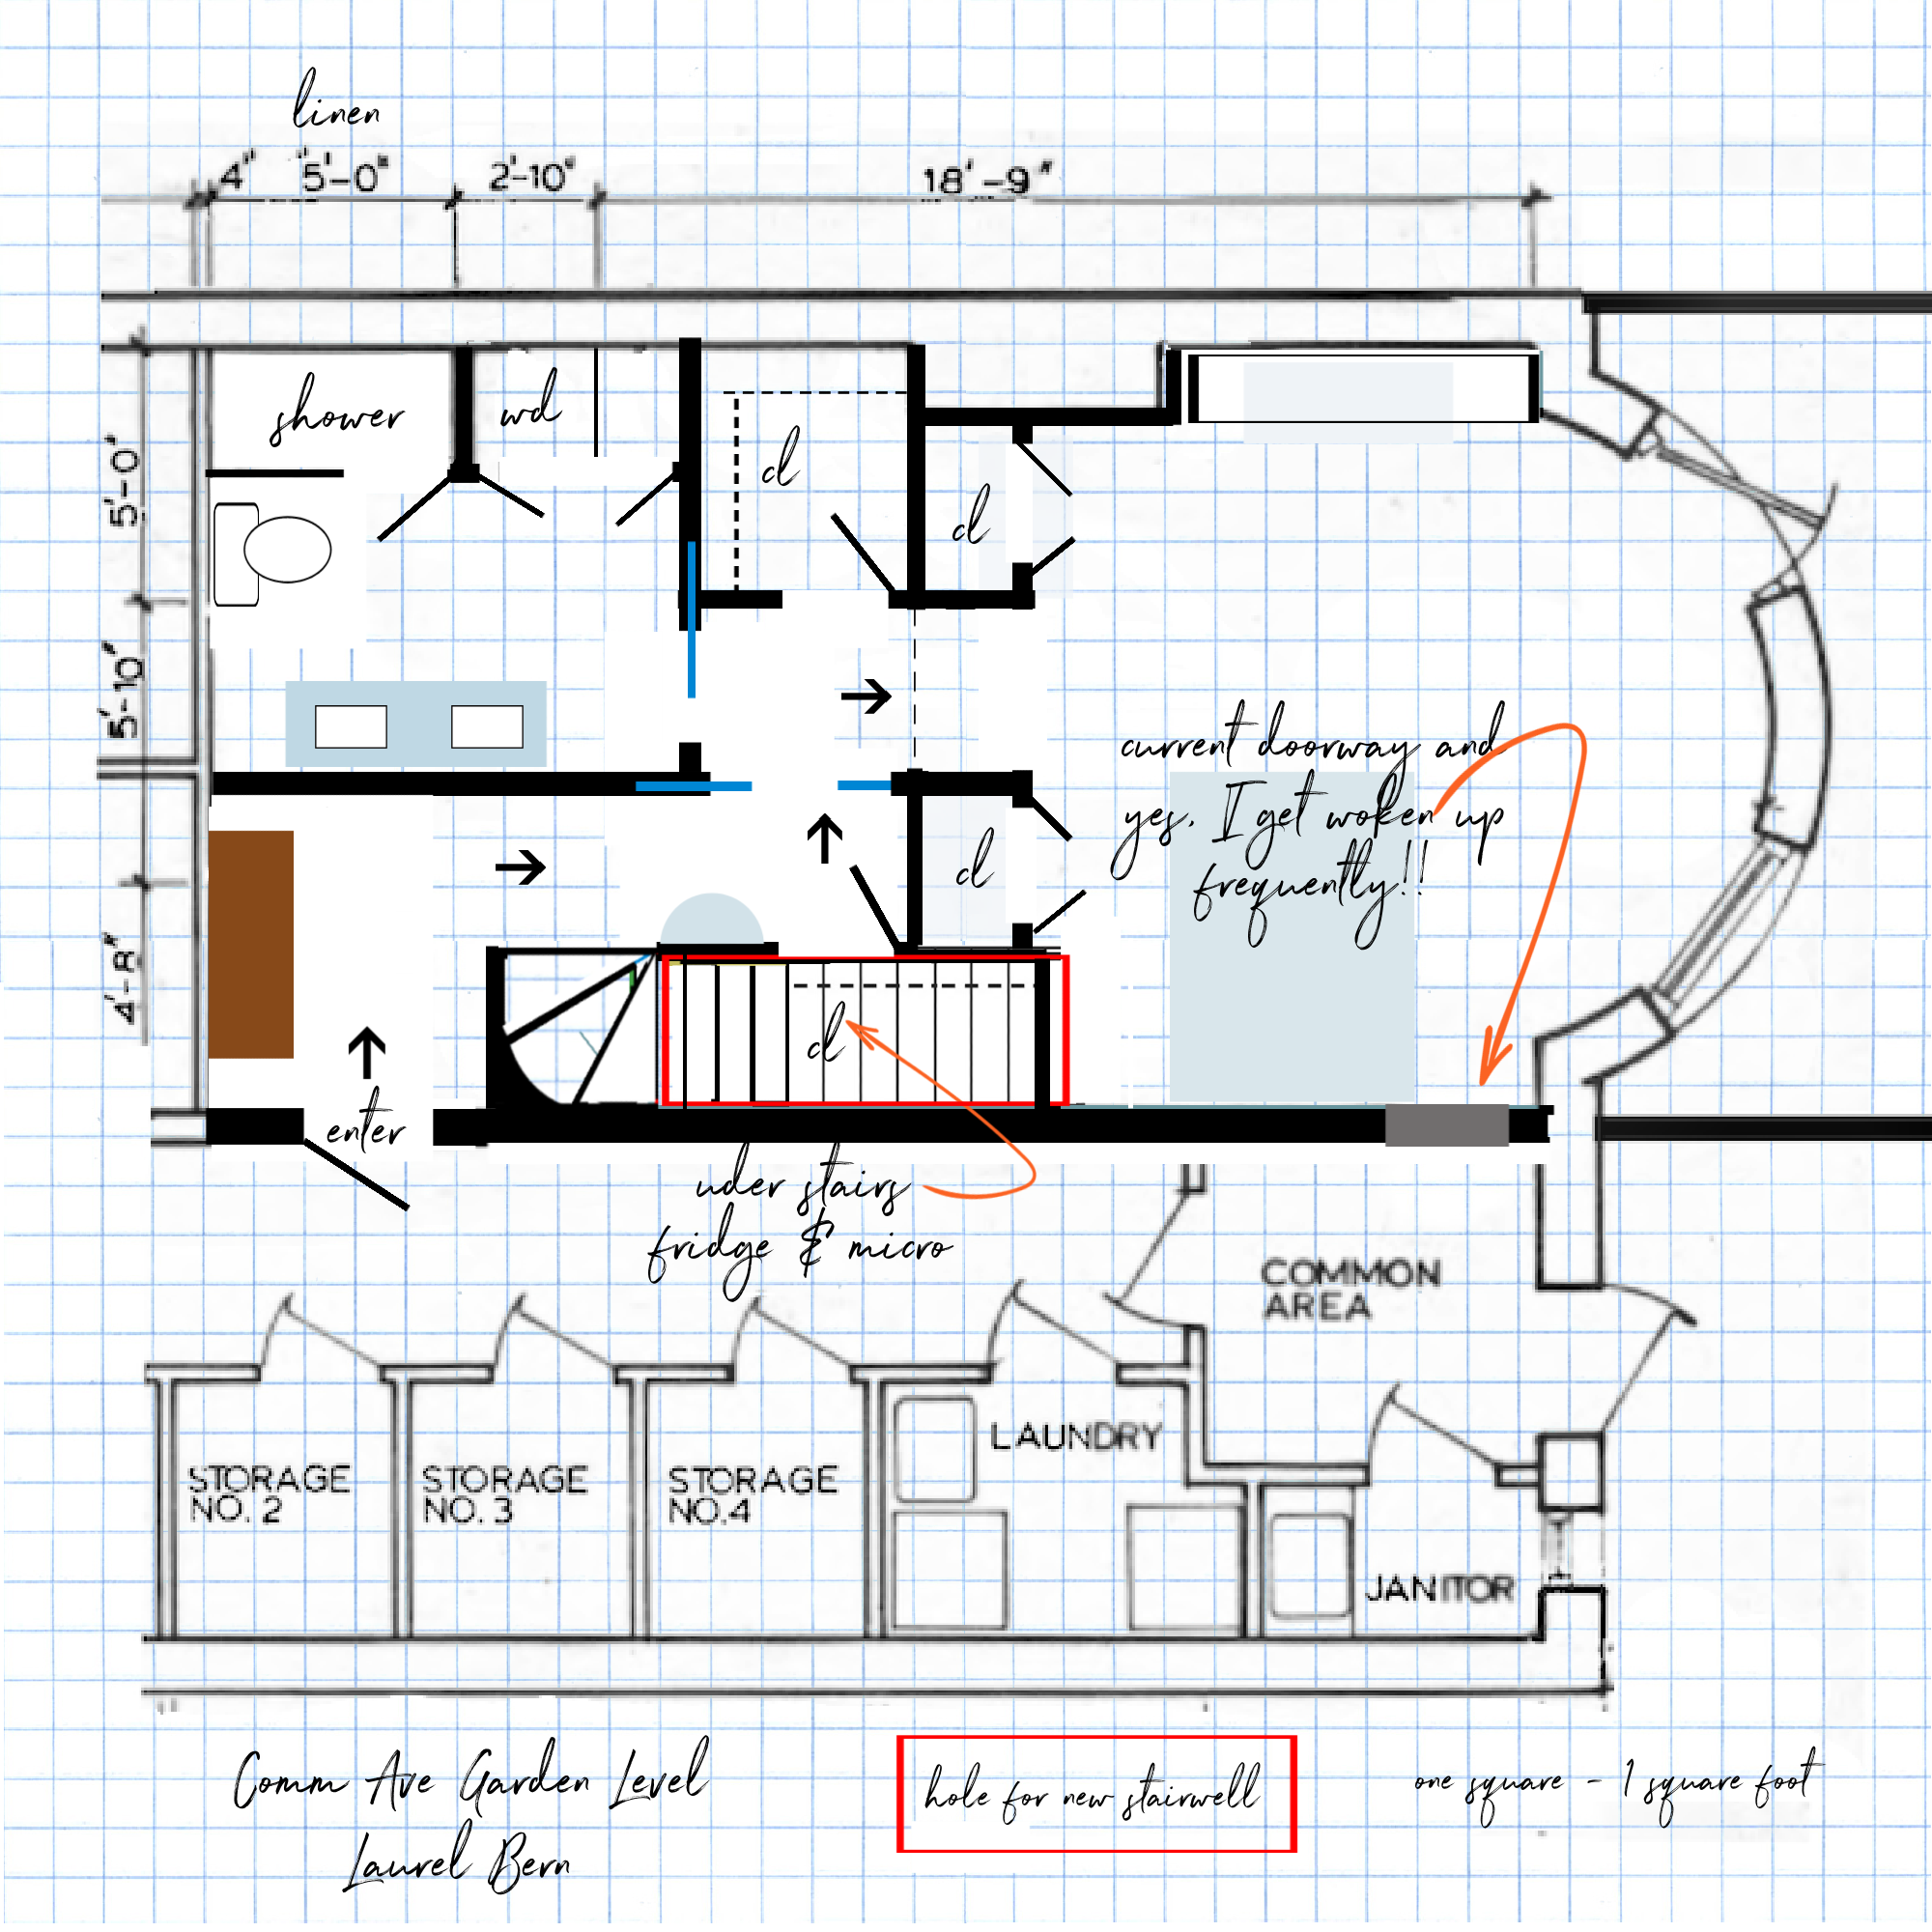
Above is number one or A
So, I’ll briefly go over what’s going on.
You walk into a lovely little entry. To the right is the bottom of the staircase, like the one pictured above; only my walkway is much wider.
One thing I’m exceedingly mindful of is how furniture will be moved in and out. The existing exterior doors on this level are all super narrow at only 25″! I know! But, that’s what they are. I actually made my new entrance door a little wider.
However, the halls are all at least three feet wide and, in most places, wider.
Please notice the larger bathroom with this design and vanity for two. ;]
A kind reader pointed out that if I want a partner, according to Fung Shui, I need to live as though I already have one.
So, I’ve started buying shaving cream and boxer shorts. ;]
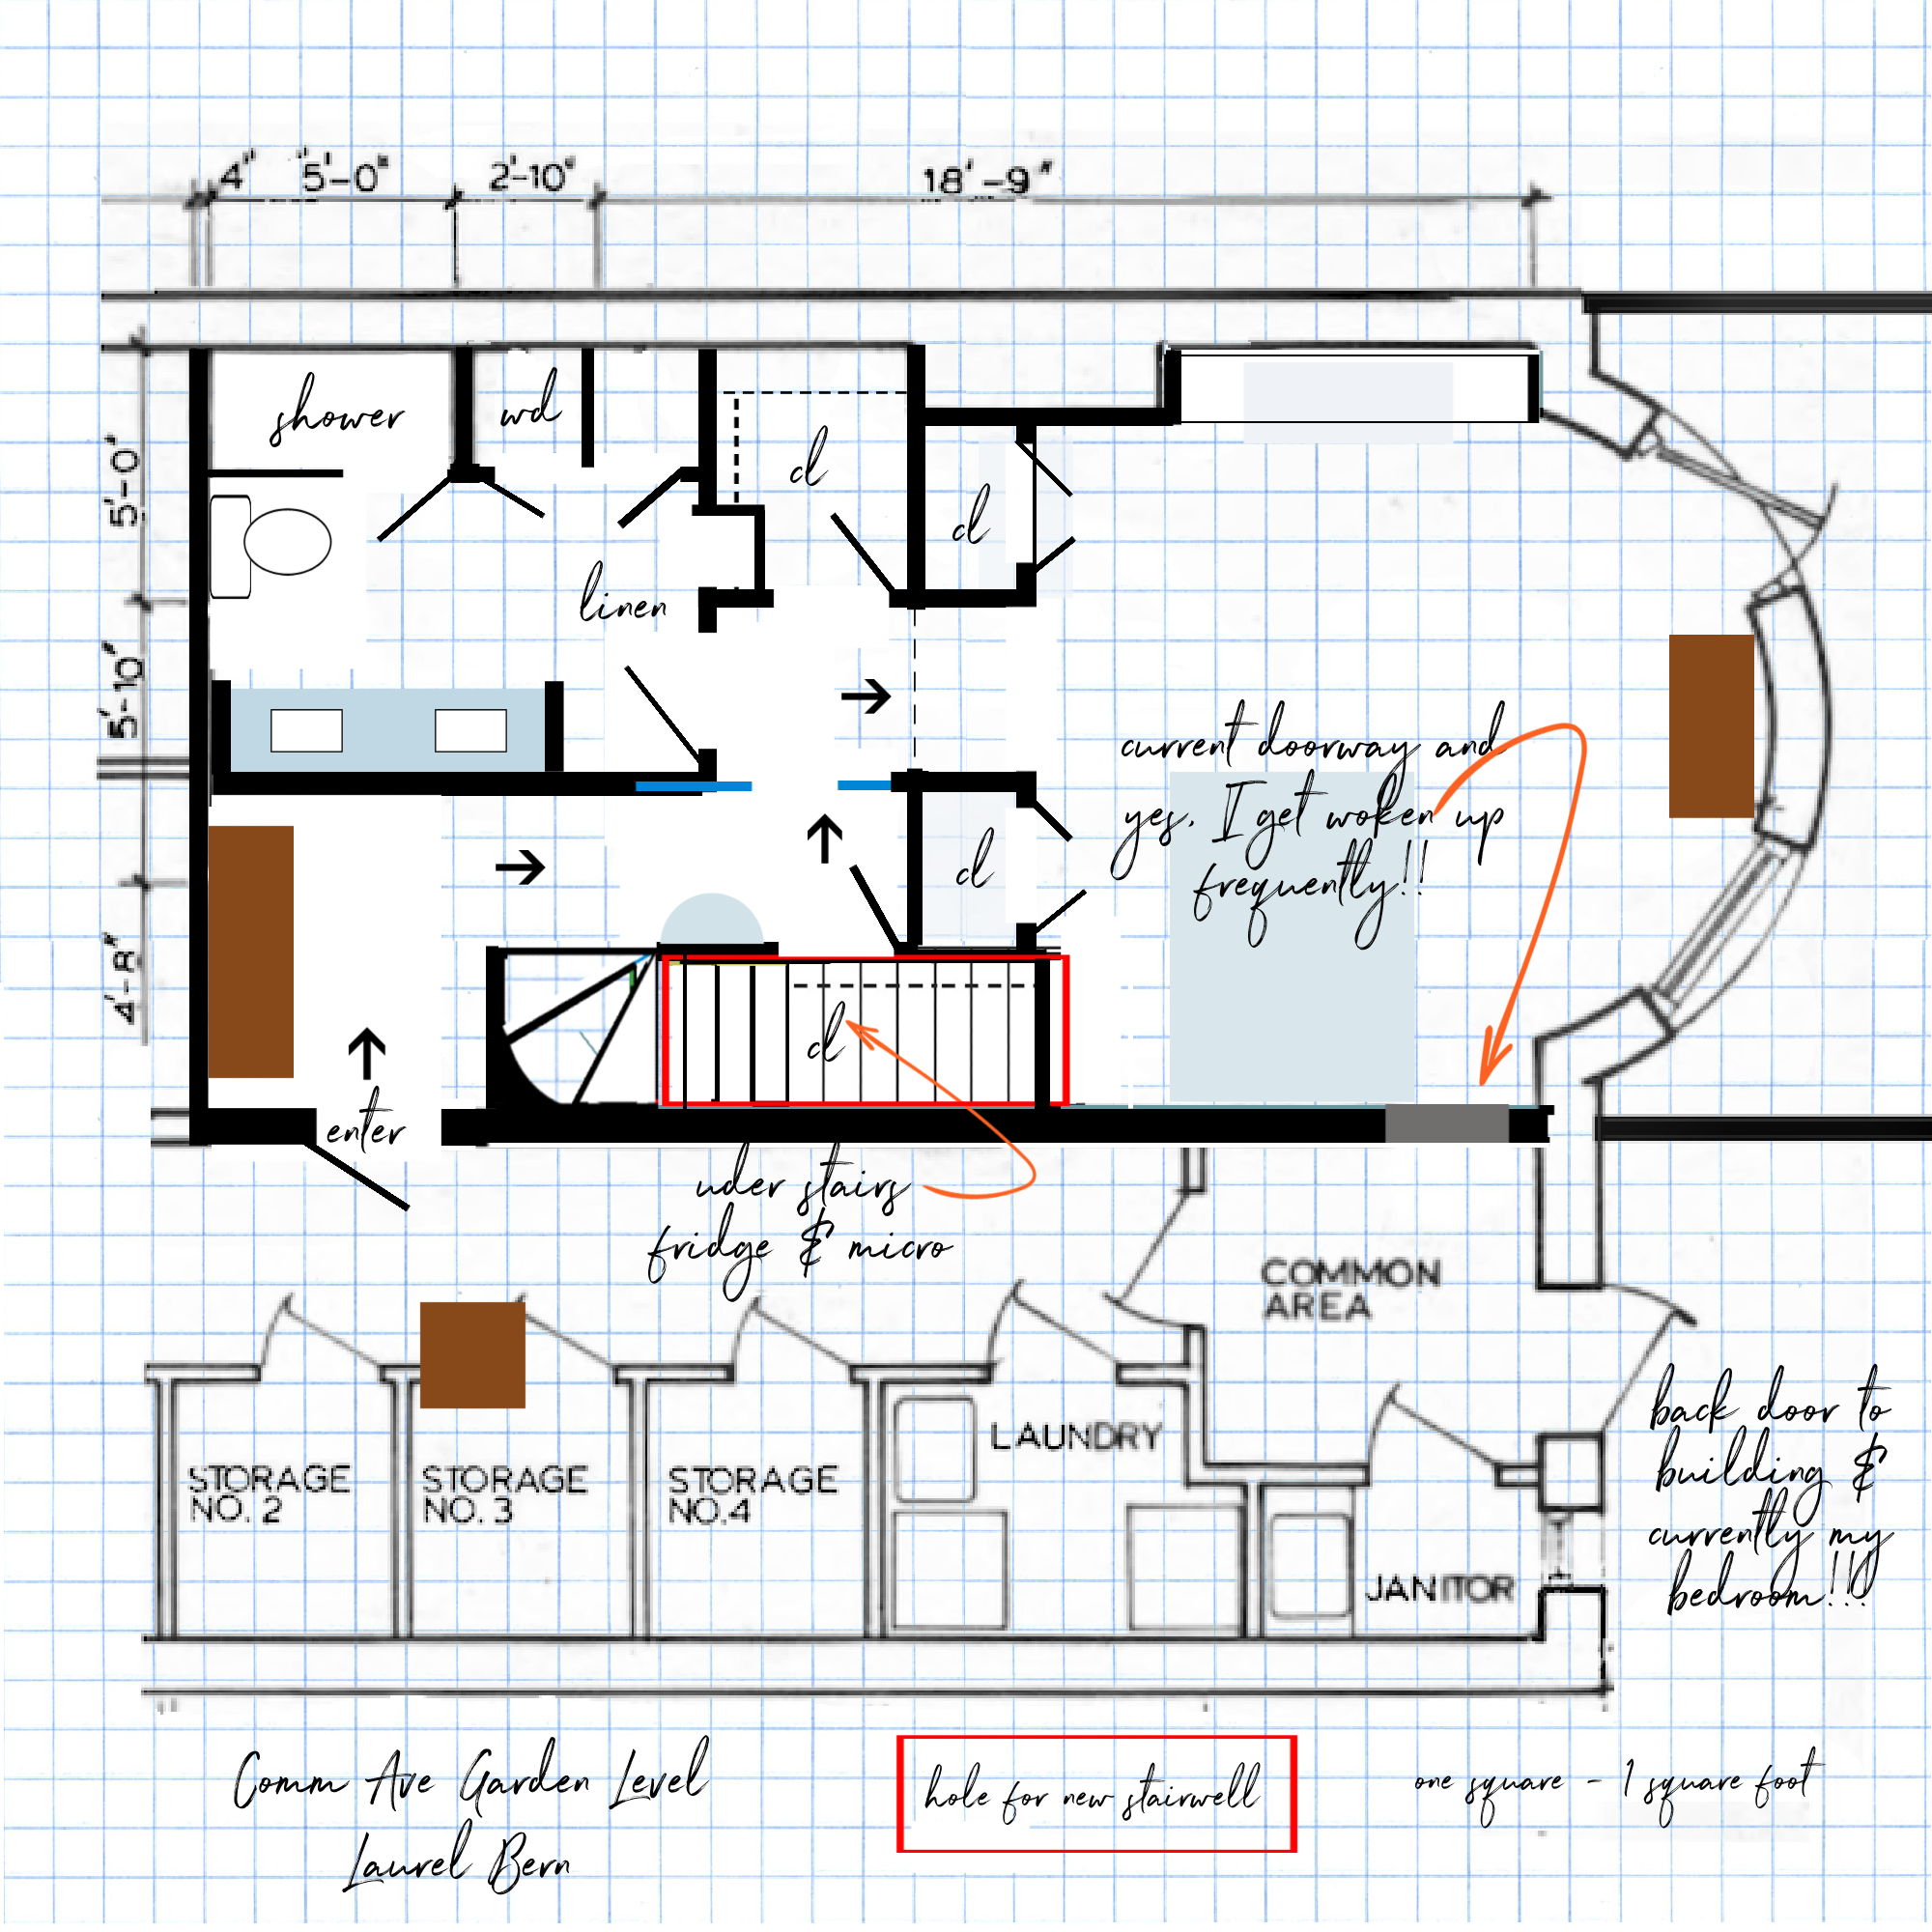
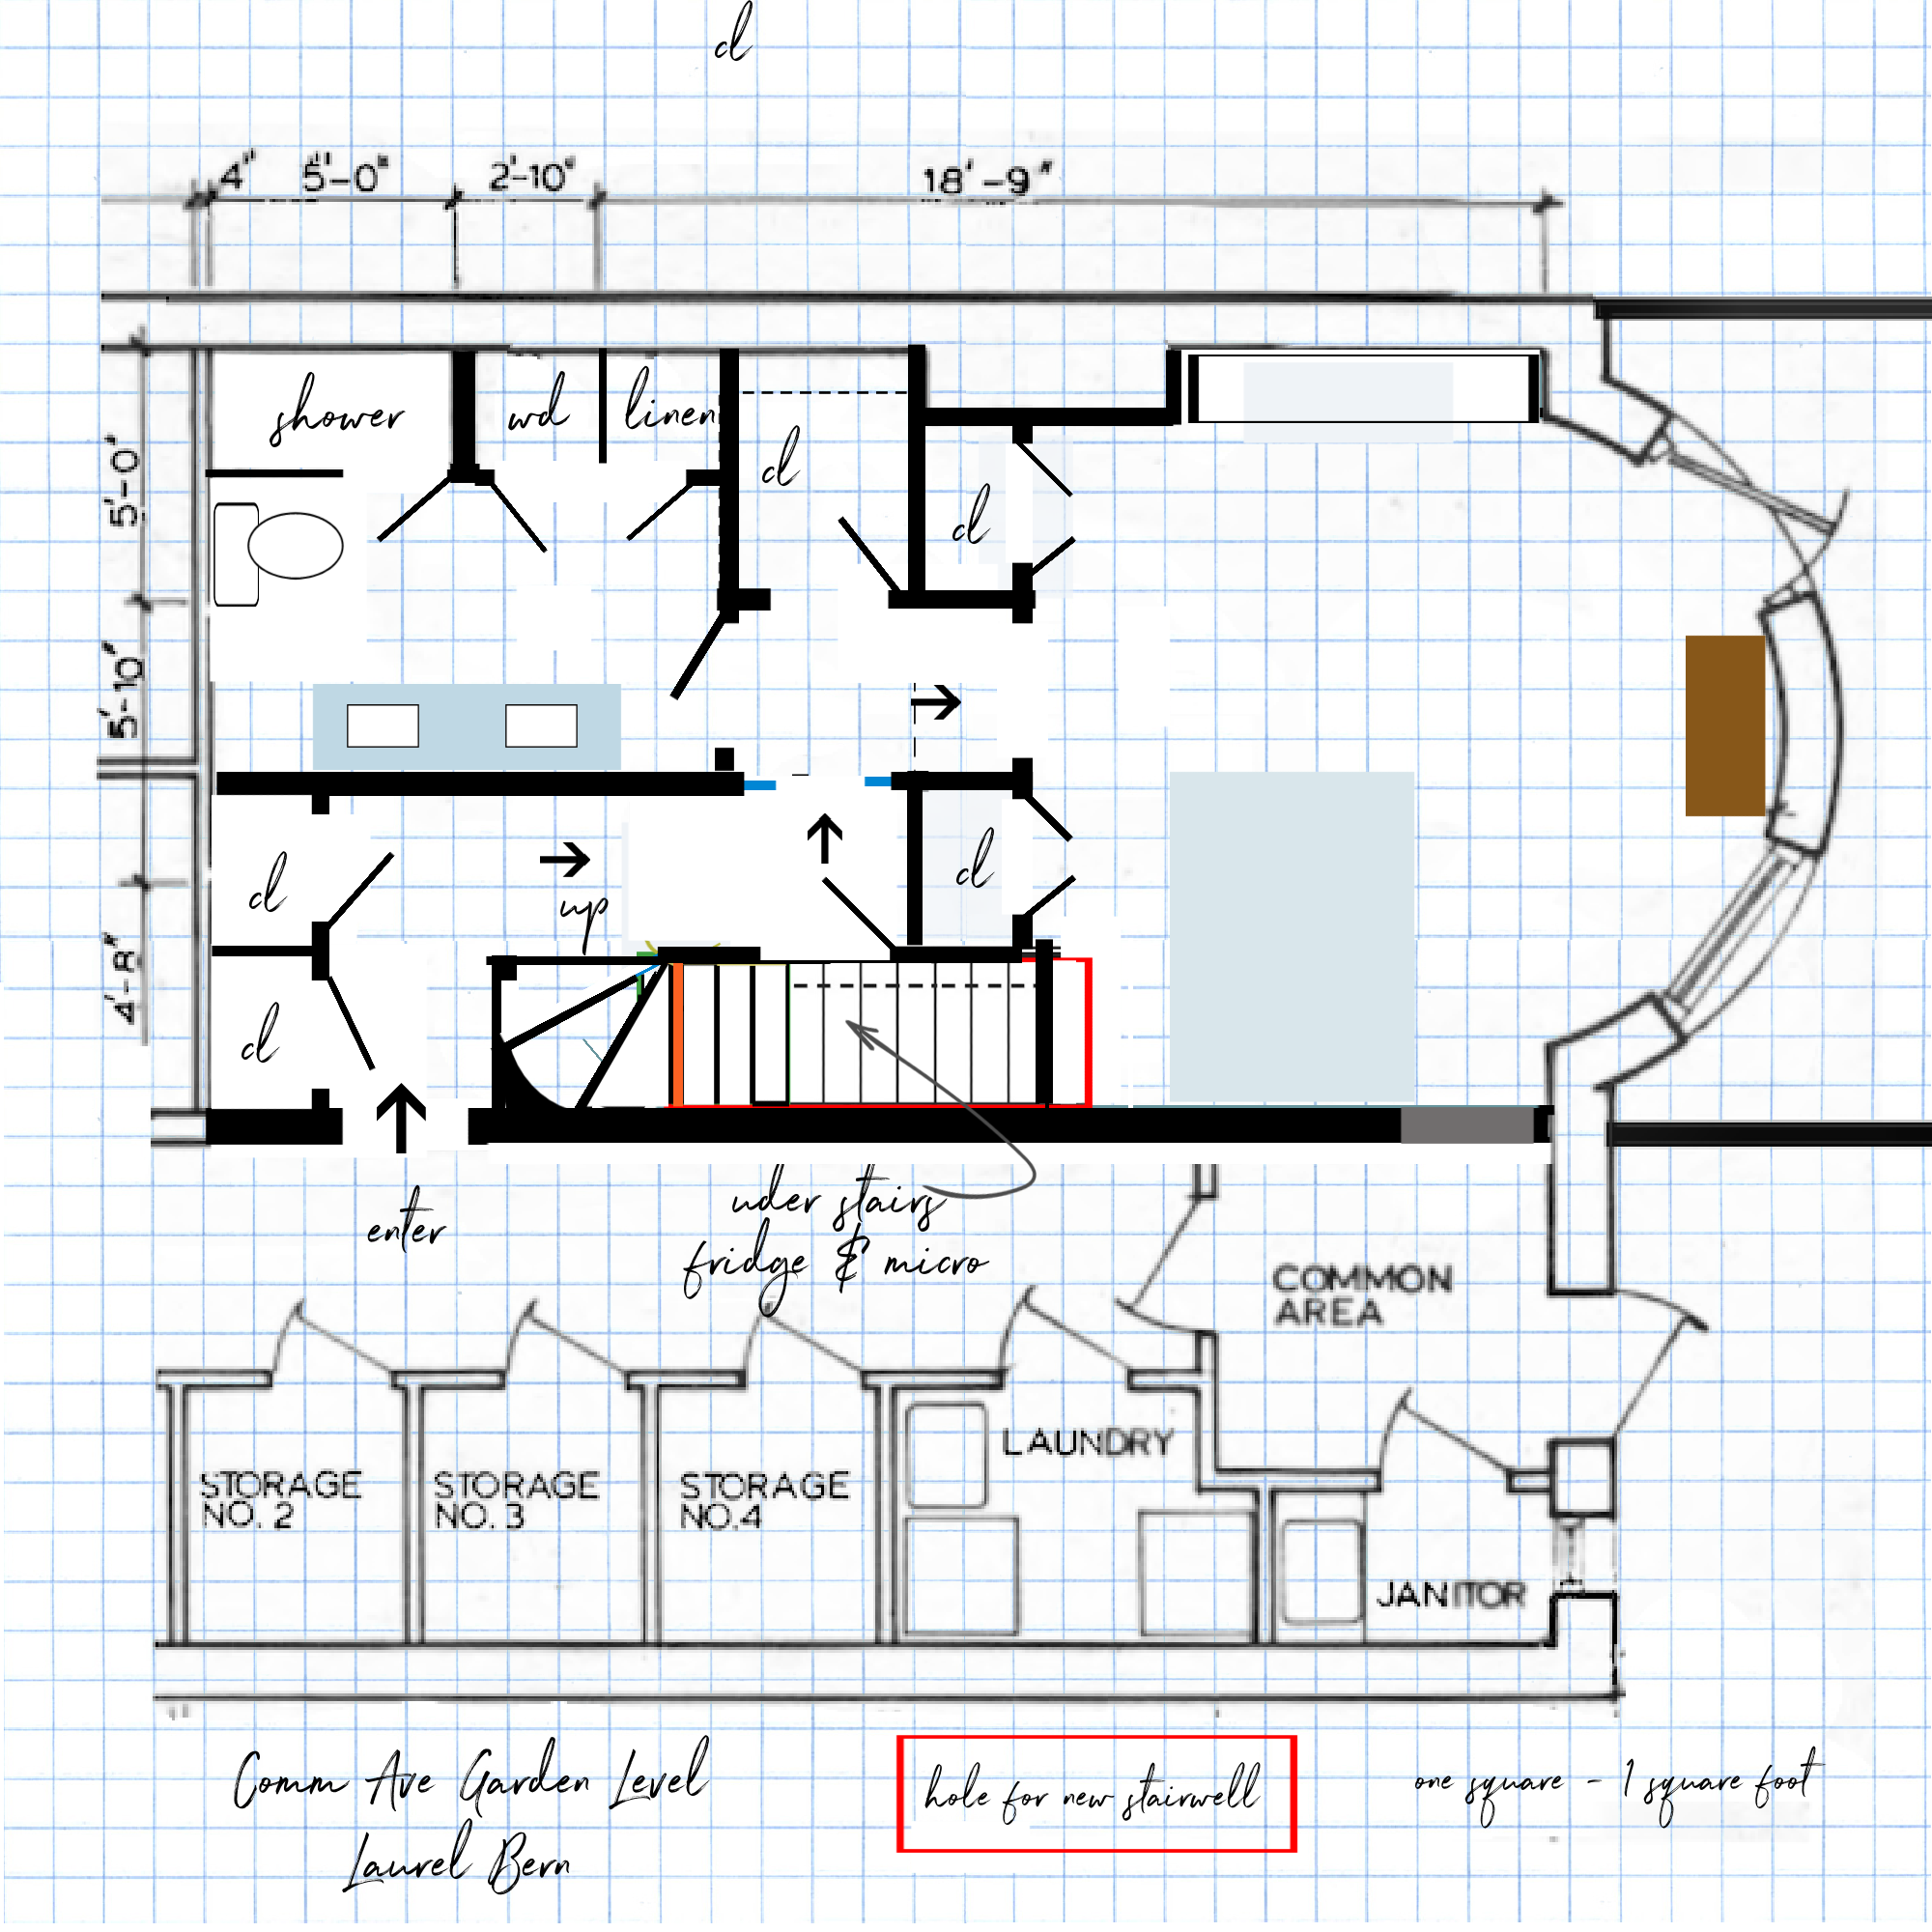 Number B is quite similar. However, by moving the opening to the bathroom to the right, I can center the vanity and still have sufficient space to come in without gouging out my hip bones. Even so, if I end up having a vanity made and doing something like this, it would be great to do one with the canted corners like the Bronxville Bathroom.
BTW, I’m going to put smaller versions of all four on one board so you can compare them more easily.
#C Takes some space from the bathroom but gives the hall a feeling of spaciousness.
I love the wider French doors. However, they do not have to be pocket doors; they could even be bi-fold French doors. Of course, most of the time, they’ll be open.
Although this one’s kind of impractical, I do love the spaciousness, and drama of the larger doors.
One thing I want to be sure to do is to make the entire bedroom suite private from the upstairs, should I have guests.
Therefore, the entrance to the bathroom is on the bedroom side, not the staircase side.
However, if you go to version number one, it would be possible to do both a guest door and bedroom bathroom door. Still, I’m not sure if it’s really worth it.
#D marries both the open and more closed versions.
I also added additional storage in the bathroom. That would be if I did console sinks. I love those, too. I will most likely do some hidden storage in the walls with custom mirrors.
And, below is the graphic with all four designs.
Now, to really make y’all really crazy, I could also do a no-turn or winder straight run of stairs. Here are two versions of that.
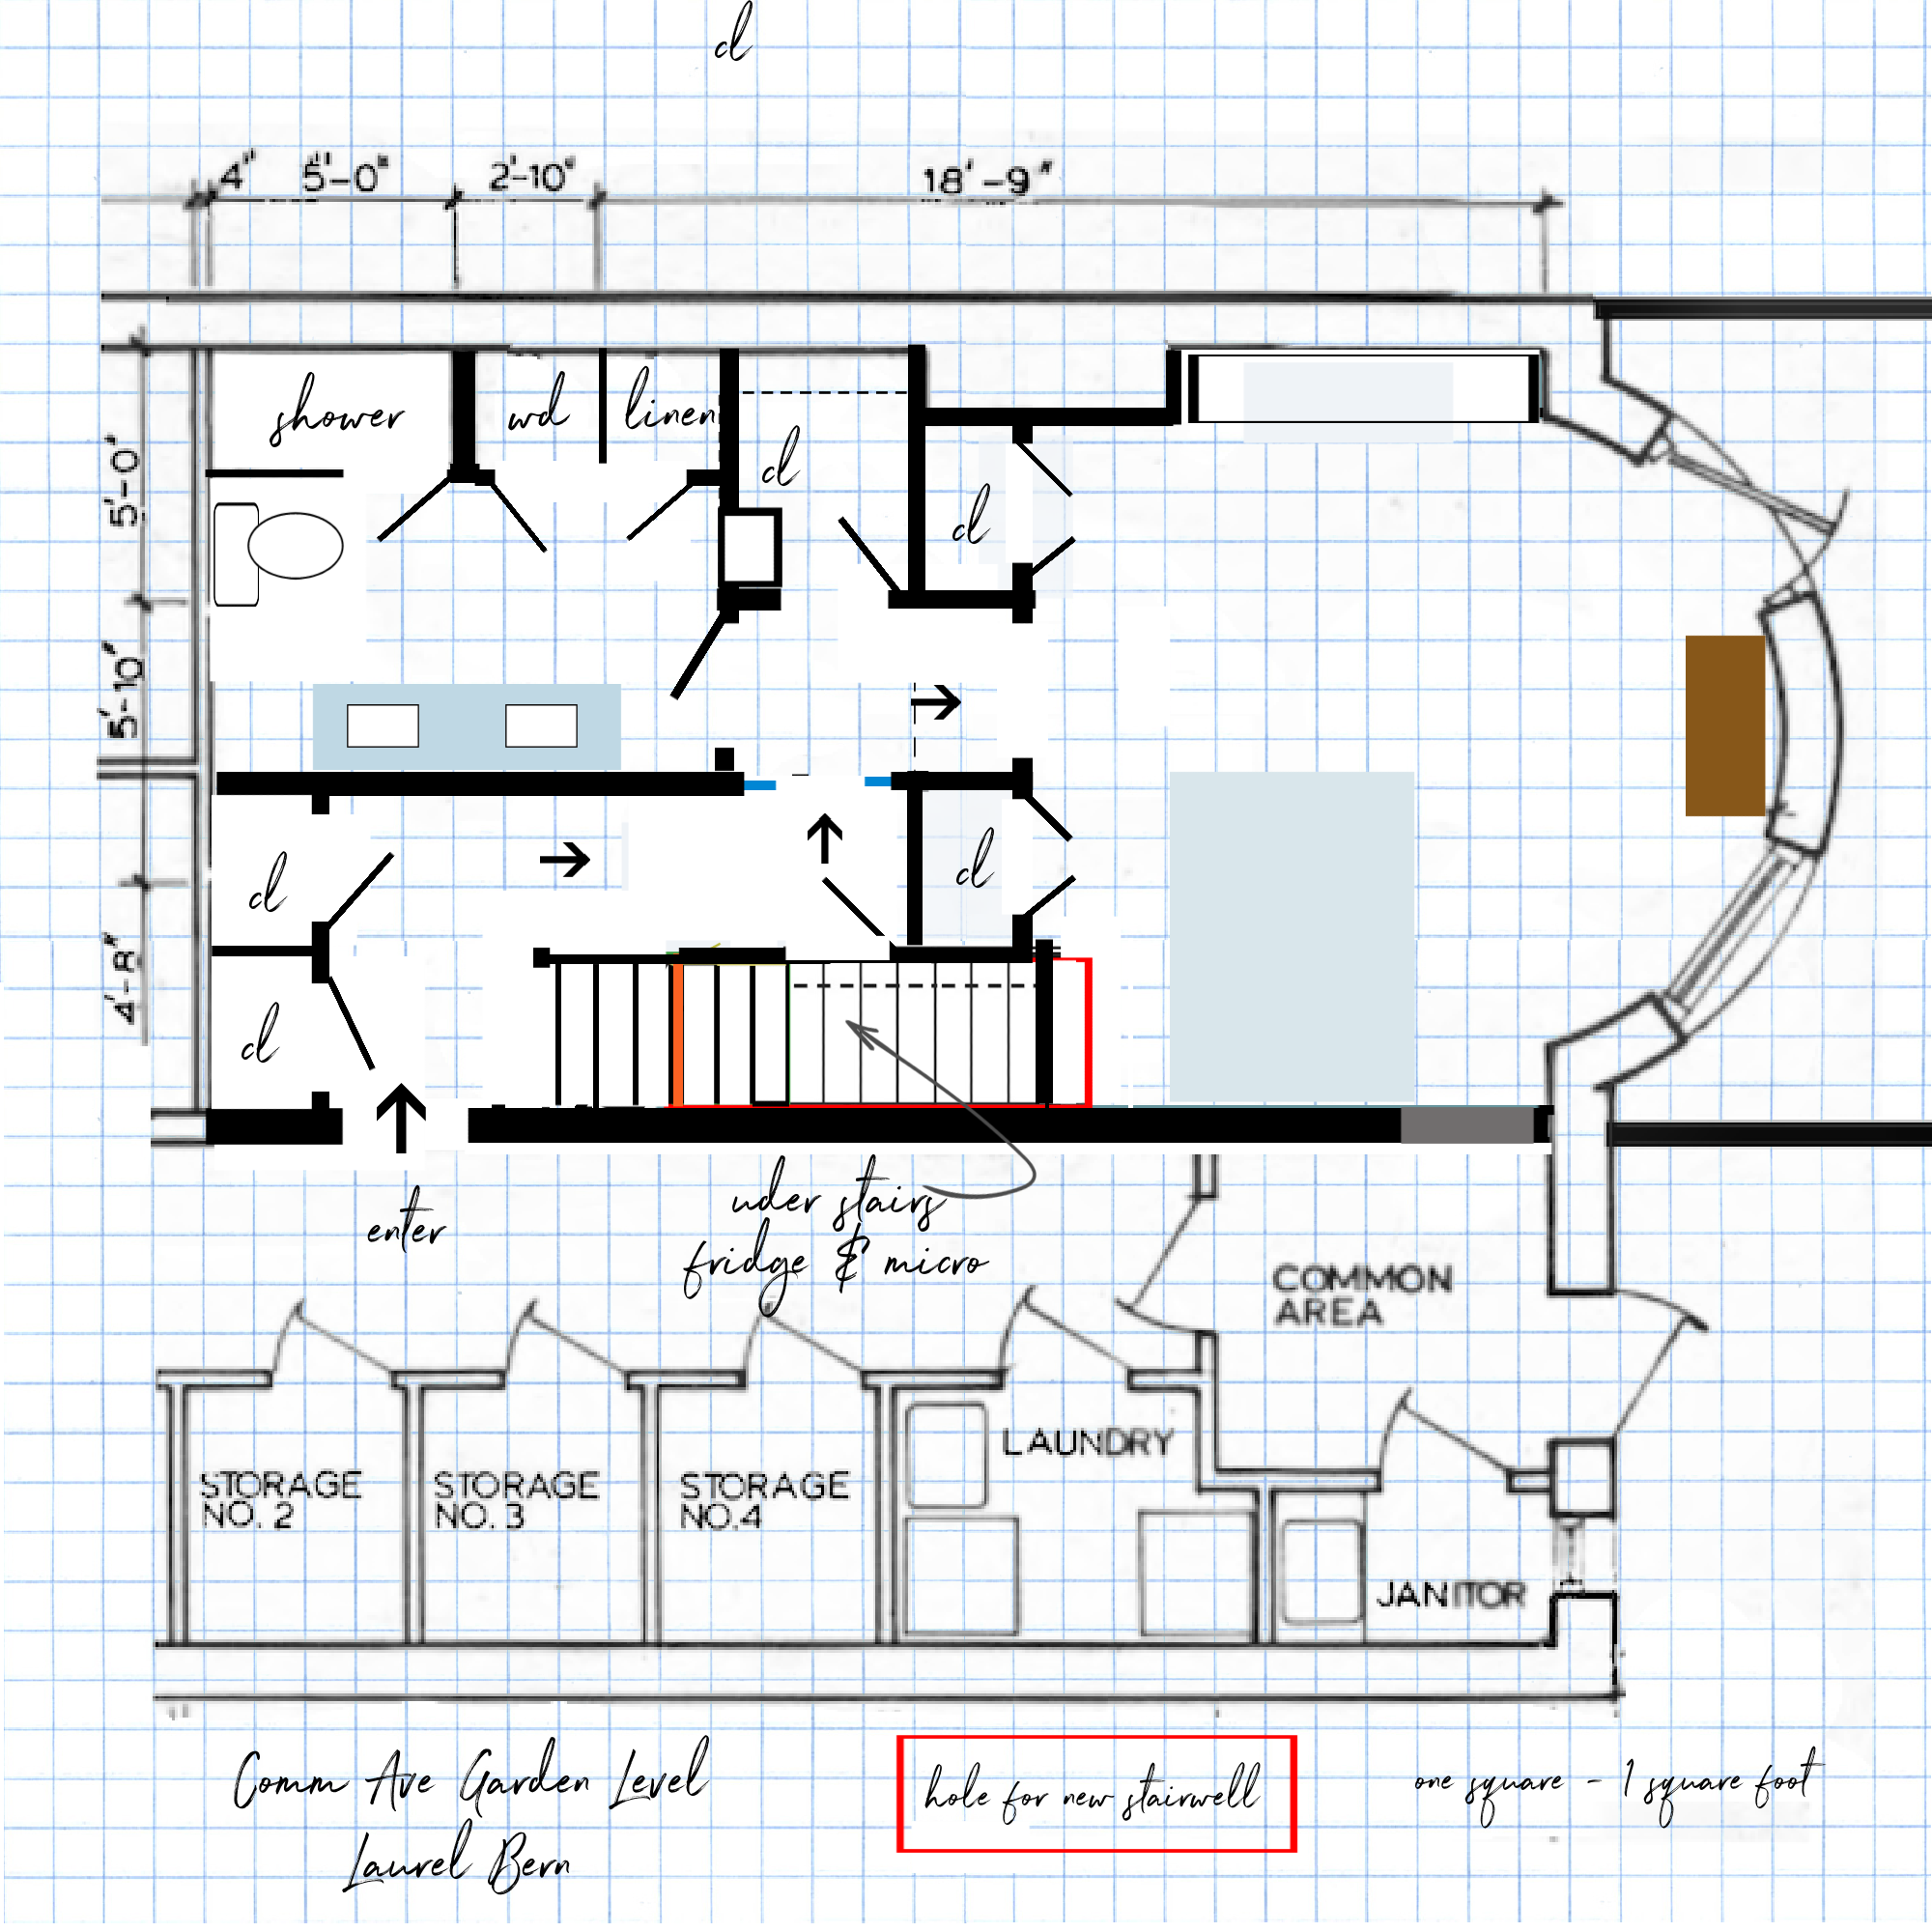
Above is B with a straight staircase
And above is C with a straight staircase.
I do prefer the winder. It’s prettier and more interesting. However, a straight staircase would be easier to build.
I’ll look forward to your kind thoughts.
Please remember, no elevators!
xo,

Please check out the HOT SALES!
***Please note that there are only a few days for the Nordstrom Anniversary Sale! They are adding new items every day. Also, because of returns, something you may have been interested in might be back in stock. The sale ends August 31st 11:59PM PT. After that, the prices will be going back up!
Related Posts
 25 Seriously Jaw Dropping Urban Gardens
 The One White Trim and Wall Color That Works Every Time
 The Most Beautiful Fireplace Mantels | White Mantels | Part I
 21 Common and Hideous Interior Design Mistakes
 Ground Zero For The Nordstrom Anniversary Sale 2022
 Throw Pillows – Everything You Need to Know
 5 Classic Kitchen Combos, Cabinets, Hardware, Lighting…


