
This is a two-part post about all of the issues with had with our white oak floors that are on the lower level. If you’ve read part 1 and woujld like to skp it, then, please click the link below which will take you to part 2. If you’re here for the first time, please start the post from the top of the page. There’s a lot of great information here and that includes all of the wonderful comments you guys left!
Part 2 Begins Here
(Part 1 begins below)
Hi Everyone,
Well, the white oak floors are proving to be quite obnoxious, as is our weather. We are flirting with 100 degrees today in Boston. After the most delightful June weather I’ve ever experienced, we’ve been socked with super high temps, high humidity, and thick air. And with all of the bricks, it’s like one gigantic brick oven.
Okay, this post is about the white oak floors downstairs. The original bedroom floors are white oak, not red oak, as previously thought.
However, before we get into the white oak floor issues, thank you for your terrific input the other day regarding the bathroom floor tile design.
I have made my decision. Before I tell you, I must apologize for my eccentric numbering system. lol The first example, the original design, had no number. So, some of you who preferred #1 might’ve referred to the original design, not the example with the #1.
While I, too, love that design, I had to let it go because it’s too much with everything else.
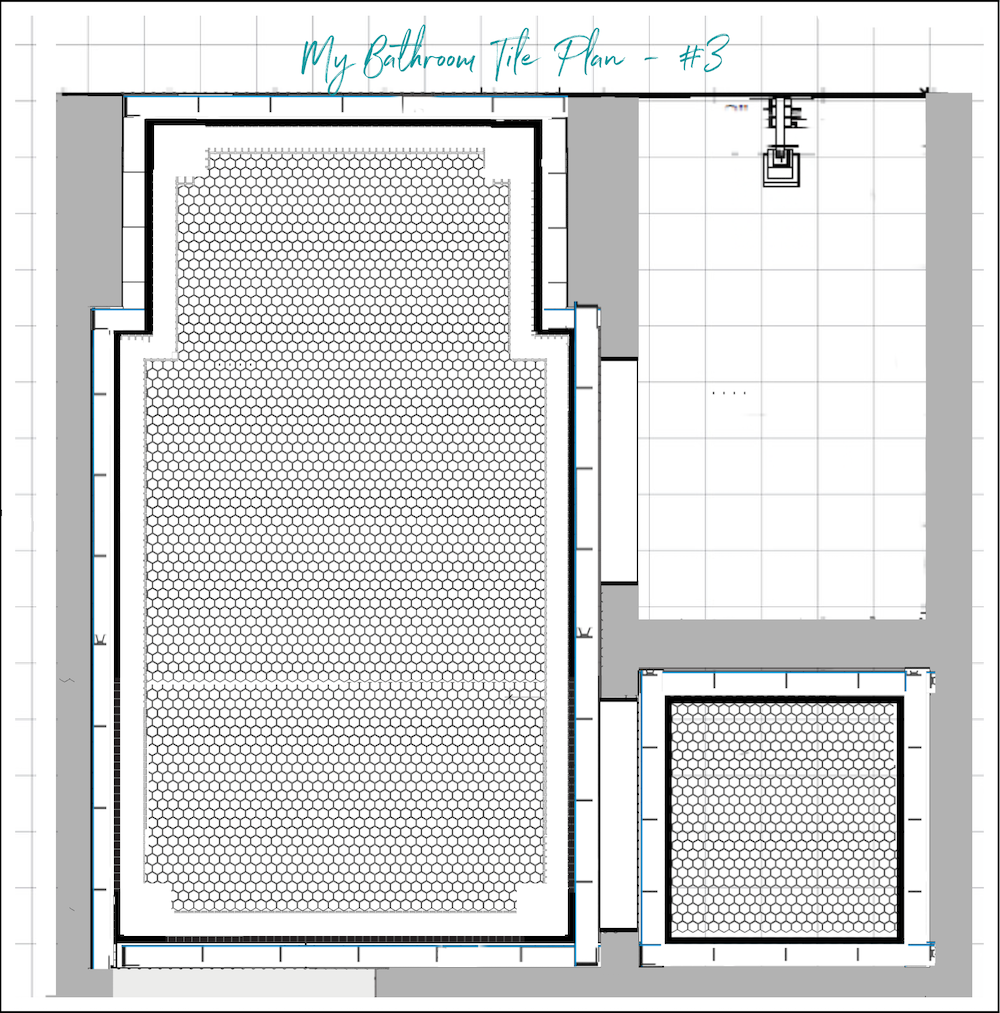
Anyway, I am going with the final rendering, #3, because less is more, and it doesn’t lock me in if I want to do a small area rug. Plus, I have a lot of the 3×12 Dolomite tile left over.
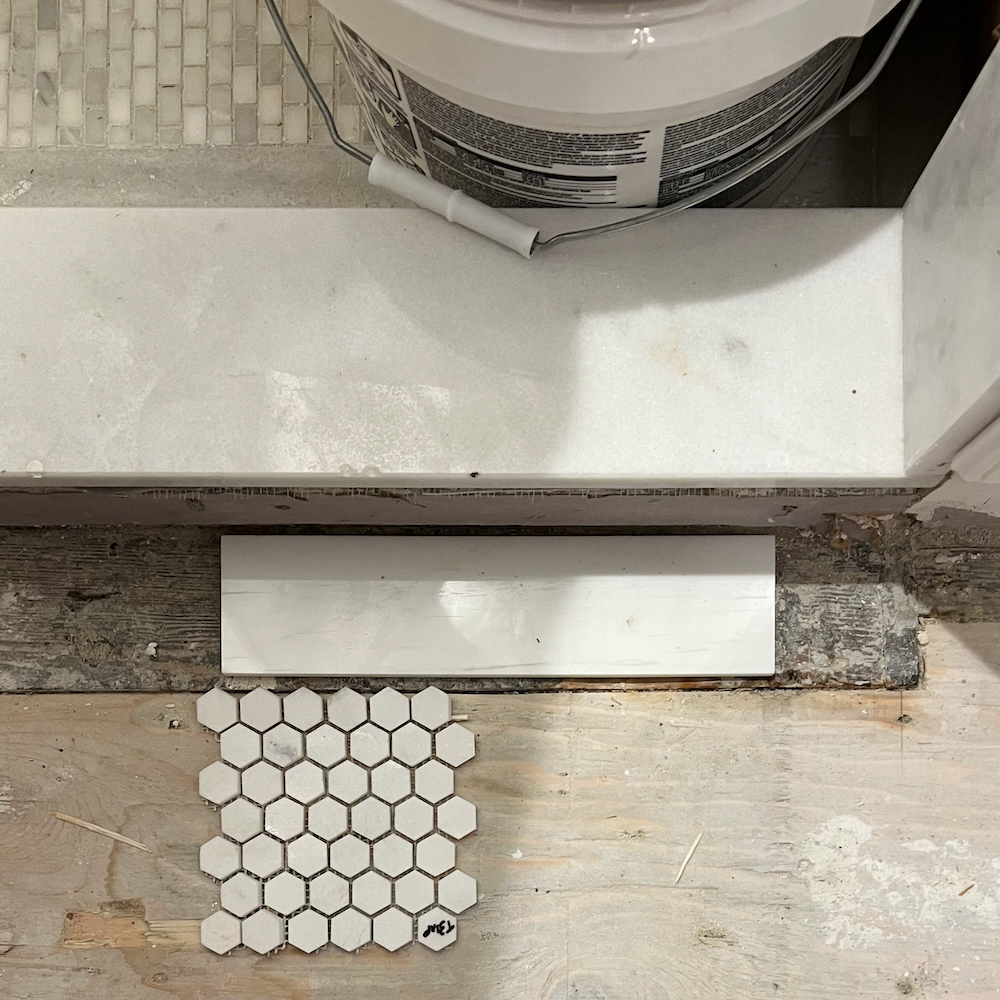
While the Dolomite coordinates pretty well with the Thassos, I found a 1″ Dolomite hexagon with the same thickness as the border. I also found a black 5/8″ Nero Marquina square mosaic for the border. That one’s missing, and you’re still looking at the Thassos hexagon tile.
I will order all the tiles tomorrow and hope to install the new bathroom floor before the month’s end. Hooray! Yes, the shower tile is different, but it’s barely visible and still has a lot of white in it. The Dolomite is already on the shower walls. Plus, there’s Carrara on the shower and WC door jams. I think it’ll be fine. And if it’s not, I can always change the shower floor tile down the road.
Alright, it’s time to visit our “problem child.”
It’s the white oak hardwood floors.
Who knew? I mean, who knew that was a problem? Everyone is always complaining about the red in the red oak.
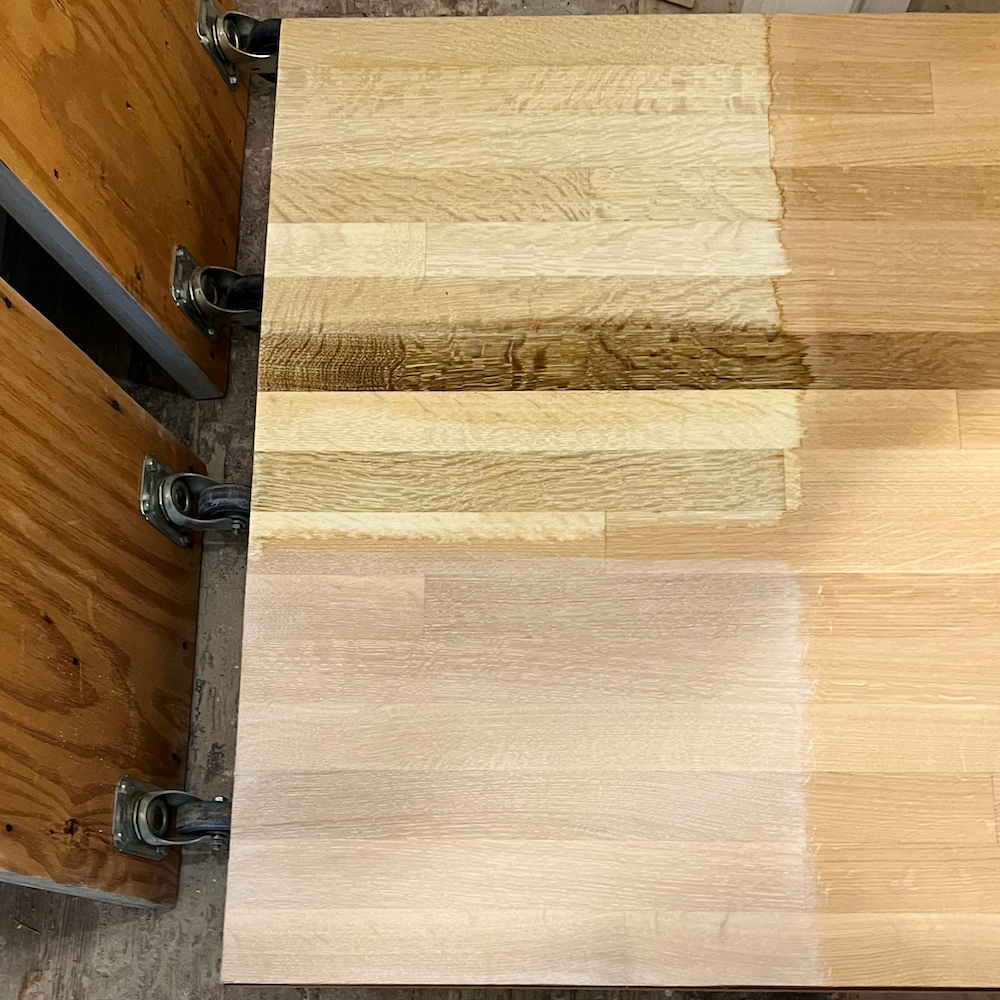
Well, I learned recently that white oak is a misnomer if ever there was one. It is anything but white. In fact, it is nearly as pink as red oak and usually a fair amount darker. However, that darkness results from the heavy dose of tannins inside the wood fibers. Red oak, while redder has far fewer tannins to leak through a white stain.
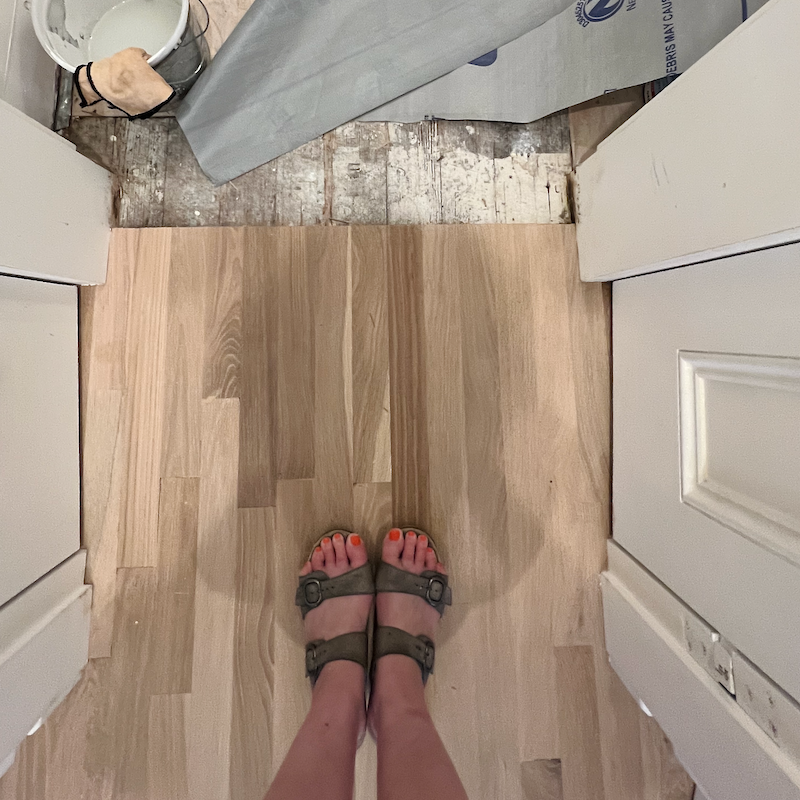
In the image above, the border is red oak, and the rest of the floor is white oak. To be clear, this is the old bedroom floor, newly sanded.
Those tannins get released when certain chemicals hit the surface. This doesn’t happen with typical floor stains, but it happens when trying to get a translucent white floor.
Oh, we tried everything.
But, before we go on. Some of you suggested Rubio Monocoat and using a pre-color easy as a base. We could’ve done that if not for the Harlequin floor. The monocoat is a hard wax oil and we need to stencil over it. So, that is almost definitely going to be problematic.
Still, Gary Dessert, the owner of Sequoia Floors, has had a good experience using the pre-color and then either Bona Nordic Seal or Bona White Stain over it. However, these are both too dark, with pinkish tones coming through, giving it a muddy look.
We also tried bleach.
Ahhh, yes, just bleach it, Laurel.
Nope, like I always say, there is no just; well, not with white oak floors. If you want to see green tannins come pouring out of white oak wood grain, just hit it with floor bleach.
Gary warned me about bleaching white oak, saying it would turn the wood GREEN. He was correct; however, Chris said vinegar could neutralize it.
The bleach was Chris’ experiment. Look at what happened when he first poured it on.
It took two heavy rounds of bleach, followed by a vinegar bath. However, the lighter boards were practically white, and the darker boards were an ashy gray color. Because of this, it would mean a coat of white sealer and a coat of white stain, followed by two coats of poly.
This doesn’t include the intermediate sanding steps. However, there are four extra steps than one typically has when staining wood.
In the top strip, I believe he used Bona Nordic Seal or Bona White stain. That’s not bad, but the other thing about this wood is the variation in the boards. The darker boards have more tannin, and that’s a problem child on steroids.
In addition, white oak flooring still has an inherent unpredictability.
Some of the boards have more tannins than others. We experimented for seven days, including last weekend, with Gary and Chris, the painter. I added some coats on Sunday to allow adequate dry time.
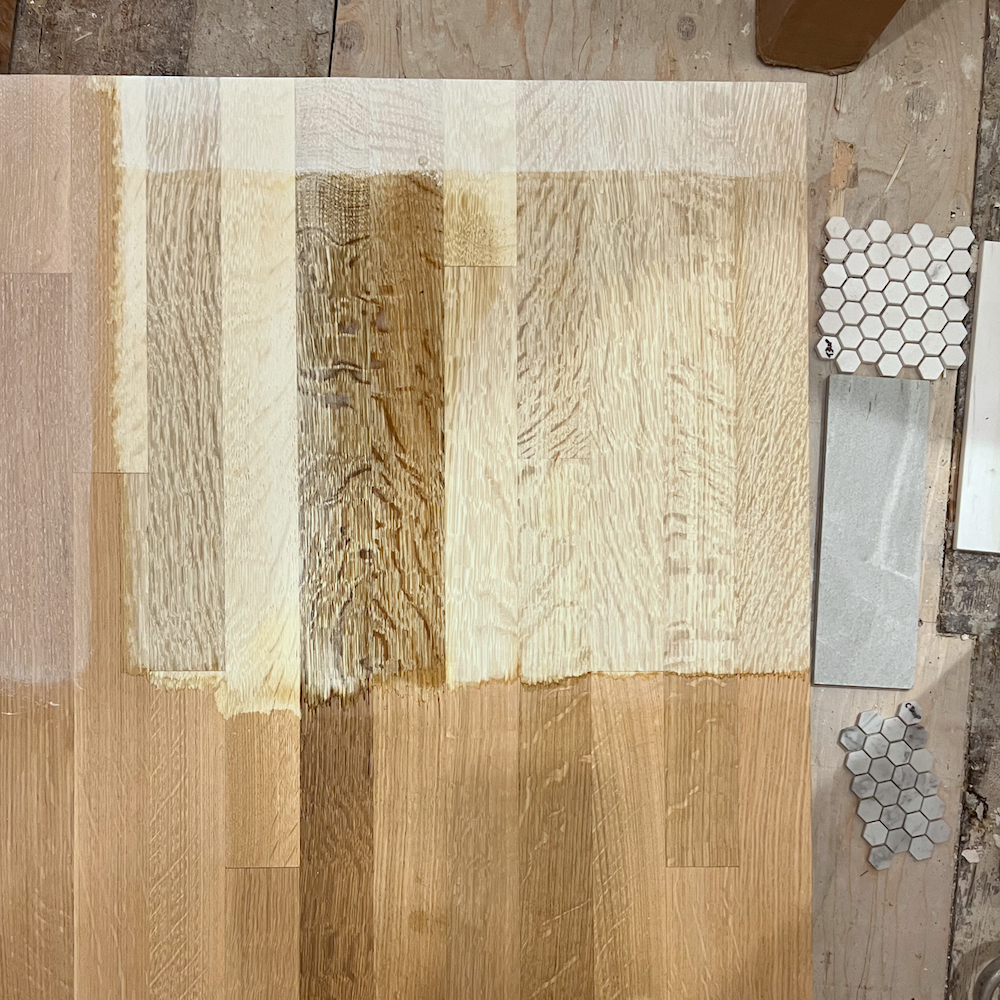
The color we used for our experiments is an off-white with a slight green undertone, White Wisp.
You can see it above.
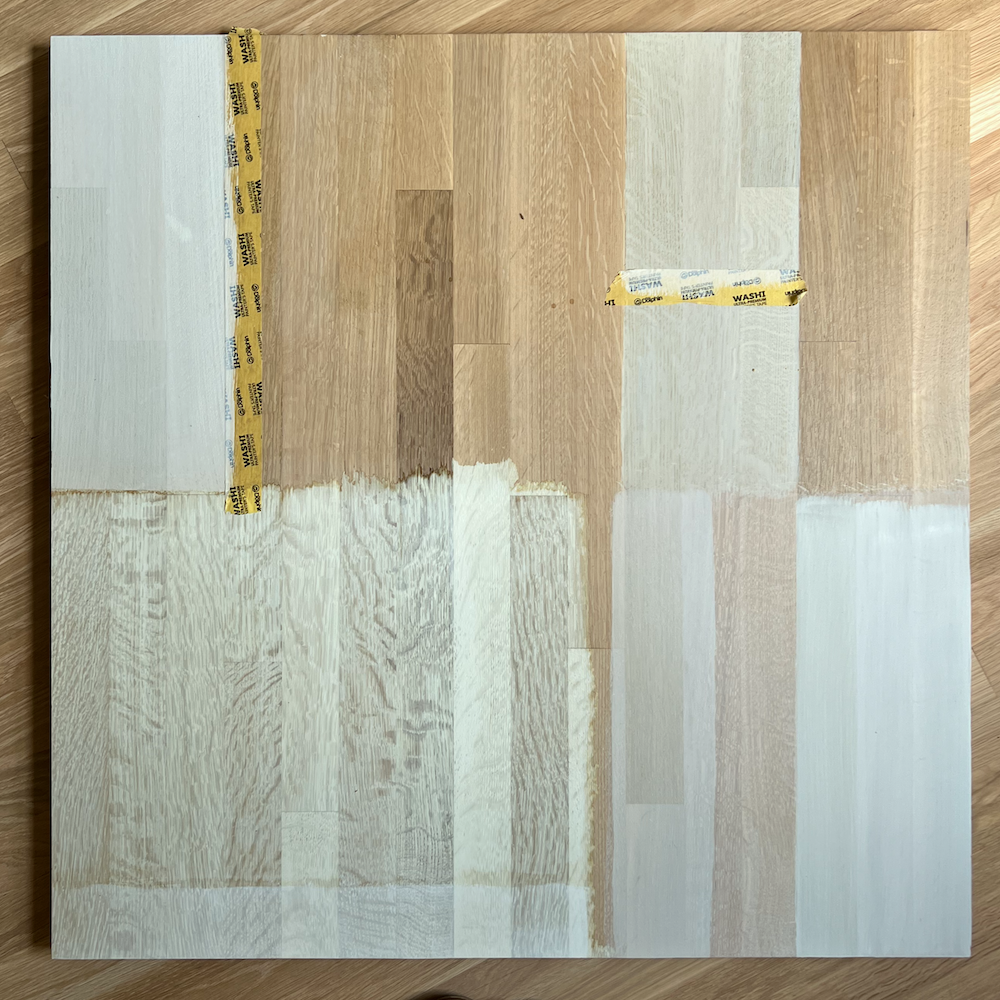
Chris did further experiments with diluting the paint with an extender. Well, that turned the wood either greenish or blueish.
The lower left shows the white oak after the double bleach had dried.
Okay, I am sure I have put y’all to sleep by now. So, let me conclude.
Without bleach, it’s impossible, and even with bleach, it’s risky– and super expensive. It’s not worth it. Chris and Gary came by on Saturday, and a few hours later, my assignment was to put on a layer of Bona Nordic Seal, a sealer with a white tint. Well, that product pulled off the paint!
So, I went to sleep Sunday night, but not before sending Gary and Chris an email telling them I wanted dark floors, like super dark floors.
However, I realized when I woke up that I sounded like I was drunk dialing.
This is why I don’t drink. It’s redundant. haha
I adore super dark floors—at night. However, in a large room, during the day, not so much unless it’s a dark room overall. But that’s not what I have. My bedroom is light and bright during the day.
No, I want a white or off-white floor. But not a blue floor.
So, Laurel, you tried to get a white floor, and it failed, but you still want to have a white floor. I’m not following, Laurel.
We were trying to create a white wood floor that still exposed a touch of the wood grain. However, the fallback solution is to do a solid white floor with a polyurethane topcoat.
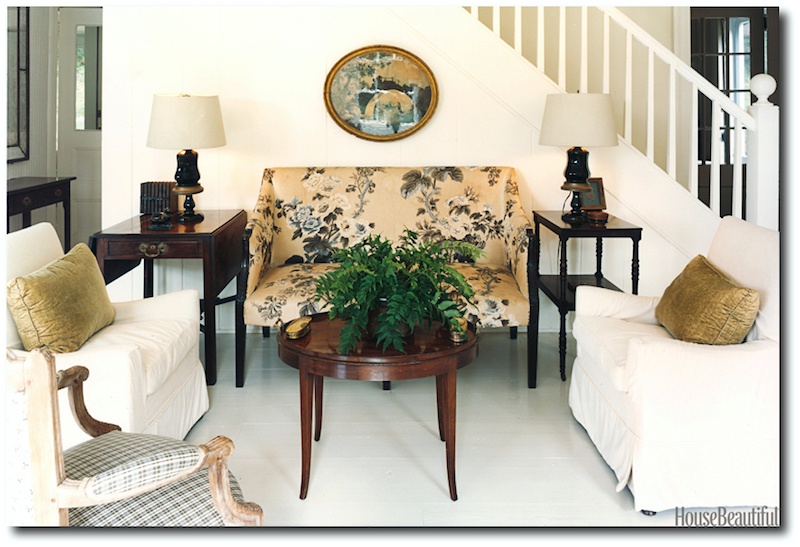
This is the Albert Hadley look I’ve often shared on the blog.
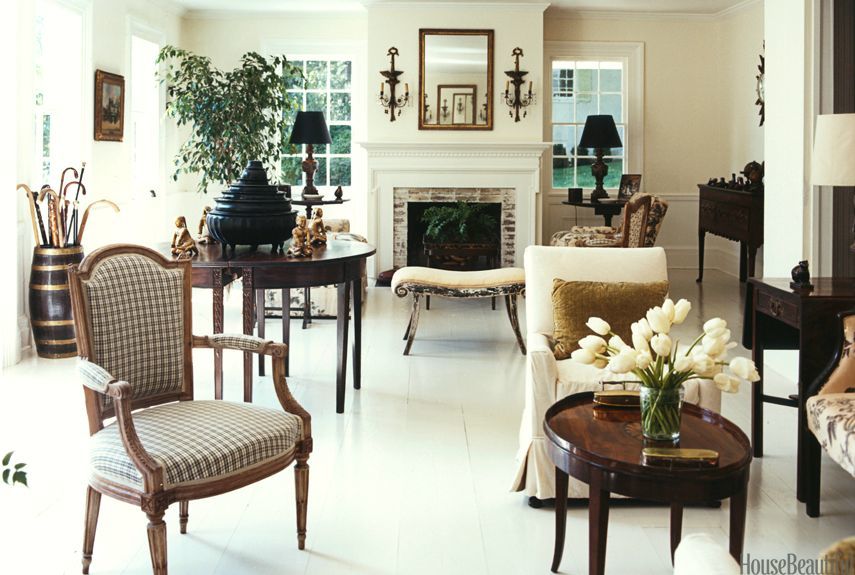
And, below, the same room. Would you believe this room was done in 1972?
For more rooms like these, please check out one of my classic posts featuring many white floors, many of which are painted.
Its sister post is Should You Embrace the Dark Side of Wood Floors?
So, tomorrow, Gary is coming and he and his crew will put down a coat of primer.
Do you mean you’re covering that expensive white oak with paint?
It wasn’t expensive, and please stop the neggy chitchat. Thank you. :] Most of the white oak came with the house. In the 19th c and earlier, bedroom floors were typically painted.
It’s fine if you’re not a fan of painted hardwood floors, but many people love the look of them. So, please don’t kill our joy.
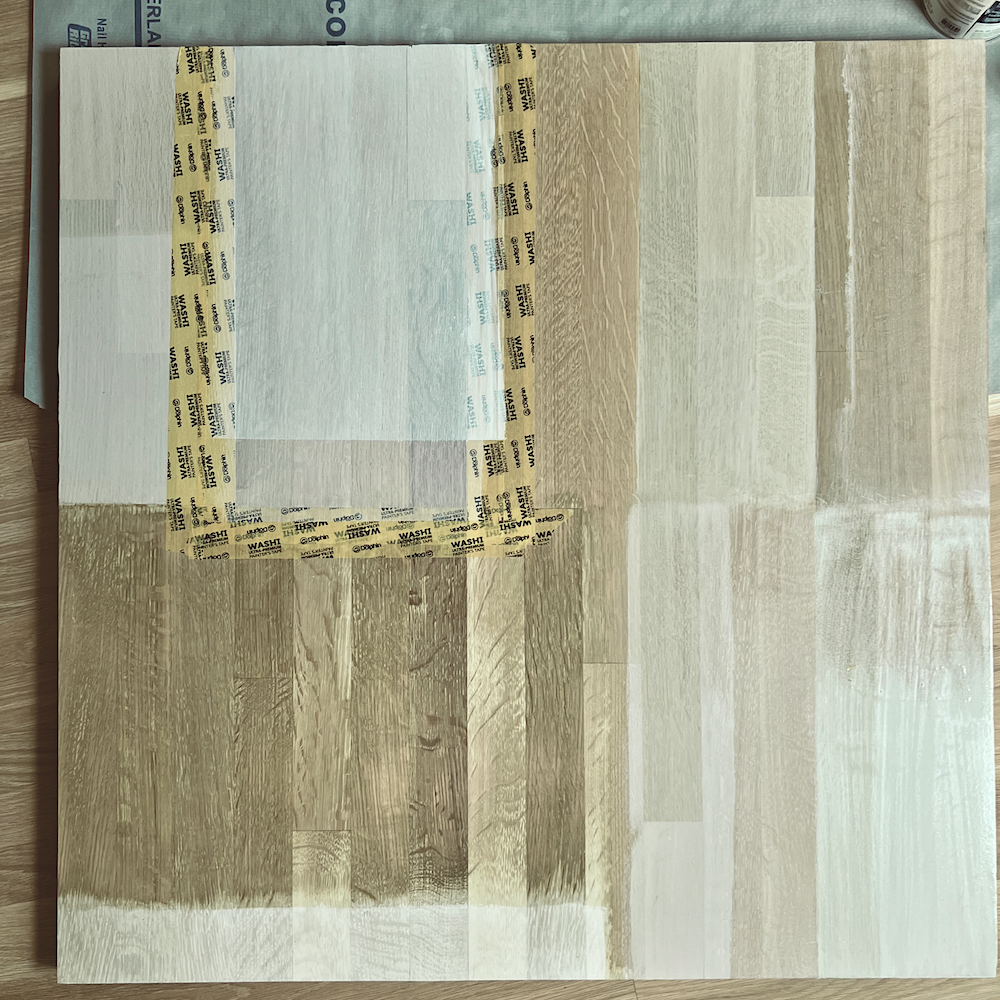
On Monday morning, Chris came by and sanded the samples on the floor. He also sanded the bleached section above, and it looks like he added another translucent coat of white on the bottom left strip. That’s gorgeous, but it’s a tremendous amount of work, is the problem.
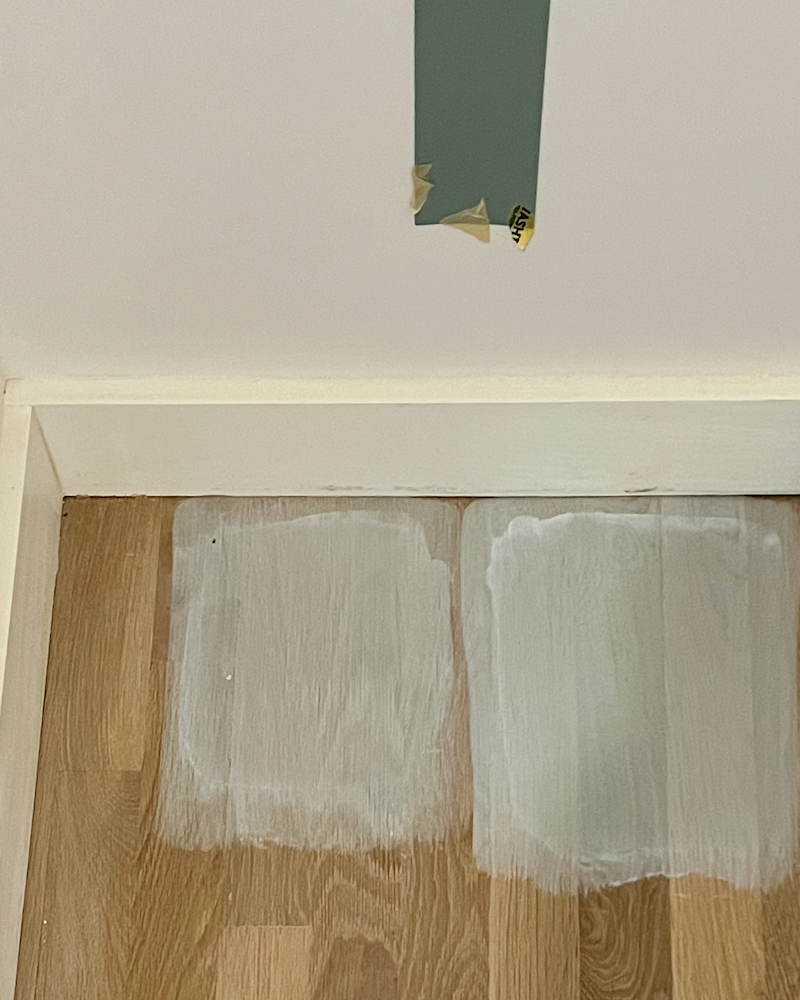
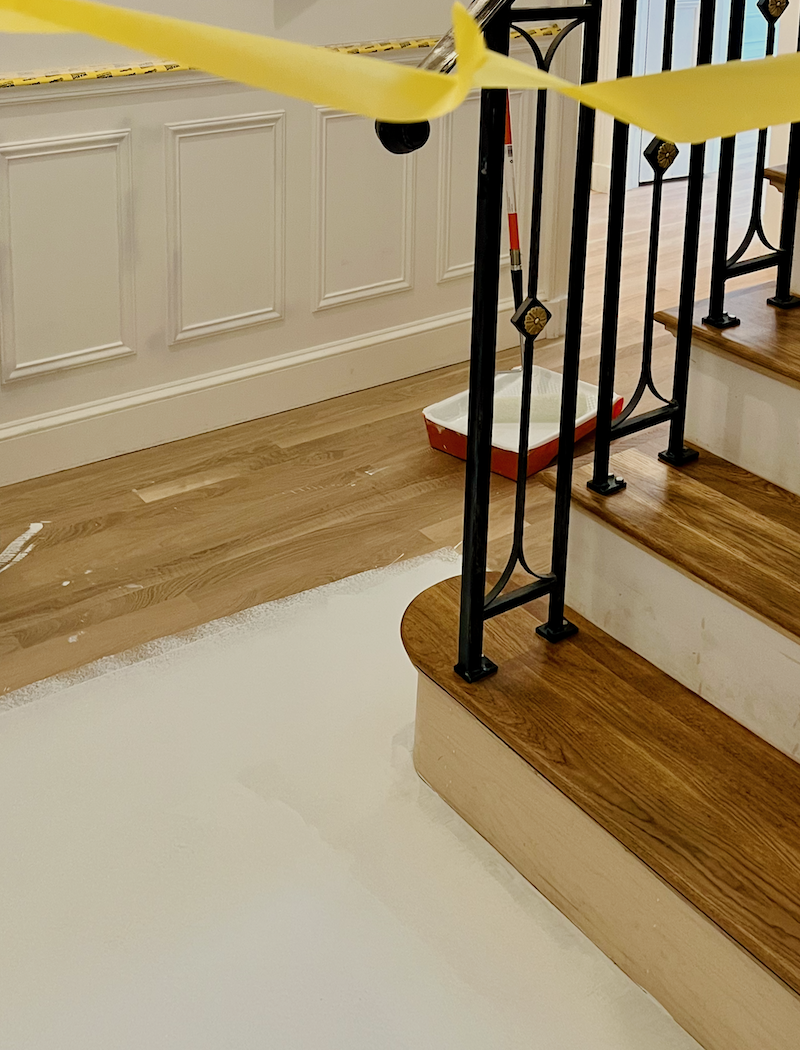
The final experiment was where you see the yellow tape.
We gave Rubio Monocoat pre-color easy in white another go. We let it bake in the sun to get it dry enough. Then, around 4:30, he added the Bona White Stain.Seven hours later, I put on a coat of Bona poly.
Now, can you understand why I went mental and said I wanted super dark floors?
I kept thinking about my Gustavian-style bookcase and how gorgeous it would look against a super-dark floor.
Okay, please cross your fingers that all goes well tomorrow. We need to finish the lower-level floors by the end of the month so I can move back into my bedroom. Chris can hold off on his stenciling until later. More about that in a future post!
There will be an update on Thursday and I also can’t wait to show you what the painters have been doing.
Oh okay… One photo.
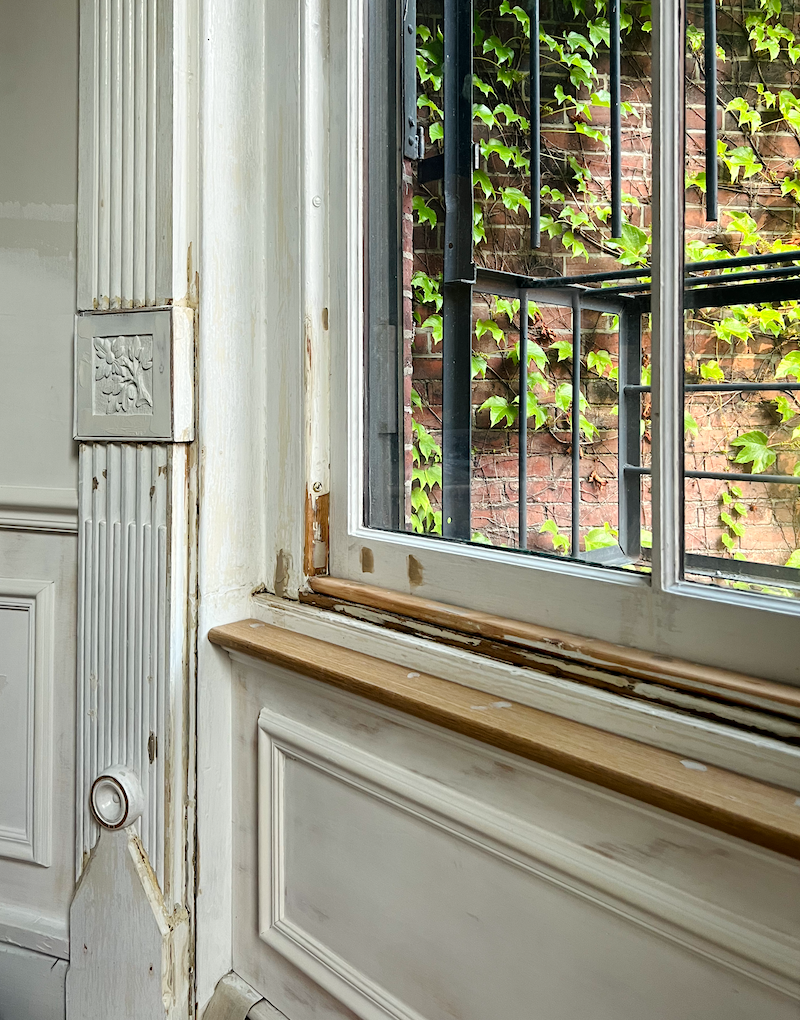
Look at the number they are doing on my historic trim! This was my dream!
xo,

*********************************************************
Part 2 Begins Here
July 19, 2024
Hi Everyone,
Thank you for all the terrific comments regarding solutions for creating a white-painted floor.
Knowing what I know now, I wouldn’t have wasted the time we did. Every product you guys mentioned I already know about. Gosh, I better. Between all the posts about hardwood floor finishes over the years, plus my research, I’ve learned a tremendous amount.
Many of you mentioned brands that make hard wax oil finishes such as Rubio Monocoat, Pallmann and Loba. However, much of the white floor will be stenciled later, and a hard wax oil could create adhesion issues with our black diamonds.
In addition, based on the comments, some of you didn’t realize we were having issues with the wood being both pink AND green when the chemicals caused the tannins to rush to the surface, thus staining the stain green.
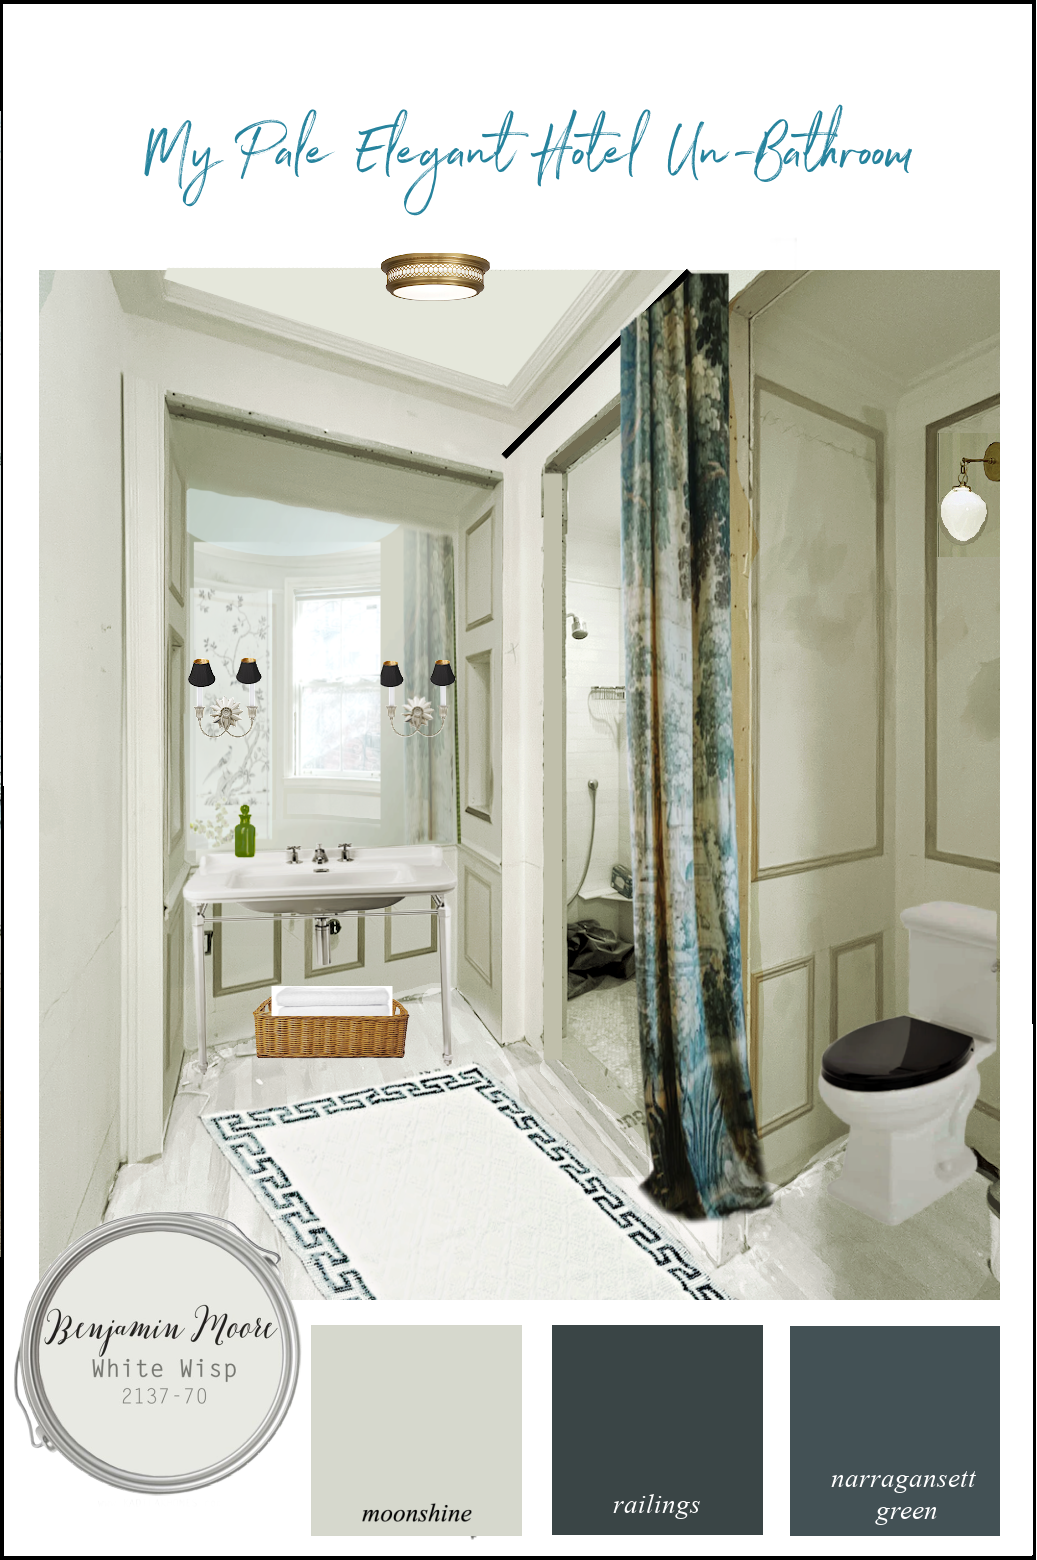
True, I wanted to see a bit of the wood grain and then have a chalky, matte finish, ala Frank Babb Randolph (below)
However, I also love a solid white floor with a satin finish. So, our only option was to seal the floor with a good primer made for this purpose.
Yesterday, around midday, Gary Dessert of Sequoia Wood Floors came over to prime the floors. A few hours after he left, (with permission) I was sitting on the newly primed floor to select a floor color. I realized it was a waste of my good time to select this color until the primer went on.
The primer turned the floor a pale gray BLUE! It’s not a terrible color, but I want to see more warmth. So, that ruled out a couple of colors I was considering.
Unfortunately, Gary won’t be able to return until tomorrow, (which is now today) ;] when he will apply the only finish coat of white paint.
Then, early Monday morning, he will return to put on one coat of Bona satin Traffic HD water-based-two-component poly.
He’ll be able to recoat it with a second coat later in the day.
On Tuesday, we are giving the floor a chance to harden up. It will not be fully cured until three days later. However, after one day, it will be 80% cured, and it is fine to walk on it in socks after 24 hours. Unfortunately, we don’t have the luxury of waiting until Friday to move my stuff downstairs.
However, a breathable paper meant to be laid over a newly polyed floor will be laid down and attached to the baseboard, not the floor.
Okay, that’s all for today.
Wait, Laurel! Aren’t you going to show us the primed floor?
Oh yeah, I took some pics. However, we have primed walls and a primed floor. My mommy would’ve called that a marshmallow in the snow. However, I adore white on white. Remember this post about Charlotte Anne Fidler’s most charming English country home?
There are too many designers to count who’ve done white-painted floors, but here’s a short list off the top of my head.
Darryl Carter
William McLure
Albert Hadley
Frank Babb Randolph
Furlow Gatewood
Bunny Williams
Vicente Wolf
Okay, let’s examine the primed floors and some other photos from this past week.

Cale bussed into town for a day on his way to Europe.
We met for a hotpot in Chinatown.
My boy sure knows how to live.
I admire that, but I couldn’t live his lifestyle, and he couldn’t live mine, either. But, we sure do have fun together when he visits. By the way, those are natural highlights. Cale is a natural blond! But, it goes dark when he’s not in the sun. When he was a baby, if you can imagine, he had the most beautiful golden blond curls. Strangers would stop in their tracks to coo all over my beautiful baby “girl’s” beautiful spun silk yellow curls.
hahaha
The biceps are from his jobs in construction out in western Mass. And yes, he’s currently single.
It was only a 22-hour visit, but we did a lot. One was an errand to return the offset pivot hinges I purchased from Cook & Boardman. They were about 1200 bucks; luckily, there was no restocking fee. Still, it was an ordeal, (for me, it is!) and it was 95 degrees outside.
As we melted down Boylston Street, Cale started laughing uproariously. “Look at that sign, Mom!”

Hilarious!
Meanwhile, back at the condo…
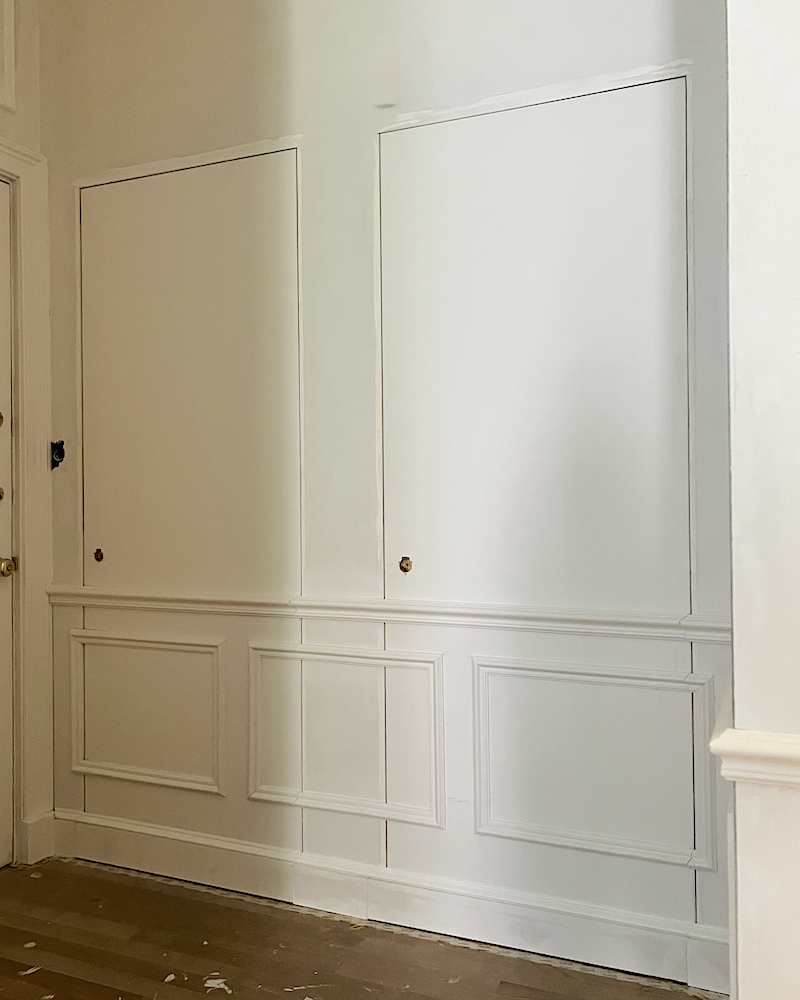
Aside from the floor drama, the Brazilian painters have been here every day since the last week in June. This week they quietly took the living room by storm!
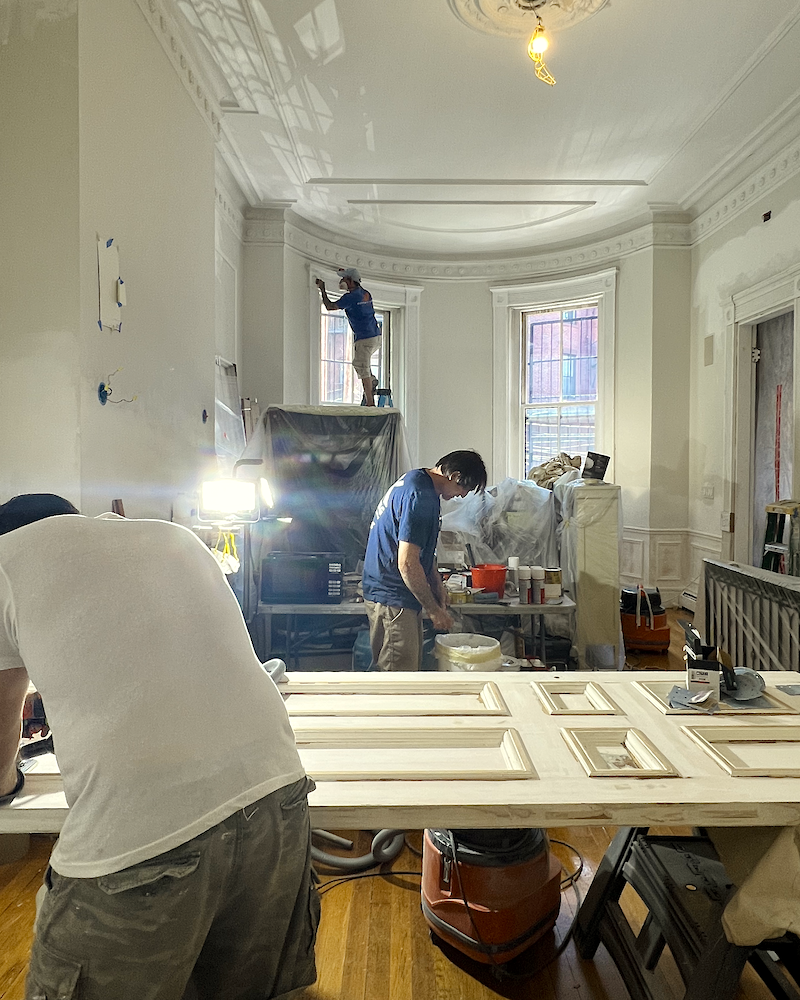
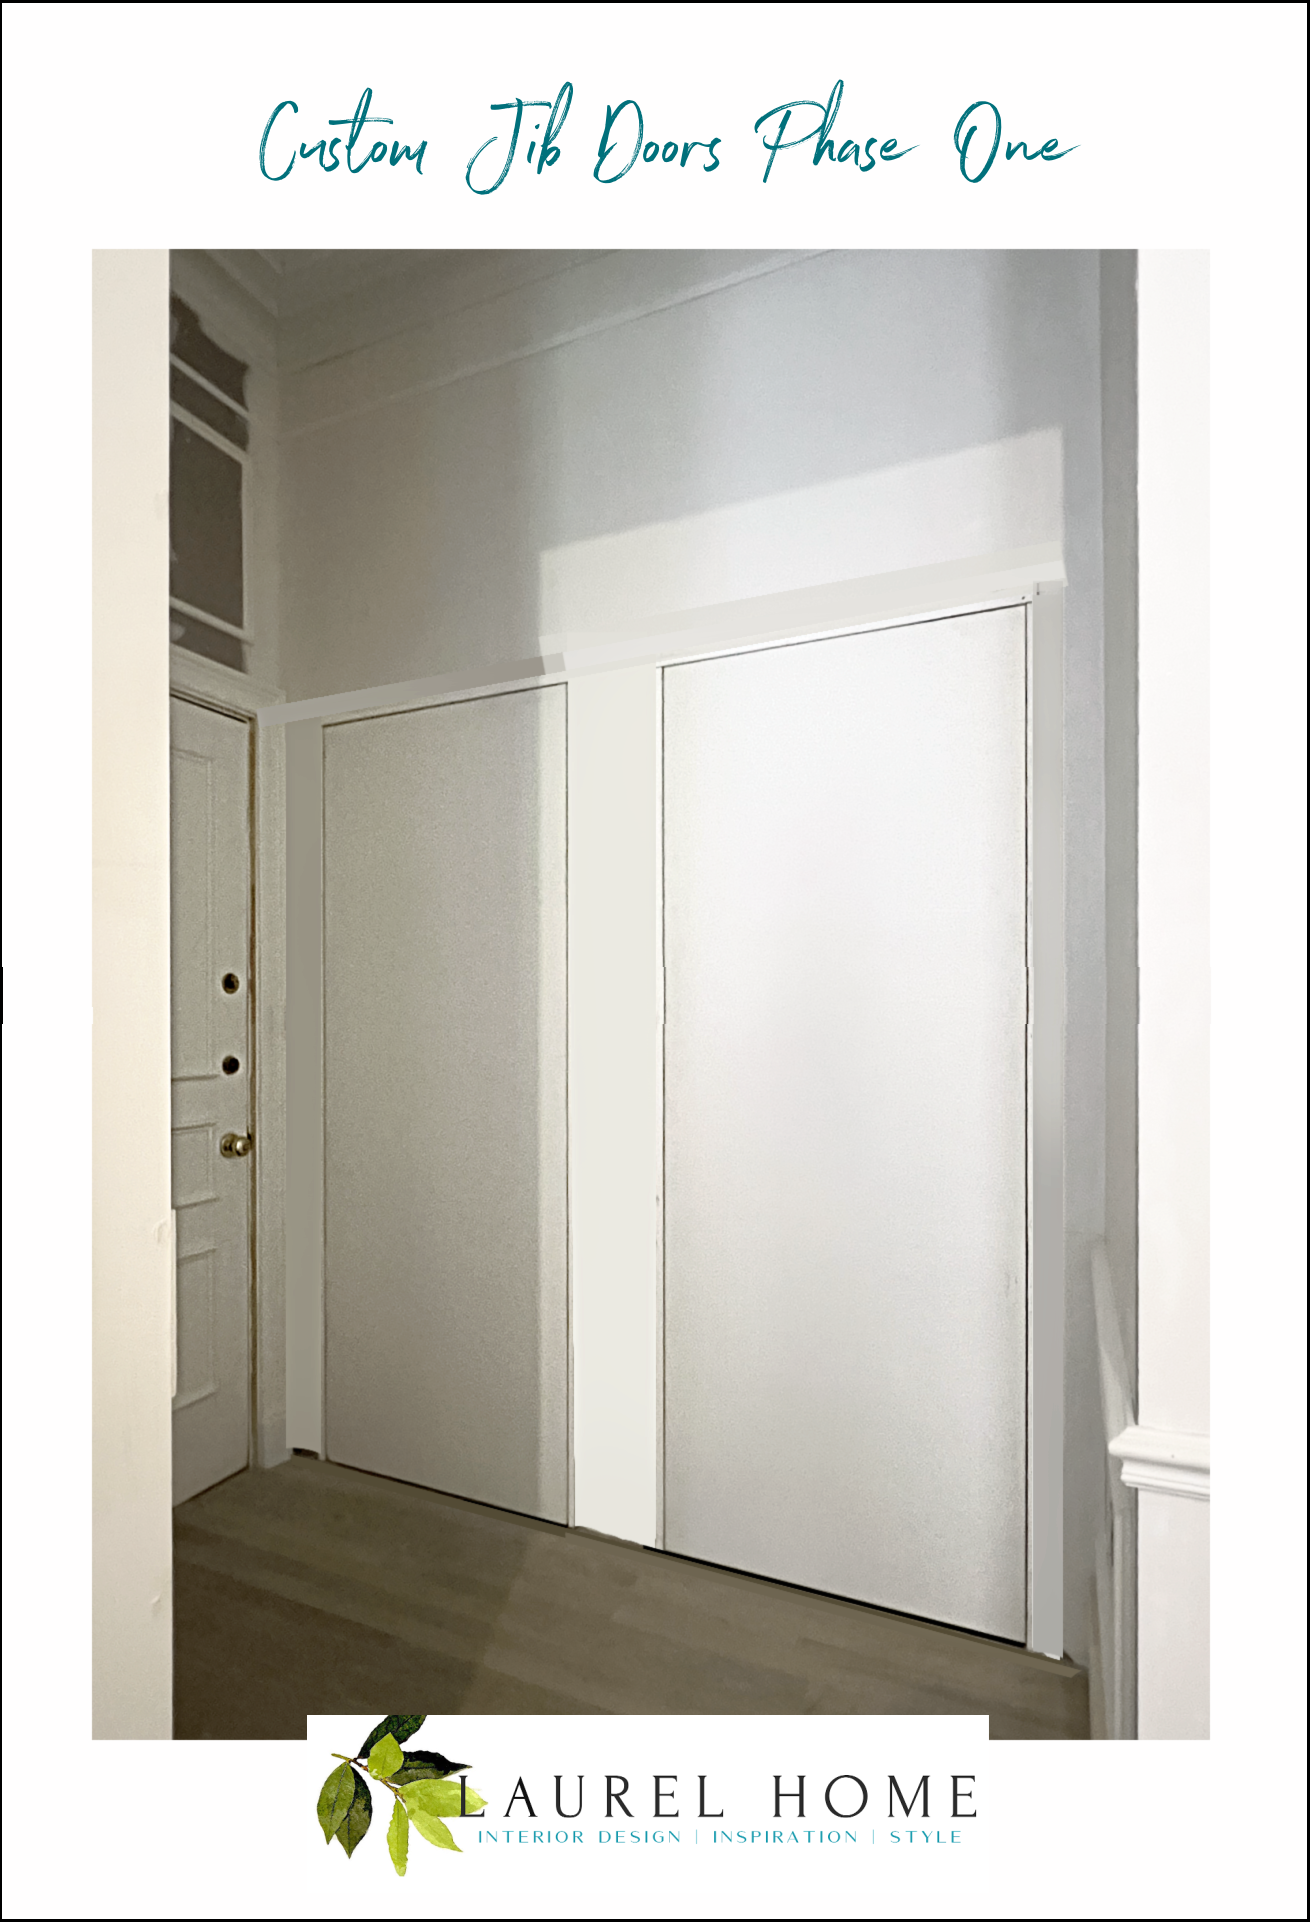
That’s the den door! It was such a mess with copious amounts of peeling paint. I love this image of the painters doing their thing.
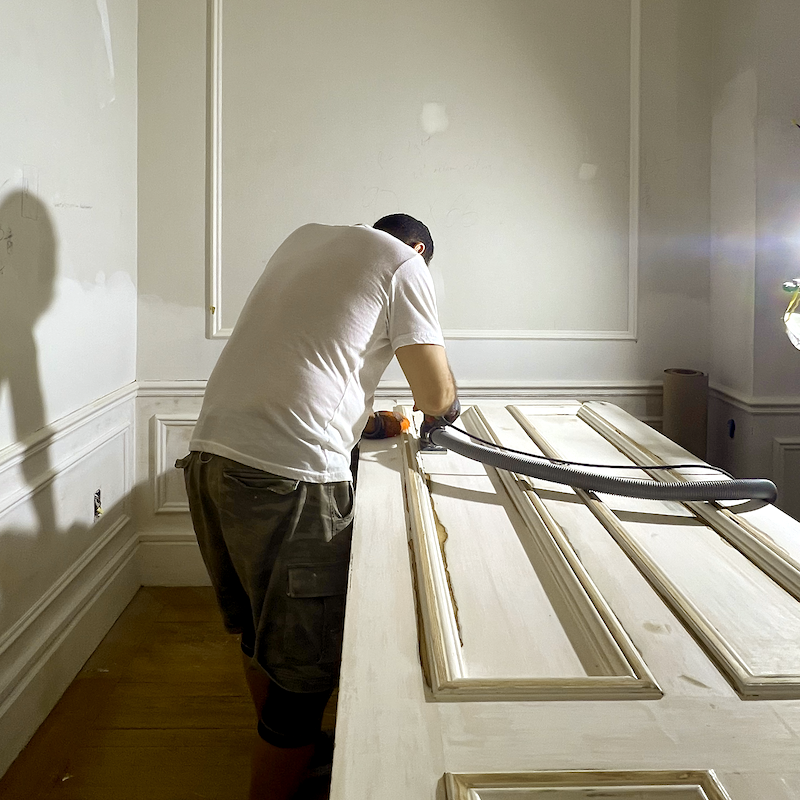
Sergio is busy sanding the den door.
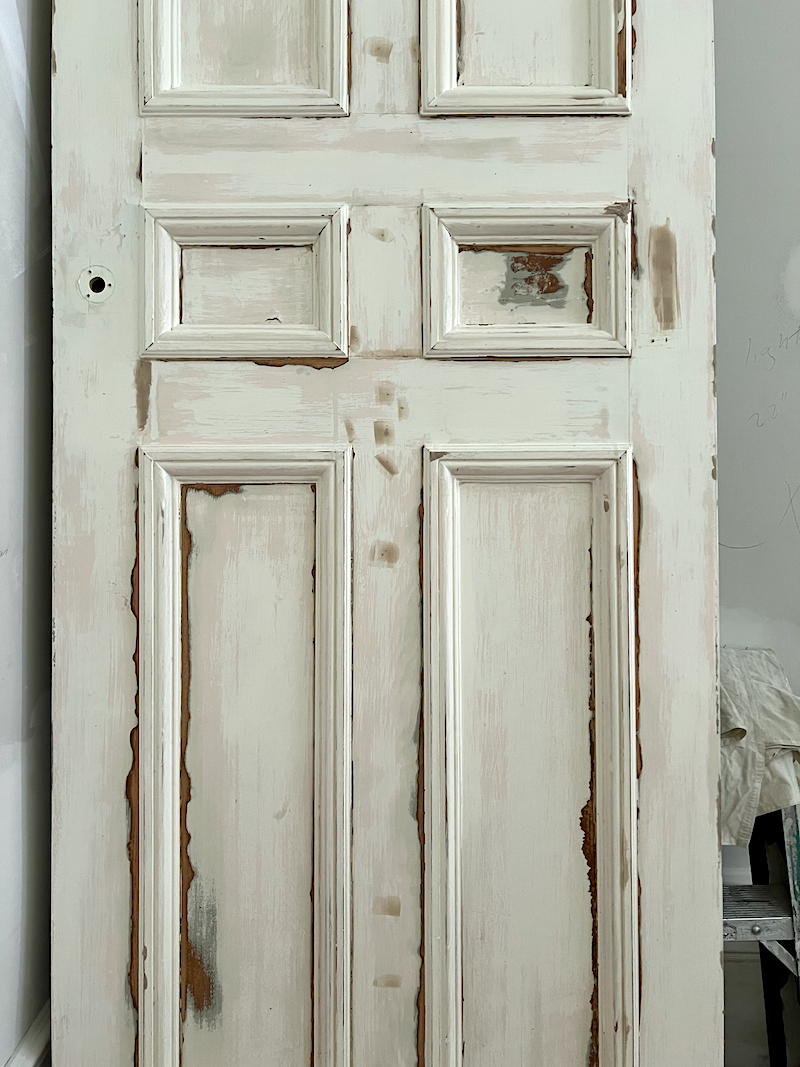
The same den door, the next day.

Some misguided soul had painted over numerous coats of varnish on the old oak or walnut door.
This is the door taken yesterday. Today, it’s even better. And yes, it’s upside down.
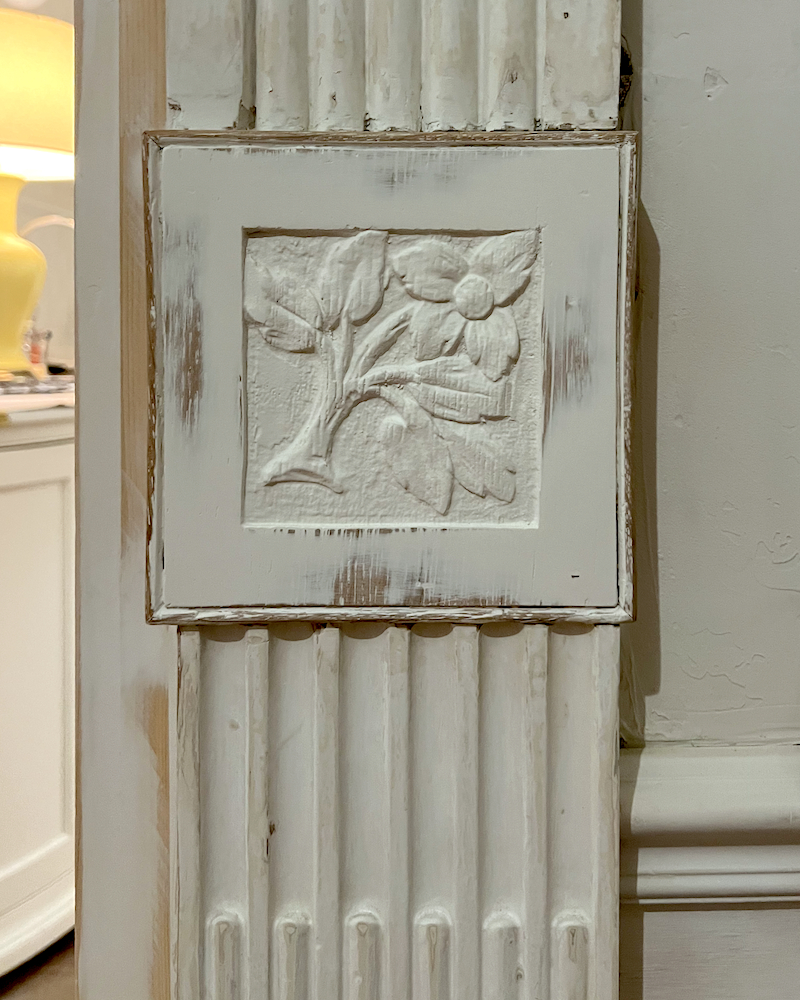
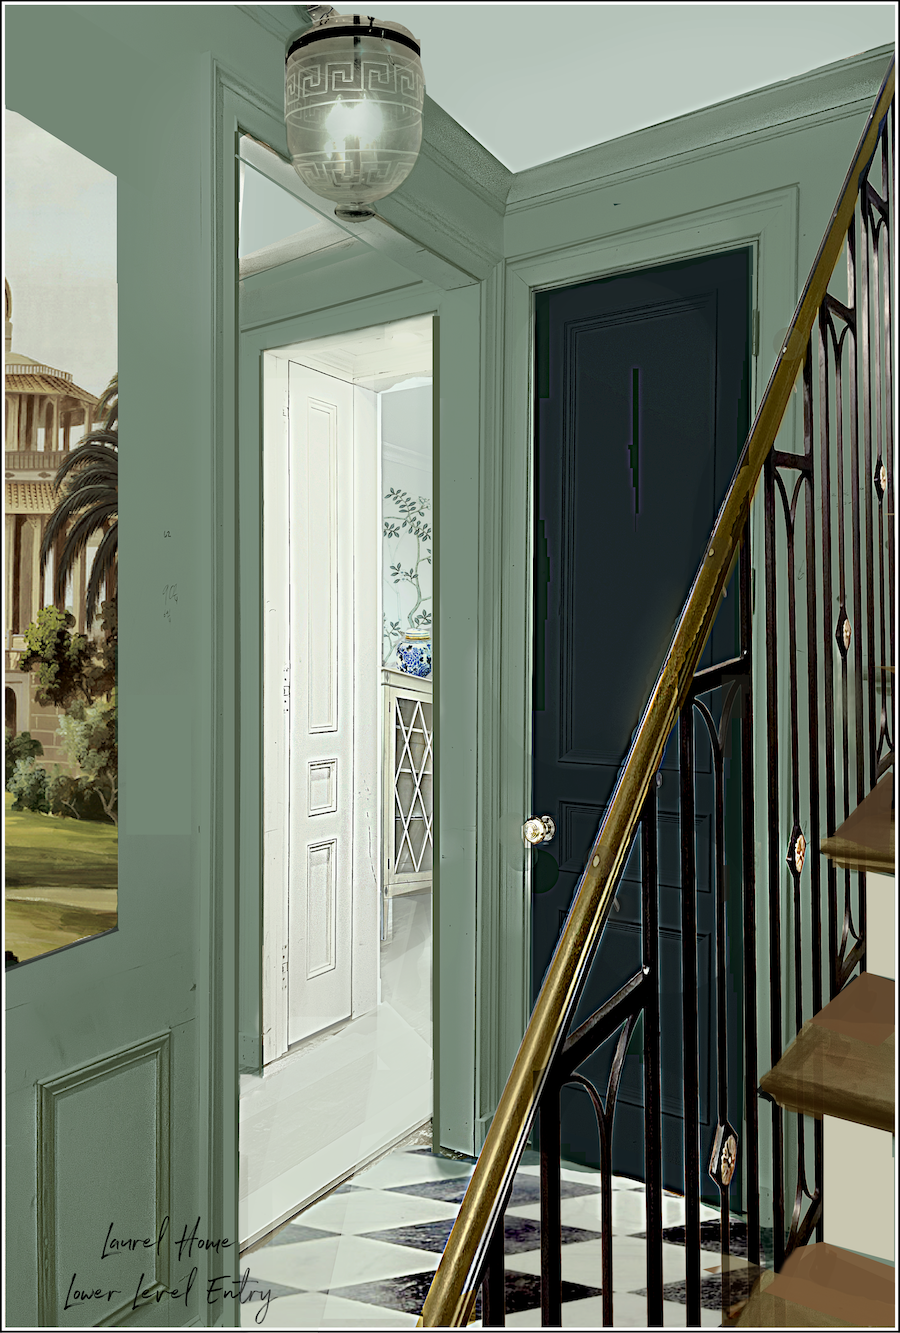
This is one of 14 rosette plinth blocks that adorn the door and window casings in the living room, entry, kitchen, and vestibule.
Now, I have a treat for you. Remember this post about gloppy paint written shortly after I knew I was buying this place?
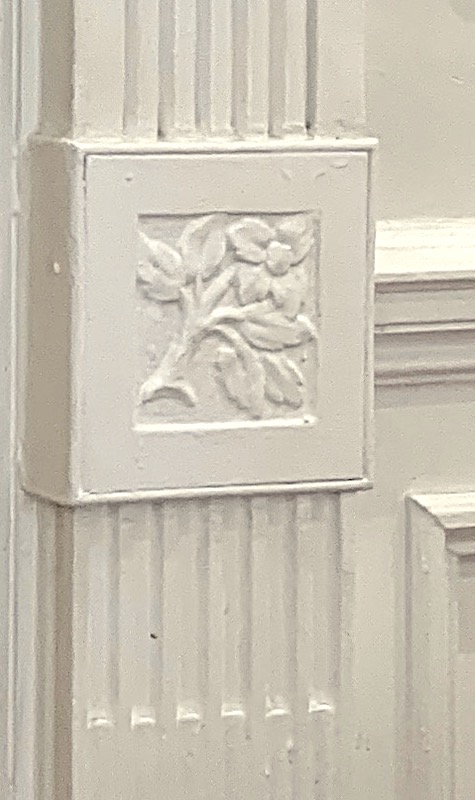
This is the same rosette!!! The trim will still look old, but it will look like it’s been old and well-maintained.
No more virtual spackle. This is the real thing.
Let’s compare the real spackle with the earlier doctored images.
Before the moulding, of course, but with virtual spackle applied by me.
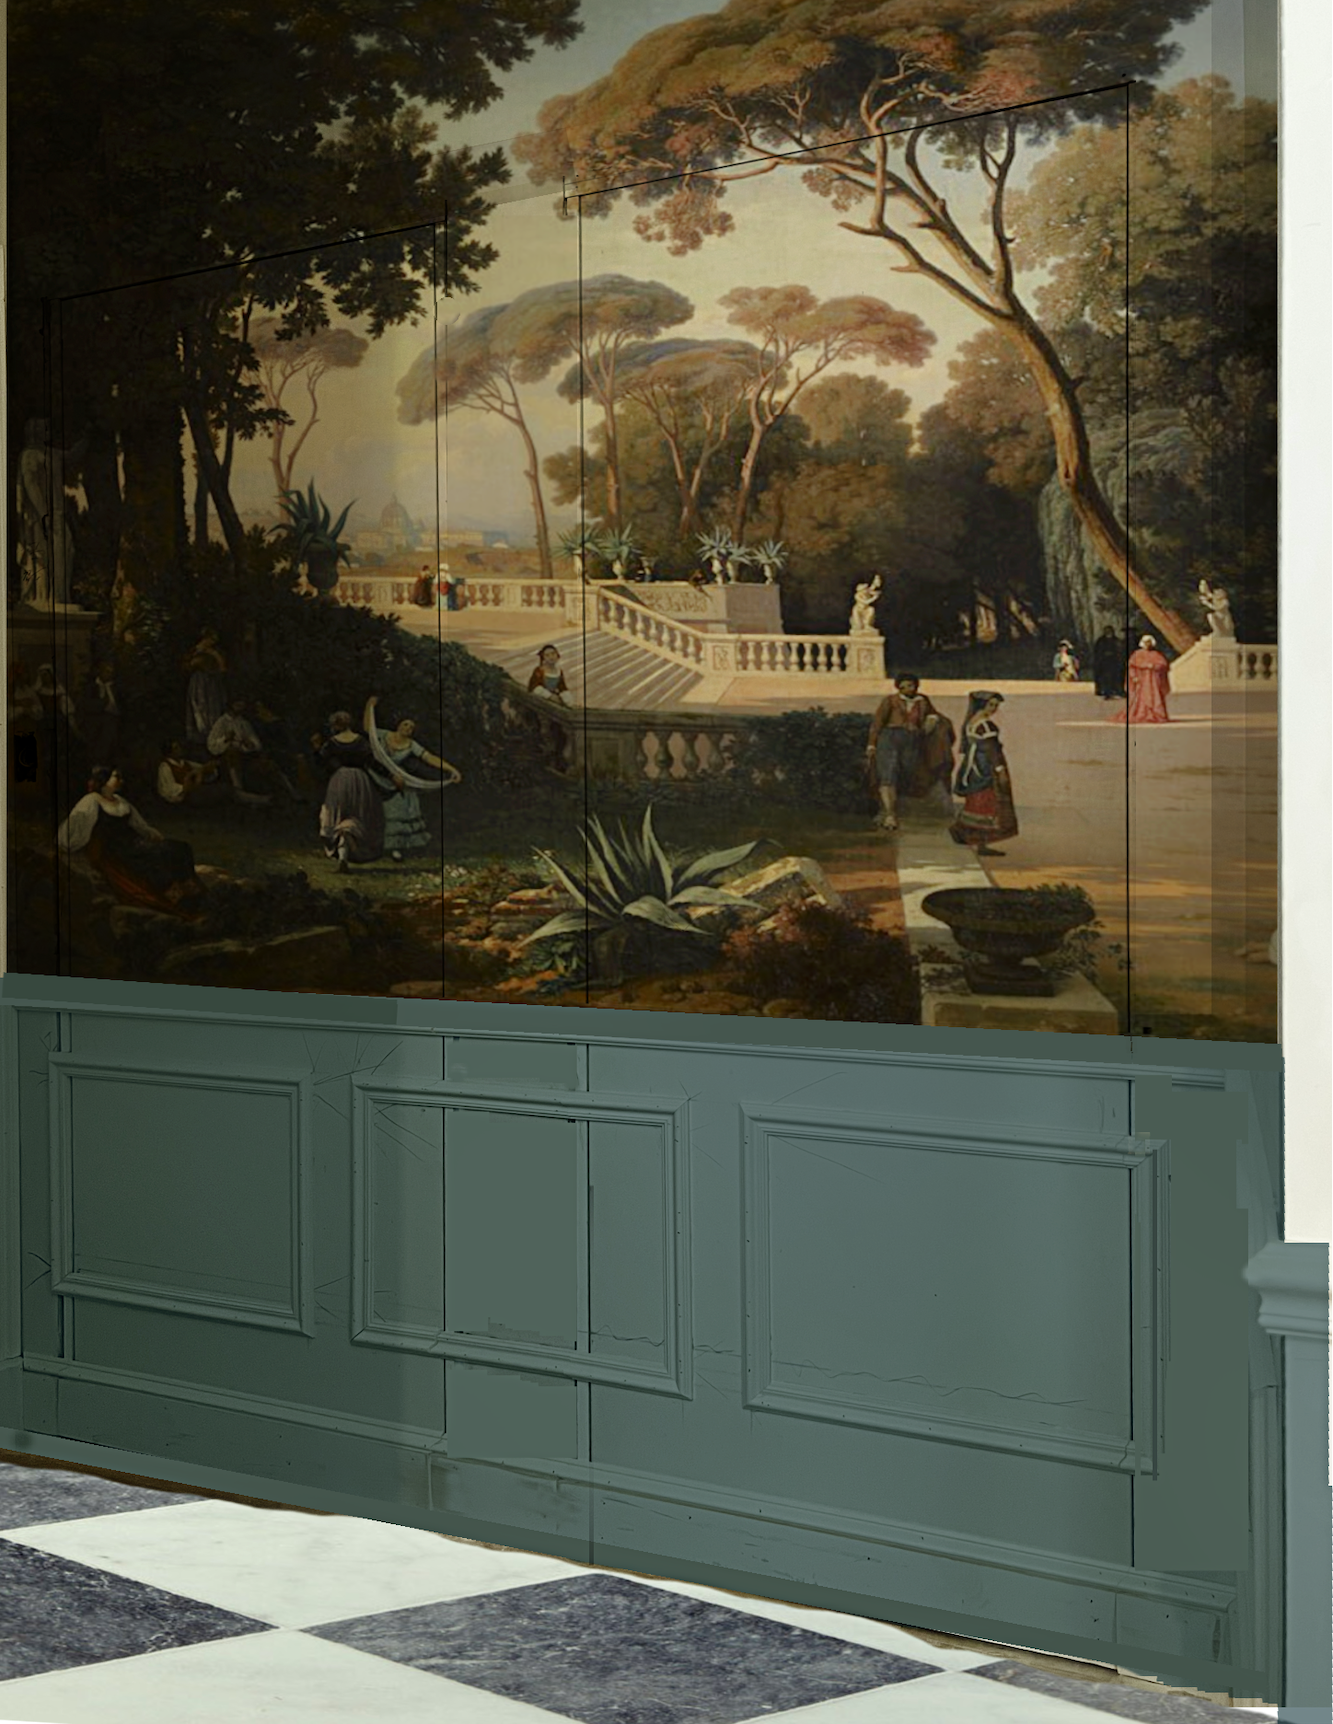
This one has a virtual mural, floor, and paint.
Laurel, why are you torturing us? The floor, remember?
Why, whatever do you mean? ;]
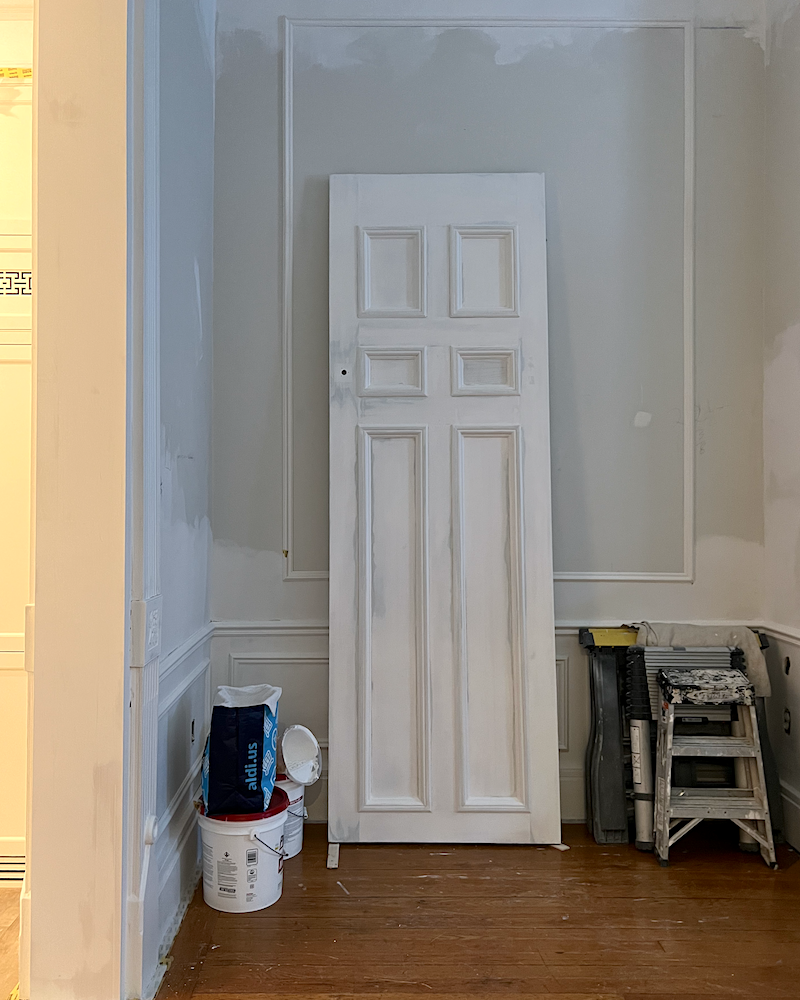
Okay, standing in the bathroom entry minutes before, the white oak floors were primed for paint. I bid farewell to Gary and went back upstairs.
However, I couldn’t resist going back down about an hour later, as I knew he had to do a quick sand and vacuum, first.
My timing was perfect.
Of course, I only stood at the door long enough to snap a pic and leave Gary to do his work in peace.
Three hours later, I came back down. The floor was dry, so I set about finding the perfect paint color for the floors. I also opened the door a crack to let the fumes out. Even though this was low VOC, it was still pretty pungent.
Here I am in the middle of the bedroom. It is so light and airy. I love it. And yes, I have decided on the floor color.
It looks fantastic with the tile that’s on order, and it looks terrific under natural and the horrid LED lights which I can’t wait to see gone.
And tomorrow, the one and only coat of white paint will be applied and left to dry all weekend. Monday will be two coats of poly and then, except for the stencil, the lower level floors will be done. When things have settled way down, Chris will come back and do the stencil. After he tapes, he’ll have to abrade the poly. Then, after it’s all done, he’ll most likely repoly the area where the harlequin pattern is going.
Um, Laurel, for the love of God, what shade of white paint did you pick out?
One of them. ;]
To be continued…
Thank you again for your much-needed support. It’s exceedingly helpful. However, I do have my moments and I.am.pooped!
xo,
***Please check out the recently updated HOT SALES!
There is now an Amazon link on my home page and below. (It’s Amazon Prime Day today, the 17th) Thank you for the suggestion!
Please note that I have decided not to create a membership site. However, this website is very expensive to run. To provide this content, I rely on you, the kind readers of my blog, to use my affiliate links whenever possible for items you need and want. There is no extra charge to you. The vendor you’re purchasing from pays me a small commission.

To facilitate this, some readers have asked me to put
A link to Amazon.com is on my home page.
Please click the link before items go into your shopping cart. Some people save their purchases in their “save for later folder.” Then, if you remember, please come back and click my Amazon link, and then you’re free to place your orders. While most vendor links have a cookie that lasts a while, Amazon’s cookies only last up to 24 hours.
Thank you so much!
I very much appreciate your help and support!
Related Posts
 The Perfect White Bedroom Paint Color
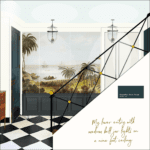 Laurel’s Home Renovation 2024 – News & Deets!
 Architectural Details That Will Elevate Your Rooms – Parts 1 & 2
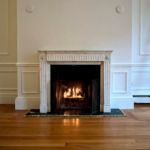 The First Renovation Tour Of The Upstairs Living Areas! (Parts 1 & 2)
 Hardwood Floor and Primary Bathroom Update!
 14 month Renoversary! and I’m Back In My Bedroom!
 The Renovation Construction Ending Soon & The Painter Is Fired!