Several of you have asked for a PicMonkey tutorial so that you can make mood boards for your rooms.
At first, I thought a PicMonkey tutorial might not have a very wide appeal, however, on second thought, it’s a wonderful tool for both professional designers as well as folks who are planning on doing their own decorating.
In fact, using PicMonkey to develop your design and be able to visualize it before you spend thousands of dollars is something that I’m not sure how I ever lived without.
First of all.
What IS PicMonkey.
PicMonkey is a powerful photo editing and graphic design software system.
Why PicMonkey over say another program like Adobe photoshop?
Do you really want to learn photoshop? It’s complicated. But, there are a bunch of other compelling reasons for using picmonkey over photoshop.
1. The monkey actually winks at you on occasion. I like to think it’s only me, he’s winking at, but let’s not be [too] delusional. He winks at everyone.
2. PicMonkey is EASY to use. Very intuitive. I really is! I did not learn everything over night. But I’ve never read a tutorial. Why? Well, because Laurel is a lazy reader. Yes, yes, I know. Let’s just accept this as fact because it is. If a computer program is not intuitive, I get easily frustrated. Mostly I learn things by messing around.
3. You can easily make your own graphics, logos, invitations, mood boards. And, you can edit photos, fix your hair and make-up.
And– put your face on iconic statues before going into battle with a slingshot and T-square.
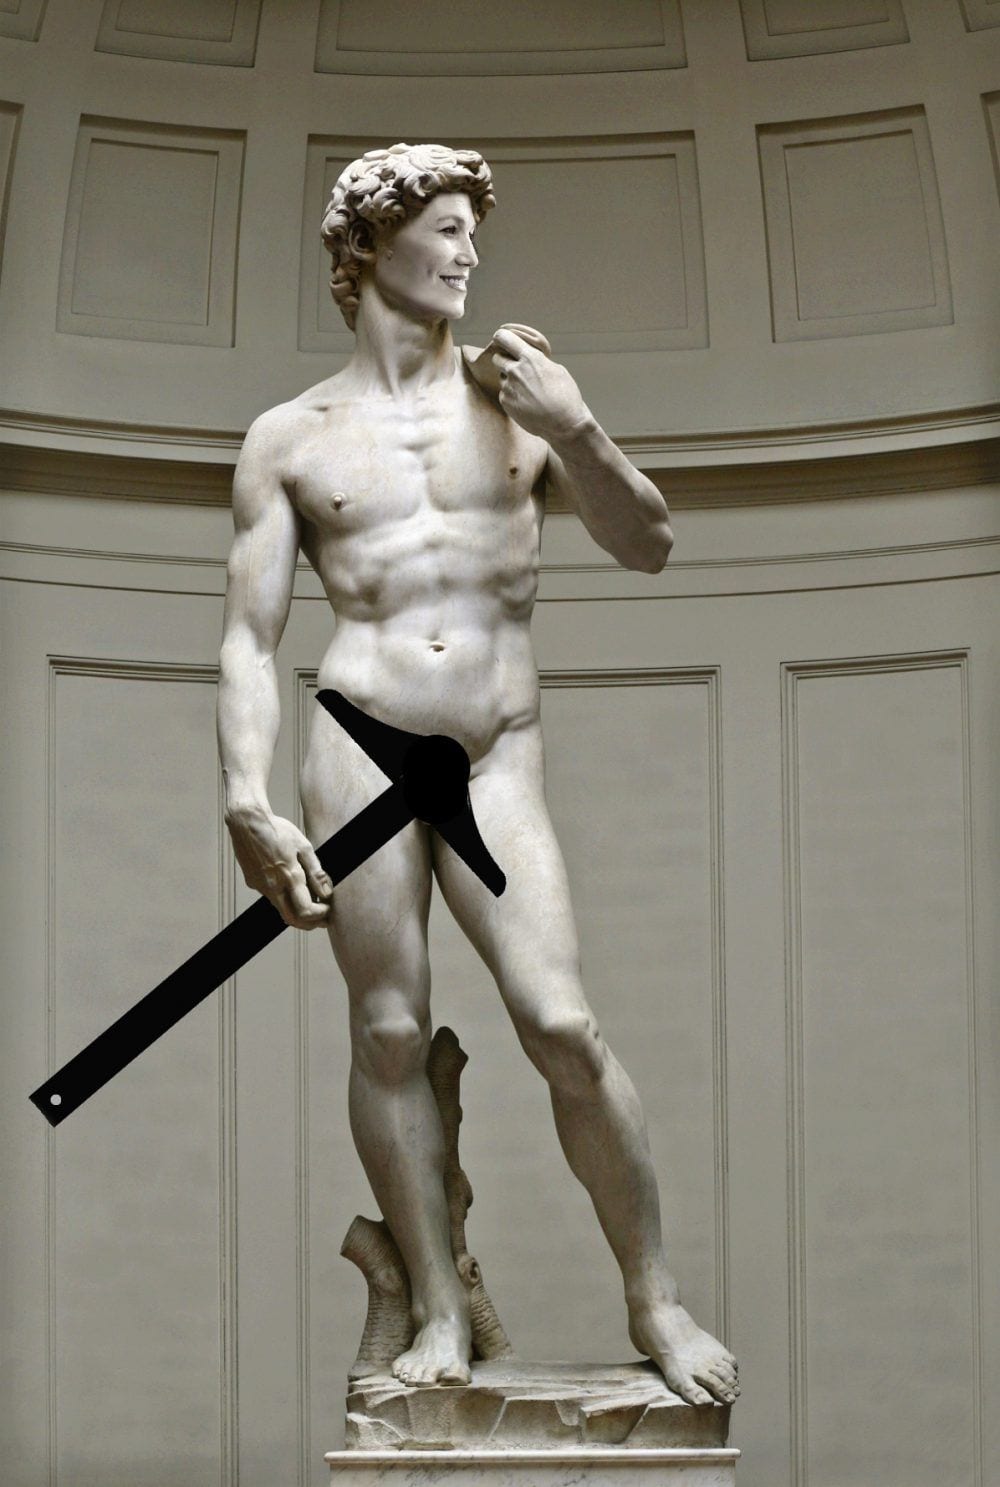
“Davida”
For those of you who may not have been reading for a long time and think that I must be a raving lunatic, there’s a very good reason I did this.
4. It’s a barrel of monkeys. Please forgive me. But really, picmonkey is easy and fun.
5. They have mad-wicked fonts. And, some really awesome new ones with their new beta version which we’ll discuss in a sec.
6. You can save your work now with hub. Originally, you could not save it. Oy. More about that in a sec.
7. It’s inexpensive. To get the most features, you need to get the pro version. It’s about $119.00 a year. (paid annually, not monthly)
8. It’s web-based. That means that you don’t have to download mega gigs onto your hard-drive.
9. And although easy to use, they have zillions of tutorials that can explain much more than I can in one blog post.
10. They have expert customer service that can help you if you get really stuck.
AND – PicMonkey is making improvements all of the time. One of those is the ability to save your work as I just pointed out.
Now, here’s the sticky wicket.
There is the OLD PicMonkey which is the version that I currently use. And there’s the NEW PicMonkey which is currently in Beta. Once you are a member, you can switch back and forth.
I’m in two minds over which version I should show you. I think for now, it’ll be the old version. I was playing around with the new version and it is easy to understand. There are just more features.
And, the most compelling improvement is that your work is AUTOMATICALLY saved.
OMG. That should’ve been done from day one. Can I tell you how many times I had spent two hours on something only to have Firefox crash on me? OR, a blip in the power?
And gonzo. Everything. Sometimes, I would take screen shots as I went along, just so I could remember what I had done— just in case.
Some of you are going to bring up Canva. And, some of you are going to wax poetic about it.
But, I do not find it nearly as easy to use. The only thing it has a bit of an edge over the monkey is putting words on your image. You can just type it out and drag it over and resize on Canva. As far as I know, that is not yet available on PM. But, we will explore how to put words on your images, as well.
I make all of my graphics on PicMonkey.
Every time you see an image with words on it, I made it in PicMonkey.
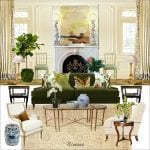
But, for today, we are going to discuss how to make a moodboard like I make for the Laurel Home Paint and Palette Collection.
We saw a few of them the other day.
We are going to make this board using Benjamin Moore Super White. That is one of the 144 Laurel Home Benjamin Moore curated paint colors in the paint and palette collection.
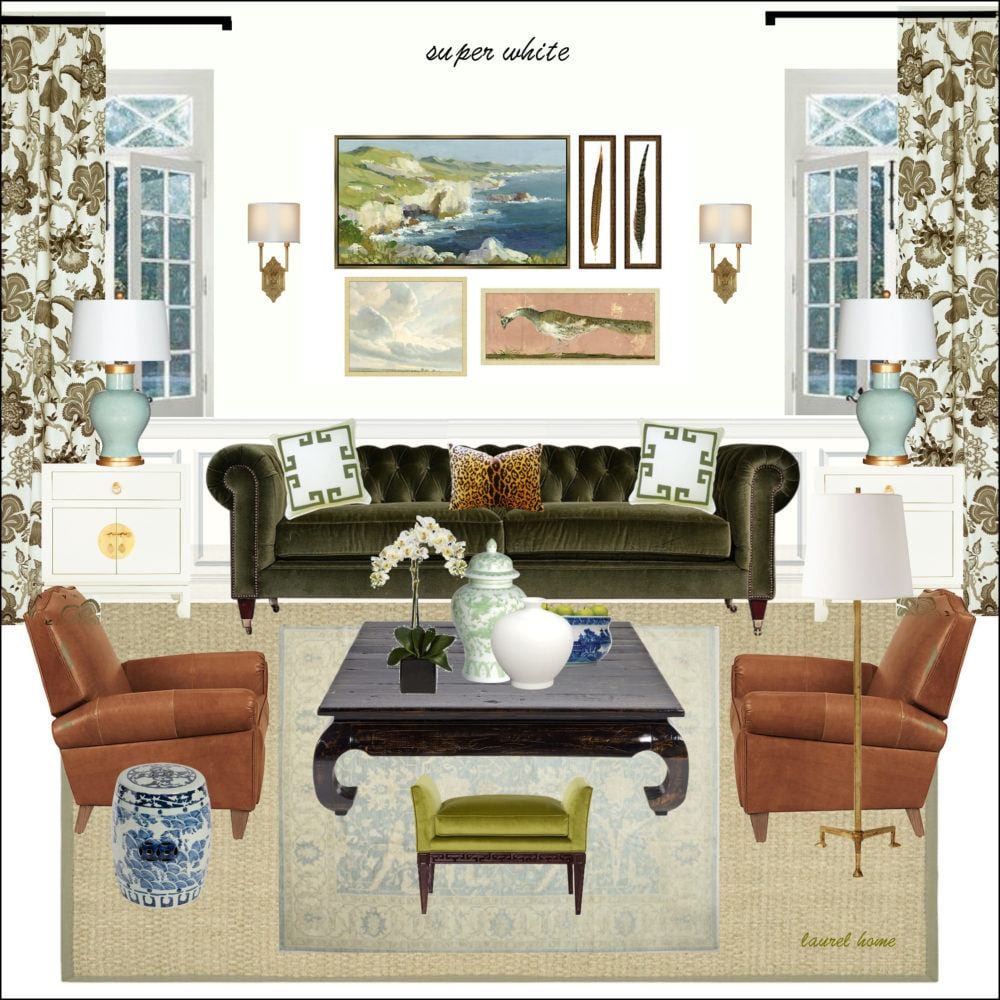
This board has already been made, so I have to reconstruct it.
The furniture doesn’t need to be arranged as if in a room, like here; but I find that it’s especially helpful if there’s a little perspective. I just eyeball the sizes. Of course, the objects in the foreground will appear larger than those in the back of the room.
The first thing you need to do is save the images you wish to use for your mood board.
However, before you do that, there’s one thing to be mindful of. And, this is if you want your board to look good. For, if the image has a background, you’ll need to remove it, most likely.
Now, you CAN remove backgrounds in picmonkey. However, it’s a royal pain in the arse. This is something that is one thing that I hear is easier done in photo shop. So, what to do?
While I did remove a few backgrounds for the Laurel Home Paint Palette and Home Furnishings Collection, I had most of them removed using a darling young graphic artist on FIVERR, named Saarika. Of course, she might be a 300 pound burly dude, for all I know. But, the photo is of a young woman. This link should take you directly to her. (if not, just put her name in the search box)
No matter. She does a stupendous job of removing the backgrounds and charges a whopping 50 cents an image.
I wouldn’t give her less than ten at a time, however. I gave her about 80 one time, and she had them back to me in under three days. Otherwise, it’s not more than 30 hours. She under promises and over-delivers. The proof is in the sharpness of the images. If they are not sharp, it is because I did them or they were images without a background that weren’t well-done.
After you get your images back, you need to put them in a folder. I temporarily put that folder on my desktop. This is the organized way. But, if you want to experiment, you might not know which images you’ll be using. So, you could send her a bunch of images that you’re considering using.
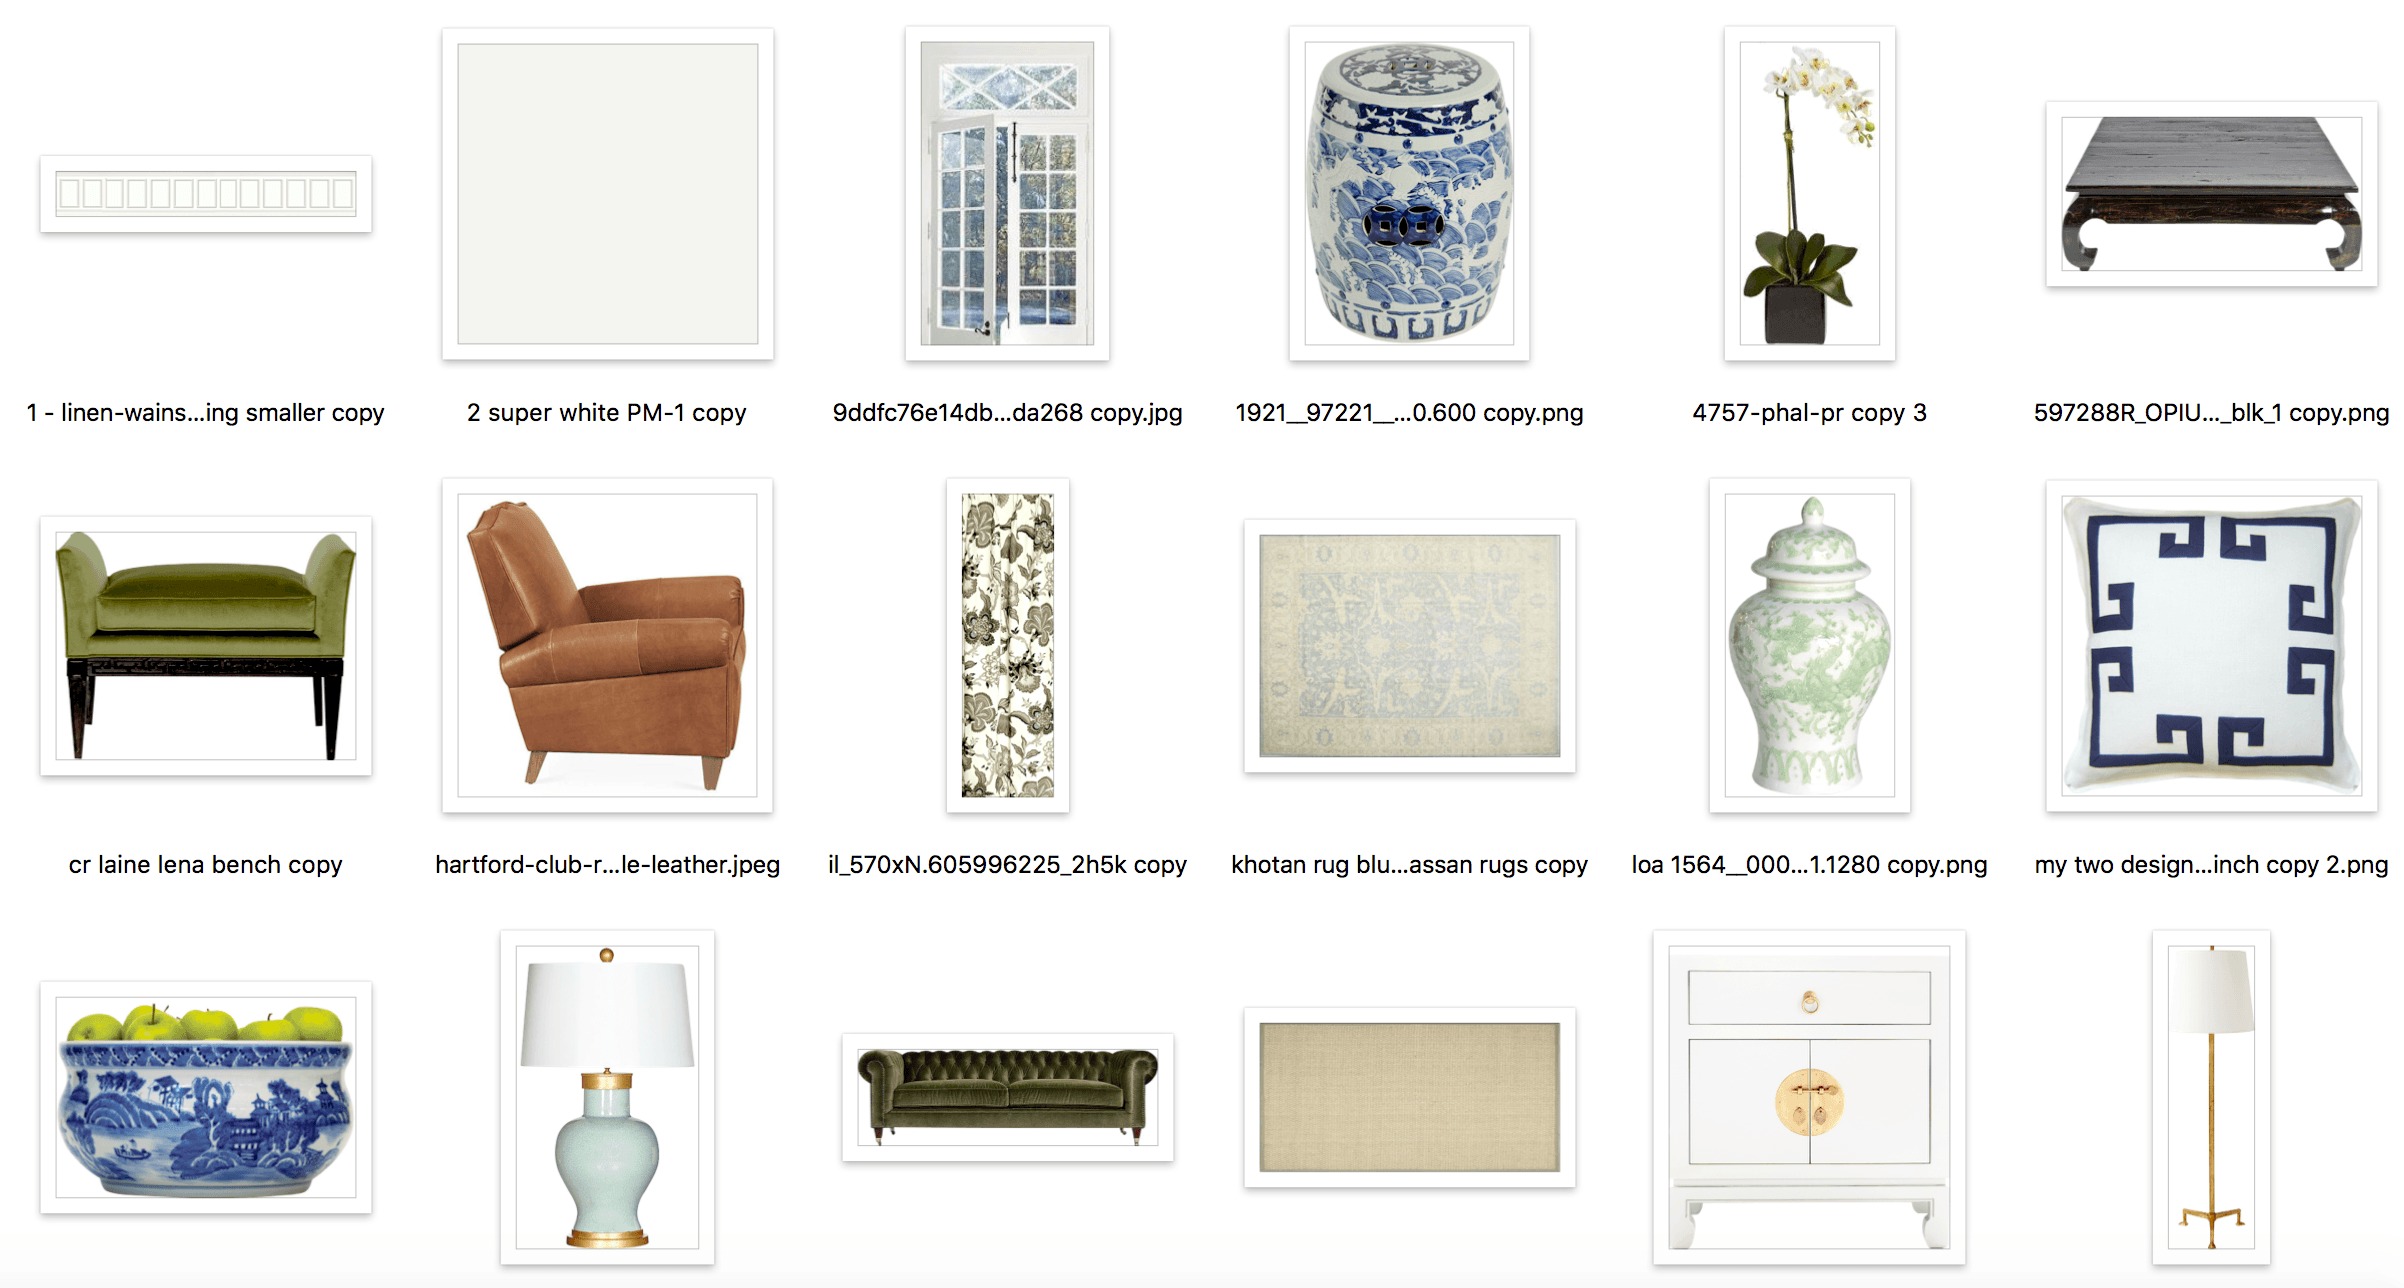 Images for my moodboard in a folder.
One other thing to remember is that you don’t want to use super high res images because they will actually become distorted on your board.
However, they shouldn’t be smaller than the size they will end up being. So, no tiny images under 100 pixels that are showing up as 300 pixels on your board. That, you probably don’t need to worry about. But, if your image looks fuzzy, you should try to find a higher res image.
Now, it is time to open up PicMonkey and have some fun with our board.
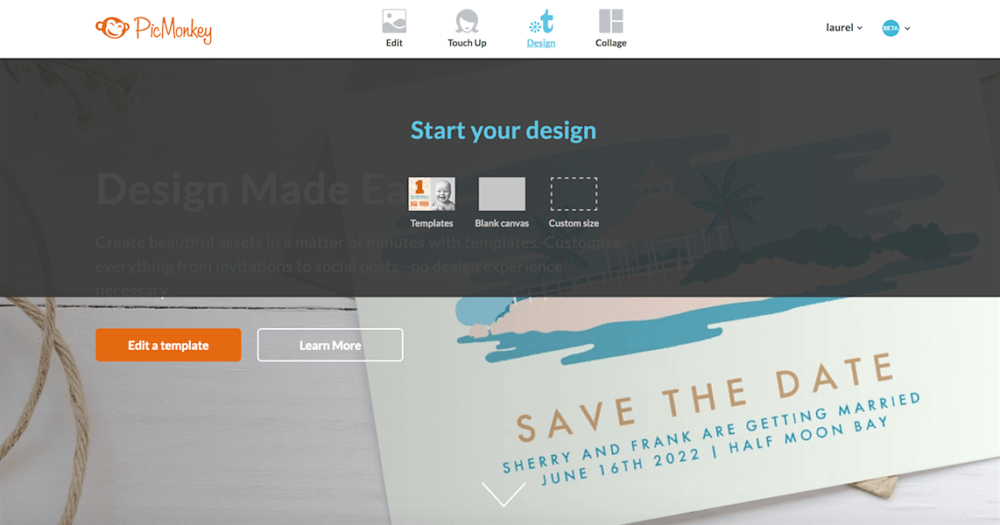
In the top menu, click Design
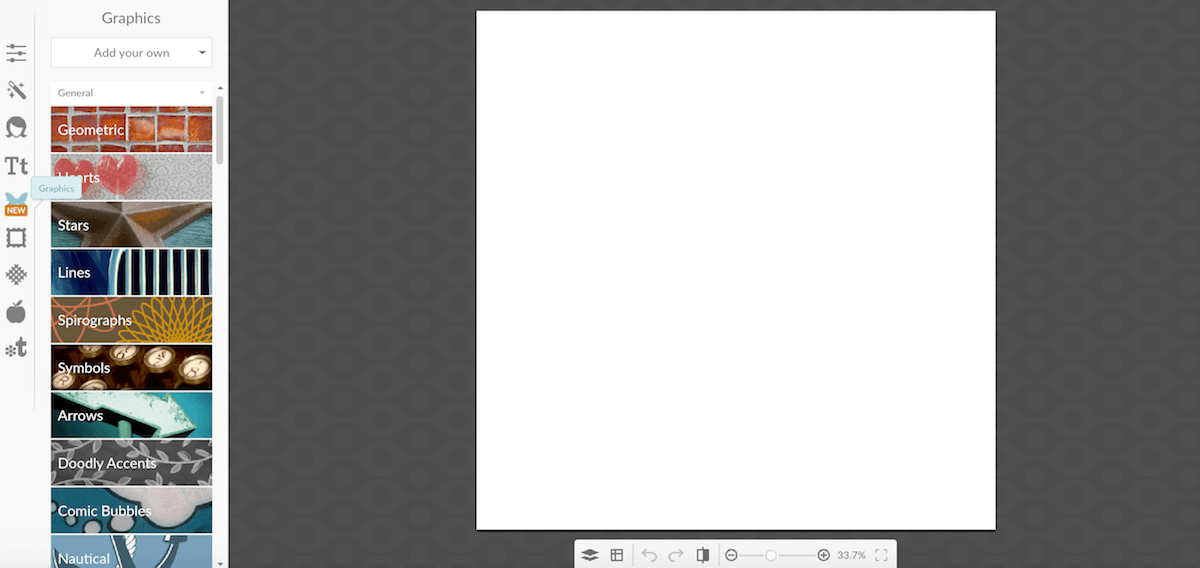
You can choose a custom sized board, but the default is 2000 pixels by 2000 pixels which is quite large and that’s a good thing. The widest images on my site end up being 840 pixels. You can also crop your boards. But, this is what I usually use. Usually, I reduce the size after it’s created.
Now, we begin to add our images using the butterfly icon on the left where it is partially covered with the word “new.”
After you click, you will see under Graphics — “Add Your Own.” Click that and then click “my computer” and go to your folder to begin adding the images one at a time.
I’m going to add a few saved images to show you.
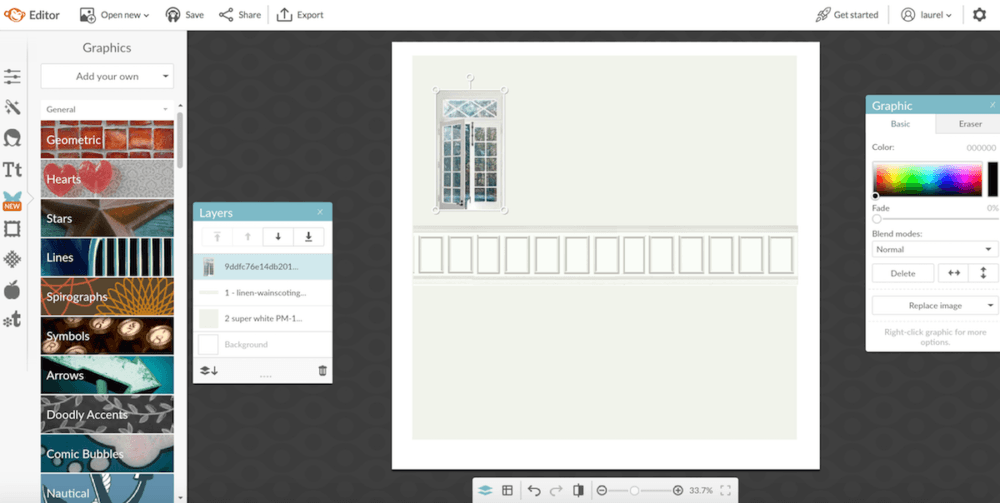
I added three images, above. The wall color – Super White. Wainscoting and one window. But now, I need to resize everything.
To resize, do one image at a time by clicking on that image. You will see a thin outline and four circles in each corner, click and drag the image to be the size you wish. You might need to play around with this.
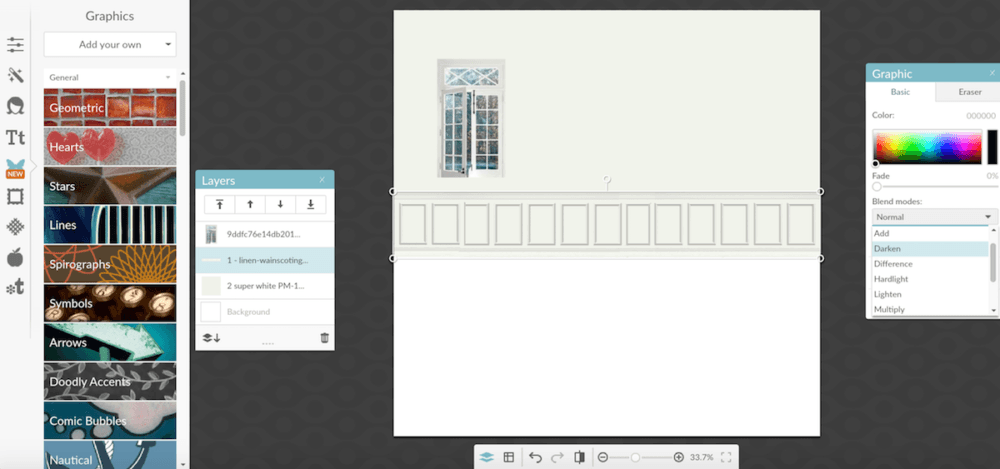
Above you can see where I began to resize the images. But, I noticed that the wainscoting looks a little light. A place to make changes to each individual image is where it says graphic. You will see the eraser button and a place to make color changes, if necessary.
There are also some blend modes which will create different effects.
I selected the darken mode and voila. the wainscoting matches the wall color better.
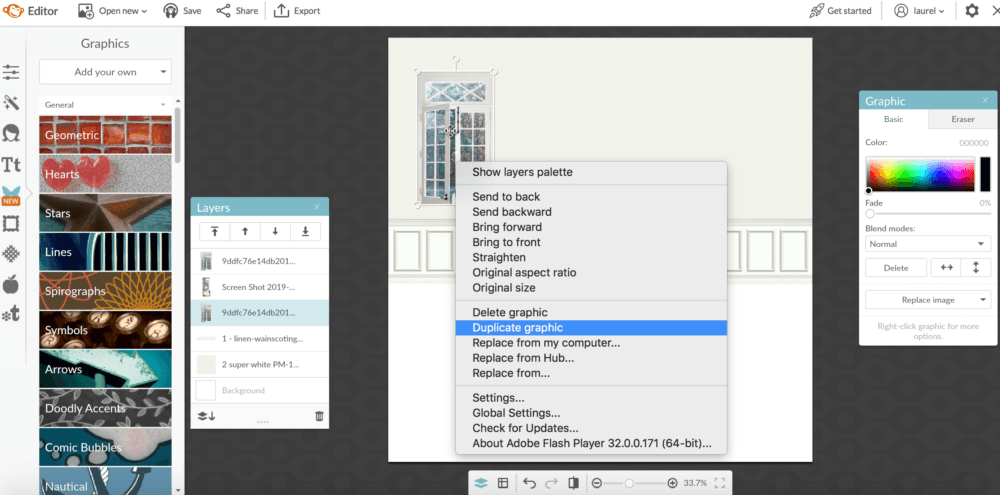 To duplicate an image, hi-light it and right-click. You will then see this pop up which lets you do different actions. Click duplicate image and poof, you will have two images. It is best to get the original image to be the size that you wish it to be first. If you’re not sure, then what I do is play with it and then delete the second image once I have figured it out and redo the duplicate.
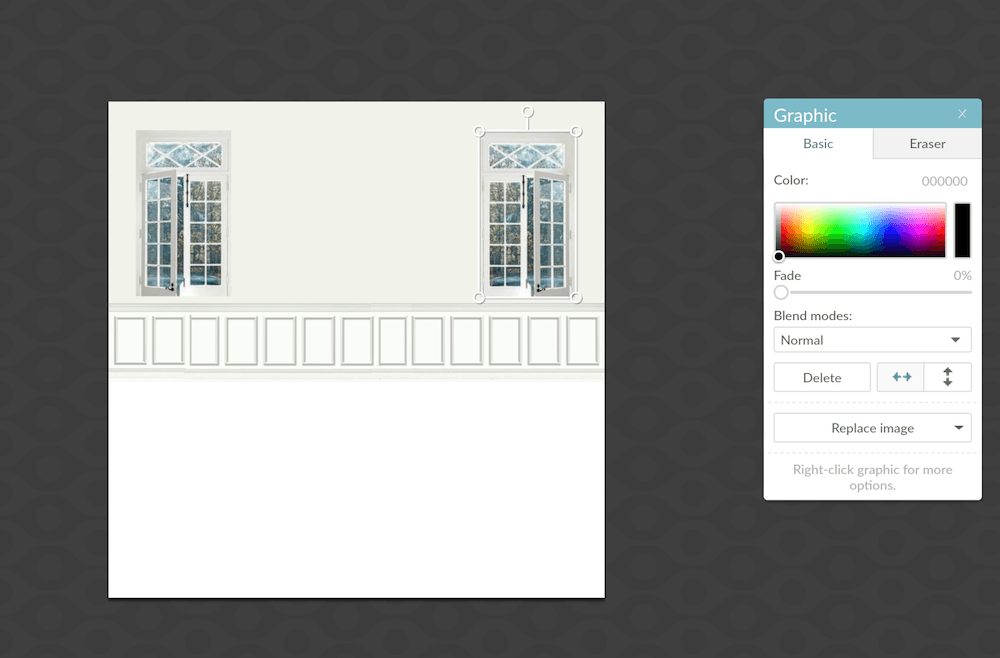
Here, you can see that I duplicated the window and I reversed the image by clicking on the horizontal arrows in the graphic editor. (see above)
Now, I will continue adding more images from my folder to the board.
You can stabilize the background if you are sure it’s the right size. You’ll see a horizontal paper on paper with a down arrow. Click that and it will combine the images. We’ll also be doing this at the end.
To undo that or anything, there is a back arrow at the bottom. (see below) Or if you want to keep going, keep clicking it.
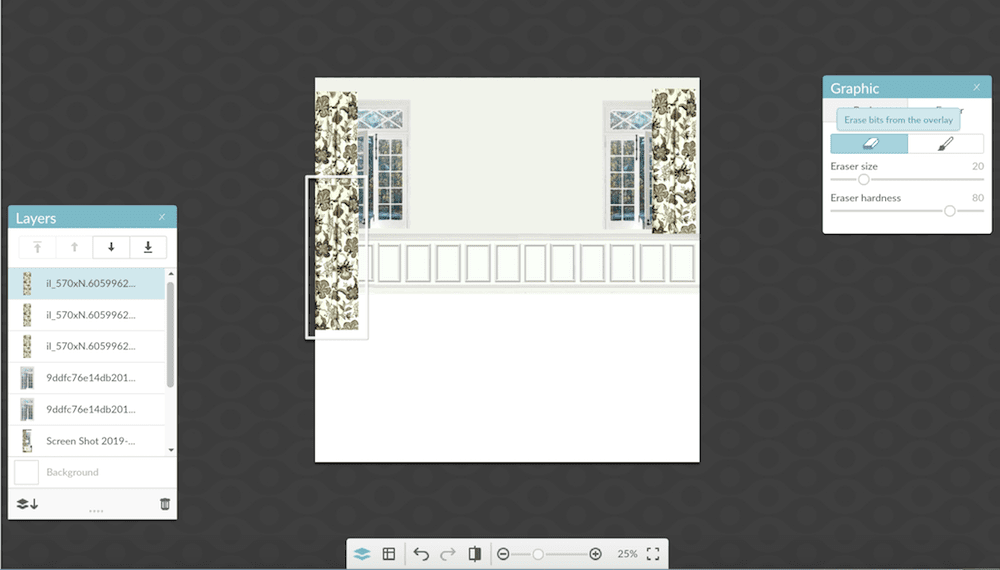
I added the draperies, but they are too short, so I simply duplicated the drape and overlaid it matching the repeat. Fun! But alas, they need to be “hemmed,” so now we get to use the eraser.
This is a lot of fun. Click the graphic and then click the eraser icon. You can control the size of the eraser and its hardness. I usually set the hardness to 100% unless for some reason, I want a soft effect.
If you make a boo boo, you can then click on the paint brush and add back what you took away or click the back arrow to do over what you just did.
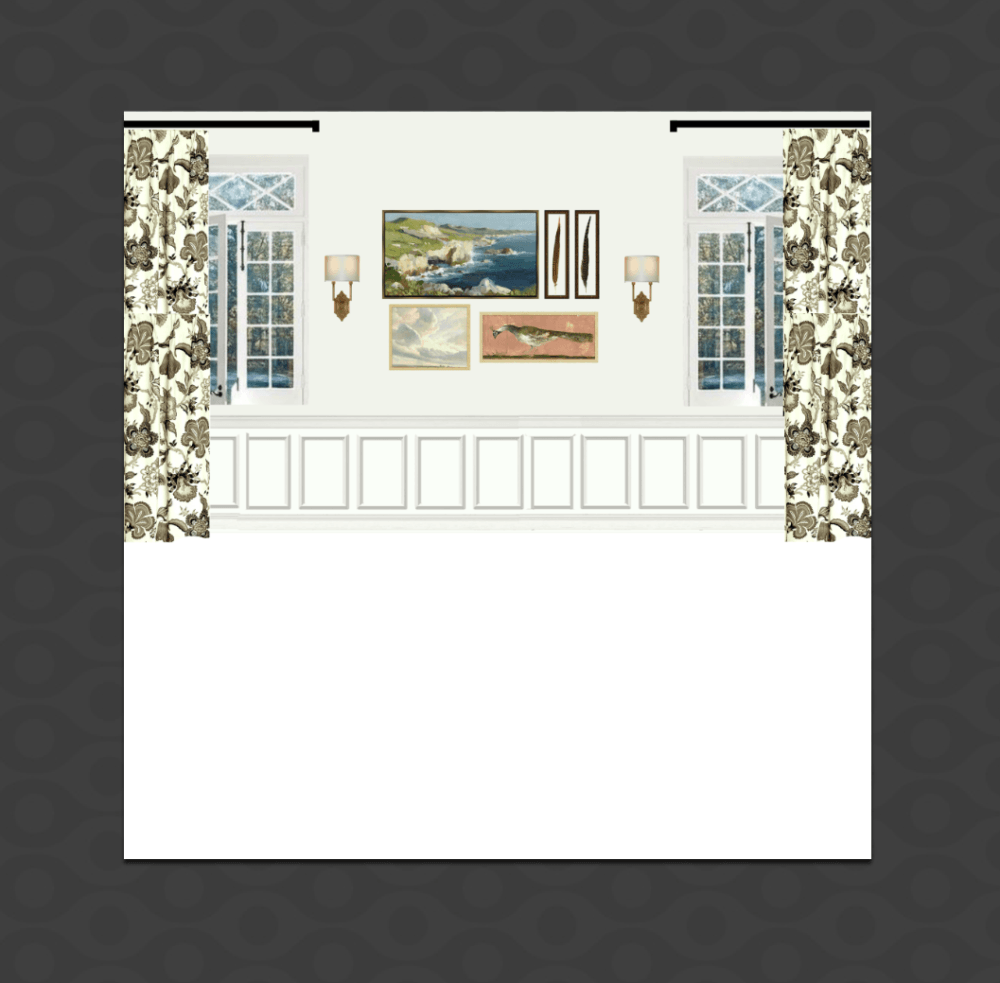
back wall finished
I forgot to say that I made the curtain rods, using a black geometric overlay and manipulating it until it was the right length and thickness. And then I added a little piece. It’s a delicate operation. You just have to practice.
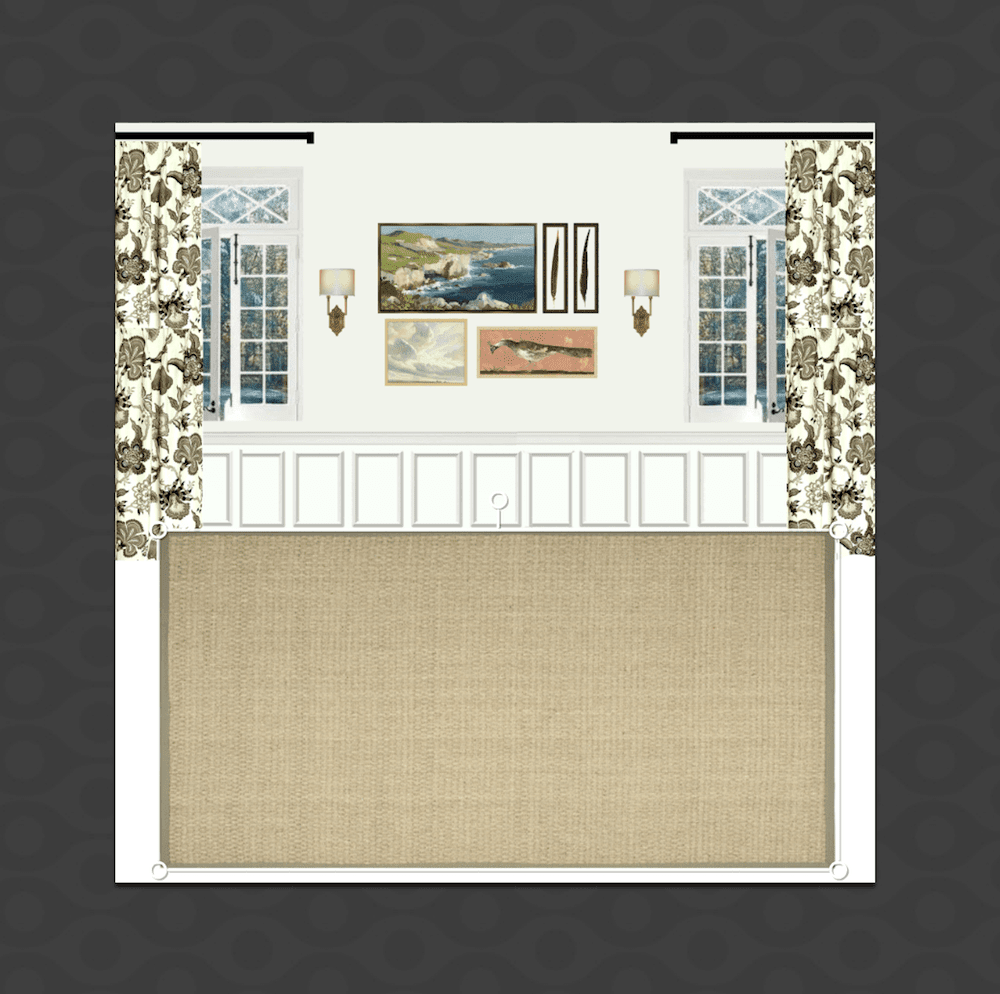
The rug needs to go behind the curtains
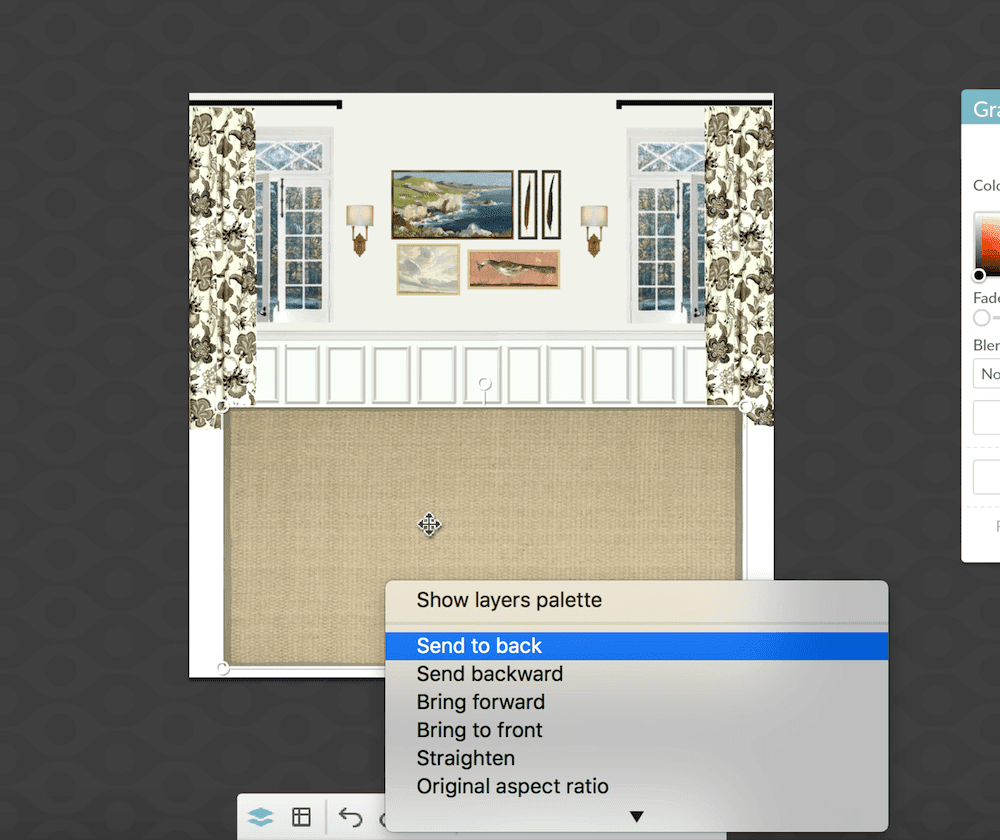
Click the rug and click send rug to back and it will go behind the drape and wainscoting. Sometimes you’ll need to bring things to the front, as well.
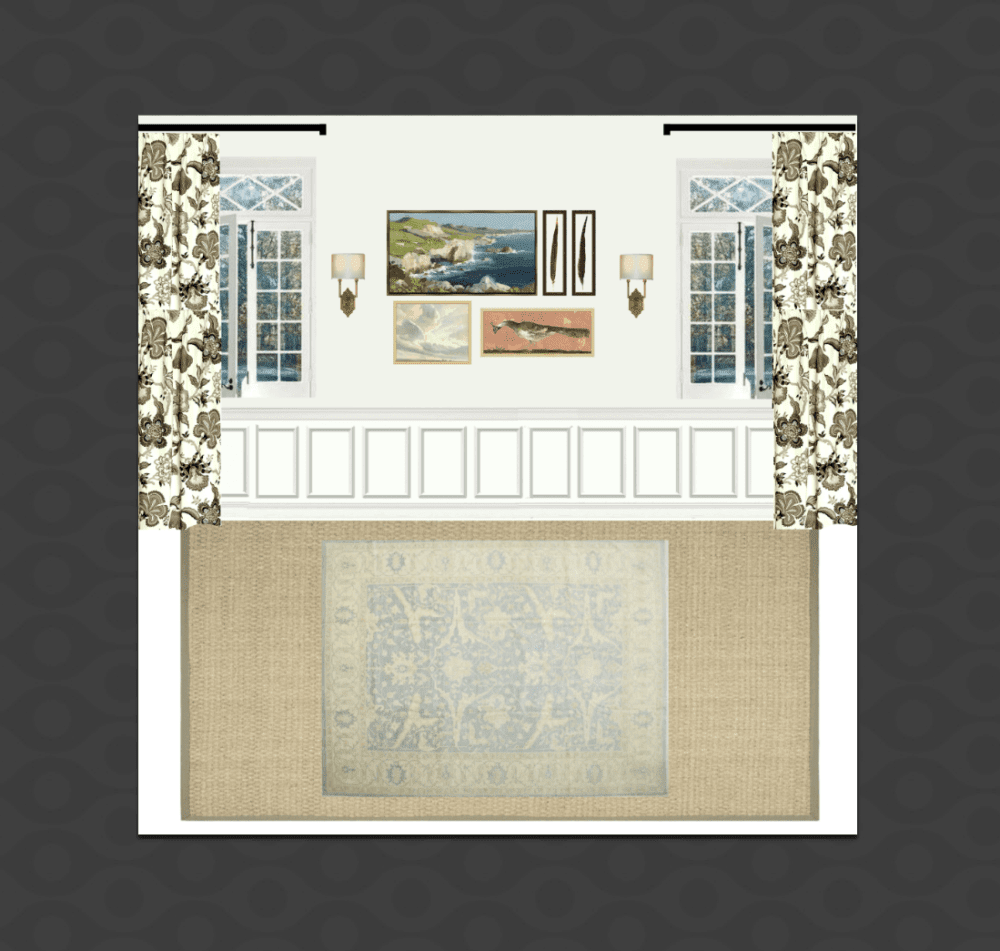
Add an overlay of an Oushak rug over the seagrass rug.
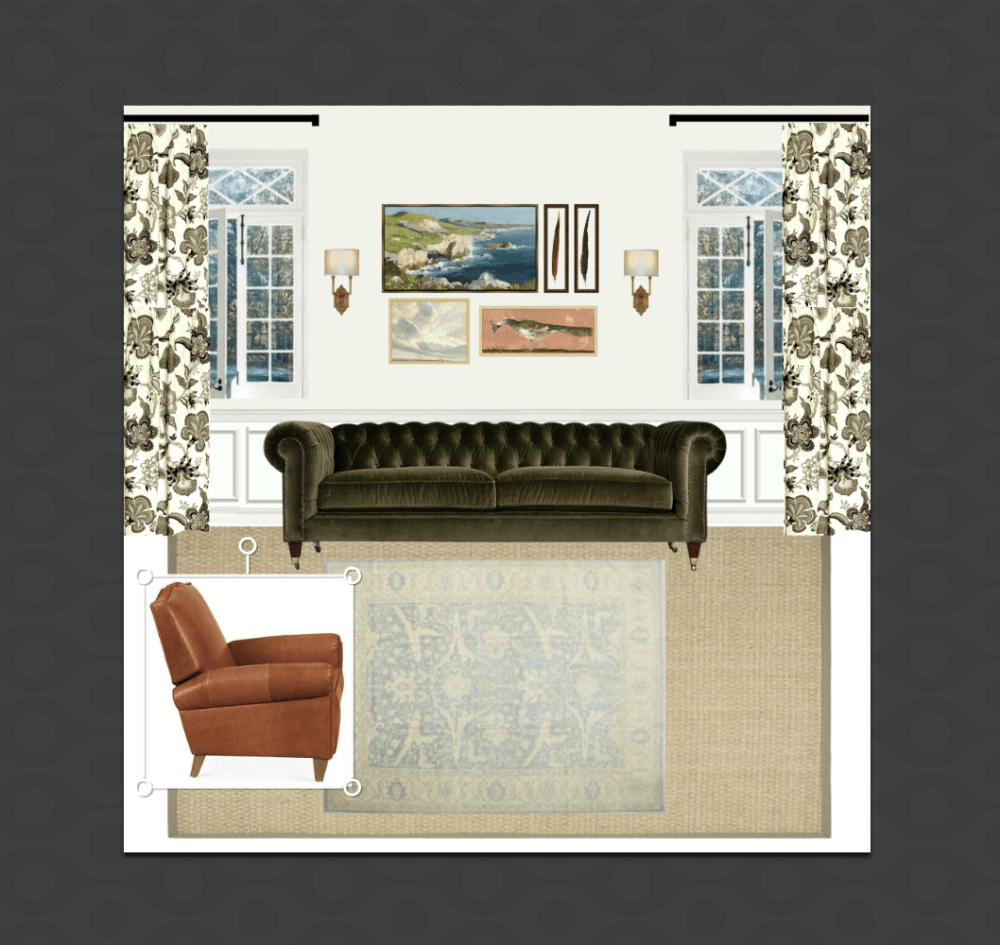
A white background showing on a dark piece of furniture over a lighter background.
We can get rid of this white background easily.
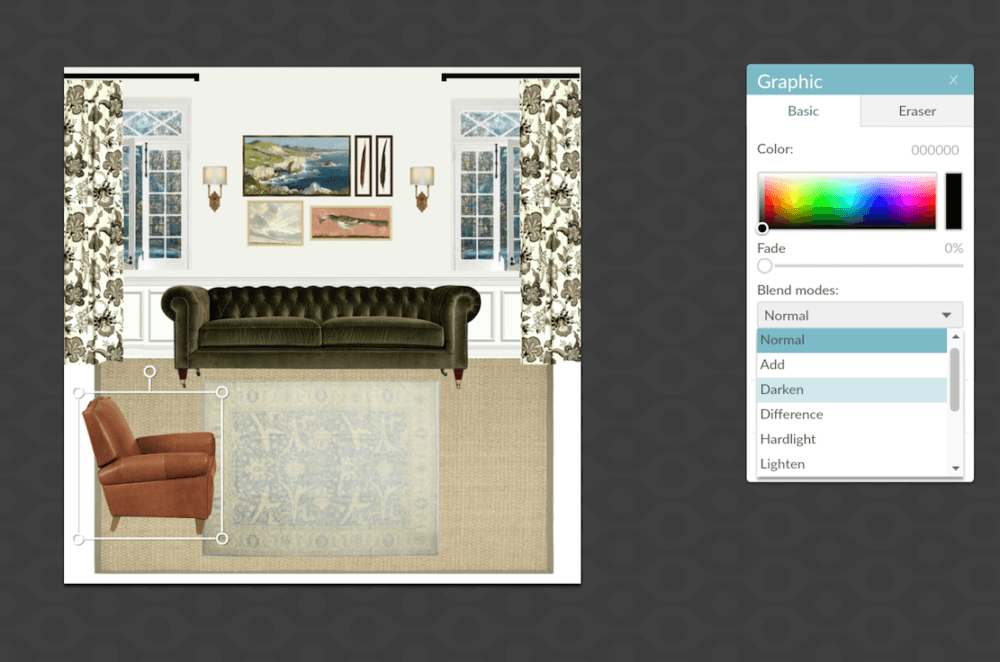
Just, click blend mode and select darken and like magic the white background is gone! Again, this ONLY works if it’s a darker piece of furniture over a light background. But a work around is to temporarily make the chair translucent and then erase what’s behind it if, it’s showing through.
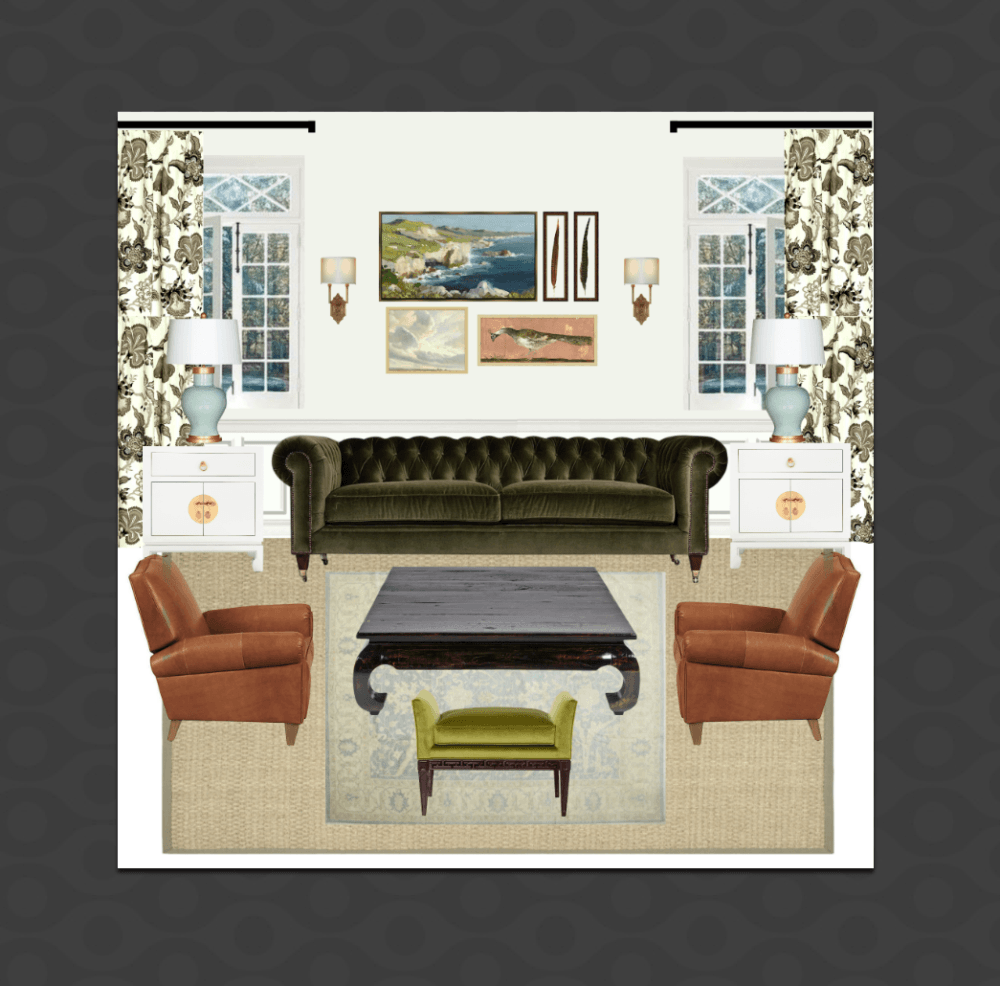
The furniture is in place and now all we need to do is add all of the accessories.
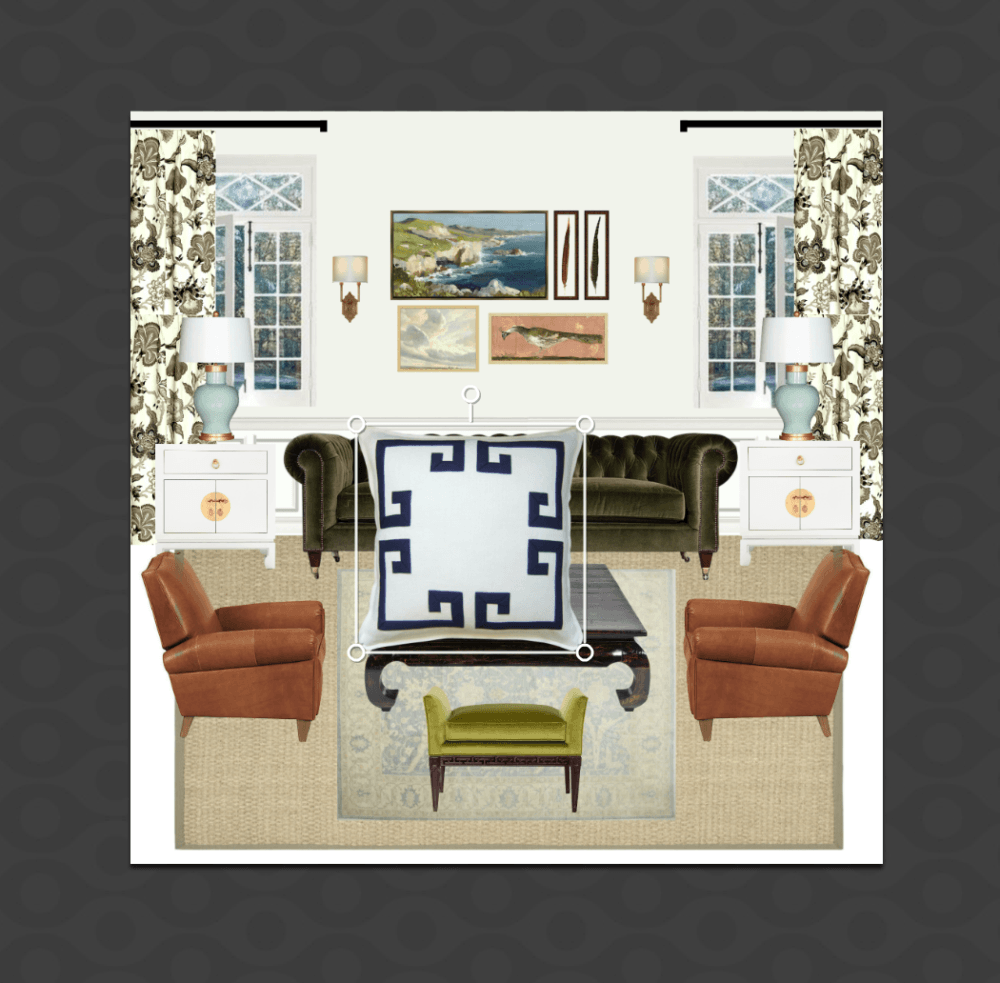
This pillow trim needs to be changed. I could do it later using the eye color changer and actually, “paint” the trim. But, there’s another way that works sometimes.
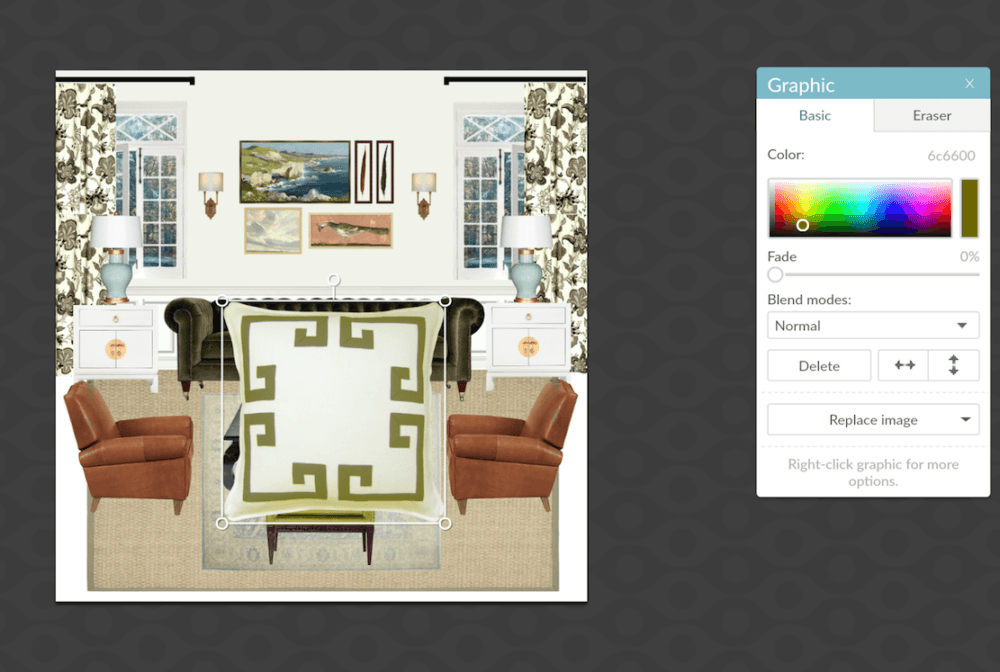
The color editor works great to manipulate the color of the trim. Later, I’ll fix the green bleeding through with the eye brighten enhancer. You will find that by clicking the woman icon in the sidebar.
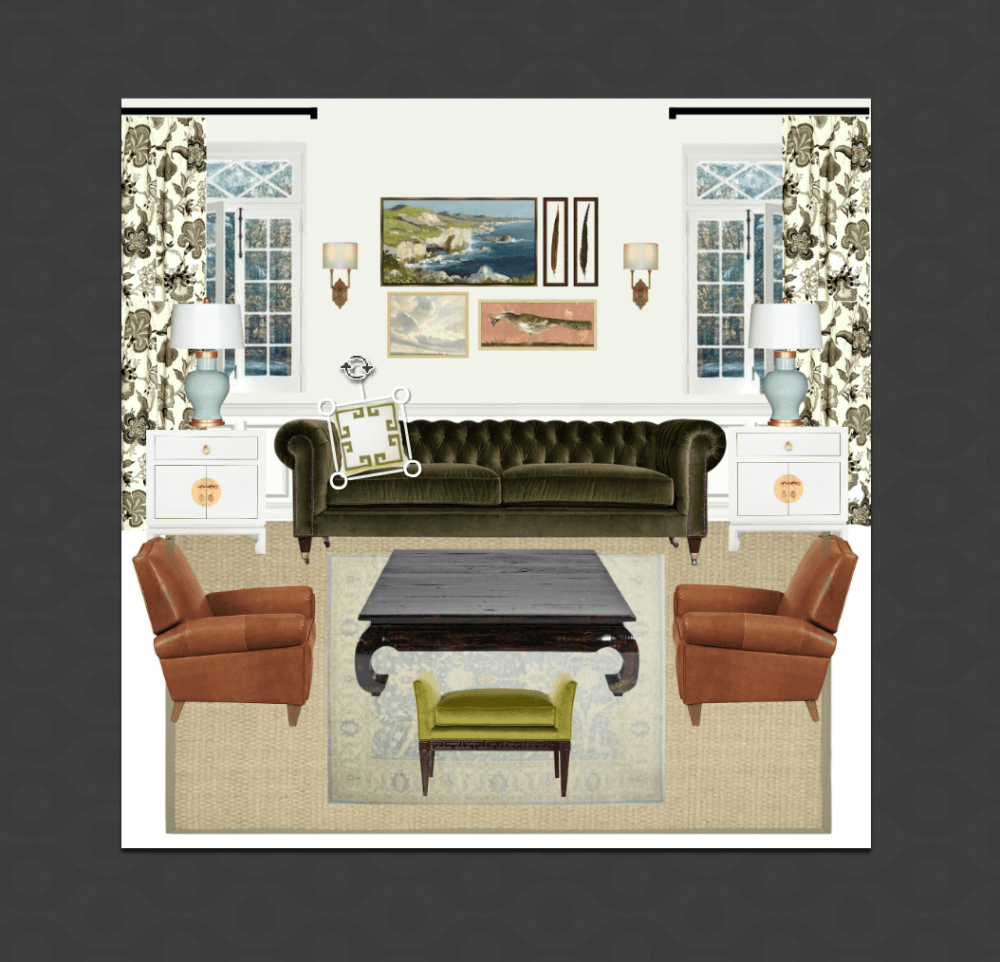
All images have a little toggle thingy if you need to change the angle. This works great for the pillows so they look more natural sitting on the sofa.
After we’ve added all of the accessories, we need to add a little text.
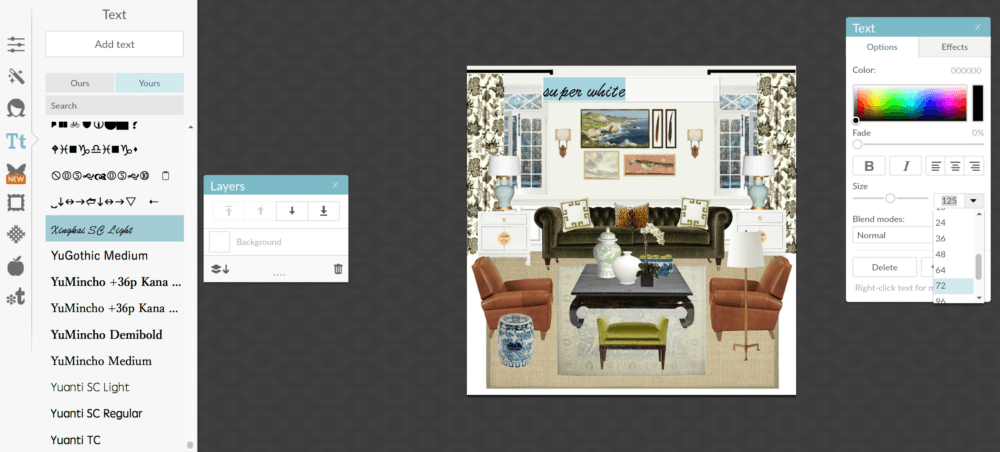
Click the text icon on the left and choose your font. You can adjust the size and color if you wish in the text editor. You can position it anywhere you like. To adjust size and color, you may need to hi-light the text.
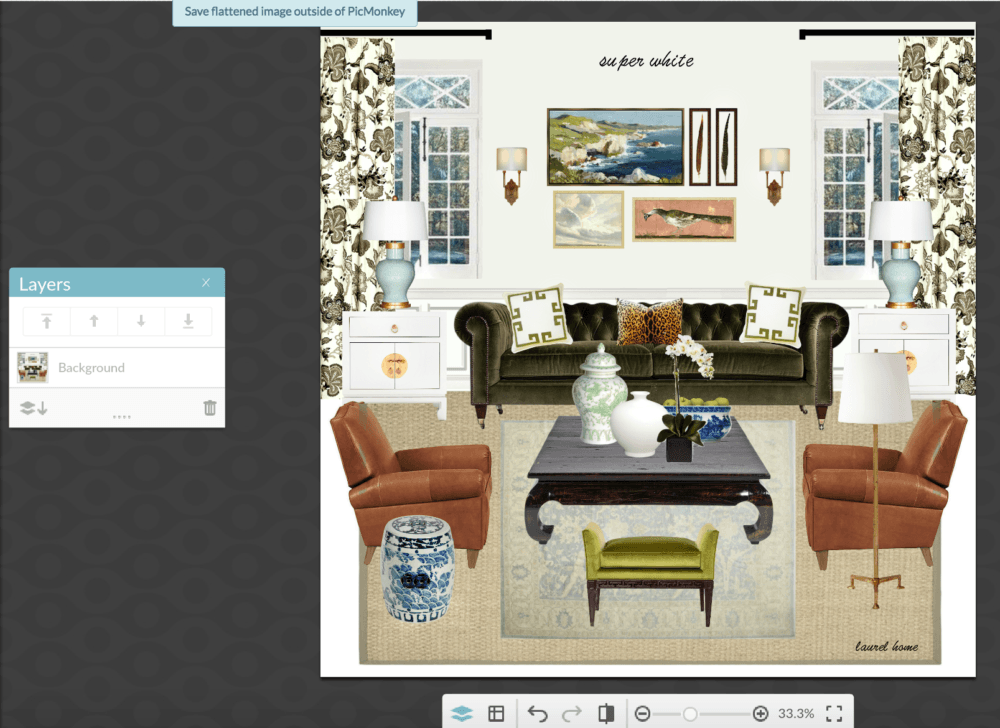
Save the flattened image. Flattened means that all of the images are combined. After they are combined, if you wish you can add some special effects.
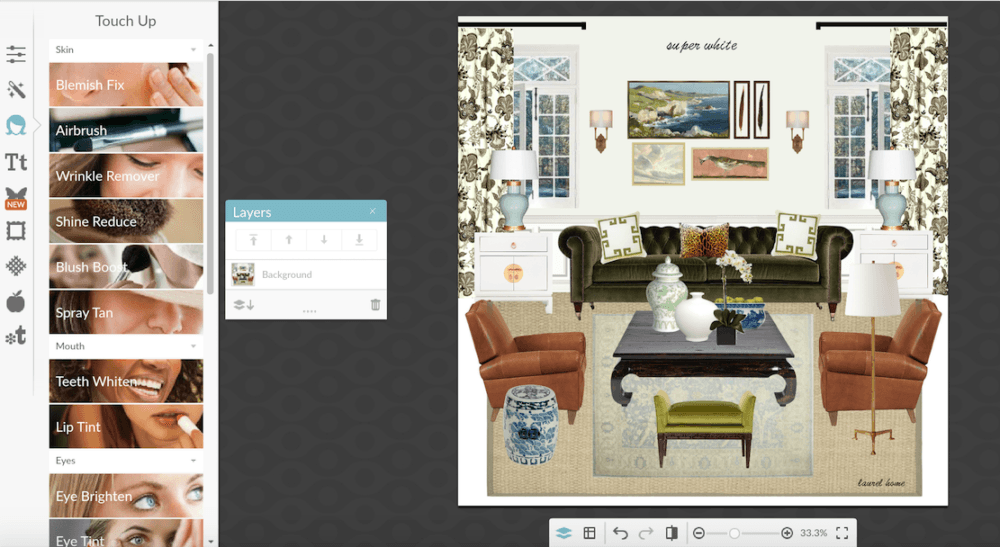
One of my favorite touch up tools is “Eye Brighten.” You have to play with it to get the effect you want. But, it makes the images or parts of the images sharper and more eye-popping. But, how much is under your control.
![]()
The last piece of business for my mood boards is to add a simple frame to finish it off. My default is delete the inner frame and make the one simple black frame only 2 pixels.
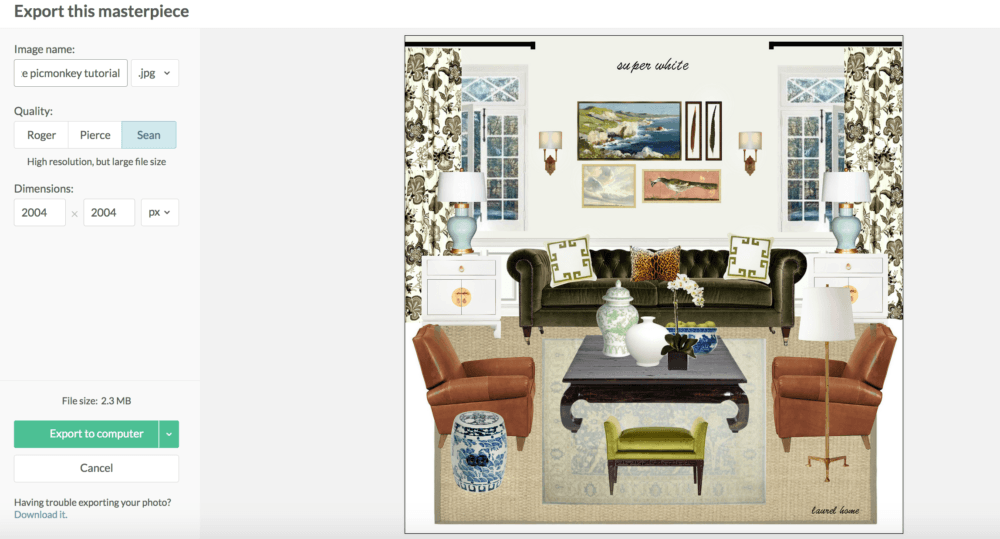
Finally, we export our work to our computer. Monkey calls it a masterpiece. Isn’t that sweet?
You can save it either as a .JPG or .PNG. I also use the Sean quality which is the highest res. It is possible to resize the res here or you can do it later in your image editor after exporting the image to your computer.
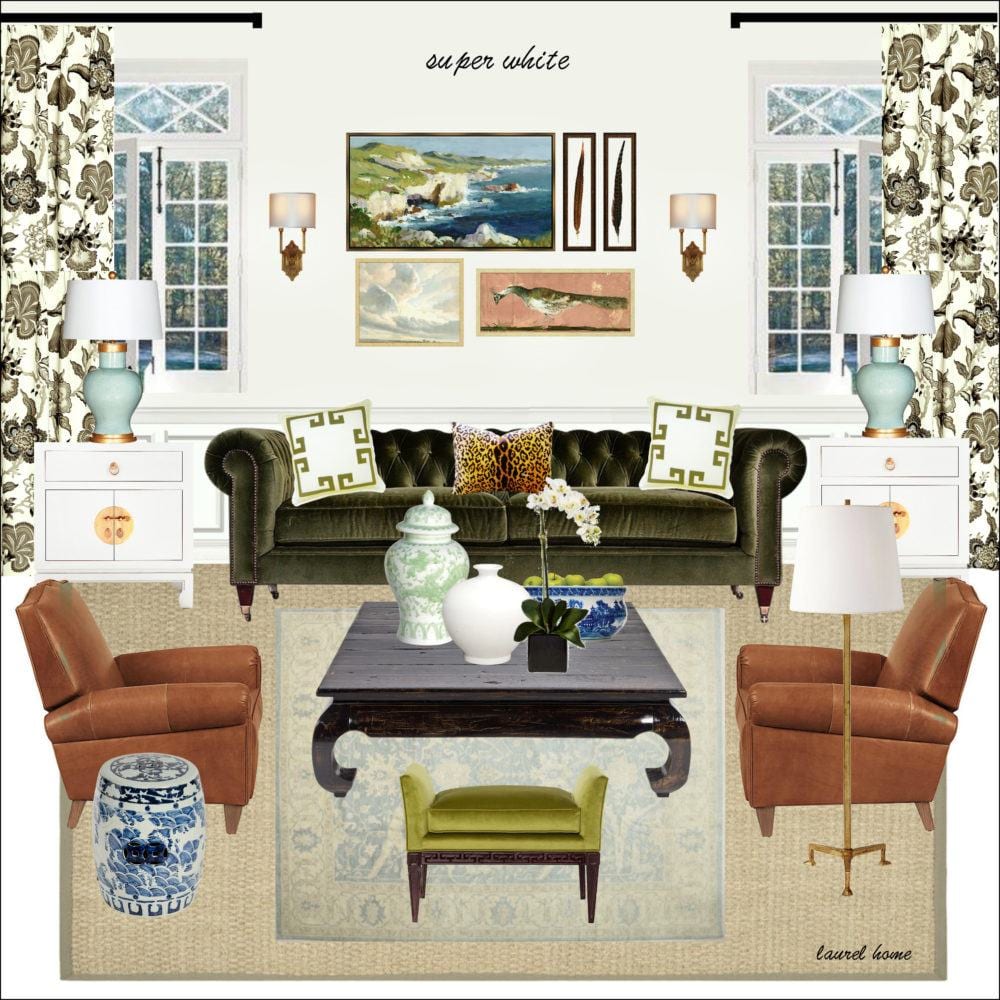
And, here it is. The finished mood board.
PicMonkey is such a great tool to use to help visualize your room before you make a costly mistake.
I know that it helps my clients make decisions more quickly.
And, if you’re a young designer or a wannabe designer with no portfolio. This is an excellent way to create a body of work to show prospective clients what you’re capable of doing.
please pin this graphic created in PicMonkey to your pinterest boards
I hope that this has been helpful. And, that my explanations are reasonably clear. The best way to learn is to get a trial of picmonkey and just start playing with it.
xo,

Please check out the hot sales!!!
TRIPLE DIPPING – NO JOKE on sofas, sleepers and sectionals at OKL. (use promo code: OKL20CARD for 40% or more off!)
And, less than two days to get your custom upholstery orders in at Serena and Lily.
In addition. Looking for some Mother’s Day Gift ideas. I put together a list of gifts I’d like to get. Just kidding. sorta. ;]
Related Posts
 Eileen Lonergan Didn’t Know It, But She Saved My Life
 The Ugly Truth Behind The Pretty Interiors On Houzz
 Have You Seen These Popular Living Rooms on Pinterest?
 Our House Floor Plan is Impossible to Furnish!
 One Living Room Layout – Seven Different Ways!
 24 Cheap Sofas and Chairs That Look High-End
 Here’s How You Can Create Beautiful Rooms – Effortlessly

