Hi Everyone,
This is a two-part post about the primary bathroom design. If you’ve already read part 1, please click the link below. If not, please continue reading from the top.
Part 2 Begins Here
Hi Everyone,
Okay.
I admit it.
I’m tired.
However, I found my silverware. It was under the old air conditioner box filled with stuff, and when I picked it up, the bottom of that box completely busted open, spilling its contents in the middle of the dusty living room.
The silverware was underneath that, just chillin’ in the next box.
I also found my coffee filters.
This is why this is so difficult. It’s all of the little things heaped onto everything else. I’m a stranger in my own home.
Plus, washing dishes in the bathroom sink seriously sucks.
Sorry for the whine fest.
Every time I feel exhausted, I think of my beautiful kitchen where I was unloading lots of goodies earlier today.

I’ve been working on the primary bathroom design and measuring.
You see, there are “rough measurements” and finished measurements. The difference is about 1/2-3/4″ per vertical surface.
Whatever the reason, there always seems to be less to work with than the drawings indicate.
I did one more design for Brendan. He loves it because it’s easier to build.
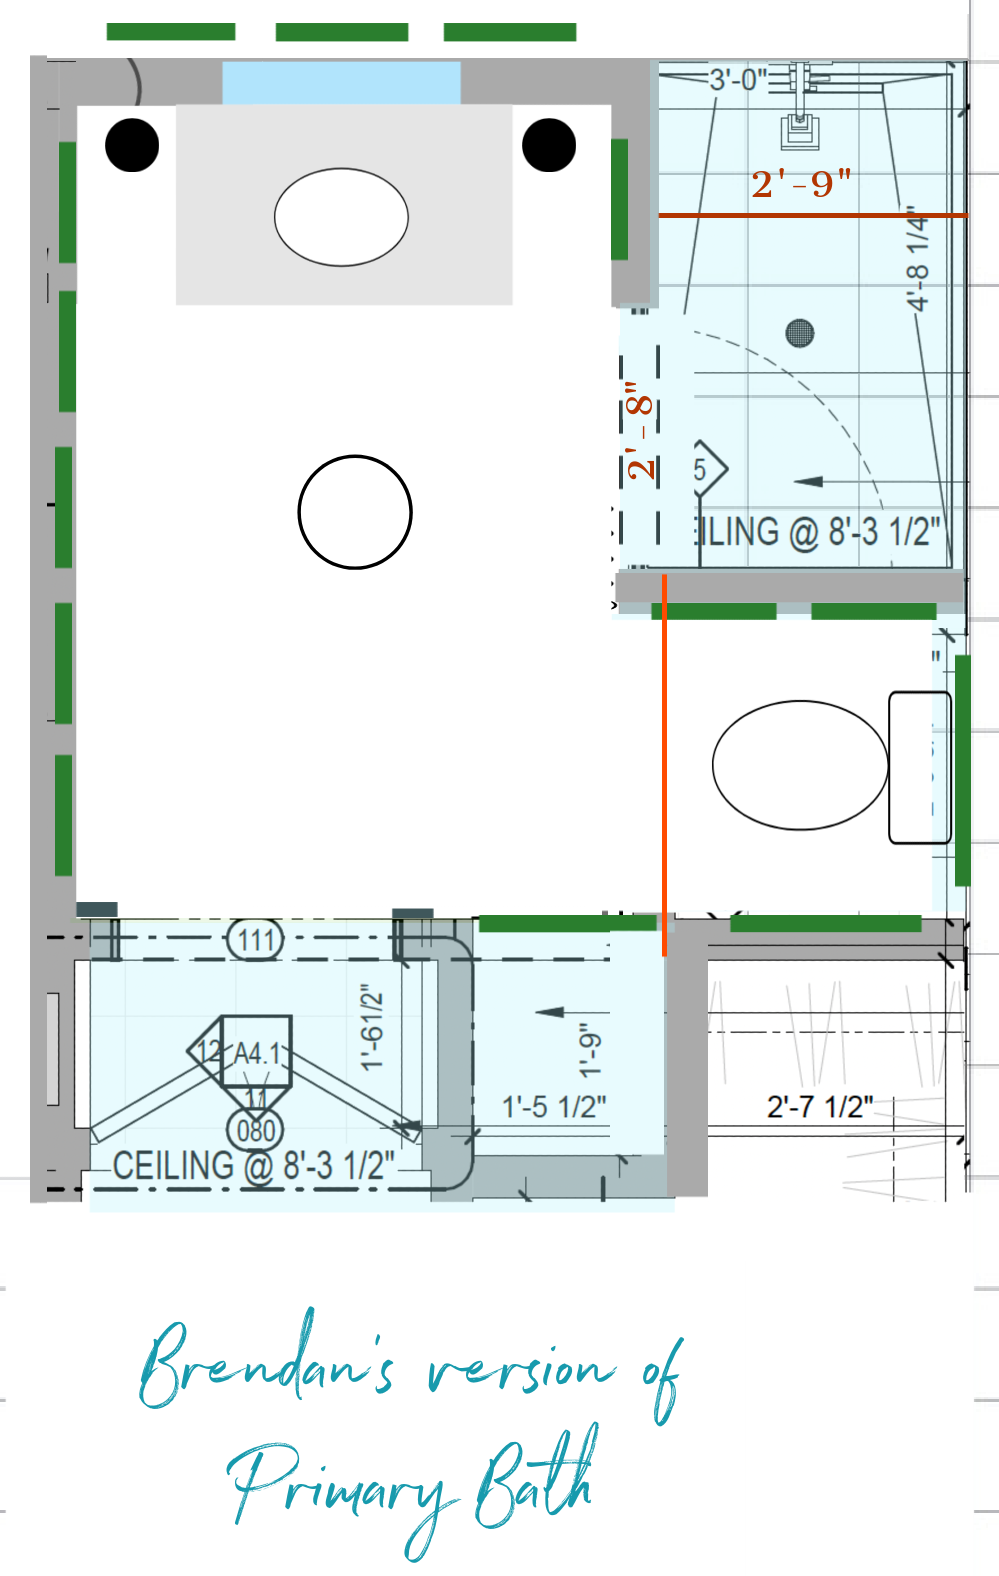 The problem is that the toilet wall at the bottom is six inches shorter than the one shared with the shower.
There’s nothing implicitly wrong with this.
However, it lacks the finesse and charm I’m trying to incorporate. Plus, the design lacks continuity.
Oh, and that dumb beam attached to the wall would show. You can see it next to the shower. Nooooooooooooooooooooo!!!
The green lines represent the wainscoting.

Above, you can see how the architects made the walls the same. The dotted line represents a header beam across the shower and toilet area. It’s not present in Brendan’s version.
In the meantime, if you missed Thursday’s post, I’ve decided on the side niches without the rear cabinet (Unnecessary) and will show you what I’ve come up with.
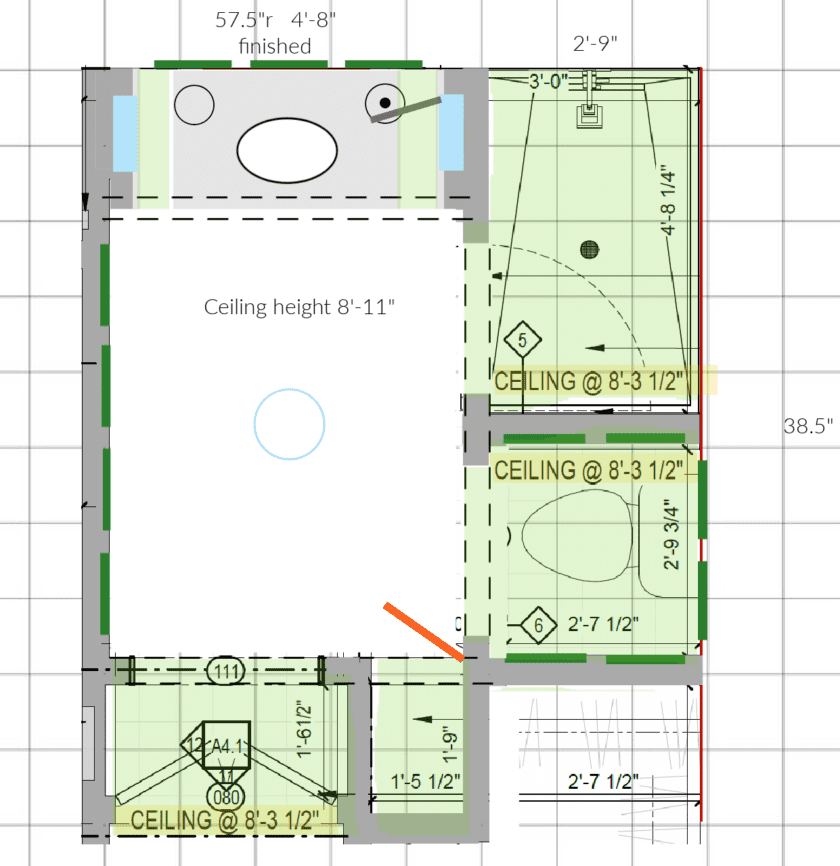
Everything but the white ceiling is at 8′-3″.
I don’t know what’s with all the fractions. Maybe the builder will deduct 1.5″ when he’s framing. We needed to lower the 9′-1″ ceiling in the bathroom to 8′-11″ because of a small copper pipe.
The tricky part is the toilet area. I don’t think Brendan has to redo anything, but that closet needs to be smaller. Right now, the rough opening is 20″. We need to lose 6″.
This plan makes sense to me. Actually, I love it. It has everything on my wish list.
- Charming vanity nook with a console vanity
- Gorgeous polished nickel faucet
- wainscoting
- lovely crown moulding
- full ceiling height for the open section
- The crapper is no longer in front of the entrance.
- Spacious.
- Hidden storage.
- And, no freaking doors in the way of anything. Look at that long, beautiful wall!
Ironically, I had made an elevation based on this idea last June.
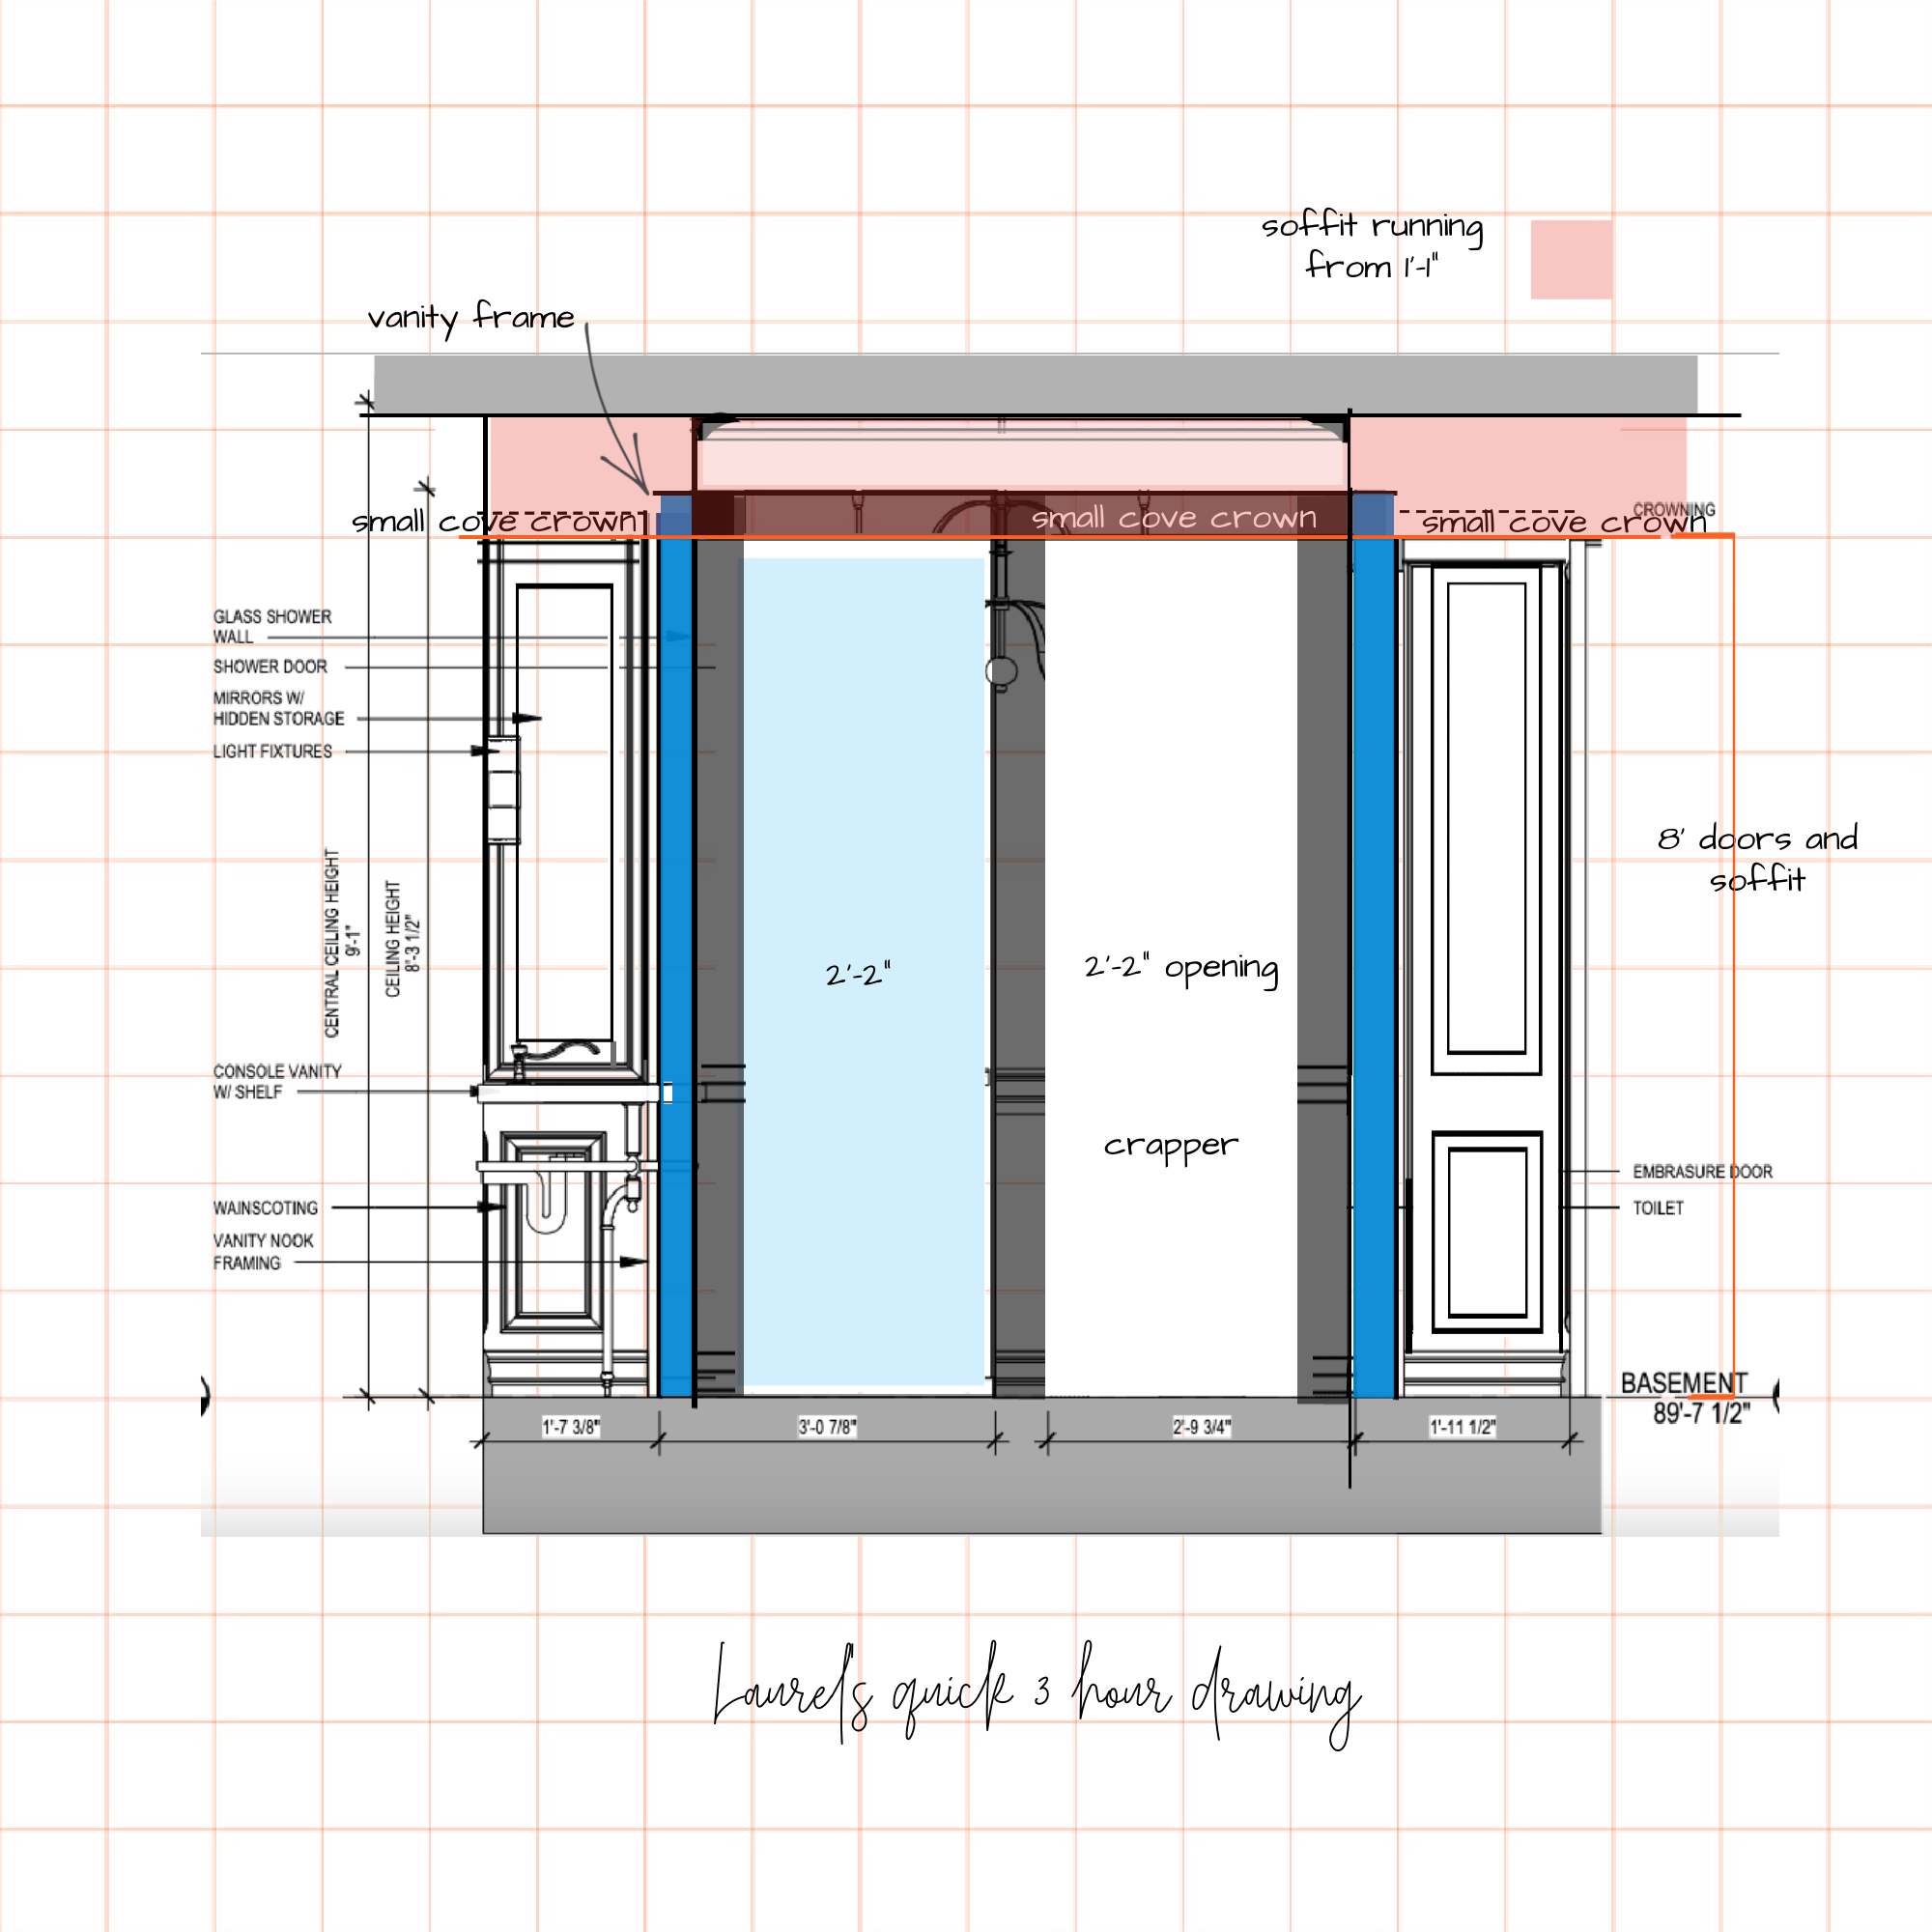
I am sure this is confusing AF. But from left to right, this is the vanity, shower, and crapper in that order, with dividing walls in dark gray. I will have a much better image for Monday.
I’ve spent several hours on this one elevation.
Laurel, why are you still working on the design?
Great question. I’m working on it because it’s being built but not according to the plans, which are off by a few inches here and there. It’s throwing off a crucial element in the primary bathroom design.
The floor space between the shower and wall is 4′-8″, not 4′-10″. I measured it at least half a dozen times this morning. The two niche walls will take away about eight inches so that we will have an opening of 48″. That’s spacious enough and also cozy enough.
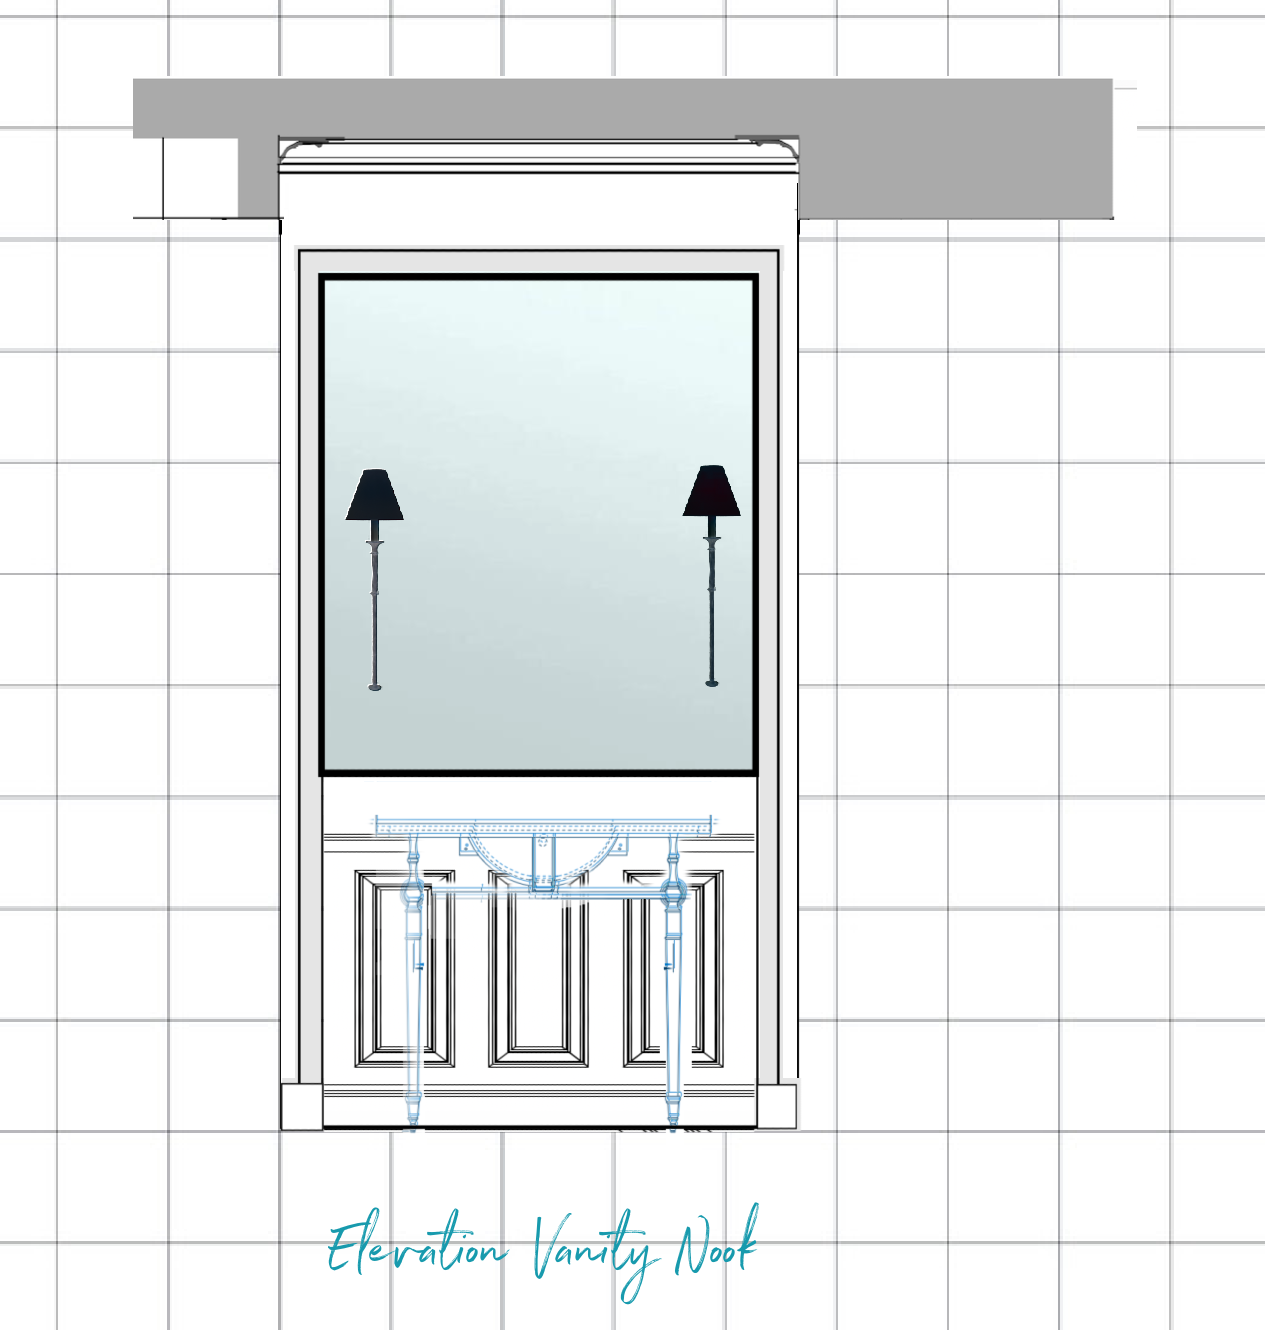
I did two elevations.
The first is only to show the process.
We can do a very small casing, 2.25″, around the vanity nook, shower, and crapper openings that you can see in light gray above. When I do the shower elevation, this will look a lot better.
I will add notes and dimensions for Brendan and Robert. However, in the meantime, the dotted line represents the ceiling height over the vanity.
The part that goes higher is a section view that reveals the higher ceiling in the middle.
The best way to think of it is if you took a giant knife and sliced the room a foot or so in front of the vanity. It doesn’t show any joists or other lumber because that’s necessary for our purposes.
Yes, the sconces have backplates, but the image had them on an angle, so I cut them off. We know they’re there. ;]
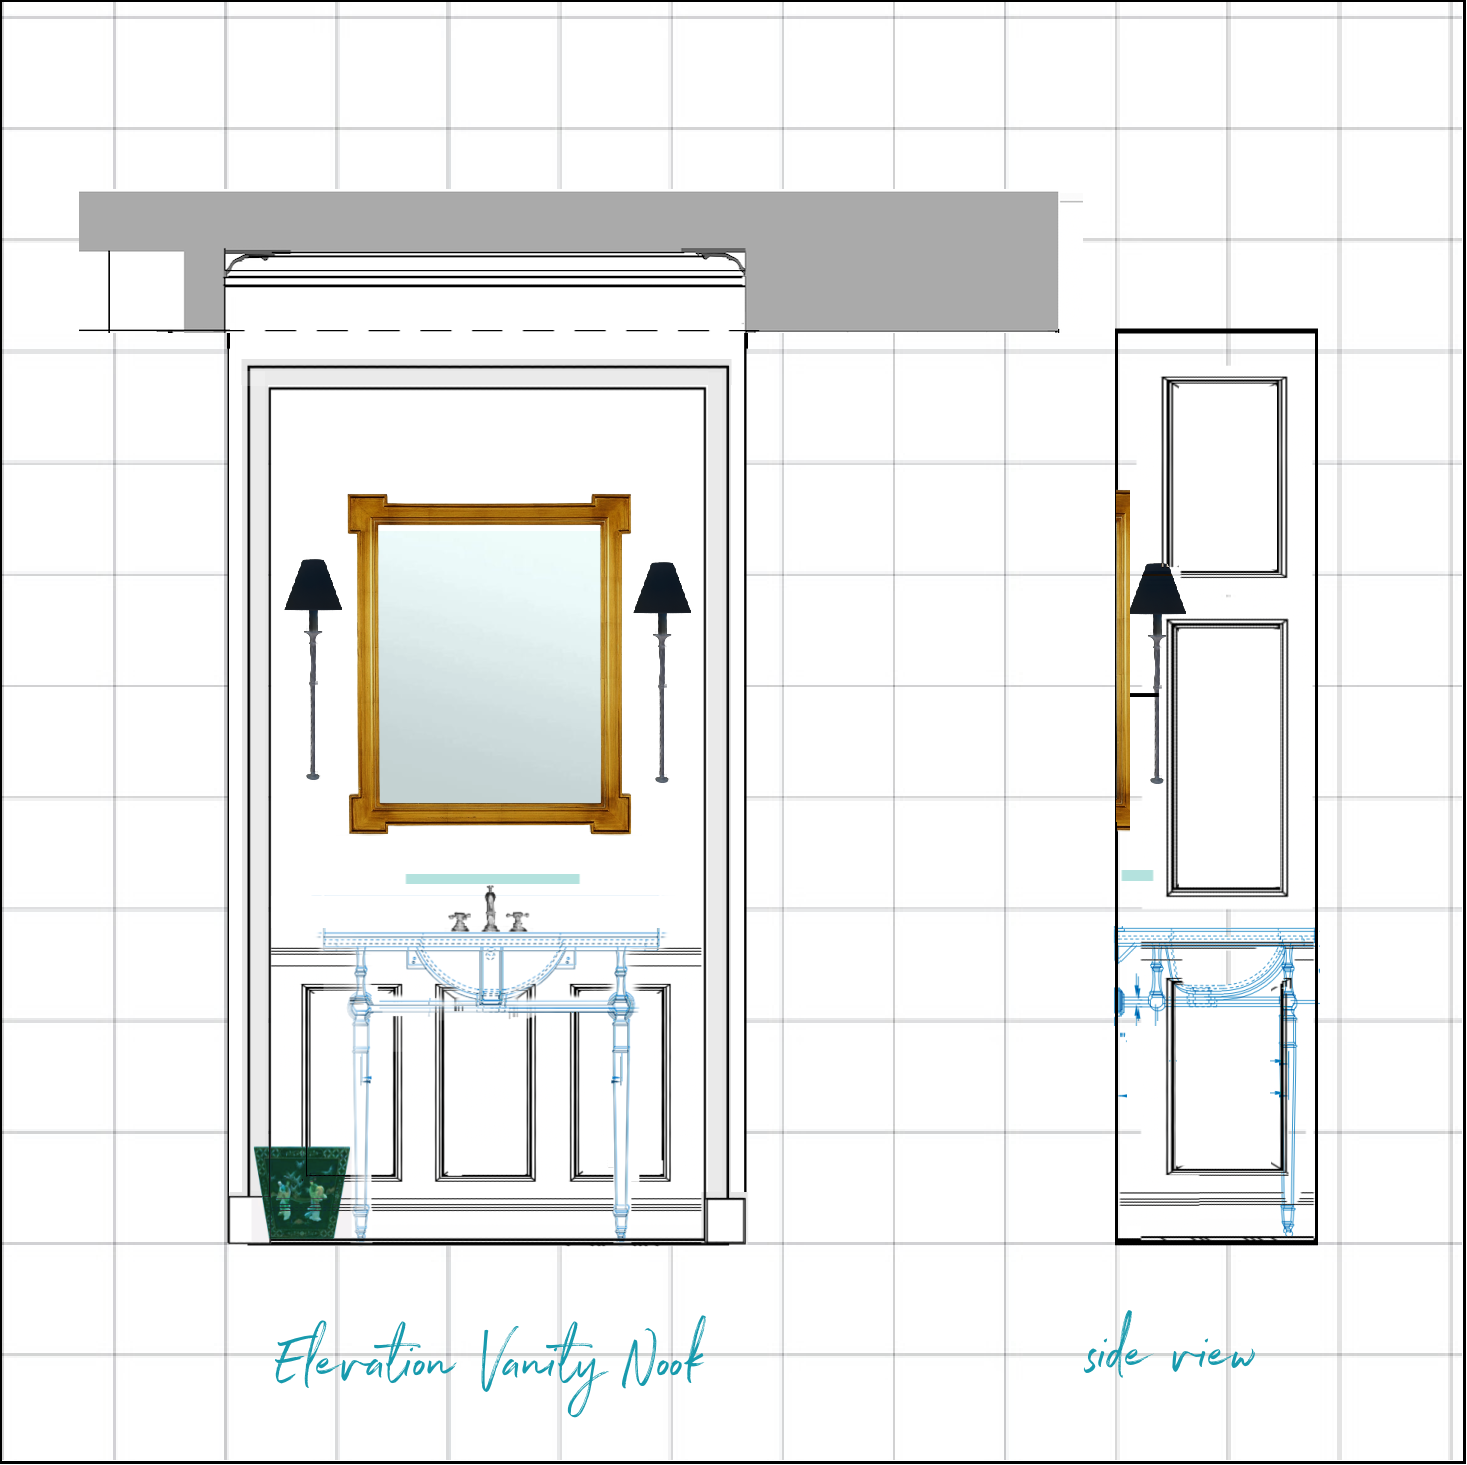
The side of the vanity nook is my favorite part.
It shows three panels similar to an embrasure shutter. The center panel has a hidden door that clears the shade.
Okay, I have to end now. I will do the shower and crapper elevation for Monday night.
And then, we’ll finalize the under the stairs closet. That’s when I’ll reveal the bedroom surprise. I did something I didn’t want to do but had no choice.
In the words of Tim Gunn,
“Make it Work!”
But, guess what arrived today?

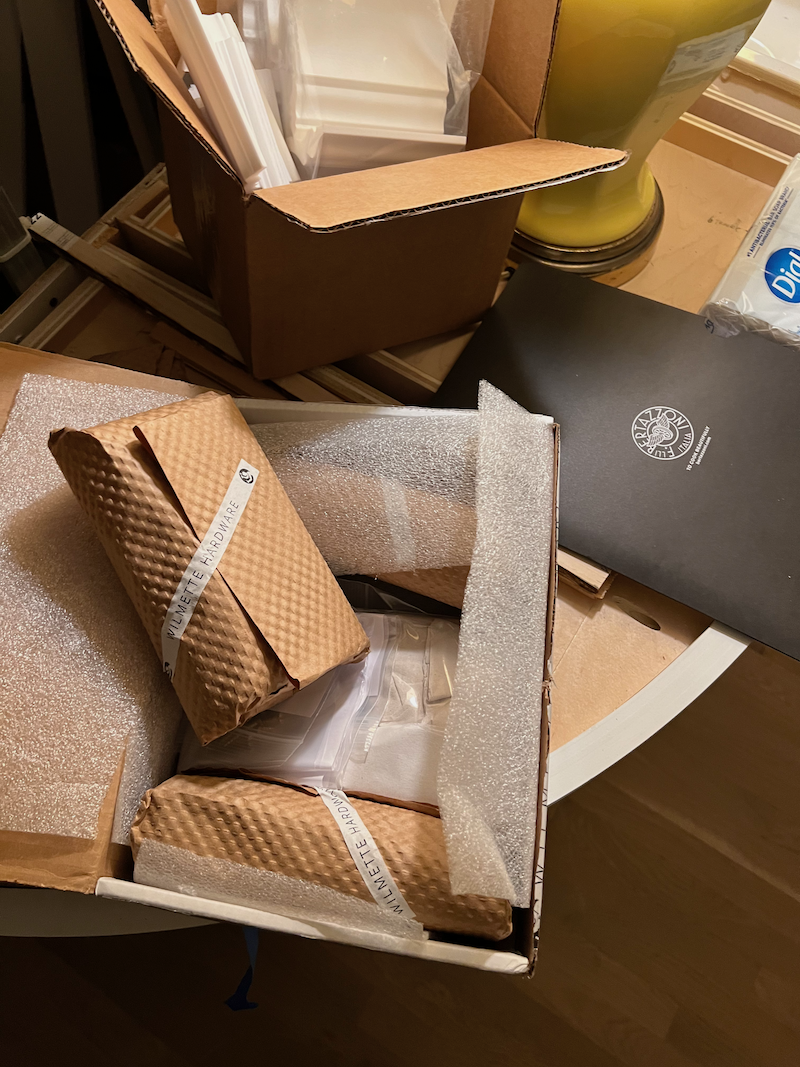
My Dial soap! lol. And YES, the Cremone Bolts from Wilmette Hardware!!!
More on Monday! We will finalize the primary bathroom design.
*********************************************************
Part 2 Begins Here
It’s Monday evening. :]
Hi Everyone,
As promised, I have for you, an updated master, queen bathroom design.
We’ve already looked at the vanity section and a sloppy floor plan. However, I’ve tidied up the floor plan with some dimensions.
We’ll also look at the shower/toilet wall elevation.
Laurel, did you work out the problem with the different-sized walls?
:]
Yes.
So, let’s first look at the new floor plan. This one has the most accurate dimensions.

Above is the corrected floor plan. I had a meeting this morning with my GC, Robert.
As I thought, the solution is to make the hidden closet by the toilet 5.5 inches smaller, and then we can have a lintel all the way across and maintain the lower ceiling height everywhere except the center section.
This will allow for a 14″ door for the hidden closet by the toilet, which is absolutely fine. My new challenge will be designing it in such a way that it looks hidden.
This should be the worst problem I ever have! haha
I forgot to mention this, but if you look back at the vanity, the hidden storage on the right side is deeper. That is a new wall, actually, a double-width new wall. So, it would be great to make that one as deep as possible.
The cabinet on the left can remain at the standard medicine cabinet depth. There is another wall behind it, full of pipes for the washing machine and dryer.
Okay, just a few more details.
Pardon me, while I take a break to eat something. I boiled my first pasta water earlier. haha
Yesterday, I put the old microwave in my room on the white dresser. This is life-changing!
Okay, let’s look at the shower/toilet wall elevation.
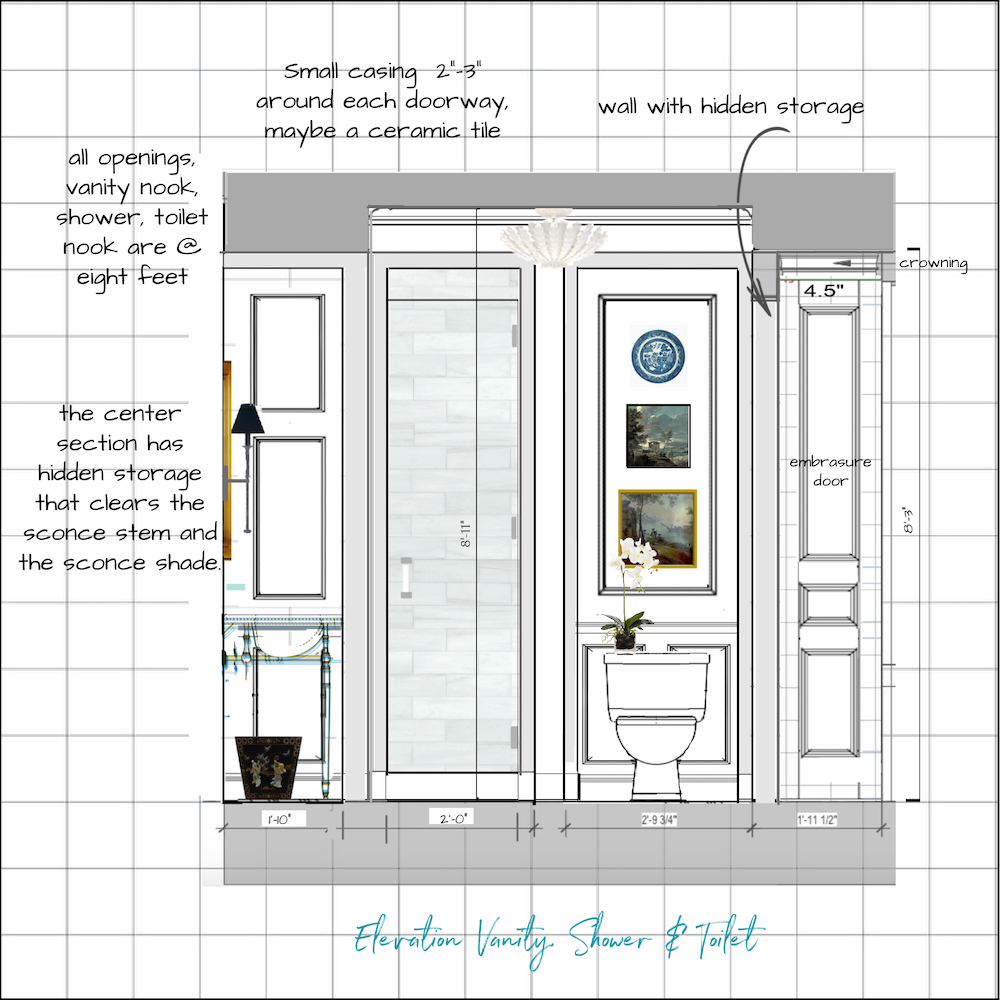
Please remember for those who aren’t familiar, that an elevation is two-dimensional. It is not in perspective. So, everything looks like it’s flat against the wall. The embrasure door on the right, sitting open its pocket, is about two feet in front of the toilet/shower area. The side of the sink is over four feet closer to us.
The idea of the elevation is to show elements in relation to each other, not as our eye sees them.
I did the elevation before I tweaked the floor plan, so there are a few slight changes. For example, I made the openings for the toilet and shower the same at 26″ each. The total interior width for the toilet nook is still about 34.”
A few other details, or deets. :]
The shower tile is not currently up to the ceiling. I’d like to change that, but don’t know if I can find a good enough match for the tile. Still, we do have to add tile to the new 22″ wall separating the shower from the vanity.
Do you know what it is, Laurel?
I had a hunch and looked it up, and yes, it’s 4″ x 12″ subway Dolomite, a type of marble.
To wrap up, I’ll quickly address the lighting.
Someone asked if the two sconces provided enough light to put on makeup.
Gosh, I can put on makeup in the dark.
In my case, if I wish to look like a woman who’s allowed to live alone, the most important factor is magnification. So, I’d love to put a magnifying mirror in one of the cabinets
But, getting back to the lighting. There is also a semi-flushmount chandelier I’ve had for about five years. It’s the Hampton “Mini” Chandelier designed by Aerin for Visual Comfort.
It holds three bulbs, which will shoot the light up to the ceiling, and it will bounce back down for overall ambient light. There are also three downlights. One in the shower, one over the crapper and one in the little vestibule between the two embrasure doors. When the doors are closed, that area becomes part of the bathroom. So, it doubles as both hall and bathroom.
It’s the same for the second set of embrasure doors in front of my bedroom.
Okay, I made a little mini-widget of the six major items, except the faucet isn’t “widgetable.” (now that’s a word!)
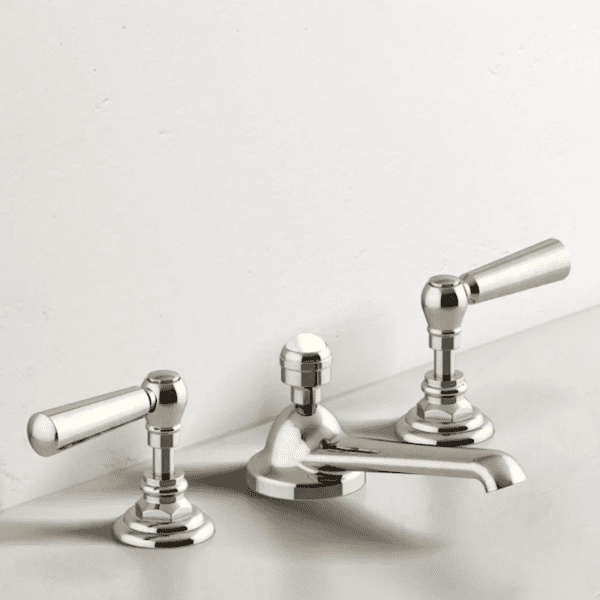
I got my Watermark Stratford Faucet from KB Authority. It was easy to order, and the faucet came far sooner than they said it would. There are dozens of finishes and about six different handles.
Watermark is not to be confused with the insanely expensive Waterworks.
This faucet cost me well under 600 bucks but it looks much more expensive. The company is located in Brooklyn, NY. They remind me of the gorgeous faucets Gil Schafer uses from Barber-Wilsons.
Okay, here’s the widget for everything else.

Next up, it’s back to the final designs for the staircase storage areas and railing. Get ready for a big surprise!
xo,

***Please check out the recently updated HOT SALES!
***And, the beautiful Holiday Shop for 2023!
***Also, I’m running a special promotion on my rockin’ interior design guides!
There is now an Amazon link on my home page and below. Thank you for the suggestion!
Please note that I have decided not to create a membership site. However, this website is very expensive to run. To provide this content, I rely on you, the kind readers of my blog, to use my affiliate links whenever possible for items you need and want. There is no extra charge to you. The vendor you’re purchasing from pays me a small commission.

To facilitate this, some readers have asked me to put
A link to Amazon.com is on my home page.
Please click the link before items go into your shopping cart. Some people save their purchases in their “save for later folder.” Then, if you remember, please come back and click my Amazon link, and then you’re free to place your orders. While most vendor links have a cookie that lasts a while, Amazon’s cookies only last up to 24 hours.
Thank you so much!
I very much appreciate your help and support!
Related Posts
 No Windows? No Problem. Help for a Windowless Room
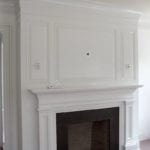 Faux Fireplace, a Great Idea or a Disaster?
 Wall Decor Vignettes – Little Known Rules You Need to Know
 The Best Warm Gray Paint Colors Designers Love!
 30 Fantastic Coffee Tables – Plus Sofa Pairings!
 Stunning Photos of San Francisco While Attending the DIC
 Help For a Small Family Room That’s Not Quite Coming Together


35 Responses
Exquisite! and thank you for the links to your bathroom items, I had no idea Wayfair carried such nice things! I always thought them a place to find inexpensive couches. I have a teeny tiny bathroom and just found a 19″ sink console like yours that I did not know I needed!
I loved following the journey of finalizing the primary bathroom design in Parts 1 & 2! Your attention to detail and the thought process behind each decision is inspiring. Can’t wait to see the final result – it’s sure to be stunning!
Everything is gorgeous, Laurel! One question: will the jib door have wainscoting? (Drawing doesn’t have a green line)
Hi Laurel,
Since you are putting side cabinets above the sink, could you also put one below the sink? That would be a handy place to stow the toilet bowl brush, plunger, cleaners out of sight.
Hi Caryl,
The sink is a console, so open. I will use the little closet for cleaners, hairdryer, rollers, washcloths, etc. Yes, the jib door will look like wainscoting.
I’ll admit that I am slightly challenged when looking at room plans and prints. I’m one that needs to see it in 3D. Here is my question – does the distance of the toilet from the wall allow enough space to comfortably and most important, functionally sit on the toilet? I supposed I’m concerned due to buying and using a travel trailer with the usual tiny bathroom and maneuvering in it. We bought this to travel with during Co-vid and will be selling it in the spring. I don’t think I’ll miss it when it’s gone. By the way, your kitchen looks beautiful!
Hi Mary,
Yes, there’s 33.75″ side to side which is quite spacious. The minimum code-wise is 30″.
I love following your reno! Absolutely gorgeous design work on your part! So happy for you!
I came here to comment on the shower door swing as well. If it only swings in, and you want to start the water before you get in, it’s likely to hit the door. That would allow water to splash out of the shower and into the main bath, meaning you’d have to wipe up the outside of the door and the floor each time you used the shower. Out-swing would be more practical (less cleaning 😉 )
If you can still reach the controls easily, I’d also consider hinging on the side closer to the controls for ease of entry into the shower and the ability to avoid much of the spray until you were ready to actually shower.
Hi Michelle,
The door will pivot in and out. The controls in this shower when facing it from the outside, are on the right wall and the shower head on the left wall. That’s how it was. I’m not changing the shower.
Does the shower door swing both ways? The drawing only shows it swinging in. If so, then when you get into the shower and close the door before turning on the water, you might not like having to wait for the water to get hot unless you have a HWH nearby. If the door also swings out, then you could turn on the water, close the door and wait until the water was hot before getting into the shower.
Hi Nelle,
Yes, it swings both ways. In any case, the shower, at 4′-8″ is long enough to stand away from the stream of water with the door closed.
Laurel, I have been amazed at all the work you have had to do as your renovation has progressed. How do “regular” people get all these little (but critical) details done? Your bathroom as a perfect example-WHO would catch these details and refine the drawings?
Hi Maggie,
Most people are working with an architect who would be providing project management to ensure that everything is being built as specified, and there, to trouble-shoot issues that come up. An interior designer can also assist in that realm, for aesthetic, non-load-bearing designs.
Liz’s comment about the toilet was my same thought😬
Could you make the door to the little closet by the toilet a pocket door? Since the wall is right there….
Hi GGG,
It’s going to be a jib door.
Will you not have a niche in your shower for shampoo, etc.?
Hi Susie,
I’m keeping the original shower which has a place for soap and a corner shelf in the back, but no niche.
Laurel, your toilet looks centered in the elevation – it doesn’t look centered in your drawing. Is that because of the “hole” (i.e., is the toilet to be in the same spot it used to be? – I don’t recall). Not being centered would drive me bonkers :))
What are you putting in the little closet? Towels, toiletries? Probably but I thought if you weren’t doing that, this is a good place for decorative pieces, scent jar with bamboo sticks inside, etc
This made my week- “ In my case, if I wish to look like a woman who’s allowed to live alone, the most important factor is magnification” – LB
LOVE!! I’m starting to look like Sherlock Holmes- magnifying glass, hunched shoulders and squinting- all to make my eyebrows even!! Reading your blog is one of my favorite “me” times. Thank you!
One suggestion: you may not want a down light in the crapper. Not a pleasant ambience. Very harsh. Consider a wall sconce. I know it’s not a place where you want to spend a lot of time but carry through your theme. Think of the pleasant lighting in the private crappers in expensive restaurants. 😃
Laurel,
Will you be using a round or square drain in the shower? 4 inch or 6 inch?
Small detail but thought I would ask.
Your taste is impeccable!
Hi Bonnie,
I’m not changing any of that right now. I do love the square drains, however. Actually the drain is neither. It runs the width of the shower along the far wall and is clad in marble.
I LOVE Gail’s comment and would like to say “Ditto!” The knowledge I’ve gained and lessons I’ve learned from you are priceless. And that’s not all, you are passionate, compassionate, and have a sharp wit! We are so blessed to have you share yourself with us. I look forward to every post :] Hang in there, Laurel; we are all rooting for you!
Paper plates and bowls–disposable cups, forks, spoon, knives! Get some fancy ones if you want something a little nicer, and save washing for when you really need to eat off of real plates and bowls for a change. Get prepared foods as much as you can without compromising entirely on healthy options. Then, when you’re really sick of the whole shebang treat yourself to a nice meal out. Remember, you faced down a rat! Do something nice for yourself (aside from building your dream home)–attend an event, or whatever that has nothing to do with the mental muscles you are currently over-using out of necessity.
Laurel, I can imagine how tired you are. You are on the last mile of the long process of the creation of your dream home – the last steps to completion always seem to be the hardest and fraught with hidden issues. But I think you are a design warrior! Your revised plan looks great – it appears the double shower curtain is gone? And your kitchen is really gorgeous and is about to become perfection. Love this post and looking forward to the cabinet hardware installation.
Laurel, I cannot tell you how much I enjoy your blog. I read several other interior design blogs and yours stands heads above the rest! Your professional education is evident in everything you do and in everything you recommend. This is no small thing, with so many “self-trained” designers out there!
I have loved reading the adventure of your total remodel and living it with you. It is going to be a sophisticated, and beautiful space. I have come to expect that from you, so that comes as no surprise.
Watching and learning how you navigate the inevitable problems that arise in a project of this magnitude has been a real lesson for me. So thank you, Laurel Bern, for being part of my life and teaching me so much. You are a treasure.
Hang in there I used a laundry tub in the garage for 3 months it was our only sink. Kitchen was on my dining table microwave hot plate countertop oven Mr coffee. We lived in our house while doing to the studs remodel. I’m 66 hubby 78 you can do it.
Your bathroom is going to be gorgeous! I have a similar side vanity cabinet that is camouflaged with molding. It has a simple push latch so it looks like wainscoting. It holds so much! I had them place outlets inside the cabinet so I can store my blow dryer on one side and electric toothbrush on the other along with all my makeup and creams. It even fits a little extending wall mounted magnified mirror that I use occasionally. Design matters so much!
will the sconces in the bathroom provide enough light for makeup? Down lights over a vanity are the worst for making up as they cast shadows –
Or that problematic too-long tub/toilet wall could get a miniaturized curve treatment such as you did in your kitchen base units. Tricky but not impossible in the hands of a craftsman/woman.
Am I the only one swooning over your stove?! I got completely distracted when I noticed it in the kitchen lol. I don’t think I had seen it yet. It’s beautiful! Hang in there with all these surprise issues…will be worth it in the end.
I guess I forgot how your bathroom was going to look. Seeing all of these details makes me so excited for you.
At first I winced when you said you were eliminating the medicine cabinet. But you’re right, with the side niches it’s not needed. Not having a recessed medicine cabinet is something I regret not doing.
Your contractor is fortunate that you can provide him with the specific drawings needed to build your beautiful bathroom.
When I saw the big cardboard tube I thought it was your mural. But the bolts are equally as exciting.