How To Mess Up a Tile Installation Without Really Trying! (Parts 1 and 2)

Greetings on this Memorial Day Weekend. This is parts 1 and 2 of the kitchen tile installation debacle.

If you’ve already read part 1, please click the link below to read part 2. If you are here for the first time, or wish to review, please read from the top of the page.


Part 2 Begins Here


Guys,

Most of the time, I’m upbeat and satisfied with the work, not the pace, but I don’t have many complaints about the work itself.

I was all set to show off my new subway tile installation. However, I imagine you can guess from the headline that things didn’t go well today.

I took pics yesterday, which I can share, except the tile no longer looks like this.


It’s not the grout *lines*.


No, the grout lines are fine. The grout color is fine, too.

What’s not fine is that the grout STAINED the tile– badly.

I’ll let that one absorb into your gray matter for a sec.

*

*

*

But, here’s the really horrible part. (Although, it may be the thing that will save my arse from any blame.)


***I left the tile guy a note this morning.
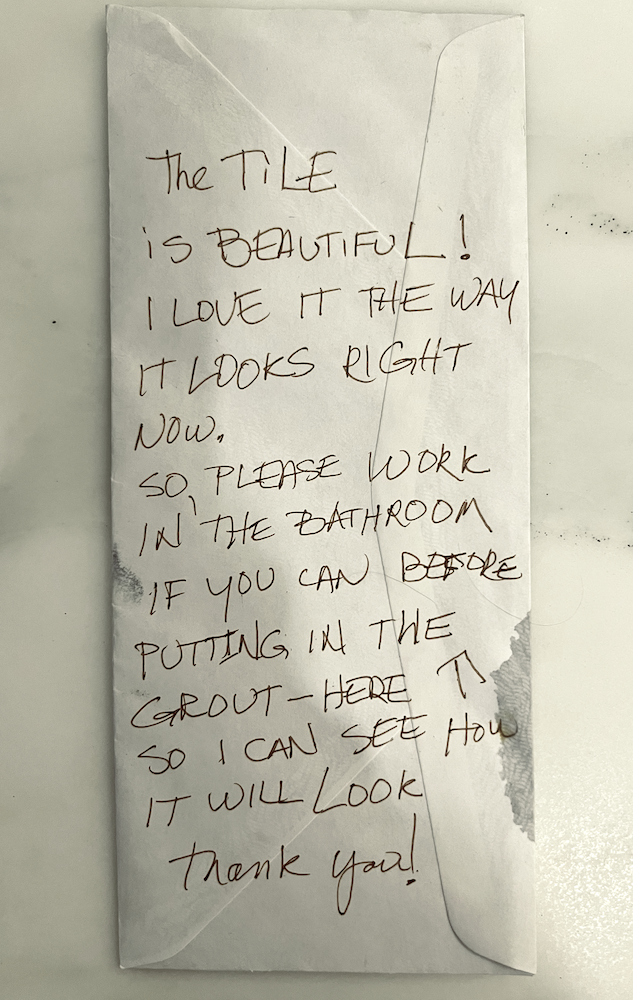
 

So, just before 9:00 AM, I dragged myself out of bed to use the bathroom, and you know what’s coming, don’t you?

Yes, you know, because I already told you what happened.

It’s really a good thing I don’t own a gun.

I tiptoed past the kitchen, trying not to look like I wanted to claw this dude’s eyeballs out.


“Did you get my note?” (Seeing that it was missing from the counter, I knew he did and ignored it.)


He said, “It’s going to dry a lot lighter than it is right now,” as he kept smearing dirty water all over the tile.

Did I say anything about the darkness? No. In my note, I said I wanted to see how it looked. The grout didn’t look bad as it was, so after my potty break, I went back to sleep.

(Pleeeeeease, no judging!)

My sleep seems more messed up than ever. However, I’m completely over my cold, and the allergies should be finished just in time for the mosquitoes to feed on my type O-positive blood.


The tile guy was gone when I emerged from my room just before noon.


I went into the kitchen to check out the grout. It didn’t look substantially different from the ungrouted version. We used a medium-dark gray with a slight green cast.

But something seemed off. I figured I wasn’t used to seeing the tile with the grout, so I let it go.

In the meantime, Eugene was hard at work. And OMG, he’s almost done! (Although, I really shouldn’t say that yet!)


Laurel, are you going to show us the tile?


Yes, of course. First, I will show you the subway tile installation from Monday morning.

This first image is the kitchen with the lights off.
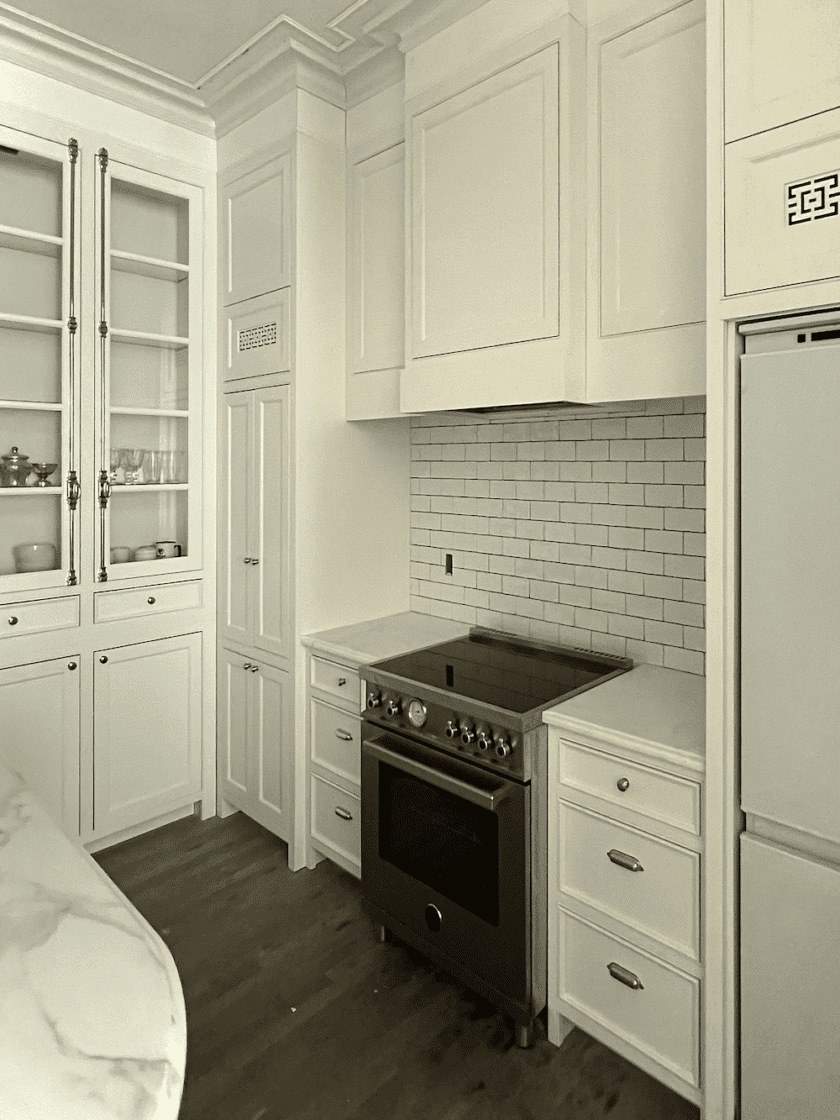
new old kitchen subway tile - lights off


Below is with the single bulb, range lights, and sconce only. (And yes, they finally patched up the old exhaust hole.)
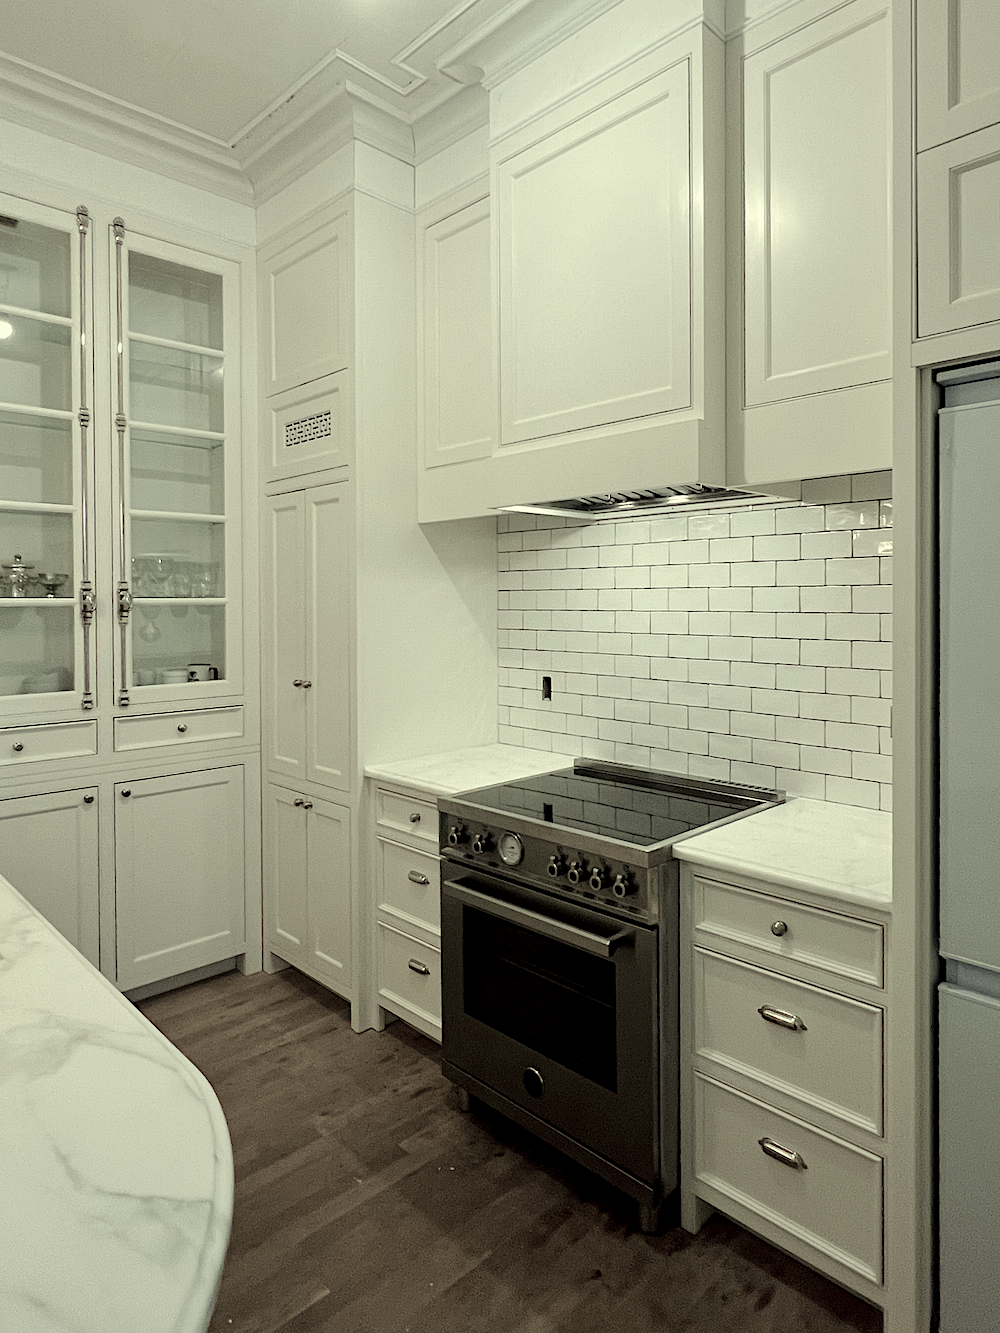
 

new subway tile - range backsplash

Above is the same view with the so-so lights on. The LED is creating problems for some images. This is not as sharp as it normally is, and the lighting is not great. But it doesn’t make me go running for the hills.
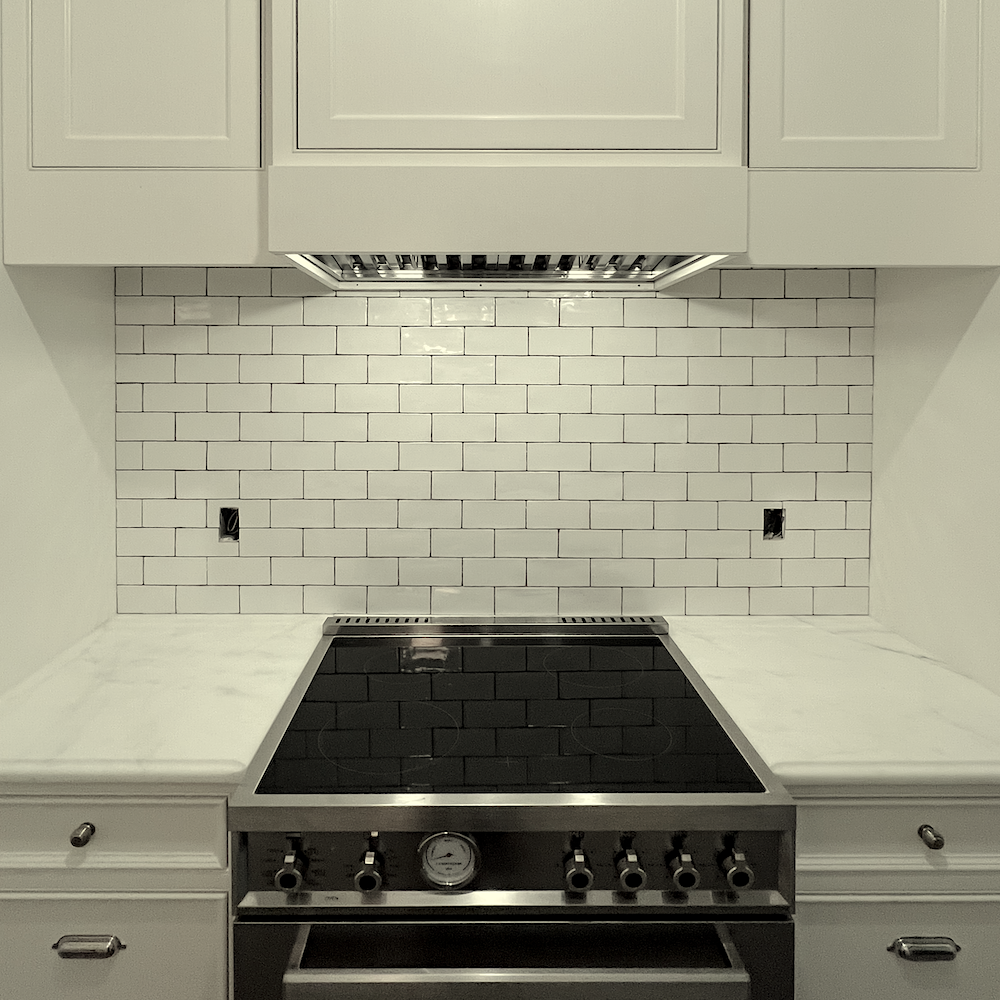
 

range wall subway tile

Groutless tile installation above the range.

I have no fault with the tile installation. Pip did a great job.
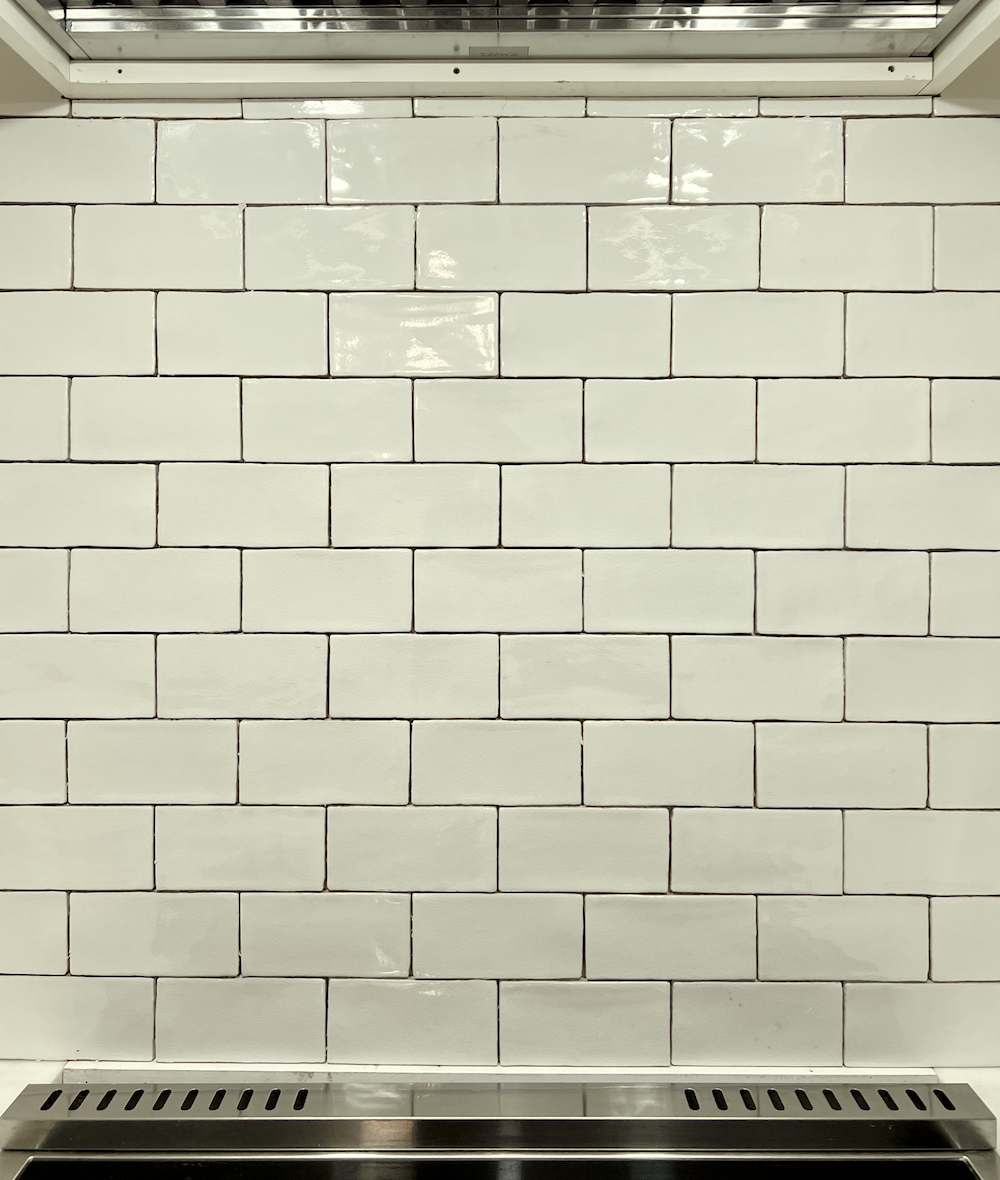
 

A closer view of the beautiful, creamy subway tile installation. The range is still pulled out.
 

Kitchen subway tile living room - renovation 2024

This is a fantastic view, or it will be when all the crap disappears! This truly is the kitchen I was envisioning.  The camera lens doesn’t know what to do with all of those knobs except for the top one on the right. Too funny!
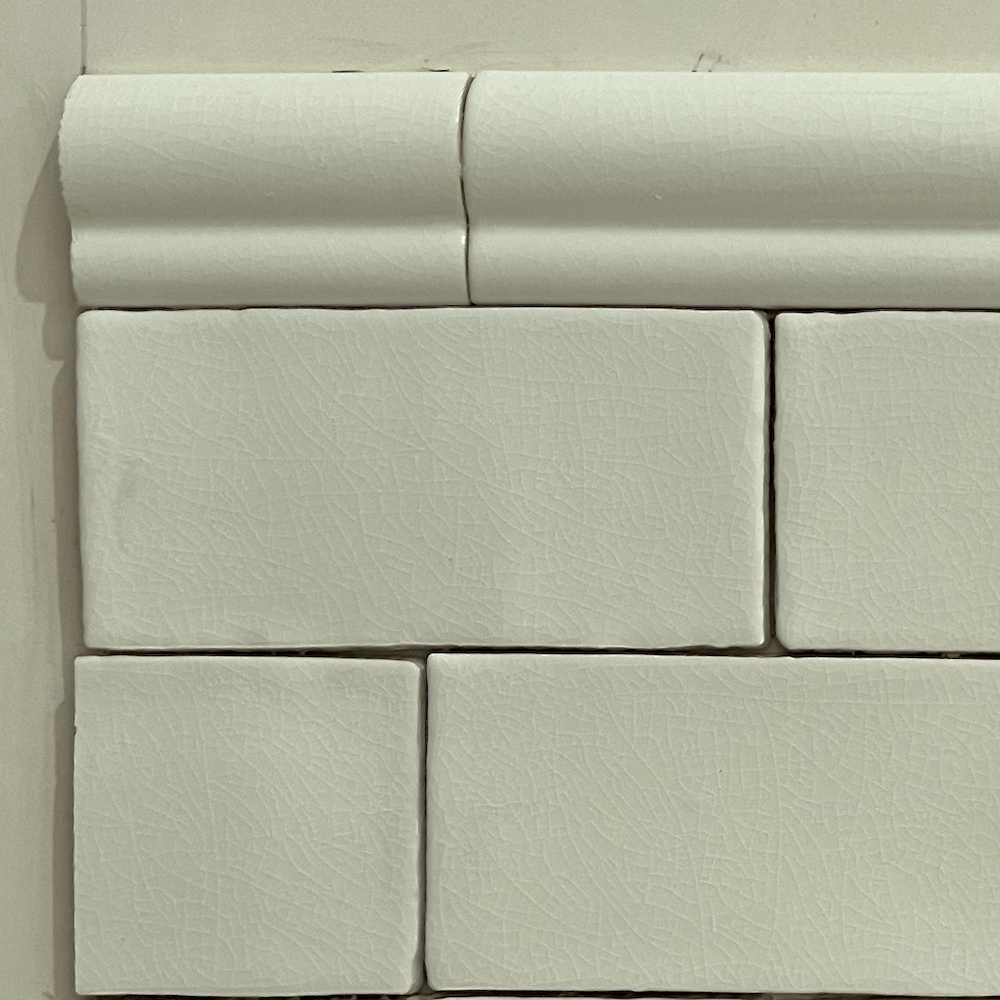
 

historic decorative materials - historic white subway tile

This is a close-up of the handmade subway tile from Historic Decorative Materials in Historic White.

Please burn this image into your brain.
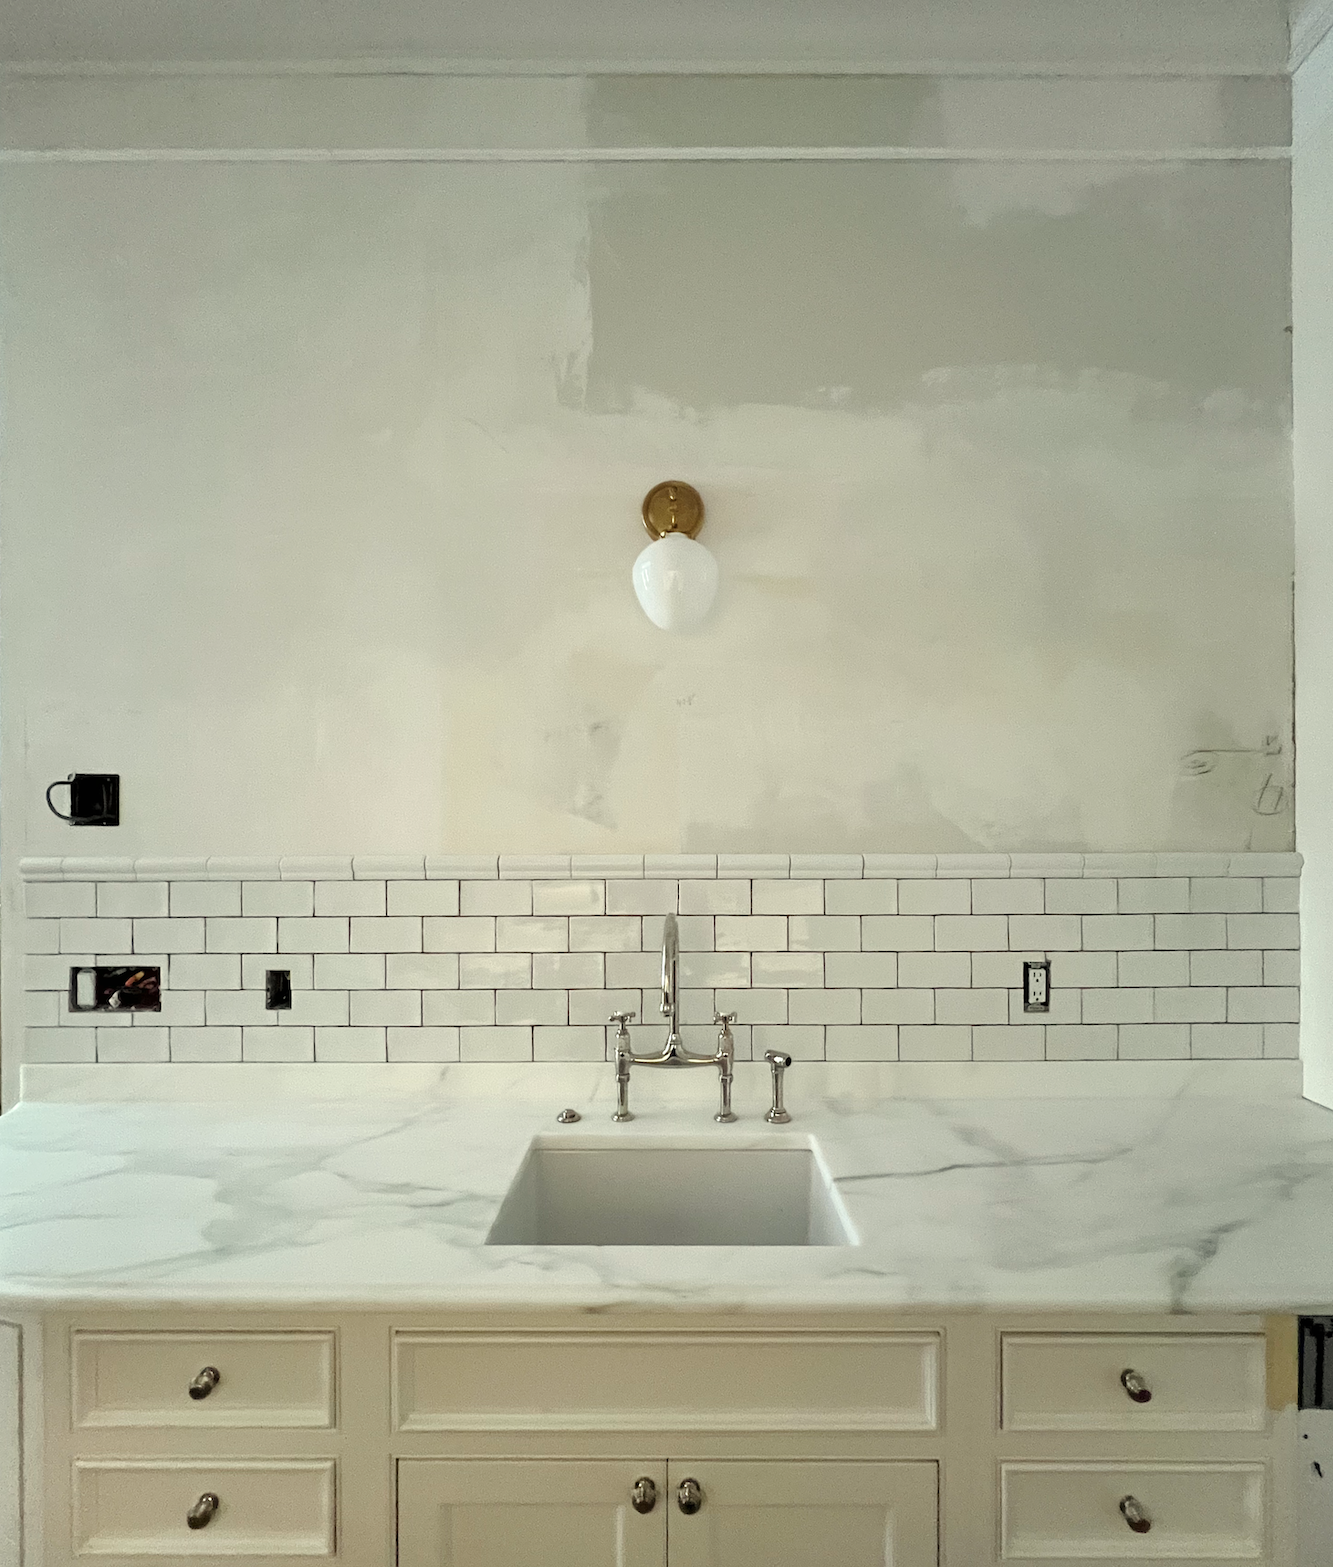
 

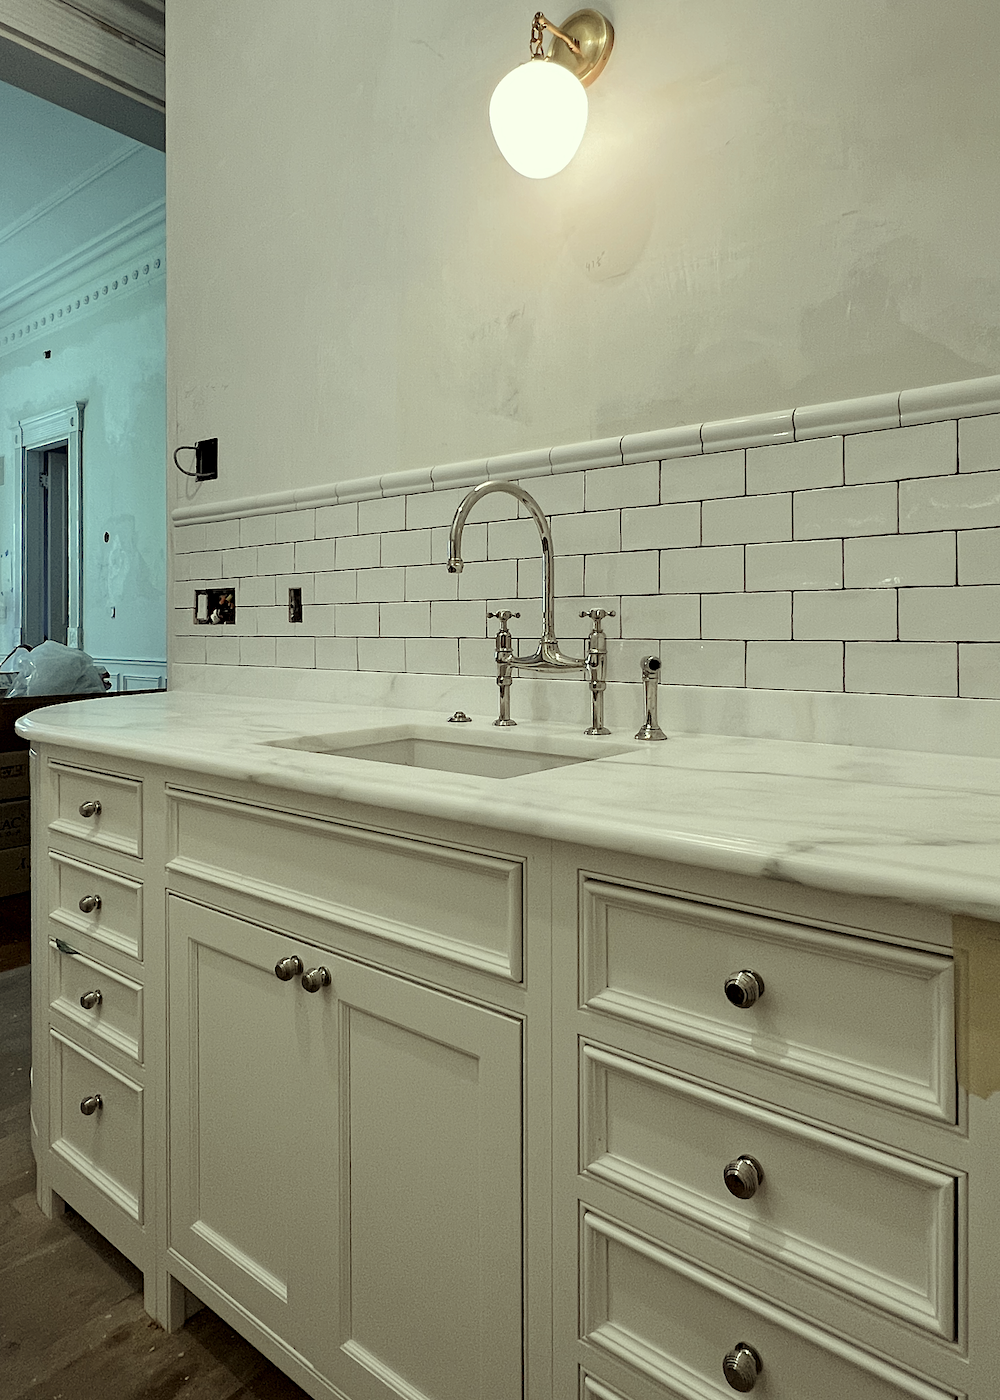
sink wall subway tile


Okay, this was the subway tile  installation yesterday.

I love it!

What happened is that after Eugene left today, I went into the kitchen to watch the grout drying.

And that’s when I saw what was bothering me earlier.
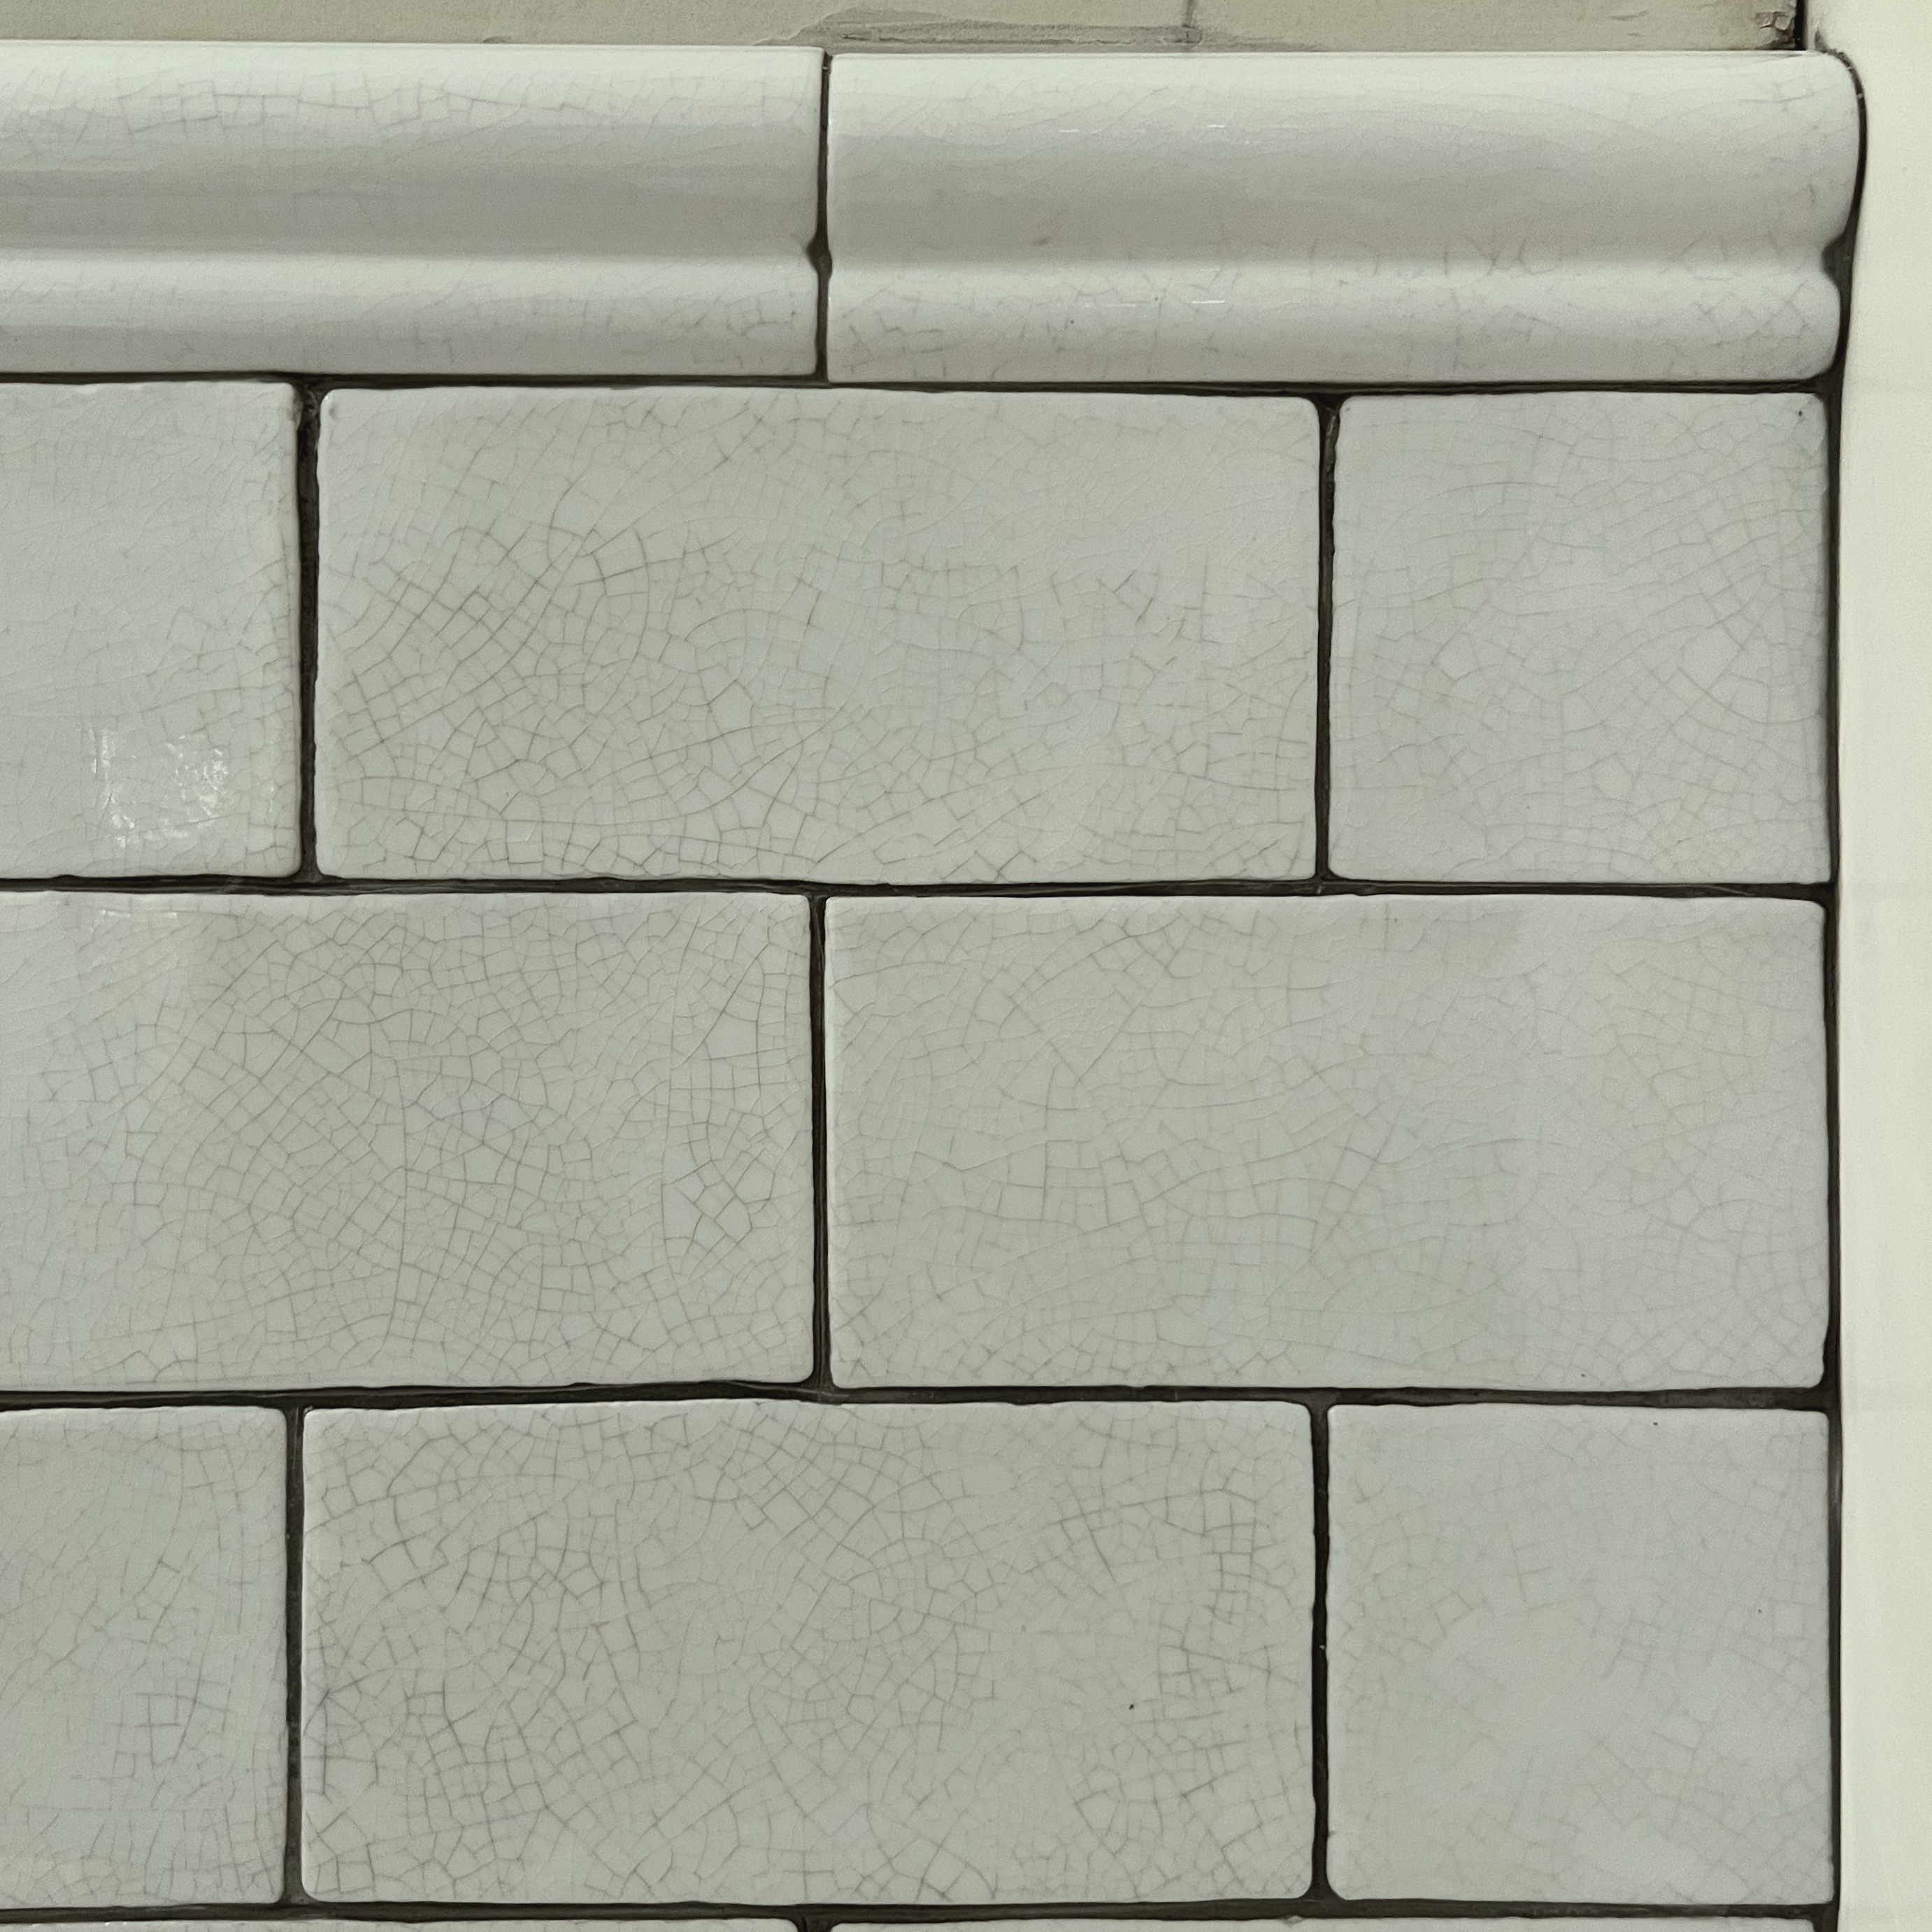
 

discolored tile from grout

WTF???

Scrolling up a bit, you’ll see that the craze lines are subtle and white-ish. In fact, you have to be standing inches away from the tile to see them.

Okay, some people would say this is cool because it adds to the aged effect of the tile.

I would say it adds grunginess, not age.

Before I shot this image, I tried to get the grout seepage off. I used water and vinegar, too, being careful not to hit the grout. I also used a toothbrush. Occasionally, my paper towel had a bit of residue but nothing substantial.
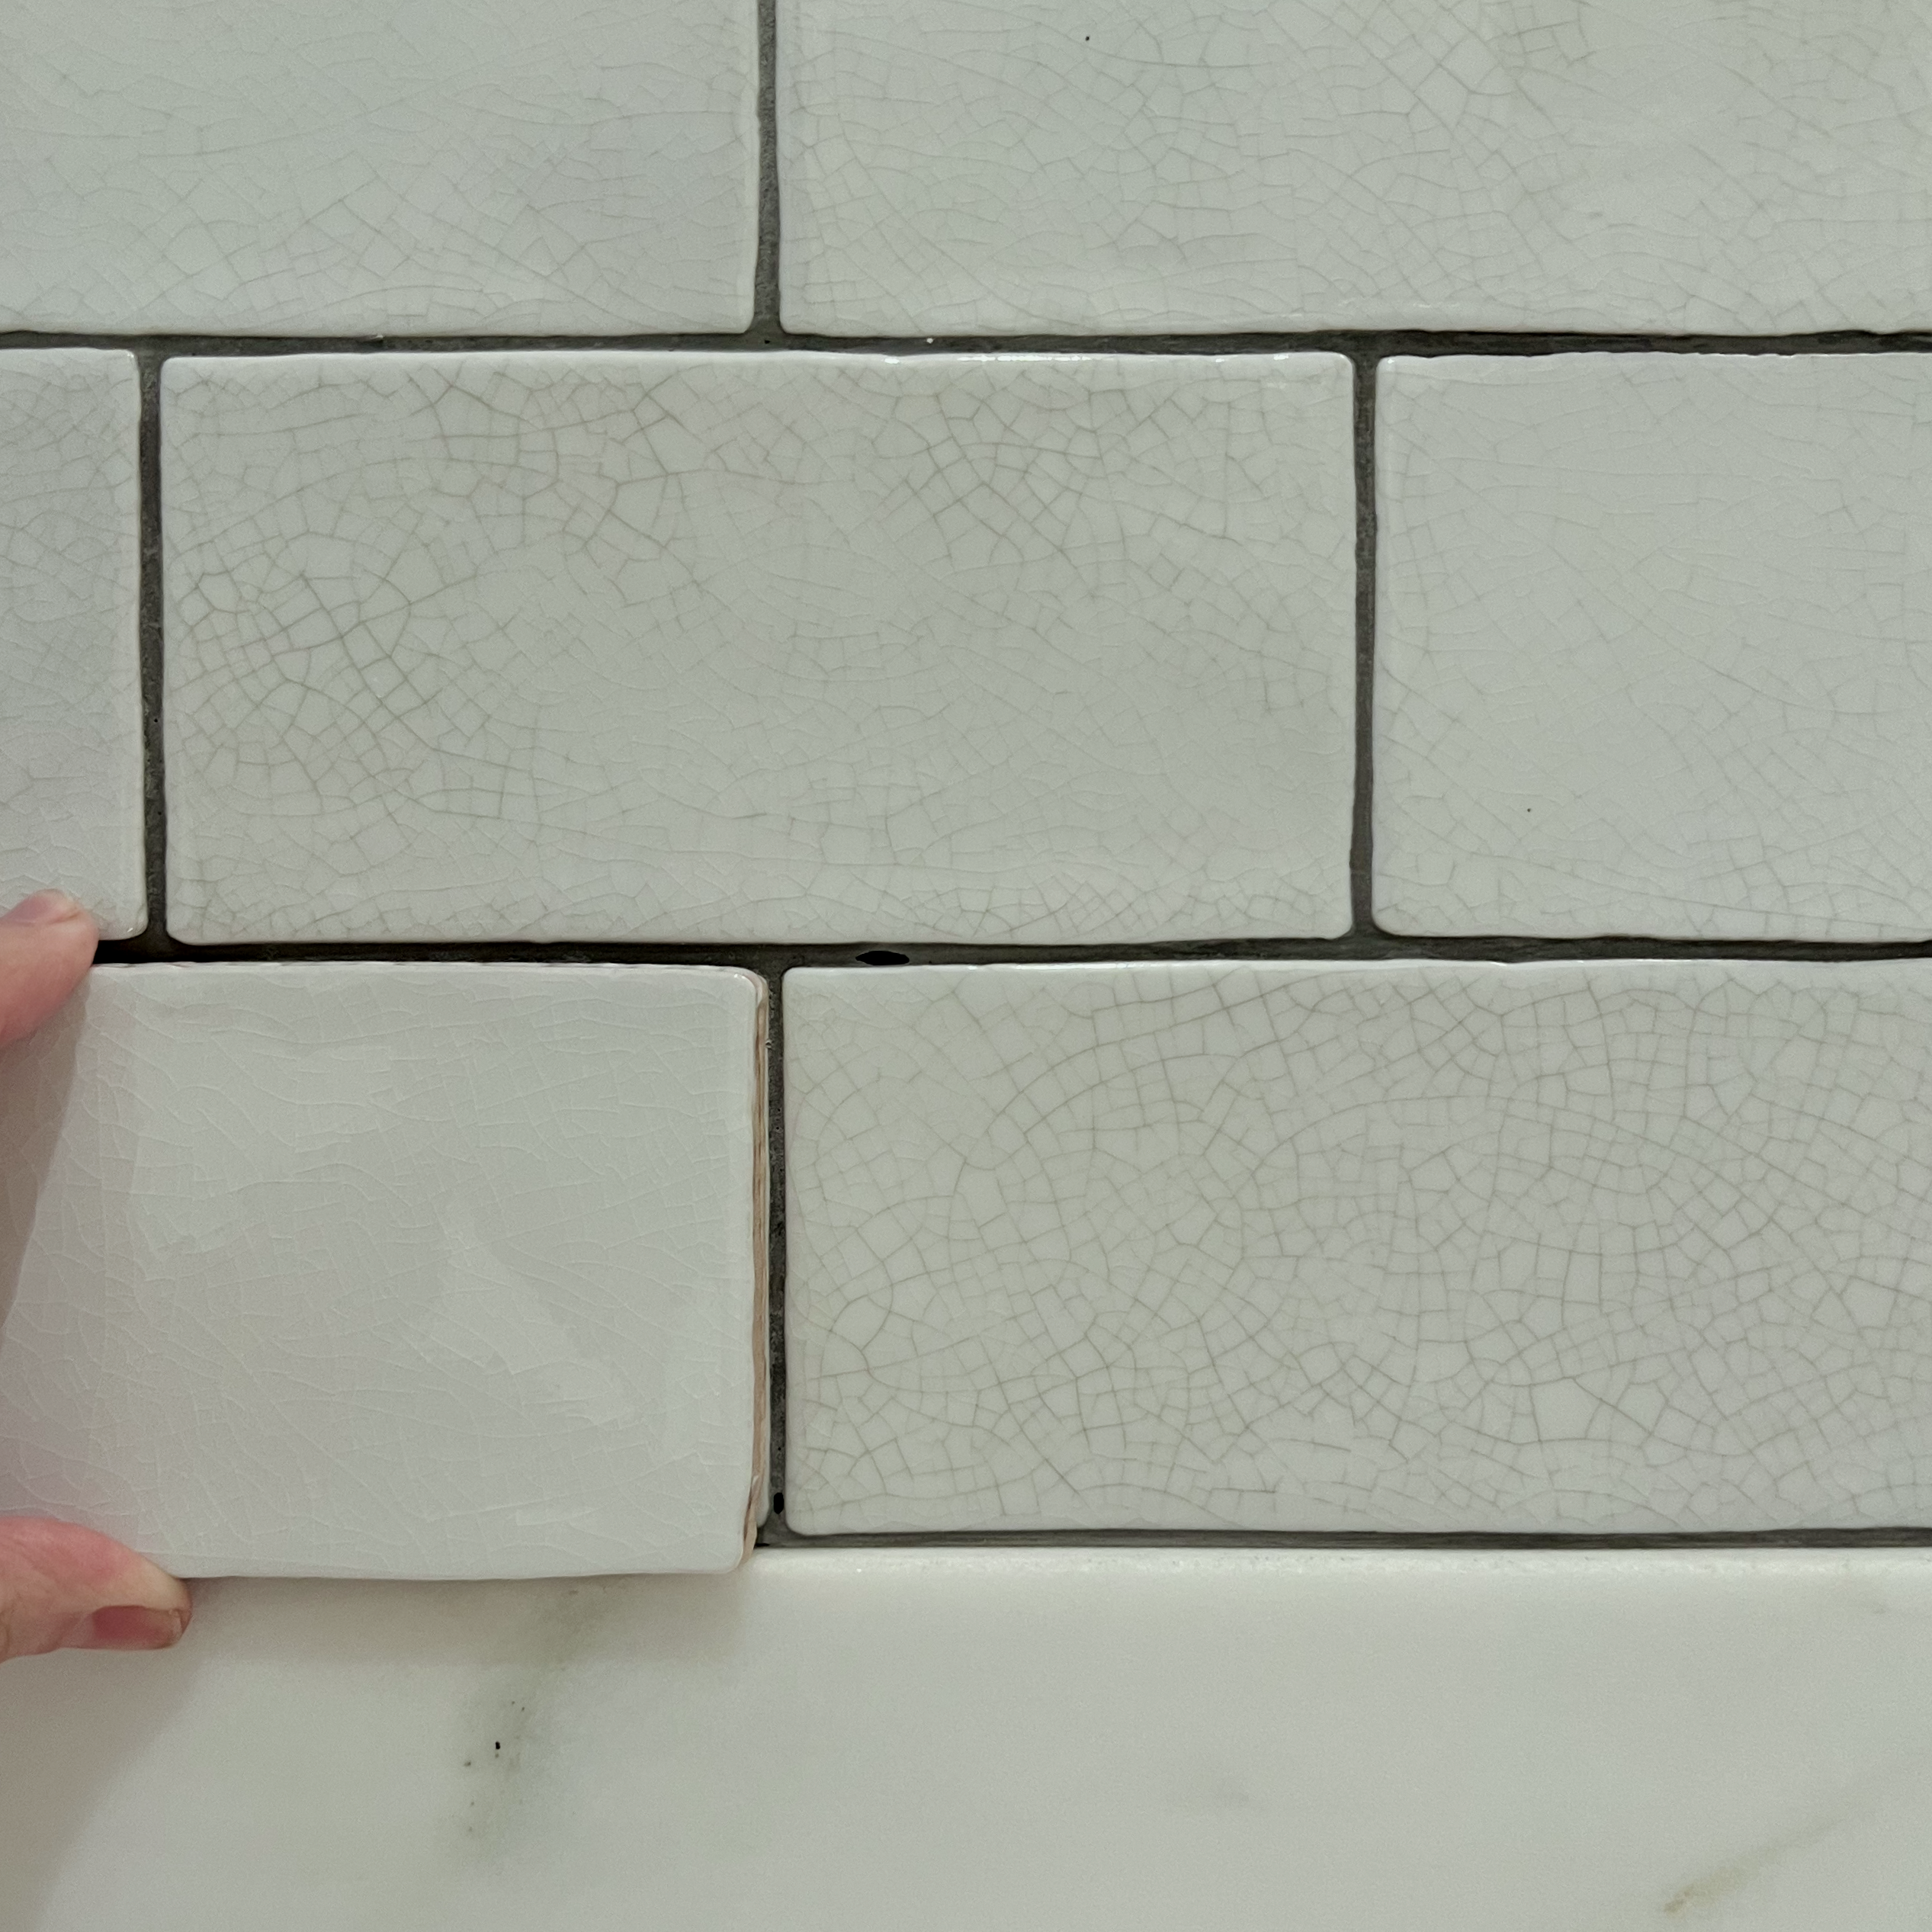
 

craze lines discolored tile
Above, I’m holding a virgin tile next to one of the worst tiles I worked on for several minutes.


Oh, why, oh, why did this have to happen?


Oh yeah, it didn’t have to happen! I wrote that idiot a note, damn it. Like, what part of please hold off on the grout did he not understand? If he had taken the time to make a sample which is the responsible thing to do, we would’ve caught the problem before it became a PROBLEM!
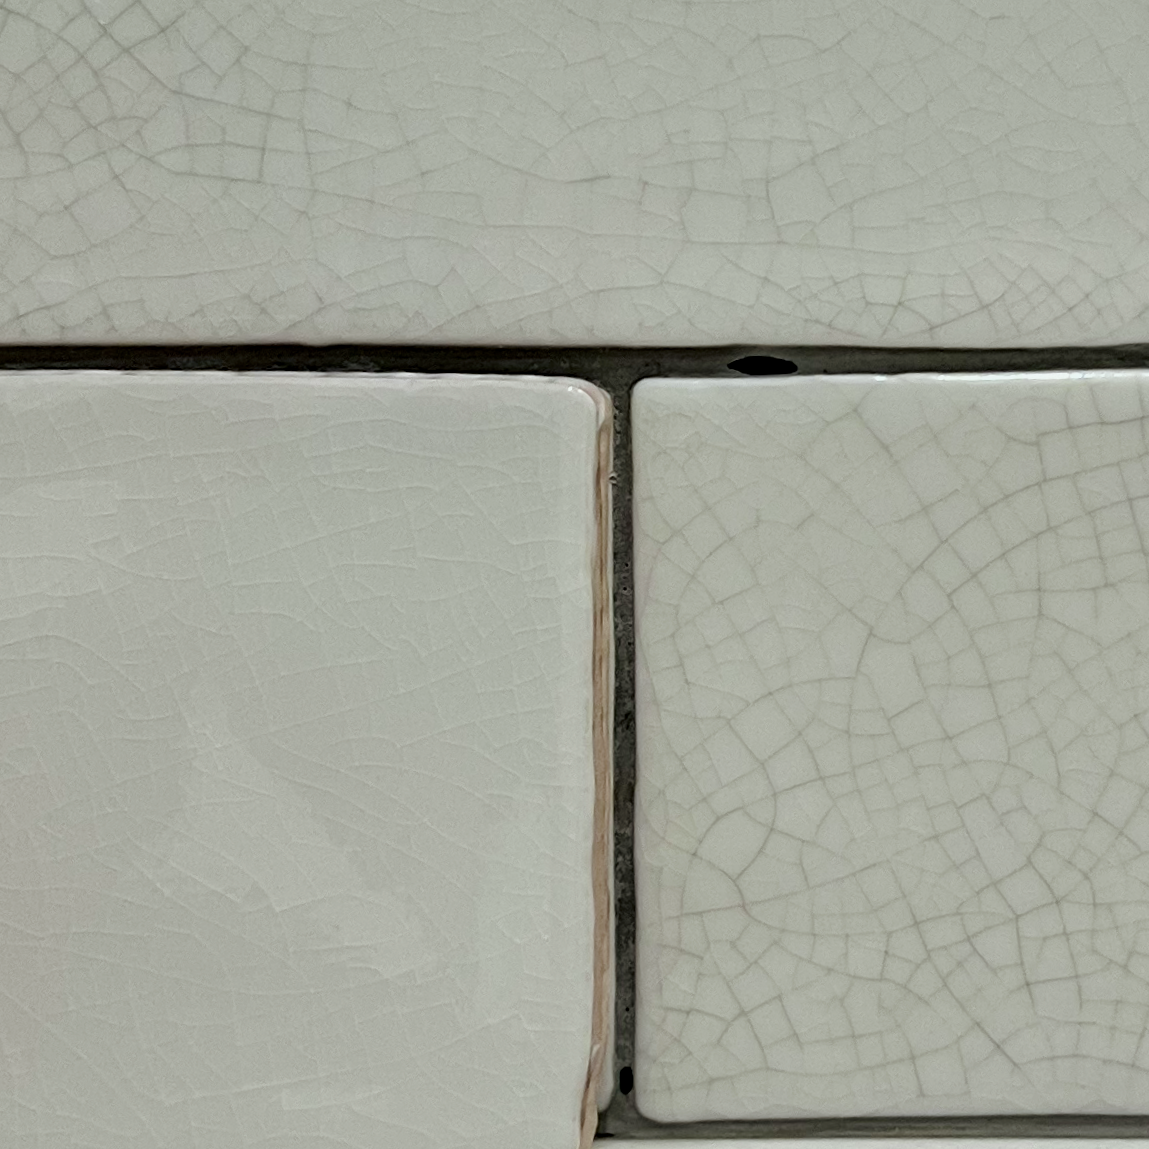
 

craze lines discolored tile copy

This is a super close-up. In fact, on my 14″ MacBook Pro, it’s larger than life. (The virgin tile is on the left.)

Now, I was kicking myself because we could’ve done light grout, and I could’ve gotten a grout pen and made the grout lines darker if I wanted.

Now what?


Is all of it this bad, Laurel?


Overall, yes, but some isolated areas are passable.
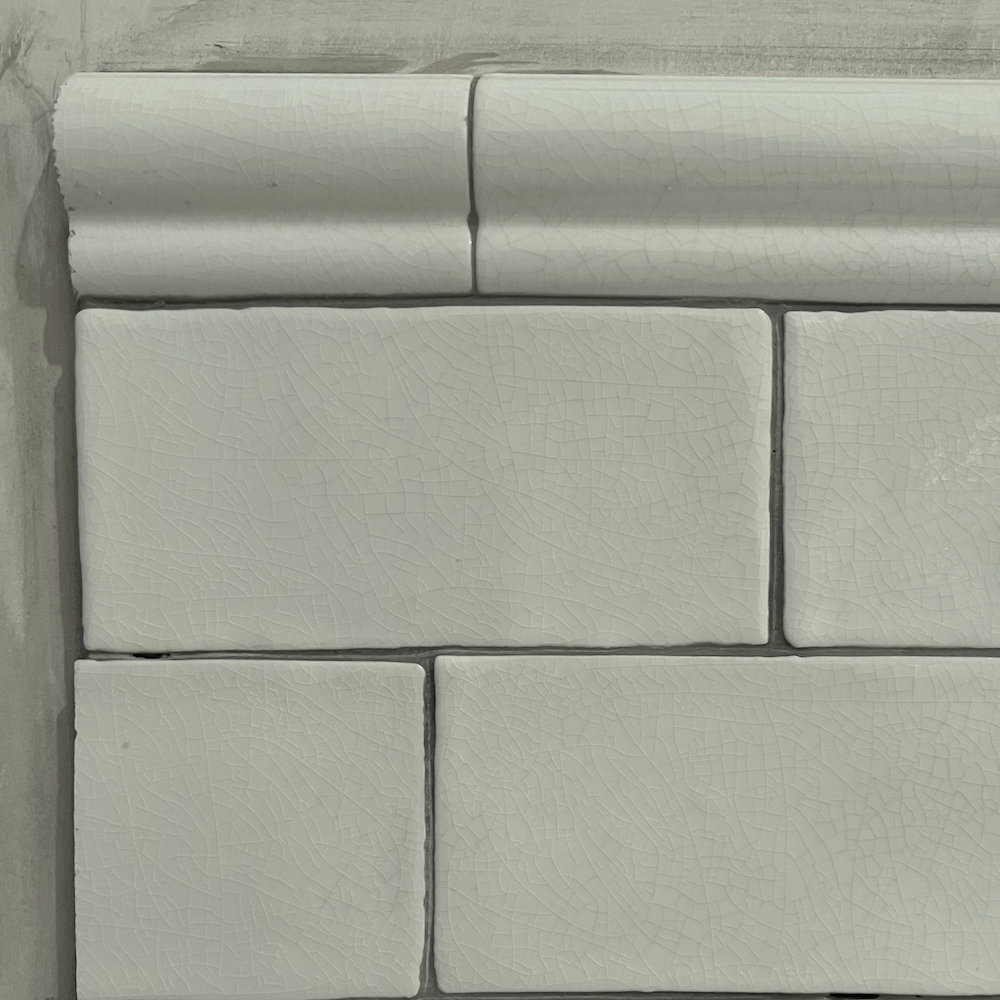
 

As you can see, this is today, after the grout. I’ll bring yesterday’s tile installation down to compare.
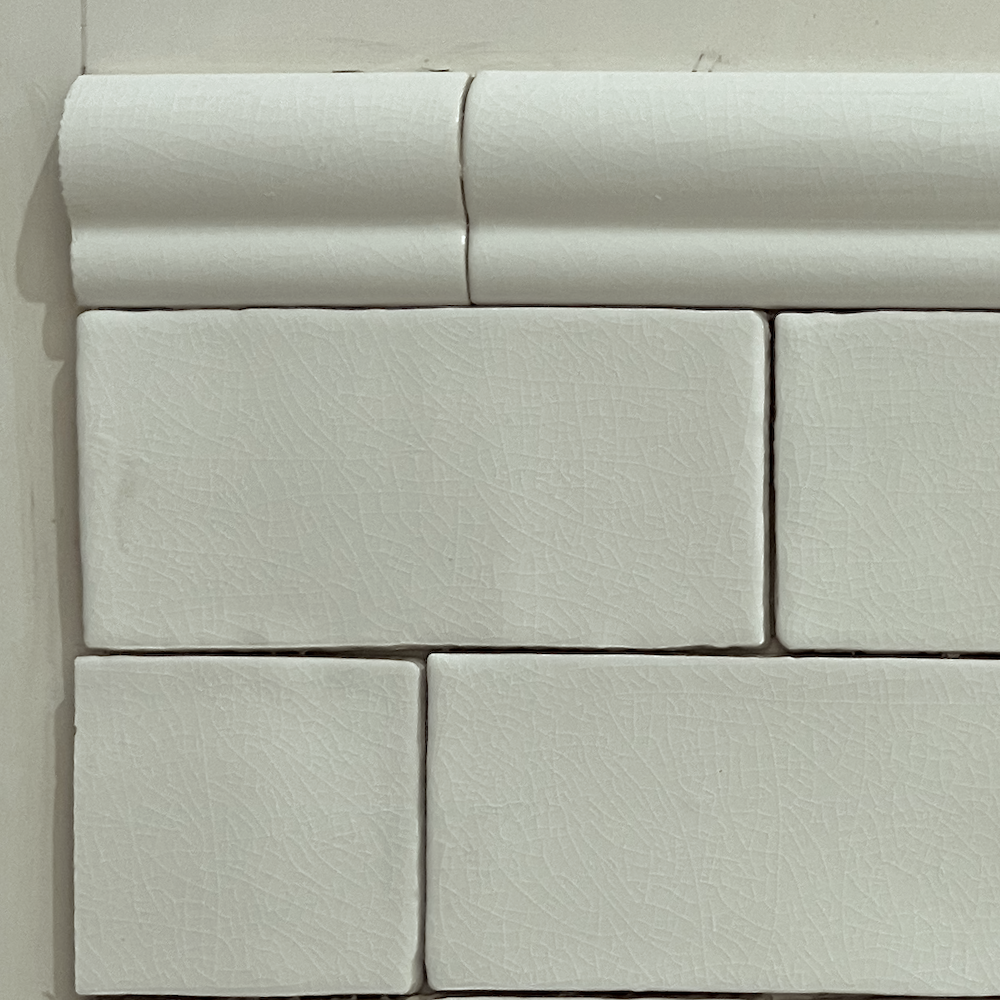
 

historic decorative materials - historic white subway tile

If all it was was the top image, no problem. That’s hardly noticeable.

However, most of it is a mess.


I did Google this issue but didn’t come up with a lot.


The thing is, those cracks are so fine I don’t see anything much coming out.

Dear me, do I have to live with this? It would have been different if I hadn’t left him a note. In any case, a sample should be SOP, just like a floor finish sample is.

However, if he can’t get most of it out, I would like it redone. Wouldn’t you?  This new color clashes with the cabinetry, and it’s lost its lovely creaminess in favor of muddiness.


Because Historic Decorative Materials has a minimum order of 55 square feet, I still have enough left to do one side or the other.


We only used about 35 square feet for the entire kitchen. If I explained what happened, they might allow us to get just enough to do the other side. Fortunately, the tile is only $14 a square foot. Imagine if it was Ann Sacks and $65 a square foot!

I sent Robert, my GC a text with the handwritten note and a few images.

Poor guy. He’s had a lot of aggro from me recently. I feel bad about that, but I’m spending a lot of money, and I’m tired of people who are in such a bloody hurry that they can’t be bothered to do the job right.

This makes the HV/AC guy, the floor guy, and now the tiler. I’m not too thrilled with the electrician, either, the boss, that is. However, his employee, Peter, is first-rate.


I didn’t hear back from Robert which means he’s unhappy.


Of course, he’s unhappy! We do have a meeting scheduled tomorrow morning to discuss the bathroom floor.

No wonder I’m sleeping strange hours!

If anyone happens to know for a fact how to remove grout from fine cracks without destroying the tile, please let us know in the comments.

Thanks again for listening!


*********************************************************

Part 2 Begins Here


I began this (part 2) on Thursday and finished it on Saturday afternoon.

Gosh, guys! Thank you for the dozens of kind, empathetic, helpful comments. You displayed some awesome critical thinking skills and came up with some fantastic ideas that might help rectify the situation.


So, here’s what happened last Wednesday morning.


Robert came over, all tan from his vacation, but he wasn’t his usual warm self. No, he was all business-like as he forged down the long hall to my apartment.

I followed along, resolving that no matter what happened, I would remain calm and in control.

He made a bee-line for the kitchen where I had left my note to Phillip the day before. However, I had already sent Robert a photo of the note and a few pics of the stained tile.


Did you see the note? I asked.


He shook his head with a barely audible but exasperated no.

I let him have his moment. I understood completely. I’ve been there more times than I care to remember. However, if you’d like to hear about several mistakes I’ve made in the past that together cost me tens of thousands of dollars, read here.


Then, I said. “Do you know of a way to get this out?”


Without skipping a beat, he said, “No, that can’t come out”


“Well, if that’s the case, I want this redone because the grout has stained the tile unattractive. I’ve already checked. We have a little over two boxes left out of five. That means we only need one more box of tile. I will call to see what their stock situation is like.


Robert didn’t argue with me. So, we went downstairs to deal with the floor.


Phillip, the tiler, was there, working on the bathroom, and was as defensive as possible. He claimed the tile was glass (Whaaaaaat?) and that he had never worked with anything like it before.

No, of course not.
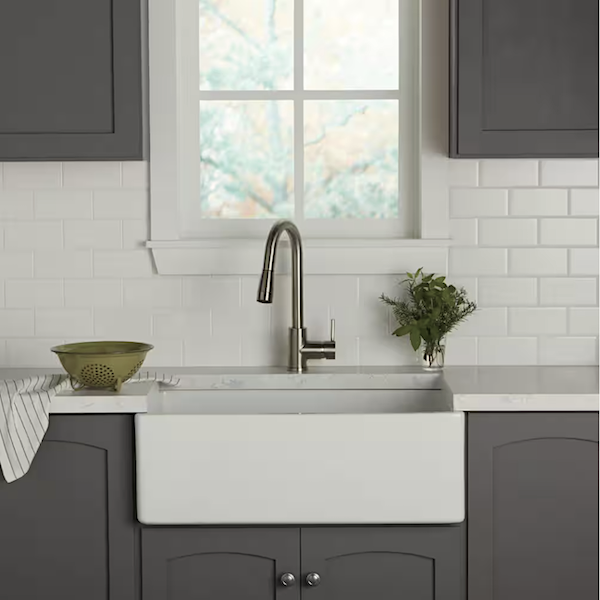
Daltile, white subway tile Home Depot
That’s because the bulk of his work is stuff like this, which is available from Home Depot for $1.20/square foot.

Don’t get me wrong. I couldn’t afford to get one box of the $1.20/square foot tile for most of my life. It gets the job done, but it’s nothing extraordinary.

I asked Phillip if he had read my note. Yes, he did, but as some of you so astutely pointed out, he honed in on the word “IF.”

That’s my mistake. However, I did say I wanted to see how it looked FIRST. He said, he didn’t have his saw to work on the bathroom, so he had no choice.

I said, yes, you did; you could’ve left.

Then, he started shreaking.


“And, who the f**k was going to pay me for my time?”


I would, but you cannot speak to me like that.

And then we went into the bathroom. I said I understand now that the entire floor down here is crooked, so it’s a moot point. We can’t fix the bathroom floor without putting up floor saddles. So, if you don’t think it’ll worsen, let’s leave it as is. Then, we went over everything else that needed to be done which, except for the stairs, isn’t a lot.


Robert said they would take the tile down immediately because the longer it’s up, the more difficult it will be to remove.


And, just like that, it was gone!
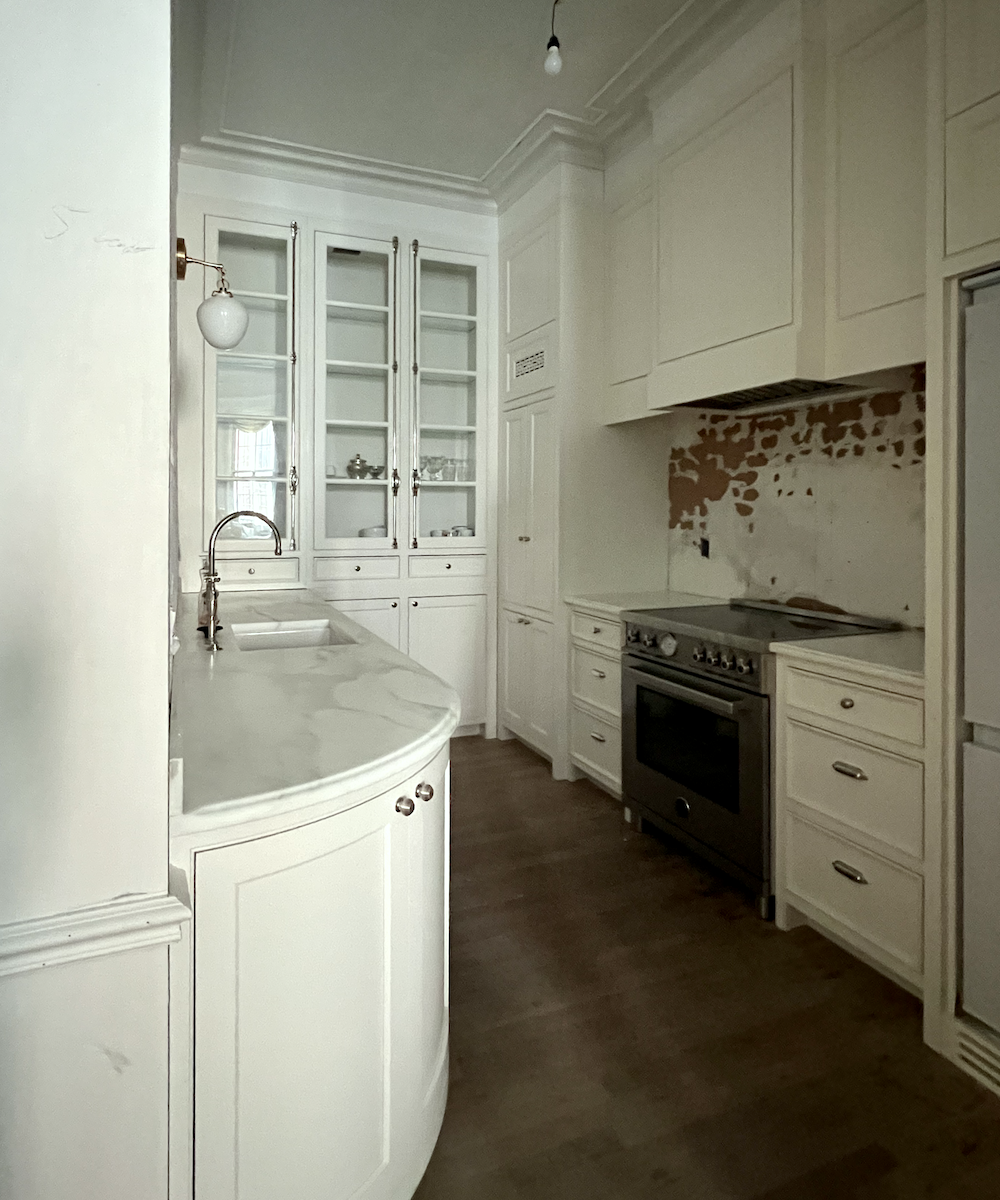
 

Kitchen without tile

The wall looks worse here than it is.
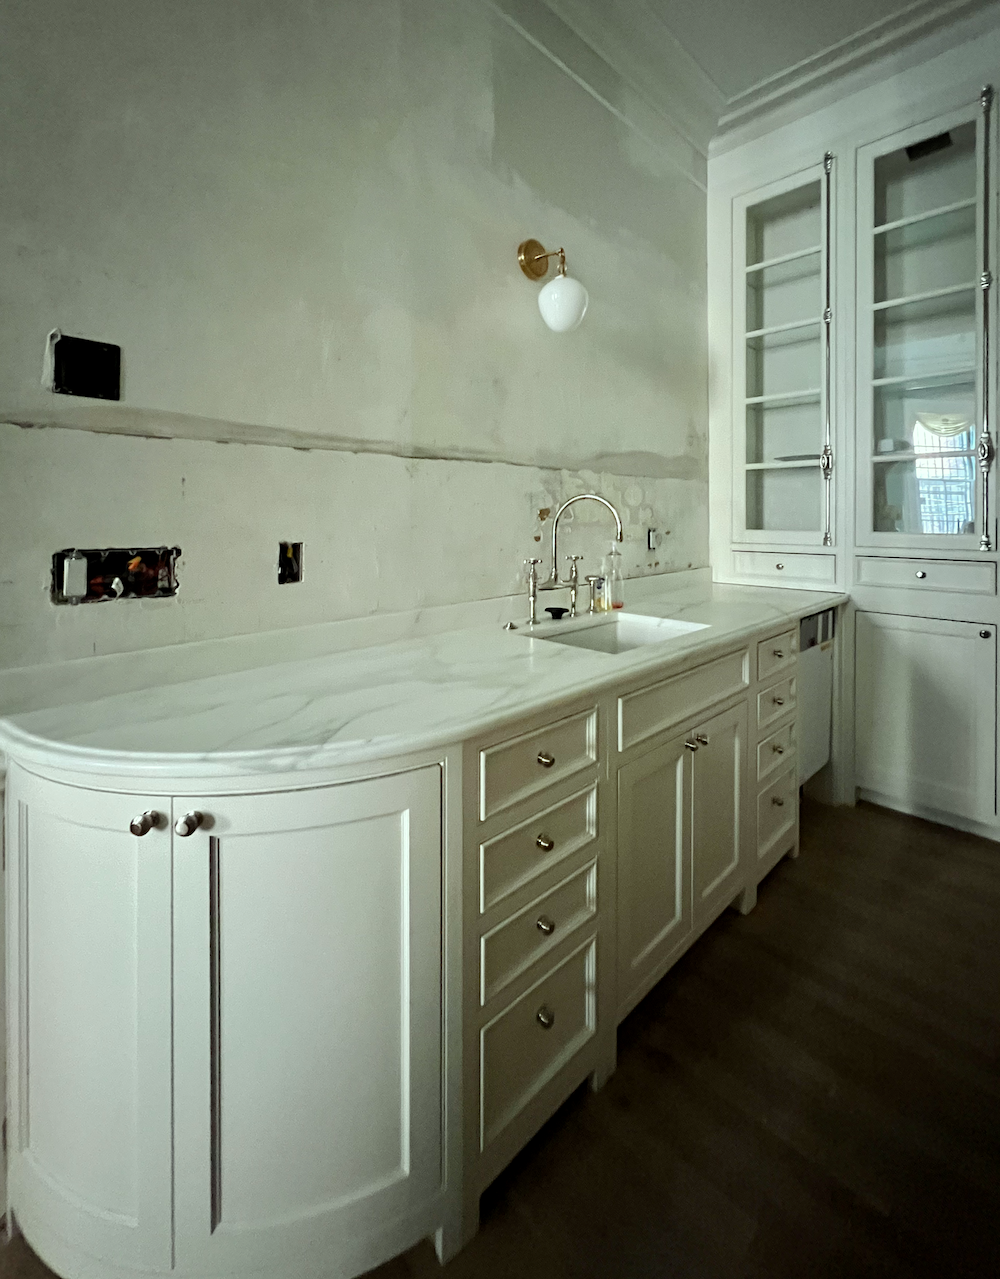
 

sink wall, no tile

I was willing to try and fix the stained tile, but that would’ve meant the tiler would’ve needed to work on it, and it probably wouldn’t have improved.


Later, Phillip needed to see me in the bathroom because the new shower tile was about a 16th inch smaller than the old tile.


The solution is to make slightly larger grout lines. From then on, he was delightful and joked around with me.


Now, for the replacement tile.


I called Francois, the manager or owner of Historic Decorative Materials, and explained what had happened.


I told him that the grout had stained the tile horribly.


His answer was:

“Oh, I’m so surprised. This has never happened before. I have the same tile in my own home and love it!”

Yes, I love the tile, too, but I have a decorating blog, and many readers have said that it should’ve been sealed before it was laid.

He ignores that and repeats, “Well, this has never happened before.”

No, of course not. (eyes rolling) However, it was clear I wasn’t going to get anywhere on that front, so I said, do you have any tile from the same run?

“Yes, it’s all the same,” said Francois.

“We only need one box, plus 18 tiles for the chair rail.”


“By the way, the chair rail and field tile don’t match,” I told him.
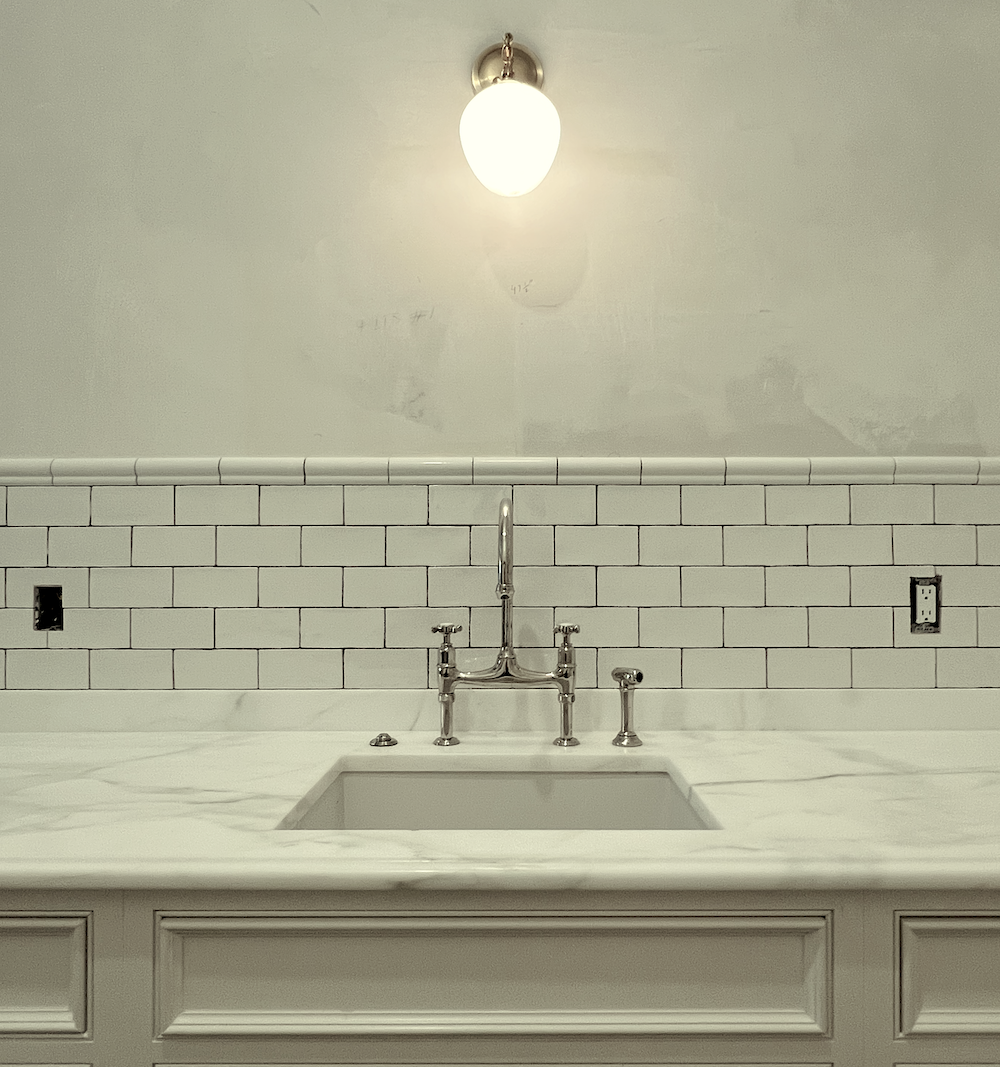
 

sink new subway tile May 2024

They never do, he said without skipping a beat.

Now, that one, he’s heard before. It’s not noticeable in the image above, (before the grout) but the chair rail is a little lighter than the field tile.


Francois then said he would sell me what I needed with a 50% discount.


Okay, thank you I said. I was in no shape to haggle.

“I will send you an invoice shortly, he said.”

I called him the next day because I hadn’t received anything and he brusquely said he was very busy with orders.

That is not what I would’ve said.


Before this happened, I ordered some sealer for my kitchen counters, which came yesterday.


Incidentally, Phillip, the tiler, who did a nice job in the bathroom tile installation, said he would make a sample board for me to experiment with.


He forgot.

However, I found the stained, exiled (extiled?) kitchen tile on my patio and brought several of them upstairs to the kitchen.

I also took out some fresh tiles to begin my experiments. Today, I put two coats of the noxious sealer on two tiles. No change.

In further experiments, I soaked one of the stained tiles in half water/half vinegar with a handful of baking soda. After 7 hours, there was no difference. I also smeared bright white (they call it) grout over both a stained tile and a virgin tile. I let it sit for about 20 minutes, but I also tried to work it in with a plastic spoon. Neither tile showed any change once rinsed off.


Tomorrow, after the sealer has cured for 24 hours, I will smear dark grout over the sealed tiles.


I will also smear it over another virgin tile to see if that replicates what happened after Phillip’s grouting.

In the meantime, most of the gray grout is still stuck to the edges. It’s a true cement color. It looks darker when the tile is up, than it is. Below is my kitchen drain stopper for comparison with true black. (I know, only the finest plastic for me! lol)
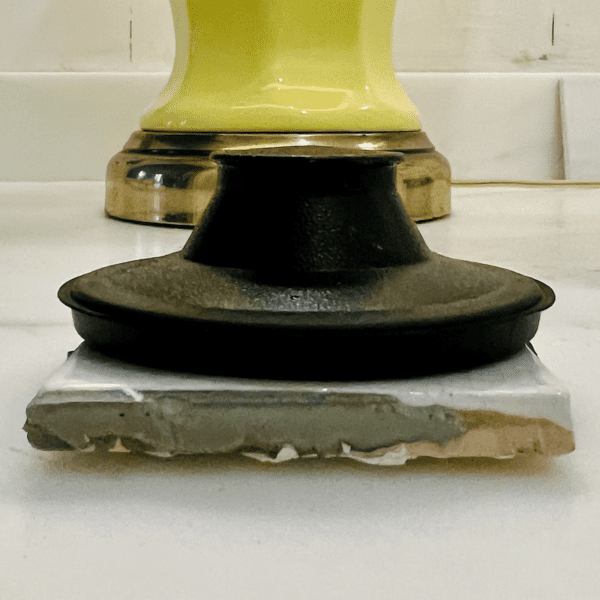
 

medium gray grout stained tile
Imagine how the tile would’ve looked had we used dark gray or black grout.


I know you’re busy shopping, so I’ll let you get back to it.


However, one last teaser  preview image.
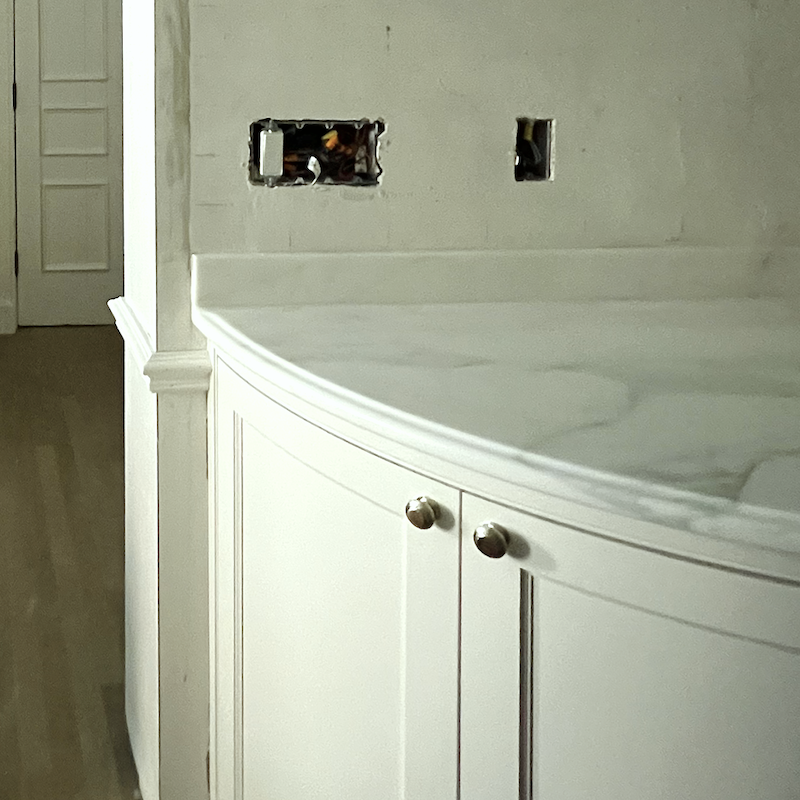
 

kitchen - no tile - entry door


Oh, Laurel, is that a new front door? I thought you said you weren’t allowed to change it.


You’re right. I’m not. It’s the same door. hehehehe More about that soon.

In the end, it wasn’t a terrible week. They agreed to replace the tile.

And, despite Brendan leaving at the 11.5th hour, Eugene was here every day, working super hard.

I can’t wait to show you what he did. I’m pretty sure there will be more on Monday evening.

Please enjoy the rest of your long weekend.

xo,


***Please check out the recently updated HOT SALES!

These are the best sales of the year, so far! If you need some gorgeous lights, please check out the Hot Lighting Page as Visual Comfort has put their entire line on sale, but only through Monday, May 27th.

There is now an Amazon link on my home page and below. Thank you for the suggestion!

Please note that I have decided not to create a membership site. However, this website is very expensive to run. To provide this content, I rely on you, the kind readers of my blog, to use my affiliate links whenever possible for items you need and want. There is no extra charge to you. The vendor you’re purchasing from pays me a small commission.

Amazon ad

To facilitate this, some readers have asked me to put

A link to Amazon.com is on my home page.

Please click the link before items go into your shopping cart. Some people save their purchases in their “save for later folder.” Then, if you remember, please come back and click my Amazon link, and then you’re free to place your orders. While most vendor links have a cookie that lasts a while, Amazon’s cookies only last up to 24 hours.

Thank you so much!

I very much appreciate your help and support!

102 Responses

  1. This must have been very frustrating. You were also given poor advice about possible fixes. Sealing or cleaning won’t resolve the problem because the colour is not being absorbed via the surface of the tiles. These tiles are porous so the darker grout is being absorbed from behind and through all four edges. It’s not an unusual problem either, but clearly neither the tiler nor the supplier were aware. Good luck with the next go-round!

  2. Laurel,

    Ditto to what Liz said below about protecting your countertops while the tiler seals your tiles.
    But I’d add:
    1. Get yourself some cardboard moving boxes from Lowes Home Improvement – or Home Depot. Instead of assembling the boxes, cut them on one side, so you can unfold them completely, laying them flat.

    2. Use blue painter’s tape (Lowes, Target: cheap at Target!) to attach these flattened boxes (cardboard sheets) to every countertop and lower cabinet in the vicinity of the tiles. Fully cover both the countertops and cabinets with this cardboard, so nothing’s exposed. Tape the gaps in the cardboard with blue painter’s tape.

    I’ve used this method to protect flooring when I was bleaching walls to remove deep tobacco stains in an old home I’m renovating. It works! It works so well, I now use the cardboard to line my floors when I’m painting also. It works better than painter’s plastic that way, in fact.

    I often use shipping boxes from Target, Amazon, etc. for this purpose as well. But those often have a lot of black truck soot on them.

    Alternatively, you might want to consider sealing all the tiles individually, before you put them up. However, I’d be cautious about doing so. As the tiler cuts tiles to fit various places, some tiles could lose their sealant during the wet-saw-cutting process.

    I hope this helps you.

    Take care,

    Dr. Suse

  3. Dear Laurel:

    Re: the experiment you’re doing with your leftover tiles:

    I’m an actual, Ph.D. scientist (biochemist). Here are my suggestions:

    1. Don’t waste your time placing grout on an unsealed, leftover tile. Phillip already did that experiment. You have the result. You know the result is repeatable because it happened across what must’ve been 70 tiles.

    2. To test the tile you sealed with one layer of sealant by applying grout on top is a good idea.

    3. I recommend you test two additional, spare tiles as follows:

    a. Coat one tile with the same sealant. But wait to grout it for 48 hours. You’ll be testing the time it takes for the sealant to cure, which could vary by humidity. Research and record the humidity in your city at the time of this experiment, across two days. Or check your home thermostat, as many will record and digitally display the ambient humidity for you.

    Note: try to keep the temperature in your home constant during your assays.

    b. Coat another tile with the same sealant. But apply two coats, 24 hours apart. This may seem redundant, if you assume one coat is enough. However, it’s always possible to miss tiny sections of tile when you coat them. And there’s a chance some sealant may migrate and get absorbed beneath the glaze, leaving top sections less-than-fully sealed. So test this by applying two coats.

    Note: when you apply grout to each dried tile, do so using a homogeneous thickness of grout (same for every tile). Decide what you think that thickness should be. I’d recommend making it fairly thick, to replicate what could happen in some sections when a pro is quickly grouting the tile.

    Decide also, in advance, how long you’ll leave the grout on said tiles. Ask your tiler what’s the maximum length of time he’d normally leave grout on tiles before cleaning them. And use that amount of time – just in case something happens, and he actually can’t work for a day/needs to leave the grout on longer when he finishes this job.

    I hope this helps you. Let us know your results!

    Take care,

    Dr. Suse

    P.S. – If your tiler isn’t willing to replicate the method that proves most robust for sealing these tiles, offer to seal them yourself, before he grouts them. Most pro tradespeople I’ve hired – the good ones – don’t object to letting me pitch in for one or two steps of a job, if what I want to do is straightforward. You yourself will always have more time to be careful with what you’re doing, as you’re not on the clock. Take advantage of that fact, and assist with the job, if you need to. This method works wonders for achieving better results on a job. Teamwork can work wonders. I wish you the best as you all work together to finish this job!

  4. Hi Laurel,
    Absolutely, you made the right decision to abandon the tile that was damaged by the dark grout during installation and reinstall new tile.
    I wanted to warn you about another bothersome contractor/worker error that bothers me to this day from our own renovation in 2020. We renovated our kitchen, laundry room, powder room, and master bath and closets. This entailed 6 new sinks and faucets and all the towel bars, and so on. We replaced everything with polished nickel and I had used your site to help me select Rohl faucets in the kitchen, but in the master bath I chose Kohler Kalista polished nickel faucets. The contractor/workers used water from our new sinks, splashed water on the faucets and left the water to mark the faucets. I was never able to remove the water marks from the Kohler Kalista because it is a ‘living’ surface? With lots of TLC and constant attention, the Rohl are less affected. My advice is that the workers must not use the water and damage the finishes. (Leave that to your loved ones.) Of all my faucets, the most durable and easy care polished nickel is made by Rohl and Watermark.
    And if I could do it over, all my tile would be by Ann Sacks.

  5. I just read parts 1&2, a mess indeed. I would suggest a poultice made with baking soda and chlorine bleach. Mix together to form a thick past and put a nice layer of the paste on the tile and cover with plastic wrap to keep it moist. It can take 12 hours or so for it to work; if it is going to. This advice is too late but thought I would share it anyway.
    I do hope that work will start going more soothly for you.

  6. This is distressing and I’m sorry you have to go through it, especially after you have been so attentive to every little detail of this renovation. You deserve better.

    One comment, my oh my, your kitchen cabinets are absolutely gorgeous! Crown Point did an excellent job. I would just pull up a chair and sit and stare at them whenever you feel frustrated. What color are they? It really is the most perfect kitchen for this space. Well done Laurel!

  7. Aren’t your counter-tops marble Laurel? After seeing the pic of the now “tileless” kitchen, I am worried about the counters. They look OK in the pic but if that careless tile guy is to seal and grout the tiles after retiling (readers mentioned that’s the way to do it and I’m assuming the sealant is “drippy”) please do make sure he protects the counters. When the guys sealed my granite counters after installation they let it run down the sides of the island and left some white streaks on my pewter green cabinets. I think I was able to get the streaks out but still……

  8. Dear Laurel, the way you were talked to was totally unacceptable. Personally, I would not have the guy back into the place at all. A new guy/gal would have been pulled in by the GC IMHO……..I can see your beautiful vision for your home, and am so sorry you have had to deal with this…..

  9. Good morning,
    We are all giving a big sigh of relief. I’m so happy the tile mess is being resolved.
    Am I to understand you’re living with your wavy flooring?
    Your trimmed out door is looking smart. You may have had a setback with the kitchen backsplash but progress is still happening.

  10. Laurel, stick to your guns and have them redo it at their expense. It is very different than expected right now. I have had so much trouble with tile over the last few years of home building/ reno I have learned to keep it simple. I had a horror story with white subway and dark grout also where the grout lines were uneven and it just looked awful. Made them redo it with light grout. It wasn’t worth the headache for me but I’m sure you will get what you want in the end. Hang in there.

  11. Lauren, I’m so sorry!! I love the crazed times and the dark grout, but wowzers what a moment. In my previous house, I used a very similar crazed subway tile from Walker Zanger, but I believe it was factory sealed. Perhaps you could find something like that? Oh such a headache!

  12. Laurel, Bravo! so there was a rainbow (kind of) at the conclusion. After reading your first post, I searched on “crazed tile installation” and just about every post had the direction to seal the tile pre-grout. Those lovely fine cracks in the glaze absorb the grout. Read a DIYer post asking how the grout stain could be removed. All the replies were negative. It was either live with the look or remove the tile and start again. Discovered a tile shop FAQ where they not only said the crazed tile needs to be sealed but also should be sealed at least once a year. However, I am guessing you now know all of this. Your tile is lovely and adds tremendous character to your already gorgeous kitchen – so in my opinion is worth your effort (pain & suffering?) and the correct outcome. PS: any news on your railing? Just curious 🙂

  13. You are very brave to go the dark grout route, again. Can’t wait to see the results of your experiment.

  14. Hi Laurel,
    I am surprised the tile supplier did not offer you free replacement of tile. He should have. It is quite possible that no one had used this tile before in combination with a dark grout, hence his ignorance about how they were ruined. Sadly although some tile layers may have good expertise in laying tile, they do not always pay attention to aesthetics – he should have taken note of the porous quality of the tile and how it was changing colour. BTW, the tile should be laid first, then the sealer put on, followed by grout application. This is how marble tile is installed as it too is porous. Asking to see a sample first is so important. Going forward, if you do decide to stick with the dark grout, I would highly recommend getting a sample board done first and ensuring that the sealer does a good job of resisting the grout. Even if you chose white grout, I would also recommend you seal the tile after it is laid, prior to the grout application. Even the white grout can affect the look of the craze on the tile.

  15. Makes my stomach hurt to imagine the stress of those conversations and the reaction from the tiler. I worked on large complicated hospital projects and have memories of my own. No project is without at least one of these type of issues. You handled it well Laurel…

  16. After this horrible experience, if it were me, I’d go with a lighter grout – after sealing the tiles. It won’t have as much contrast but in case it still stains the tile, it won’t make them look dirty. No one should have been mad at you. This was clearly their error. The only person they should be mad as is themselves. It’s not your responsibility to know their trades. You shouldn’t have to be testing your tiles to see if they’ll stain when grouted. In this instance, your only responsibility is buying the tiles and paying them for their work – when it is done correctly. I liked the comment of another reader who said if you were a man you wouldn’t worry about being nice to them. You also wouldn’t have been treated the way you were in this interaction. We are always discounted as knowing nothing and aren’t respected when we do, especially when we have to call them out for not knowing how to do what we are paying them for.

  17. On the second round of kitchen tile, I would have the tiler seal the tile first AND use an epoxy grout. Decades ago, on our first house, my husband DIY’ed our kitchen. We used handmade white tiles with a craze. He used what was then a brand new epoxy grout. It was a little difficult to apply, but it never stained. And it was beautiful. But have him make a sample board first.
    The most learning comes from the toughest lessons.

  18. Lots of great suggestions here on how to fix this disaster. My opinion is, however, that you need not give a thought to how it is fixed. That’s your GC’s job. It’s also his job to ensure all kitchen surfaces are properly protected while it gets fixed. He needs to be there to oversee the work. Whether he likes it or not. That’s his job. You should not be made to feel like a nag. He should be noticing these errors and demanding they be fixed. If he isn’t, then you are forced to complain and he needs to suck it up! If he’s not going to ensure top grade work from his subs, he’s in the wrong business. Good luck with it all.

    PS. If you were a man would you be worried about being nice and keeping your GC happy? Nope!

  19. I can imagine your frustration! I have been there personally and professionally! From my experience, I would check with the tile supplier, however it most likely needs to be sealed. Many years ago one of my professors told me if I wanted a successful business I should start by putting everything in writing regardless of how minor it was. Use the correct form, he said, if it’s a change order use that form etc. That advice has served me well. I have done four personal renovations, I understand the word frustration! Now, as a retired designer I marvel at my fellow designers and all the issues that arise with the jobs. You are doing a great job, handle this just like you would if you were working a clients job…..after you take this weekend off! Good luck!

  20. This is the responsibility of the tile installer to resolve…meaning replacing the tiles he screwed up at his own expense. Stay firm and insist. My brother had someone relay brick stairs three times because they were too lazy to do it right the first time. They finally relented and did the right thing and learned the lesson the hard way. This was his error. Do not accept excuses or anything less than him doing the job correctly. Ruining tile is NOT doing the job correctly.

  21. Regarding that last idea to whitewash with paint, I only mean to wash it on, let it sit a few min, and then to REMOVE IT by wiping the surface. Not to leave the paint on. So that it reaches the cracks and whitens them. But experiment on those spares of yours.

  22. My advice: You have extra tiles. Use 4 or 5 as testers! Mess them up with the same dark grout. Then experiment and see what works to whiten them – at no risk to your wall tiles! THEN do the best option to the wall. Btw its a small amount of tile so it shldnt be too long a job to whitewash the surfaces carefully and leave the dark grout alone. I just used an artists brush to paint my kitchens dark floor grout light and it was a much larger surface. Epoxy modified acrylic floor paint by Benj Moore. Grout is rough and takes color well so I wld think that any enamel (epoxy especially) would penetrate those crackles. USE YOUR TESTERS. Blacken them, then see what idea works to whiten them. You will have an instant answer. Like today. 🙂

  23. Laurel,
    I agree, I would not be happy with the way this looks. I would try either white grout to go over it, or as a last ditch effort, they make grout renew colorant. I got it from Home Depot and have used it to whiten gray grout very successfully. It comes premixed in a small container. It has held up in a shower for years. But you have to work fast so it does not dry on the tile. Basically you would carefully wipe it on each tile, then buff it off.
    It would be pretty labor intensive to color the cracks and leave the grout as is but it could be done.
    Honestly, if it were me, I would start over though.
    Good luck!

  24. I can understand how disappointed you are after such a protracted renovation, but I’m not sure you’ll be able to demand the tiles are replaced. This is because you framed the note as a suggestion “please… if you can” rather than a demand. Basically, you gave him an out, which he took (if he bothered to finish reading the note at all, which seems to be open to question). Also, you also came out while the tiles were being grouted and didn’t object at that stage. If the instructions on the tiles weren’t clear that they had to be sealed before grouting, they can blame the tile company.

    Personally, I don’t think the tiles look bad as they are – although I understand that they weren’t what you wanted in terms of your overall vision of the room. I suspect there are things you can do to improve their appearance (including many excellent suggestions here), and once you’ve accessorised the kitchen and got all your finishing touches in place, I don’t think any remaining crazing will be at all obvious, as it’s a lot easier to see the flaws in an undecorated room. It sounds like you have to pick your battles at this point, so maybe this is one to fold on in aid of getting the renovation finished. In any case, having done extensive renovations myself, and had various issues with tile installation (including exactly the issue you’re describing with grout discolouring the tiles, although I did manage to improve their appearance with Barkeeper’s Friend and hours of scrubbing), I feel your pain.

  25. Laurel, What a nightmare! The kitchen was coming along so nicely! The tiler’s poor work is a shock to the senses! The tiler took an elegant beautiful room and has done this to it! They simply must fix their mistake.

    I wish for you a speedy correction to what was the beautiful tile and the pain and suffering the tiler’s workmanship has caused you.

  26. Dear Laurel! I felt so sorry for you reading your last few posts!! I hope and I am sure your tile can be redone! BUT, I would be very careful when they remove the tile, make sure everything is well covered and protected, removing tile is a messy job, I’d be there in person to supervise, because oftentimes ‘covered’ means different things to contractors vs homeowner. We are at the end of a many months agonizing, never ending, bathroom remodel where everything that could go wrong did go wrong, and we’re facing the exact same problem like yourself right now with the floor and shower tiles. We put white honed dolomite (marble) tile on the floors and shower (what was I thinking??!!). It all looked so gorgeous when it was installed, I almost cried. Then the tile guy came back to seal it and when he was done we went in and saw dried, smeared patches all over, the honed look was gone, it all looked hazy, foggy, dull and dirty, floors and shower alike!! Just like you, I almost fainted!! Long story short, we’re now hiring a professional marble guy who will refinish (rehone) our freshly installed, expensive white honed marble tiles (at the tune of another few thousands of dollars)!! Just as a side, the gorgeous marble counter top I selected at the shop, was switched out and they brought another piece that I had particularly disliked at the shop!! I’ll stop there but could go on and on. Renovation/construction business is not what it used to be, now it seems everyone is rushing, taking on multiple projects to make a living, has difficulty finding skilled workers and just wants to churn out the least sophisticated, standard work and move on, so, yes, there is a lot of unhappiness all around.

    I have to say though, please, no matter what happens, don’t cause yourself too much anguish, it will somehow, eventually work out and get rectified, and yes we compromise a bit on quality here and there and some things will not be to our best liking just to get to the finishing line. I made myself so sick with worry and anguish and anxiety that I got very ill for months and I am just slowly recovering now, so please take care of yourself. As the Brits say, keep calm and carry on! 😉

  27. Dear Laurel, wow, these cracks. What a drama. I was wondering, why are there cracks in the tiles in the first place. I know they are historic, but living close to Delft in the Netherlands, I thought we solved the problem of cracky tiles some centuries ago. I have never seen cracks in Delft tiles. I thought that was the whole point of a tile.
    You can do the whole sealant thing, for sure, but that seems so much work.

    Can’t you complain with the tile company?

  28. Hello Laurel, So sorry about this annoying problem. I know that poultices sometimes work wonders with stained stone. I once used a poultice of baking soda and acetone (covered with plastic wrap) to get out wax that had seeped into marble, and after four applications I can no longer be sure exactly where the original stain was. A poultice with oxalic acid, acetone, hydrogen peroxide, bleach or some acid might work, but check with the tile manufacturers first because some harsh chemicals might injure the tile, and you especially don’t want the crazed areas to start flaking off. You might also check with the manufacturers of the grout or the grout color as to what might remove or de-colorize it. And always, as many here have cautioned, protect the countertops.
    Good Luck, –Jim

  29. While reading this sad tale, it crossed my mind that maybe the tiler can’t read, or read very well. I hope a fix is found for the staining in the crackle. Thank you for sharing alllll the joys and pains of a beautiful renovation (no, reimagining of the space to better than at any time in it’s history).

  30. This site had some good advice. wwwDOTwallsandfloorsDOTcoDOTuk/blog/how-to-seal-crackle-tiles
    3 coats of sealer to prevent dark grout staining the tiles and crackle glaze, 2 hours dry time for each coat. Your faaast guy is not the right dude. Too impatient. After installation, clean grout frequently and keep sealing all of every tile to avoid staining over time. You are showing all the signs of reno fatigue; fight the good fight, Laurel. You’ve been a total Trooper; keep going, sister!!

  31. Unfortunately a lot of workers do not read past the first sentence. In emails I try to make the point on the first sentence like – “please hold off on grouting until we speak,” and then say the nice stuff. Perhaps he just saw the compliment and did not read further? I’ve learned this lesson the hard way. Hopefully it will be okay in the end.
    Your details are making this project stunning! Beautiful selections!

  32. All of the above…but I have another question. How are the raw edges to be finished? Seems like both the chair rail and half tile are cut on the sides with no bullnose or finish detail. Often chair rail has a corner piece, or the installer can miter the edge so that the visible part is finished. When you call the tile company perhaps they can look into it for you. Sorry for your troubles. I hope it’s all resolved quickly.

  33. Sad about the tile installer and the resulting problem. However, all will be resolved – the hard part of this process…
    Your kitchen is just gorgeous – beautiful and warm –
    I’m always surprised that someone would knowingly not do the right thing …
    AND who wouldn’t want to be part of the wonderful design universe you’ve created…
    As the saying goes: “the se back before the comeback…”

  34. Dear Laurel,

    I’m so sorry you have this to deal with. What a mess!!!!
    The fellows that pay attention to you are worth their weight. I know first hand. We recently finished building and during the process we ended up throwing the first tile guy out. He had installed some of the laundry room slate floor tiles with the back of the tile up. The tile is a matte dark green; the back is a similar color but has the grip nubbies in cream. Our painters were horrible too; fortunately I love wallpaper and used paper throughout the house. I also got to use different painters in areas where I wanted stain.
    I wish I had a solution for you but it sounds like you tried and it wasn’t working. So sorry!!

  35. Also, I totally agree with Dee-Dee. When you hire contractors, and they tell you they can install whatever it is you’re specifying, it is incumbent on them to know what they’re doing, and one SHOULD be able to trust them to do it right. If we knew how to do it, we wouldn’t need to hire them. And being a designer doesn’t mean you know squat about the mechanics of it all — especially if one has been fortunate thus far in having contractors who do it right, one never had reason to know the pitfalls. The only reason I called the tile manufacturer to confirm the process is that I had already been burned by a project manager whose favorite phrase was, “Sure, we can do that, no problem! We do it all the time!” only to discover that he/they knew nothing. If they hadn’t completely screwed up my soapstone countertops because I assumed that the professionals knew how to to work with it (which is still unresolved over a year later), I never would have thought to call the tile store. As for the jabs at “sleeping half the day,” wth? Even a paid kitchen designer/engineer doesn’t spend every working moment on sight — they delegate and trust that they’ve hired the right people to get the job done. Laurel shouldn’t have to be there all the time, every time there’s work being done. If we all had to do that we’d have to take year-long leaves of absences from work.

  36. I haven’t had a chance to read any of the other comments, so apologies if this is repetitive. I had Pratt and Larson handmade/hand-glazed white subway tile installed last year. It, too, has a crackle. I already didn’t trust my very incompetent project manager by the time it was installed, so I called Pratt and Larson and verified the process. They told me we had to seal the tile before grouting, and again after grouting (and then again every couple of years). So the tilers set all the tile. Then they sealed it. The next day they came back and grouted. When they left, the tile all looked stained — it looked darker overall, and water-stained. And very unevenly so. I was about to blow a gasket, but someone (I don’t remember who — tile guy project manager, or carpenter, who was also there and knew way more than carpentry) told me that this was normal. The grout needed 24-48 hours to dry before they could come back to seal it, because the porous tile would absorb moisture from the grout, but once it all dried out it would return to its normal color; if they didn’t wait long enough before sealing, it would have trapped the moisture in and there would have been much bigger problems than just staining. And this did, in fact, turn out to be the case. Now, I don’t know if that moisture seeped so egregiously into the crackle, bc I didn’t look at it that close-up (just noticed the overall discoloration) and also, I used white grout so there would have been a lot less contrast in the crackle vs. your gray grout. But my questions for those involved would be: 1. Did they seal the tile first before grouting? If not, this may be why the grout stained it. 2. If they DID seal the tile first, did they wait long enough after grouting before doing the second coat of sealant? 3. I seem to recall needing to use a special kind of grout — so if the answers to questions 1 and 2 check out, my third question would be did they use the right grout? With that much gray up there in the crackle, though, I’d bet they screwed up either 1 or 2. In which case, someone (not you and not Historic Tile) should be liable for replacing and redoing the tile, depending on who was supposed to be briefing whom and/or who was supposed to be the expert. But maybe there’s an outside chance what you’re seeing is the part where the grout hasn’t dried yet and they haven’t done the second seal, and it will all look much better in a day or two? Good luck — it’s gorgeous tile and looks so beautiful in your beautiful kitchen!

  37. I saw a clip of Sarah Richardson explaining how she handles a sub-par job. She very politely asks the boss if this is an example of his best work.

  38. Hi, muriatic acid will clean up those tiles, and probably clorox would, too. The tiles needed to be sealed prior to grouting to not absorb the colorant in the grout. They should come clean with either one of the two mentioned above. Best of luck.

  39. I echo what most have said: Tile installers should know about sealants for tiles that could absorb the grout. (I’m a DIYer and I know that.) The company should have mentioned it in their instructions.
    If you want to try another fix, I had grout that was setting up far too quickly and I was panicking. It was mesh sheets of glass and travertine so I had sealed first but it was getting very difficult to remove the grout. I googled the particular grout I used and many were having the same problem and someone mentioned Kaboom Foamtastic. I gave it a try and thought I had then ruined it even further. Everything was purple! But the color went away and the grout was easily removed from the surface. I called it a miracle.
    Yours, however, has seeped into the crackle. That may be far more difficult. Be wary of any advice to use something caustic because you don’t want to harm your counters. That would be disaster upon disaster. I’m sure you’ll come to a resolution soon. And I think it’s fine you called the installer an idiot. You’re entitled to a rant. Just don’t do it to his face. 🙂

  40. It’s a bit shocking to me that people are placing blame on you. Designers do not know everything- they can’t possibly. This is why you hire professionals to do this work- they are supposedly experts in their narrow field. And they have a GC who is the one who is responsible to oversee these subs. You are not a GC, and you are not a sub contractor! This is why you hired a GC.
    I am a designer who hired a GC who hired an excellent sub contractor to install my crackled subway tile behind my stove. I never had one problem because the sub knew what he was doing. This area did not get any food on it, it’s a vertical surface, for heaven’s sake! And I had three big strapping boys I cooked for! I loved my crackled tile backsplash, and I wish I had it in my new place. A bit of wiping now and then for any greasy film, and that was no problem, BECAUSE I HAD AN EXPERIENCED SUB, which your GC was responsible to hire. Crackled tile is not that unusual, he should have known to pre-seal. SO not your fault. Don’t listen to the nasties- easy to hide behind the keyboard and say s**t. I know you are probably used to them, but they infuriate me.
    You are a great, experienced designer who is making your brownstone a work of art. Hang in there.

  41. So many good comments!
    If there is a positive side, it’s not that much in square feet to redo. It is totally on the tile guy…he should have followed the instructions on your note. And, if he’s any kind of professional, he should have known to seal the tile first.
    But having said that…I’d try two things before the redo:
    1. Try Kohler Enamel Sink Cleaner. This is a miracle in a bottle. It got my super gross stained 30 year old crackled cast iron enamel sink sparking white again.
    2. Try a very liquidy white wash with milk paint to see if it will penetrate into the cracks and cover the darker grout. Then wipe it off and seal right away.
    I wouldn’t use muric acid as that might be risky with your marble counter top and everything else like the beautiful cabinets. That stuff is nasty!
    Good luck! And as an aside,,, during our Reno, I’d run into guys that would listen to me, but not follow my instructions, and I know what I’m doing and ain’t a wall flower. Definitely a misogynistic streak in many of them…but when all else fails and I get my 6’5” ex football player husband on their case…and thing magically got done. Unfortunately it is often unconscious in some trade guys, but a very real thing.

  42. Laurel, I feel you. I really do! I am a renovator of a historic home too and things just like this have happened to me and it is just infuriating, esp. when we’re told “it’s fine, nothing to worry about” which I’ve heard just before a contractor laid his cutting saw on a board on the newly refinished claw foot tub, using it as a work table. I was naive then and believed it would be ok. Needles to say, tub had to be completely redone. I trust myself now. This absolutely needs to be redone and likely sealed prior. I’m surprised tile provider didn’t instruct as such too. Hang in there, it’s looking beautiful.

  43. I agree this is upsetting but, honestly, much blame to go around. I’m sure your workers are well aware that you are a pro and have been exacting in your instructions. It was overlooked by you then perhaps in deference to you, the sub. It’s a beautiful but difficult surface for a high use area. Lesson learned. You have done jaw-dropping work here but no one is perfect.

  44. I didnt read through the numerous comments so this may have already been pointed out but any crackled tile needs to be sealed prior to grouting. And I just learned this a few weeks ago from a very good installer/tile showroom rep. I’m sorry this has happened. So disappointing and infuriating.

  45. Absolutely have it redone. I have that tile type and love it. Installer should have known to seal first. Any cleaning you do might damage the tile (they are more sensitive).
    Good luck!

  46. NOPE NOPE NOPE. You WROTE A NOTE HE DISREGARDED!!! That’s so disrespectful of the homeowner who’s PAYING you. Have them rip it all out and pay for it ALL. Damn any hurt feelings. This is a major f*ck up and it’s on them. So sorry this happened, Laurel! But you deserve that pristine beautiful tile. I loved it before the staining! I’ve followed this from the beginning and I want to see you happy every time you walk in that kitchen. It’s glorious and deserves perfect tile.

  47. Your kitchen tile looks exactly like antique Subway Tiles. I happen to love it, but I’m an artist and used to working with the unexpected. If it will always bother you, then have it redone. I love your home, especially how you are striving to maintain the integrity of the age it was built in. As a glassblower I admire said when an elaborate large piece fell to the floor on its’ way to the D’nealian oven, After working on it for three hours,
    “Sh** happens, let’s Rock and Roll!” …….and they did.

  48. My husband does finish work and tile and I showed him. I think other readers said the same thing but he will only use epoxy grout with this kind of tile. It requires more skill and care in application and takes longer but is really the only way. And seal, seal, seal before and after. That’s a big hassle to re-do. Will probably require new sheetrock. We just finished building and I won’t let anyone touch my house projects but him. We had so many issues with subs and then some wonderful subs we loved to pieces. I hope this gets sorted quickly. Everything looks beautiful.

  49. Oh Laurel, That stained tile hurts my eyes (and my heart for you!) Know what else hurts my heart? The comment by reader “J” chastising you, very harshly. Says you need to apologize to tiler? Good grief, there’s another apology that’s needed–by that reader to you! Re: fault? I read that in the US, we spend time assigning blame; in Japan, that time is spent on finding solutions. As hard as it is, I would try to focus myself & GC on a solution. Not a hack. A solution, posthaste! Fingers crossed, tile co. will sell you less than minimum!

  50. Your home is beautiful! I’m sorry about the tile, and can see why you are upset.
    I would be too! Okay, they sell this stuff at the Dollar store cheap, but it works on tons of things. L.A.’s Totally Awesome cleaning spray. Just a thought….

  51. All I can say is OH GOD. I’m so sorry and feel your pain. Nobody ever reads notes! Drives me crazy. I guess I would just redo it. I had a disaster with my marble bathroom floor and made them redo it before it set. I could not have lived with it. You’ll be happier if you get it right. Good luck.

  52. The tile needed to be sealed (twice!) before it was grouted. This happened on a clients job recently. The installer was told by his boss to seal it and the installer didn’t.

  53. Hi Laurel, As someone who collects antique ceramics, here is a word of warning. Don’t use chlorine bleach on crackled or crazed surfaces because it can stay in the body of the ceramic and cause the glaze to pop off in patches later. However, some people use varying strengths of hydrogen peroxide to soak dishes with stained crazed surfaces. The process is gentle and can take a while. You can google it. But not practical for wall tile. I vote for getting them to take it off and redo with something else. Also, I had crackled tile installed as a backsplash over ten years ago. It has a grout that is similar in color to the tile, which is a darker cream and beige mottled tile. So if it was stained by the grout, I never noticed! Today after reading this I felt the tile again and you can really feel the ridges from the crazing. My tiles are also a shinier glaze–maybe that makes a difference. I have never resealed them and don’t know if the tile installer sealed them first! The crackle edges do not seem dark however, so maybe they did seal first. Best of luck, so sorry this happened in the homestretch.

  54. If you start over use grout release from Home Depot before grouting. Tilers don’t like to use this because it is an extra step and has to be used within a certain period of time when grouting (which should not be an issue on such a small area). Use grout with epoxy in it. I ONLY use epoxy grout that has the sealer built into it & only the pre-mixed tub version. Yes, again tilers don’t typically use this type of grout because it is harder to work with & the premixed is better and harder to work with but I insist!! I insist because I go and buy it myself & don’t worry about the extra cost because it’s so worth it. I think we just spent approx $120 for a tub at Floor&Decor. I have used it in the bathroom and kitchen specifically but also on our interior brick walls & marble tile flooring which still looks brand new after 7 yrs and post house fire. Home Depot carries the tubs or most tile stores. You will be so happy you used this but you do need the grout release first (which we also purchase on our own). I have white brick in my kitchen and mother of pearl/marble tile on the entire wall above bath sinks and now with a shower pan leak will use that for bath tile. It dries very hard. You will not have grout sand constantly on your counters like regular grout tends to do & if you splash tomato sauce on the grout, no problem…it literally wipes right off. Nothing that I’ve found can stain this grout. Even regular grout that is sealed will stain. My personal preference is to use “bright white” grout with any white tile/brick as using a dark color grout with light tile just doesn’t seem as classic and I know I’d get tired of that look as well. Your tile is classic and beautiful and deserves the best grout! IMHO

  55. Hi Laurel,
    Once again, I feel your pain. After we moved into our new build I discovered that defective wall tile had been installed in two of our bathrooms. The defects were small, but they made the tiles look like they weren’t clean. The tile manufacturer agreed that they were defective. They replaced the tile, and covered the labor costs. It was a mess, but I am glad that I pursued the problem.
    I am not personally familiar with your kind of tile. In your situation, the first thing I would do is contact the manufacturer. Did they include sealing instructions with the tile delivery? Do they have any recommendations as to how to remove the grout from the crackles. Hang in there, and best of luck. It is frustrating and exhausting trying to get everything done properly, but later on you will be glad that you are persistent.

  56. I think the blame lies squarely on the tile manufacturer. Zud or BarKeepers Friend is worth a try since it removes crazing from dishes. I would try to fix it myself because no one will care as much as you.

  57. I have crackle tile in my kitchen backsplash. It had to be sealed before grouting for this exact reason. And if you don’t seal it any grease or splatter will stain it. I would think an experienced tile person would know this.

  58. It has to be fixed one way or another. You may want to contact a grout and tile professional cleaning company and make inquiry; however, it seems to me that it would be very unlikely to bring the tile back to its original condition. A muriatiic acid wash using a big sponge and really saturating the tile might help, but I would hire professional tile cleaner for this, as it is quite toxic. I know the situation will be resolved to your liking. You are almost to the finish line now and it is going to be so beautiful!

  59. Oh Laurel, I feel your pain! I had a very similar situation with kitchen tile backsplash happen a couple of years ago and, as many of your wise commenters have intimated, I never got over it – and neither will you. Make them rip it out and do it again! It’s doubtful that there will be a quick-fix solution. And you’ll never be happy with it otherwise anyway. Not to mention, the stress you will feel, EVERY time you’re toiling in your kitchen and your eye comes upon the mishap, will only wreak havoc on your body – and who needs that! Consider the whole thing a very unfortunate learning experience….

  60. Wondering what some Bar Keepers Friend would do. It took all of the black sharpie marker off of the white enameled exterior surface of my washing machine just recently. (Don’t ask!).

  61. So sorry Laurel. Seems there’s always something doesn’t it? I can point out the 1 tiny mistake in every project…. Sometimes they can be charming and often only I know about it. No one else would ever notice.
    This is definitely not charming. So let them fix it. No biggie. The tile guy/company should take care of it. I’m not sure what difference your note would have made though? Unless you specifically asked for a sample to be done up of grout’s/tile? At some point he would have grouted this unsealed tile and same result.
    Anyhow, in the end, it doesn’t matter. You’ll have it fixed and this bump will be a distant memory. You have burned this into all of your readers minds, taught the tile guys something new and reminded the tile company to make sure the owner, designer, tile guys know about this product.
    Move forward! Light at end is close! It’s all going to be fabulous!!! Chin up!!

  62. There’s various steps to try – including a haze remover according to this tile/stone website. According to site important to know more about tile and grout you’re dealing with in order to select effective removal method.

  63. Such a shame! I agree with others that the tile supplier should have included instruction regarding grouting these tiles. Also, not trying to sound harsh but I have dealt with more contractors than I can even count, any notes have to be Extremely precise.

    The note says ‘If you can’ that does not sound like “do not, under any circumstances, apply any grout before installing the rest of the tiles”

    Take a deep breath, have your meeting and make sure it is corrected. Everything is coming along beautifully and it will be so worth it when you are living in your dream home.

  64. Now granted I just have a small condo and no job outside the house to go to, but whenever a workman comes over I stand there and stare at them, watching everything they do on the job. I be nice and engage in small talk and actually you can learn a lot by watching them, but they don’t do a single thing without me watching them. (my cat Sweet Pea chooses to hide under the bed)

  65. It’s common knowledge that some types of tile must be sealed prior to grouting. I wouldn’t think twice about laying this at the feet of the gc. Don’t blink. It’s their problem. Do you have to specify to painters to prime raw wood before they paint it?

  66. Laurel, oh no! The tile is so beautiful pre-grout. I would be in tears. Your kitchen is a work of art. I agree with your other followers, you have to fix it or you will never be happy. If that means removal (argh!) – then I would agree, it has to be replaced. Am guessing your tile guy never ever worked with this kind of tile. Am so sorry. Yet, lemons can make lemonade so to speak.☹️

  67. Thoughts:
    – Try the grout release. I’ve used it and it does seem to work pretty well.
    – Yes, the tile guy should have known to use a sealer on the tiles BEFORE he grouted the tiles. The manufacturer should have included some instructions or warning on the product.
    – I loved Kim H’s comment about the clay face masks! I may try that on some of my crazed dishes.
    – As for some other commenters that would like to blame you. It’s the tiler’s responsibility to understand his craft. Not your’s.

  68. Contact the tile company. Ask if installation instructions come with the delivery. Ask if the instructions state that the tile should be sealed before it’s grouted. If these things are true, this gives you additional leverage to have the installation redone at his expense.
    Yes, the installer should have seen your note & respected your wishes. My tile installer didn’t speak English. Leaving him a note wouldn’t have helped.
    I’m sorry this happened. Take a minute to breath. It will be resolved soon.

  69. Hi Laurel,

    I sell tile and dabble in pottery.

    The crackled finish on your tile must be sealed (tops of the tiles only) to release the grout from them. Also that tile needed to be sealed at least once a year as the crackles are actual cracks in the glaze and if oil or tomato sauce splatters it can stain the tile: going into the crack and stain the ceramic. The sealer wears off and that is why it needs to be reapplied. I do not have any pointers on ungrouting the crackled areas… albeit maybe the magic eraser and other suggestions given might help.

    You need to be happy and this as you will be looking at it many times a day. You don’t want to put anger and frustration into the food you are making!

  70. I shopped tile similar to yours: two high end tile shops warned me about the crackling, to seal, light grout, could stain with time unless sealed when needed etc. Given that I thought the tile was “difficult” and also having plates with crackle as another reader referred to , I decided not to use those tiles. First of all, your tile supplier should have warned you about the tiles. An experienced tile guy should have known and also should have waited, but the color of the grout would not prevent subsequent staining from using the kitchen – especially near the stove (even with a great exhaust fan). Ugh… at least the tile wasn’t expensive. If I were in this situation I would pick a new non-crackly tile. I have ptsd from renovations over the decades and it’s often a very difficult process. I LOVE your project and think that in the end you will have exactly what you envisioned and it will be fabulous! Deep breathes toward the finish line!

  71. Laurel,
    How frustrating! I would try some hydrogen peroxide with a Mr Clean eraser pad. Good luck.
    Pat A.

  72. If the tile came with instructions to seal before grouting, I would point those out to my GC as support for redoing. Unfortunately those instructions might also recommend against using contrasting grout w crazed tile. Fireclay recommends not to for this reason. If anyone will know how to remove it’s the tile producer OR I HIGHLY recommend the online community at John Bridge. Search their forum for “crazed tile stained grout” or post yourself. They are a huge help over there.

    I hate this happened to y’all. These seemingly small miscommunications are so very common (and even understandable), and yet can feel so crappy and tiring to go through this for months on end.

  73. Wow, your readers are really knowledgeable! Bottom line is, hindsight is 2020. Do what you have to do to make it right, because otherwise, every time you walk into the kitchen your eyes will laserbeam right to that spot and it will drive you crazy eventually. Best of luck. This is been a long road for you, but it’s going to be gorgeous!

  74. I am so sorry. It must be the full moon. I have been reading to learn not teach, but I agree with most. Cough this one up, buy what you need to buy, replace it with the lighter grout. It’s just personal to me. I really hate dark grout as I become fixated on the lines, and now you have dark in the crackle finish. (Which is so beautiful, by the by, the finish, not the bleeding.) But I would be fixated on that as well. A little bit OCD, I’m afraid. So, if it bothers you now, fix it, you will never be happy with it later. I am loving all of the information, have appreciated taking the journey with you. Thank you.

  75. Breathe, Laurel, breathe. I haven’t visited you site for a long time – since just after you bought your new home. I think the Universe has sent me to your site today to tell you how utterly splendidly all your work is. So very, very beautiful. Rejoice and be happy! Sorry, but I even love the grunge bathroom tile. But if you don’t, rip it out and start again. You’ll be living with that bathroom a long time. I have old faience plates and nothing but nothing will get that stain out of the ceramic. Be well, be happy and know the Universe is looking out for you!

  76. What a terrible surprise! I recommend staining a couple of your spare tiles and then experimenting on those with various methods before you do anything to what is already installed. Good luck!

  77. Following your construction from Norway. I have installed tile backsplash at my condo in the mountains and experienced with very small spacing there is no need for grouting. 12 years on they still look like they just have been installed. Alternatively use a syringe (without needle) and apply grout only in the gaps Here at my new house in Oslo I had a whole wall in the kitchen with small mother of pearl tiles, and the grout (a very light color) dulled the beautiful shine. I almost cried, but I am over it now!

  78. This is a craquelure tile and it should be predictable to a professional installer that grout would settle in the crackle lines. The solution may be to seal the tile before grouting. What will happen if a colorful food like tomato sauce gets splashed on this surface? Would it settle into the crackle lines if not immediately wiped? .

  79. My remedy probably is too long term for your situation… I rescued a stained old butler sink from a skip (ie dumpster) and overwintered it in the shed with a layer of clay from old tubes of clay face masks (which I kept buying hoping to become the sort of person who wears face mask and cucumber slices on a Sunday evening). I reasoned that if they drew dirt from pores they might work on glaze. The sink came up snowy white. But I have no idea how long it took to work as I didn’t look again for months. In your situation I’d think the tile guy should pay for it to be done again since he ignored your instructions, should have known to seal first, and ruined your tiles.

  80. So very sorry for your recent stresses. I would also verify if and how often a clear glaze should be reapplied. You’ve said you don’t cook often, but mistakes happen and I am concerned about food stains on your beautiful tile. Thanks for sharing your joyful and your painful experiences! You teach us so much! Wishing you smoother sailing. Your home will be truly beautiful!

  81. Wow, the renovation gods are really testing you! Sounds like you are getting some good advice so hang in there, Laurel! Here is what I would like to know – where exactly are you sleeping? In the upstairs “den”? Does it have doors that lock? Wondering because paranoid me would not be able to sleep with virtual strangers working in my house :))

  82. Well, drat! An experienced tile person would have known to use a sealer before applying a dark grout. I am just a DIYer, but have done lots of tile over the last 25 years. Last year when I installed a wall of white tile like yours, the professionals warned me to seal it twice (front and edges) before touching it with grout. And my grout was only a medium grey, not dark like your grout. The sealer worked like a charm and the fronts remained clean. A professional should have known to apply sealer first. Hang in there! You are so close to the finish line!

  83. Hi Laurel,
    I am so sorry this happened to your beautiful tile! I did a little research, and apparently tile sometimes comes with instructions, and a crackled glaze tile would have recommendations to seal it prior to grouting. And absent instructions, experienced tile installers should know to seal crackle graze prior to grouting. One of the products I am seeing they would use is called grout release. This is definitely something you would rely on your experienced installer to know and do. Crackled tile is not that unusual! He should have known. I think the only remedy might be an acid wash. But it may just have to be redone. Unfortunate, but they did it, they are responsible.

  84. And yes, as another poster noted, a clear glaze coat should have gone on first, and you shouldn’t have to think of that, it’s the tile guy’s job. The tile store should have mentioned it as well; rather unprofessional of them all. Sometimes, when a customer generally knows what they are talking about, the vendor and installer assume the customer knows EVERYTHING about their particular product and work. They should stand by their product/work, admit the error, and help you out, gratis.

  85. Good brainstorm JBW but is this a manufacturing problem with the glaze? It may have been fired at a temperature that was too high or cooled too quickly but I think the issue lies with the product not the tradie.
    Those tiles could also pass as ‘seconds’?

    1. Why thank you Joy… I do think the tile is supposed to have this aged crackle look to it. Sadly, it soaked the dark gray grout right into those crackles and should’ve been properly sealed first. Another idea I just had is a grout lightener.

  86. Sorry you are going through this; it is frustrating, especially when you left a note.
    I have no idea if this would work, but have you tried Clorox bleach? Try applying with a Q-Tip first, to see if it lightens the marks in the cracks at all. You might try the thicker version of Clorox, so it has some cling to it. If this works, the tile guy should sponge it on and off the face of each tile, till it comes clean. Subway tiles in the NYC subway system are crazed like this and I believe they come clean, albeit their grout is light colored and the tiles are cleaned with a power washer and industrial cleaner. I believe the original subway tiles are made of porcelain; yours seem to be made of some kind of terracotta, by the looks of the edges. I don’t know if that will impact the cleaning or if the tile itself will be adversely impacted by the bleach seeping into the body of the tile through the cracks in the glaze. Hang in there, the last mile is always the hardest.

  87. Oh, no! I would be so upset! First, because the installer was asked to wait and ignored the note. But second, the tile installer should know that any color other than white grout on white tile that is porous will stain — and needs grout release or sealant applied to the tile first! (I know this because I just had a white handmade tile backsplash installed last month.) They should take it down and put up new. Their mistake, and, if need be, their expense, to replace it. I like to think your contractor will see this through properly, but it’s a setback, for sure. Deep breaths. It will be beautiful. Everything else is already looking so beautiful. You’ll get there.

  88. Can you check with the tile manufacturer for their suggestions? You can’t be the first to have this problem.

  89. Yikes! You must be at your wits end. I just googled your issue. Firstly there are gel products that may rectify the situation. Secondly, a tile guy said crackled tile must always have a protective glaze applied before grouting. Should your tile guy have known that? You may have a legitimate argument there.

  90. Laurel,
    I am an interior designer from Lake Forest, Il and have been following the renovation of your beautiful condo. You are so skilled and your attention to detail is amazing! I am just sick for you in regards to the lovely tile in your kitchen. As we all know, these types of things seem to happen when you are not there and when you pop in to check on your very detailed instructions (such as your note) they have been ignored! I have never had this happen but I was just wondering if you could try Dawn Platinum Powerwash. It has taken out everything I have asked of it. Just a thought…..perhaps you won’t have to replace it if this works. Best of luck to you and I hope that it works! I really enjoy your blog…..you are a most entertaining writer!

    Good luck,
    Nancy Samuelson

  91. Your note could be clearer and more to the point. Not a criticism of you but rather an observation of how some craftspeople think and process information.

    The tile looks beautiful.
    Do not grout the kitchen yet.
    You can work on the bathroom.
    Thank you.

    Clarity is everything.

    …and you have every right to be upset. This is a travesty.

    I know it will get sorted out.
    You are creating a masterpiece!

  92. This would bother me too and I would demand it be fixed. Just a thought, but would a wash of white grout over the tile pieces possibly fill in over the dark? I’m brainstorming here of course!

Leave a Reply

Your email address will not be published. Required fields are marked *

This site uses Akismet to reduce spam. Learn how your comment data is processed.

Welcome To Laurel Home!

laurel-aarons-18th-e1456449963926

Hi, I’m Laurel, and Laurel Home is the website and blog for Laurel Bern Interiors.
I’ve been creating new-traditional interiors since 1988. The blog is where I share all.

New Edition, November 2023! Get The Indispensable Guide For 100s of Home Furnishings And Interior Design Sources That Everyone Is Raving About

laurels-rolodex-final-book-cover-master 10th edition 23-24

laurel home archives

Categories:

Please click the image below for more info about my rockin’ Interior Design Guides for 2024!

Laurel Home Interior Design Guides 2024
Amazon ad

please click below to check out my favorite decorating & design books

Laurel Bern's Favorite Interior Design and Decorating Books
Subscribe To The Laurel Home Blog And You Will Receive A FREE Guide Where I Share How To Get Your Paint Colors Right, The First Time.